Skip to content
DisclaimerTerms Of UseGDPR PolicyCookie Policy

lazychefmagic

  • Home
  • Drinks
  • Appetizers
  • Dinner
  • Dessert
  • About
  • Contact
  • Privacy Policy
DisclaimerTerms Of UseGDPR PolicyCookie Policy

NO-ING-IMG

- 2 boneless, skinless chicken breasts - 1/4 cup sweet honey - 2 tablespoons zesty sriracha sauce - 1 tablespoon soy sauce - 1 teaspoon garlic powder - 1 teaspoon smoked paprika - Salt and freshly ground black pepper to taste To make this chicken, start with fresh chicken breasts. The marinade is key for flavor. Honey adds sweetness. Sriracha gives it a nice kick. Soy sauce adds saltiness. Garlic powder and smoked paprika bring depth. Season with salt and pepper for extra taste. - 2 cups elbow macaroni - 2 cups sharp cheddar cheese, shredded - 1 cup whole milk - 2 tablespoons unsalted butter - 1/4 teaspoon cayenne pepper (optional) For the mac and cheese, use elbow macaroni for the best texture. Sharp cheddar cheese melts well and has a great flavor. Whole milk gives it creaminess. Butter enhances richness. If you love heat, add cayenne pepper for a spicy twist. - Fresh parsley, finely chopped - Tips for additional garnishes: extra honey drizzle Garnishing is important for presentation. Fresh parsley adds color and freshness. A drizzle of honey on top makes it look fancy. You can get creative with garnishes. Try adding crushed red pepper flakes for spice or extra cheese for richness. {{ingredient_image_2}} To start, gather your marinade ingredients. You need honey, sriracha, soy sauce, garlic powder, smoked paprika, salt, and pepper. In a medium bowl, mix them well. Make sure to whisk until they blend nicely. Once the marinade is ready, add the chicken breasts. Coat them fully in the mix. Cover the bowl and place it in the fridge. For best flavor, marinate for at least 30 minutes or even overnight. Next, grab a large pot. Fill it with water and add a pinch of salt. Bring the water to a rapid boil. Once boiling, add your elbow macaroni. Cook it according to the package instructions until it is al dente, meaning it should be firm to the bite. When done, drain the pasta using a colander and set it aside for later. Now, it’s time for the cheese sauce! Use the same pot you cooked the macaroni in. Melt the butter over medium heat. Slowly add the milk, stirring it gently. Heat until it simmers, but don’t let it boil. Gradually whisk in the shredded cheddar cheese. Keep stirring until the cheese melts and the sauce becomes creamy. If you like a kick, mix in the cayenne pepper now. For the chicken, heat a grill pan or skillet over medium-high heat. Take the marinated chicken from the fridge. Let any extra marinade drip off. Cook the chicken for about 6-7 minutes on each side. Check that the internal temperature reaches 165°F (75°C) for juicy chicken. In the last minute, brush on some reserved marinade. This adds a lovely glaze. Now it’s time to bring it all together! Pour the drained macaroni into the cheese sauce. Stir well, making sure each piece of pasta is covered in the creamy goodness. Remove it from heat. Slice the cooked chicken into strips. Serve the chicken on top of the macaroni. For a beautiful finish, sprinkle with chopped parsley. You can also drizzle extra honey over the chicken for sweetness. To make your chicken taste great, marinate it right. Combine honey, sriracha, soy sauce, garlic powder, smoked paprika, salt, and pepper. Mix these well in a bowl. - Best practices for marinating chicken: Use a shallow dish so the marinade covers the chicken fully. Marinate for at least 30 minutes, but letting it sit overnight gives the best flavor. - Alternative marinade options for flavor variety: You can try mustard instead of soy sauce or add lime juice for a tangy twist. Want to mix things up? There are fun ways to change your mac and cheese. - Suggestions for cheese substitutions: Instead of sharp cheddar, use pepper jack for heat or mozzarella for a creamy texture. - Adding veggies or proteins for a unique twist: Toss in steamed broccoli or cooked bacon for extra flavor. You can also add cooked chicken or shrimp for more protein. Cooking chicken can be tricky, but I have some tips to help you succeed. - How to avoid dry chicken and ensure juiciness: Use a meat thermometer to check for 165°F (75°C). This keeps the chicken juicy. Let it rest for a minute after cooking. - Glazing techniques for enhanced flavor and appearance: Brush the reserved marinade on the chicken in the last minute of cooking. This gives a nice glaze and more flavor. Pro Tips Marinate Longer for Flavor: Allow the chicken to marinate overnight for a more intense flavor profile. The longer the chicken sits in the marinade, the more it absorbs those delicious spicy and sweet notes. Perfectly Al Dente Pasta: To achieve the perfect mac and cheese, cook the elbow macaroni just until al dente. This prevents the pasta from becoming mushy when mixed with the cheese sauce. Customize Your Heat: Adjust the amount of sriracha and cayenne pepper according to your heat preference. Start with less if you’re unsure and add more for that extra kick! Garnish for a Fresh Touch: Always finish your dish with a sprinkle of fresh herbs like parsley or chives. It not only adds color but also enhances flavor with a fresh, earthy note. {{image_4}} You can switch out chicken for shrimp or tofu. If using shrimp, cook it for just 3-4 minutes. Shrimp cooks fast, so watch it closely. For tofu, press it first to remove extra water. Cut it into cubes and sauté for about 5-7 minutes. This lets it soak up flavor. Adjust the marinade time to 15-30 minutes for tofu to get the best taste. You can use different pasta shapes like shells or penne. Each shape holds cheese sauce differently. For a baked version, mix mac and cheese with breadcrumbs on top. Bake at 350°F (175°C) for 20 minutes until golden. You can also add spices like garlic powder or paprika to the cheese sauce. Try mixing in some cooked spinach or jalapeños for fun flavors. To make this dish gluten-free, use gluten-free pasta. You can swap regular flour with a gluten-free blend in your cheese sauce. For a dairy-free version, choose nut milk and dairy-free cheese. Always check labels to ensure they meet your needs. You can also replace butter with olive oil in the cheese sauce. These swaps keep the dish tasty while fitting different diets. To keep your Spicy Honey Chicken and mac and cheese fresh, start by cooling them down. Place leftovers in shallow containers to speed up the cooling time. Cover the containers with tight-fitting lids. Store them in the fridge if you plan to eat them within three to four days. If you want to keep them longer, freeze them. To freeze, let the food cool completely first. Then, place it in freezer-safe containers. For extra protection, wrap the containers in plastic wrap. This helps prevent freezer burn. When reheating, warm the chicken and mac and cheese slowly in the oven or microwave. Add a splash of milk to the mac and cheese to keep it creamy. Heat them until hot but not overcooked, as this keeps the texture nice. Use airtight containers to store your Spicy Honey Chicken and mac and cheese. Glass containers are great because they don’t stain or retain odors. Plastic containers work too, but make sure they are BPA-free. For long-term storage, vacuum sealing is a smart choice. It removes air and keeps food fresh. Place the chicken and mac and cheese in vacuum seal bags. Seal them tightly and label them with the date. This way, you can easily track how long they have been stored. In the fridge, your Spicy Honey Chicken and mac and cheese will last about three to four days. If you freeze them, they can last up to three months. Watch for signs of spoilage. If you see mold, a strange smell, or a slimy texture, throw it away. It is better to be safe than sorry when it comes to food safety. Yes, you can prepare Spicy Honey Chicken ahead of time. Marinate the chicken the night before. This makes it juicy and flavorful. For meal prep, store the marinated chicken in the fridge. You can cook it later. For reheating, grill or pan-sear the chicken again. This keeps it moist. If you have leftovers, store them in an airtight container in the fridge for up to three days. You can serve a fresh salad or steamed veggies. A simple green salad with a light vinaigrette works well. Roasted broccoli or green beans also add color and nutrition. For something heartier, consider garlic bread. It balances the richness of the mac and cheese. To adjust the spice level, modify the sriracha. Use less for a milder flavor. You can also skip the cayenne pepper. If you want more heat, add extra sriracha or cayenne. Another option is to use hot sauce in the cheese sauce. Taste as you go to find your perfect balance. To ensure creamy macaroni, focus on the cheese sauce. Start with warm milk and melt the butter first. Add cheese in small amounts, stirring well between each addition. This prevents clumping. If the sauce is too thick, add a bit more milk. For extra creaminess, use a mix of cheeses. A blend of sharp cheddar and mozzarella works great. Making Spicy Honey Chicken and Mac and Cheese is fun and rewarding. We covered key ingredients, from chicken and spices to pasta and cheese. You learned cooking techniques that ensure juicy chicken and creamy cheese sauce. Remember to use fresh garnish for a nice touch. With various options for dietary needs, you can customize your dish. Store leftovers properly to enjoy another day. Cooking is about experimenting and enjoying your food. Now, get in the kitchen and have fun creating your masterpiece!

Spicy Honey Chicken with Mac and Cheese Delight

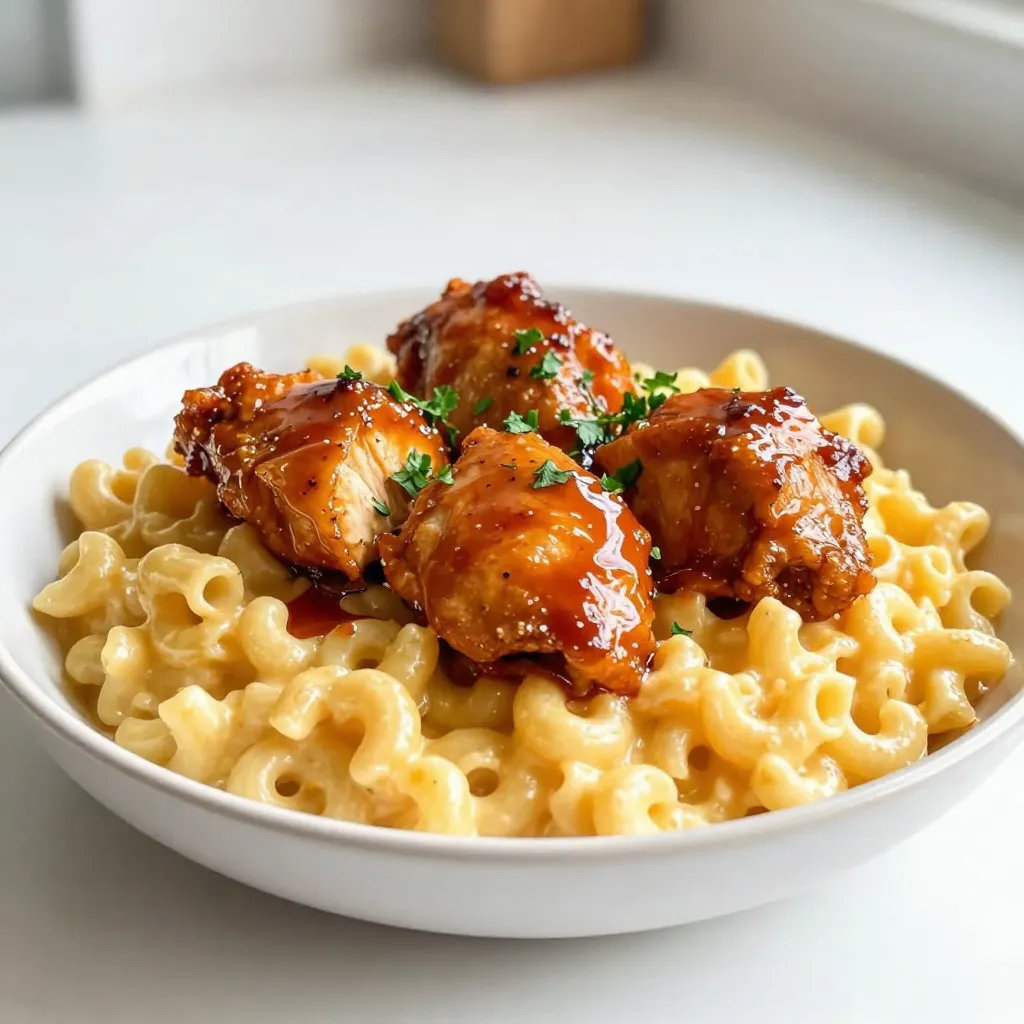
Are you ready to elevate your dinner game? Spicy Honey Chicken with Mac and Cheese Delight blends sweet, spicy, and

To make the Black Forest Trifle, gather these simple ingredients: - 2 cups chocolate cake, crumbled into bite-sized pieces - 2 cups fresh cherries, pitted and halved for easy eating - 2 cups whipped cream, light and fluffy - 1 cup mascarpone cheese, rich and creamy - 1 tablespoon pure vanilla extract for flavor depth - 1/2 cup powdered sugar, sifted for smoothness - 1/4 cup dark chocolate shavings for texture and richness - 1/4 cup grated chocolate for garnish and extra chocolate flavor Each ingredient plays a key role in the trifle's overall taste and texture. The chocolate cake adds a rich base, while the fresh cherries bring a burst of juicy flavor. The whipped cream and mascarpone cheese create a creamy, dreamy layer that balances the dessert. Sifting powdered sugar helps keep the mascarpone mixture smooth. Dark chocolate shavings and grated chocolate provide a touch of elegance and extra chocolate goodness on top. Make sure to use fresh ingredients for the best taste. This combination will create a delightful treat that looks as good as it tastes! {{ingredient_image_2}} To start, gather your ingredients. You need mascarpone cheese, vanilla extract, and powdered sugar. In a medium bowl, add the mascarpone cheese. Pour in one tablespoon of pure vanilla extract. Next, add half a cup of sifted powdered sugar. Use a hand mixer or a spatula to mix. Blend until the mixture is smooth and creamy. Make sure there are no lumps. This creamy mascarpone mixture will be a key layer in your trifle. Begin your trifle by layering half of the crumbled chocolate cake at the bottom of your trifle dish. Spread it out evenly to create a solid base. Next, spoon half of the mascarpone mixture over the cake. Use a spatula to spread it out smoothly. Make sure it touches the edges of the dish. Now it’s time for the cherries! Add a layer of fresh cherries on top, spreading them evenly. This ensures every bite has delicious cherry flavor. Finally, dollop half of the whipped cream on top, smoothing it out for a fluffy finish. Repeat the layering process. Start with the rest of the crumbled chocolate cake, followed by the remaining mascarpone mixture. Add another layer of cherries, and then top with the last of the whipped cream. Smooth the top for a nice look. For a decorative touch, sprinkle dark chocolate shavings and grated chocolate on top. Cover your trifle with plastic wrap or a lid. Refrigerate it for at least two hours. This time lets the flavors mix and the cake absorb moisture. It’s a key step for a tasty dessert! To make your trifle look great, even layers are key. Start by crumbling the chocolate cake into small, bite-sized pieces. This helps it spread evenly. When adding the layers, take your time to smooth out each one. Use a spatula to gently press the layers down. This creates a nice shape. When you add the mascarpone mixture, ensure it touches the edges of the dish. This method keeps each layer distinct and makes for a pretty presentation. You can make the trifle a day before your event. Just cover it well with plastic wrap. The flavors will mix nicely while it chills. The trifle will stay fresh in the fridge for up to three days. If you store it longer, the layers might get too soggy. To avoid this, add whipped cream just before serving. This keeps it light and fluffy. For a lovely touch, serve the trifle in decorative cups. Clear cups let the layers shine through. You can also use small mason jars for a fun look. When ready to serve, add a whole cherry on top of each cup. Sprinkle extra dark chocolate shavings for a delightful finish. This makes each serving feel special and elegant. Pro Tips Choose Ripe Cherries: Select fresh, ripe cherries for the best flavor. Look for cherries that are bright in color and firm to the touch for a sweet burst in every bite. Layering Technique: For a beautifully layered trifle, ensure each layer is spread evenly. Use a spatula to smooth out each layer, creating a visually appealing presentation. Chill Time: Allow the trifle to chill for at least 2 hours before serving. This time helps the flavors meld together and the cake absorb moisture, resulting in a more cohesive dessert. Garnishing Tips: For an elegant finish, garnish with whole cherries and additional chocolate shavings just before serving. This adds a touch of sophistication to your presentation. {{image_4}} You can change the type of cake in your trifle. Instead of chocolate cake, try sponge cake or even brownies. Each cake brings a new taste and texture. A light sponge makes it airy, while brownies add richness. Feel free to experiment. Use whatever you love! For a fun twist, add liqueurs like Kirsch. This cherry-flavored liqueur enhances the fruit's taste. Just a splash adds depth and makes the dessert more adult-friendly. Mix it into the mascarpone or drizzle it on the cherries. You control how much flavor you want! If you need a gluten-free option, use gluten-free cake. There are many choices available now. For a vegan trifle, swap out the mascarpone and whipped cream for plant-based alternatives. Look for coconut cream or vegan cream cheese. Both options work well and keep the dessert creamy! To keep your Black Forest trifle fresh, cover it well. Use plastic wrap or a lid. This keeps air out and prevents drying. If you have leftovers, store them in the fridge. Avoid leaving the trifle at room temperature for too long. It’s best to enjoy it cold. Your trifle stays fresh in the fridge for about three days. After that, the layers may start to lose their charm. The cake can become soggy, and the cream may separate. For the best taste and texture, eat it soon after making it. Yes, you can freeze the trifle! However, I recommend freezing only the cake layers. The cream and fruit do not freeze well. To freeze, wrap the cake layers tightly in plastic wrap and place them in a freezer bag. When you are ready to enjoy, thaw them in the fridge overnight. Then, assemble the trifle with fresh cream and cherries. This way, you still get that delightful taste! A Black Forest Trifle is a layered dessert that combines chocolate cake, cherries, and cream. This dessert has roots in Germany, inspired by the famous Black Forest cake. The trifle typically features rich, moist chocolate cake layered with sweet cherries and fluffy whipped cream. Each layer brings a delightful texture and flavor. The dessert is a feast for the eyes and the taste buds, often served in a clear dish to show off its beautiful layers. Yes, you can use frozen cherries in your trifle. However, they may change the texture a bit. Frozen cherries release more juice when thawed. This can make the layers a bit wetter. To avoid this, drain the thawed cherries before adding them to the trifle. The flavor will still be lovely, and you can enjoy the taste of Black Forest trifle even when fresh cherries are out of season. Making whipped cream at home is simple and fun! Here’s how: 1. Start with 1 cup of heavy cream in a mixing bowl. 2. Add 1 tablespoon of sugar and 1 teaspoon of vanilla extract. 3. Use a hand mixer or a whisk to beat the cream. 4. Whip the cream until soft peaks form. This means it holds its shape but is still smooth. Fresh whipped cream tastes better than store-bought. You can also adjust the sweetness to your liking. Enjoy it in your trifle for a light, creamy layer! This blog post explored making a delicious Black Forest Trifle. We covered ingredients such as chocolate cake and fresh cherries, along with the steps for layering and assembling. I shared tips on perfecting each layer and how to present the trifle beautifully. You also learned about variations, storage methods, and answers to common questions. Enjoy this dessert on special occasions or just because. It’s fun to make and share!

Black Forest Trifle Delightful Dessert Recipe

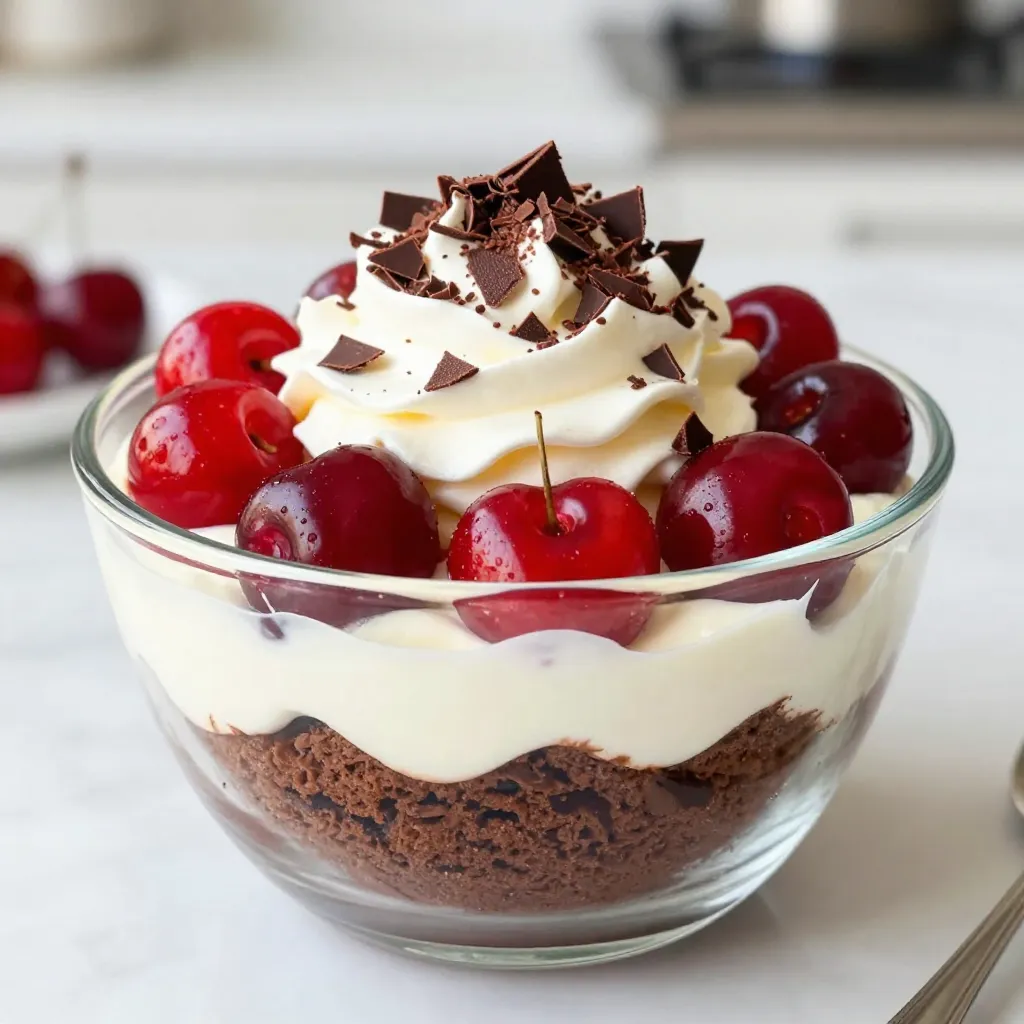
Indulge in a sweet adventure with my Black Forest Trifle Delightful Dessert Recipe! This dessert layers rich chocolate cake, tart

- Lo mein noodles: 8 oz of these noodles create a chewy base for your dish. - Boneless, skinless chicken breast: You need 1 lb, sliced thin for quick cooking. - Soy sauce and oyster sauce: 2 tablespoons soy sauce and 1 tablespoon oyster sauce add rich umami flavor. - Fresh vegetables: Include 1 sliced bell pepper, 1 small julienned carrot, and 1 cup of snap peas for color and crunch. - Seasoning essentials: Use 2 cloves of minced garlic, 1 teaspoon of grated ginger, and 1 tablespoon of sesame oil for depth. These ingredients make your Minute Chicken Lo Mein tasty and fresh. You can customize your dish with other veggies or proteins. Just stick to the base for best results. {{ingredient_image_2}} 1. Fill a large pot with water. Bring it to a boil. 2. Add 8 oz of lo mein noodles to the boiling water. 3. Cook the noodles as per the package instructions, usually about 4-6 minutes. 4. Once cooked, drain the noodles in a colander. Set them aside for later. 1. In a bowl, combine 1 lb of thinly sliced chicken breast with 2 tablespoons of soy sauce. 2. If you want extra flavor, add 1 tablespoon of oyster sauce. 3. Stir well to coat the chicken. Let it rest for about 10 minutes to absorb the flavors. 1. Heat a large skillet or wok over medium-high heat. 2. Add 2 tablespoons of vegetable oil and wait until hot. 3. Add 2 cloves of minced garlic and 1 teaspoon of grated ginger. 4. Stir quickly for about 30 seconds until fragrant, but don’t let it burn. 5. Now, add the marinated chicken to the skillet. 6. Sauté for 4-5 minutes. Cook until the chicken turns light golden-brown and is no longer pink. 1. In the same skillet, add a sliced bell pepper, a julienned carrot, and 1 cup of snap peas. 2. Stir-fry these veggies for 3-4 minutes. 3. Check their texture. They should be tender-crisp and bright in color. 1. Add the cooked lo mein noodles and sautéed chicken back into the skillet. 2. Drizzle everything with 1 tablespoon of sesame oil. 3. Toss the mixture well until all ingredients combine. 4. Season with salt and pepper to taste. 5. Cook for another 1-2 minutes to heat through all ingredients. Now, your Minute Chicken Lo Mein is ready to serve! To ensure your chicken is tender and juicy, slice it thinly. This helps it cook quickly and evenly. After marinating, let it sit for about ten minutes. This time allows the flavors to soak in well. Use high heat for stir-frying. A hot skillet or wok cooks food fast. It helps keep the chicken and veggies crisp. If the heat is too low, the chicken can steam instead of fry. Add more flavor with extra sauces. Try hoisin or chili sauce for a kick. You can also sprinkle in some crushed red pepper for heat. Fresh herbs like cilantro or basil add brightness. Chopped nuts like peanuts or cashews give a nice crunch. Both will elevate your lo mein dish. Serve your lo mein in large bowls. This makes it look appealing and inviting. Top the dish with sesame seeds for a nutty flavor. Add sliced green onions for color and a fresh taste. This simple touch makes your meal even more delightful. Pro Tips Choose Fresh Ingredients: Use fresh vegetables and high-quality chicken for the best flavor and texture in your lo mein. Don’t Overcook the Noodles: Cook the lo mein noodles just until al dente. They will continue to cook when you stir-fry them with the other ingredients. Customize Your Veggies: Feel free to add or substitute other vegetables like broccoli, mushrooms, or bok choy for a personal touch. Adjust the Sauce: If you prefer a stronger flavor, increase the soy sauce or add a splash of chili sauce for some heat. {{image_4}} You can swap chicken for other proteins. Shrimp works well and cooks fast. Use beef for a heartier dish. Thinly slice flank steak for best results. Tofu is a great choice too. It absorbs flavors well and is perfect for vegans. Just press it to remove extra moisture. Then, cut it into cubes and sauté until golden. Feel free to mix in your favorite veggies. Seasonal produce like zucchini or bell peppers adds color and taste. You can also add mushrooms for earthiness. Broccoli is a fantastic option too. It brings a nice crunch and pairs well with the sauce. Toss in any veggies you have on hand for a unique twist. If you need gluten-free noodles, look for rice noodles or gluten-free pasta. Check the label to ensure it fits your needs. For a vegan dish, use plant-based protein like chickpeas or tempeh. You can replace soy sauce with coconut aminos. This keeps the dish flavorful while meeting dietary needs. To store your chicken lo mein, use airtight containers. Glass or BPA-free plastic containers work best. They keep your dish fresh and prevent spills. Chicken lo mein lasts in the fridge for about 3-4 days. Make sure it cools down before sealing it up. To reheat chicken lo mein, use a skillet over medium heat. Add a splash of water or broth to revive the noodles. Stir often for even heating. This method keeps your dish from getting mushy. You can also microwave it in short bursts, stirring in between. For long-term storage, chicken lo mein can be frozen. Place it in freezer-safe bags or containers. Remove as much air as possible to prevent freezer burn. It lasts up to 2-3 months in the freezer. When ready to eat, thaw it overnight in the fridge. Reheat it on the stove for the best texture. It takes about 30 minutes to make this dish. Here’s the breakdown: - Prep Time: 10 minutes - Cook Time: 20 minutes Yes, you can skip the oyster sauce. Here are some ideas: - Use extra soy sauce for more flavor. - Add hoisin sauce for a sweet touch. - Try a mix of soy sauce and a little sugar. You can serve several tasty sides with Chicken Lo Mein. Here are a few ideas: - Egg rolls for a crispy crunch. - Steamed broccoli for a healthy side. - A simple cucumber salad for freshness. To keep your lo mein noodles from sticking, follow these tips: - Cook the noodles al dente to avoid mushiness. - Drain and rinse them under cold water. - Toss the noodles with a bit of oil after draining. These steps will help your lo mein stay separate and delicious! Minute Chicken Lo Mein is a quick and tasty dish you can make at home. We covered key ingredients, simple steps for cooking, and tips for perfect results. You can swap proteins, change up vegetables, and even store leftovers easily. This dish offers many options for every taste. With a few easy instructions, anyone can enjoy this delicious meal. Cooking can be fun and rewarding, so give it a try and impress your friends and family!

Minute Chicken Lo Mein Quick and Easy Dinner Recipe

Looking for a quick dinner that packs flavor and satisfaction? Minute Chicken Lo Mein is your answer! With tender chicken,

To make Honey Feta Roasted Sweet Potato Rounds, you need a few simple items. Here’s what you will need: - Sweet Potatoes: Use 2 large sweet potatoes, sliced into 1/2-inch thick rounds. These will be the base of your dish. - Olive Oil: Four tablespoons of extra virgin olive oil will help to roast the sweet potatoes and add flavor. - Seasonings: You’ll need sea salt and freshly cracked black pepper to taste. These enhance the natural sweetness of the potatoes. - Honey: A 1/4 cup of pure honey adds a sweet touch that pairs well with feta. - Feta Cheese: Use 1/2 cup of cream feta cheese, crumbled. This cheese brings a creamy tang that balances the sweetness. - Fresh Herbs: A 1/4 cup of finely chopped fresh parsley adds freshness and color. - Optional Ingredients: You can add 1 teaspoon of balsamic vinegar for drizzling and 1 teaspoon of chili flakes if you like some heat. Gather these ingredients, and you are ready to create a delicious dish! {{ingredient_image_2}} First, heat your oven to 425°F (220°C). This high heat helps the sweet potatoes roast nicely. While the oven warms up, line a large baking sheet with parchment paper. This keeps the sweet potatoes from sticking and makes cleanup simple. Next, take two large sweet potatoes. Slice them into 1/2-inch thick rounds. Place the rounds in a big mixing bowl. Add four tablespoons of extra virgin olive oil, sea salt, and freshly cracked black pepper. Use your hands or a spatula to mix them well. Every round should be coated with oil and seasonings. Now, spread the sweet potato rounds on the lined baking sheet. Make sure they are in a single layer with space between each piece. This helps them roast evenly. Put the baking sheet in the oven and roast for about 20 minutes. Halfway through, flip the rounds over. This step ensures they get a golden color and a soft texture. In the last 5 minutes of roasting, drizzle 1/4 cup of pure honey over the sweet potato rounds. The honey will caramelize and add a sweet flavor. Once the timer goes off, take the baking sheet out. While the rounds are warm, sprinkle 1/2 cup of crumbled feta cheese on top. The heat will make the cheese melt slightly. To finish, add 1/4 cup of finely chopped fresh parsley on top. If you like a bit of heat, sprinkle some chili flakes over the rounds. Just before serving, drizzle a bit of balsamic vinegar for extra flavor. This adds a nice balance to the dish. I love serving these sweet potato rounds warm. They make a great side dish. Pair them with roasted chicken or grilled fish for a tasty meal. You can also serve them as a starter. Just arrange them on a platter and add extra honey and balsamic for a pretty touch. A sprinkle of fresh parsley adds a pop of color. To get the best results, keep these tips in mind. First, cut the sweet potatoes into even rounds. This helps them cook at the same rate. Use enough olive oil to coat each piece well. Too little oil can lead to dryness. Don't overcrowd the baking sheet. Space between the rounds allows for even roasting and crisping. Check your sweet potatoes for doneness after about 20 minutes. They should be golden and tender. If they need more time, flip them again and roast for a few extra minutes. Drizzling honey in the last five minutes helps caramelize it. This makes a sweet, tasty glaze. Pro Tips Use Fresh Ingredients: Always opt for fresh sweet potatoes and herbs. They enhance the flavor and nutritional value of your dish significantly. Adjust Sweetness to Taste: If you prefer a less sweet dish, reduce the amount of honey or drizzle it at the end rather than during roasting. Experiment with Cheese: Feel free to substitute the feta with goat cheese or ricotta for a different flavor profile that complements the sweet potatoes. Make It Ahead: You can prep the sweet potato rounds a day in advance, storing them in the fridge. Just add the honey and bake when ready to serve. {{image_4}} If you like heat, add chili flakes to the sweet potato rounds. Toss the rounds with 1 teaspoon of chili flakes before roasting. This will give them a nice kick. The sweet and spicy combo works well with the honey and feta. For added crunch, sprinkle nuts or seeds on top. Chopped walnuts or pumpkin seeds work great. Add them in the last few minutes of roasting. This gives the dish a lovely texture and flavor contrast. To make this dish vegan, swap feta for nutritional yeast. Nutritional yeast adds a cheesy flavor without dairy. You can mix it with a bit of olive oil for a creamy texture. Drizzle the honey substitute for a sweet touch and enjoy this plant-based option! Once you've enjoyed your honey feta roasted sweet potato rounds, store any leftovers in the fridge. Place them in an airtight container. They stay fresh for about 3 to 4 days. To keep the flavors intact, avoid stacking the rounds too high. This way, they won’t get soggy. When you're ready to enjoy your leftovers, reheating is easy! Preheat your oven to 350°F (175°C). Spread the sweet potato rounds on a baking sheet. Heat them for about 10 to 15 minutes until warmed through. This method helps them regain some crispiness. You can also use a microwave, but they may lose texture. If you want to save some for later, freezing is an option too. Lay the sweet potato rounds on a baking sheet in a single layer. Freeze for about 1 hour until solid. Then, transfer them to a freezer-safe bag or container. They will keep well for up to 2 months. When you're ready to eat, thaw them in the fridge overnight before reheating. Yes, you can use other cheeses. Goat cheese or ricotta work well. They add creaminess and flavor. Make sure to crumble them like feta. This will help them melt better on the sweet potatoes. If you don’t have parsley, try basil or cilantro. Both add fresh taste. Thyme or rosemary also work well, giving a nice earthy flavor. Just chop them finely for the best texture and taste. You can prep the sweet potatoes a day before. Slice them and store in water to keep them fresh. You can also mix the honey and feta. Just add them when ready to bake. This makes cooking quick and easy. Use a sharp knife for clean cuts. First, peel the sweet potatoes. Then, slice them into 1/2-inch thick rounds. Try to make them even for uniform cooking. If you want, use a mandoline for perfect slices. This blog post covered how to prepare a tasty dish using sweet potatoes. We explored the ingredients, from sweet potatoes to feta cheese, and walked through each step of roasting them. I shared helpful tips for serving and perfecting your roast. You even learned about fun variations and storage options. Embrace your creativity to make this dish yours. Enjoy cooking and share your results!

Honey Feta Roasted Sweet Potato Rounds Delightful Dish

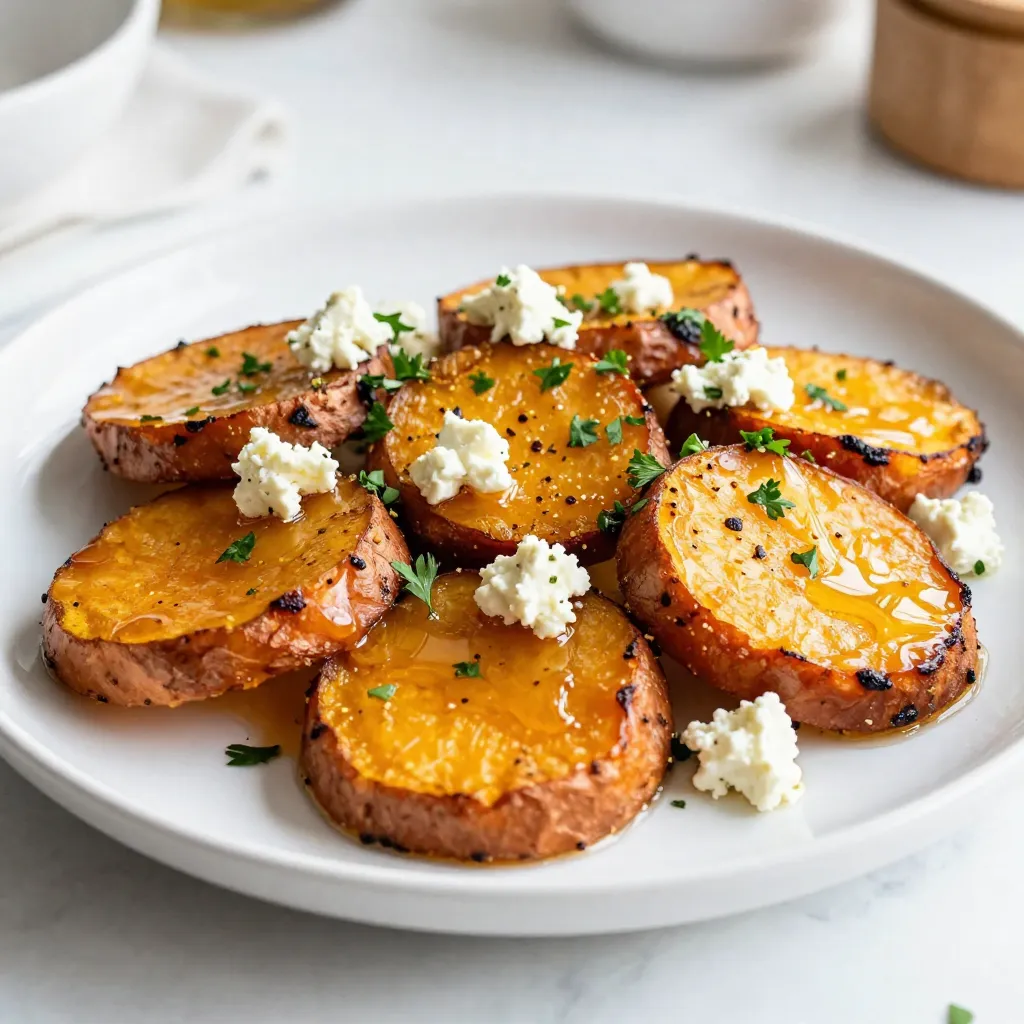
Get ready to enjoy a flavor-packed dish with my Honey Feta Roasted Sweet Potato Rounds! This simple recipe transforms sweet

- 1 whole chicken (approximately 4-5 lbs) - 2 tablespoons olive oil - 1 lemon, quartered - 1 orange, quartered - 1 head of garlic, halved horizontally - Fresh herbs (rosemary, thyme) - Kosher salt and pepper - Smoked paprika - 1 onion, quartered - 1 cup low-sodium chicken broth Gather these ingredients before you start. The whole chicken is the star of this dish. Choose one that is around 4 to 5 pounds for the best results. Olive oil adds moisture and flavor, creating a crispy skin. Citrus fruits like lemon and orange add brightness. Garlic infuses the chicken with savory notes. Fresh herbs enhance the taste and aroma. Kosher salt and pepper are essential for seasoning. Smoked paprika adds a unique depth of flavor. Onion serves as a flavorful bed for roasting and adds moisture. Finally, chicken broth keeps the meat juicy and creates a tasty sauce. With these simple ingredients, you can make a delicious meal that everyone will love! {{ingredient_image_2}} 1. Preheat your oven to 425°F (220°C). A hot oven gives you crispy skin. 2. Rinse the whole chicken under cold water. Pat it dry with paper towels. Drying helps the skin crisp up. 1. Drizzle 2 tablespoons of olive oil all over the chicken. Rub the oil into the skin for flavor. 2. Season the chicken well with kosher salt, pepper, and 1 teaspoon of smoked paprika. Don’t forget to season inside the cavity. 1. Stuff the chicken's cavity with the quartered lemon, orange, halved garlic, and herbs. This adds a burst of flavor. 2. Place quartered onion in a large roasting pan. This creates a bed for the chicken and adds more taste. 3. Set the chicken on top of the onion. Pour 1 cup of chicken broth around it. This keeps the chicken moist. 4. Roast the chicken for 1 hour to 1 hour and 15 minutes. Check that the internal temperature reaches 165°F (75°C). 1. Halfway through cooking, baste the chicken with pan juices. This keeps it juicy and adds flavor. 2. Use a meat thermometer to check the thickest part of the chicken. It should reach 165°F. 1. After cooking, let the chicken rest for 10-15 minutes. This lets the juices redistribute. 2. Carve the chicken carefully. Start with the legs, then slice the breast. Serve with pan juices for extra flavor. To get that golden, crispy skin, drying the chicken is key. After rinsing your chicken, use paper towels to pat it dry. Moisture makes the skin soggy, so this step is vital. Basting the chicken halfway through cooking helps too. Use a spoon to drizzle the pan juices over the skin. This adds flavor and helps keep the skin crispy. You can change the herbs for different tastes. Try using sage or dill for a new twist. Each herb brings its own flavor, making your chicken unique. Citrus fruits also offer variety. Instead of lemon and orange, use limes or grapefruits. Each citrus adds a different zest to the dish, enhancing the overall taste. Adjust cooking time based on the chicken’s size. A smaller chicken cooks faster, while a larger one needs more time. A good rule is 20 minutes per pound at 425°F. For larger chickens, check the internal temperature in the thickest part. Use a meat thermometer to ensure it reaches 165°F. This keeps the meat safe and juicy. For smaller chickens, start checking for doneness early. This helps avoid overcooking and makes sure your meal stays tender and tasty. Pro Tips Dry the Chicken: Patting the chicken dry with paper towels before seasoning helps achieve a crispy skin during roasting. Use Fresh Herbs: Fresh rosemary and thyme will provide a more vibrant flavor compared to dried herbs. Always opt for fresh when possible! Baste for Moisture: Basting the chicken halfway through cooking with the pan juices will enhance its flavor and keep the meat moist. Let It Rest: Allowing the chicken to rest after roasting helps the juices redistribute, ensuring each slice is tender and juicy. {{image_4}} You can change the herbs to fit your taste. Use sage for a warm flavor. Dill adds a fresh touch. Mix and match herbs to create your own blend. Consider thyme, oregano, or parsley for different tastes. Each herb brings a unique flavor to the chicken. Stuffing your chicken opens up a world of flavor. Instead of citrus, try apples for sweetness. You can also use carrots or celery for a savory twist. Experiment with nuts like walnuts or pecans for crunch. Each stuffing choice adds its own character to the dish. If you want a different cooking method, consider using a rotisserie. This method cooks the chicken evenly, giving it a nice, crispy skin. You can also use an Instant Pot for quick meals. Cook the chicken in the pot for about 30 minutes. This method keeps the meat juicy and tender. To keep your leftover chicken fresh, refrigerate it right away. The best practice is to put it in the fridge within two hours of cooking. Make sure to use airtight containers. This will help keep the meat moist. You can also wrap it tightly in plastic wrap or foil. Store it in the fridge for up to four days for best taste. If you want to save the chicken for longer, freezing is a great choice. First, let the chicken cool completely. Then, cut it into pieces for easier storage. Place the pieces in freezer bags or airtight containers. Squeeze out as much air as you can before sealing. This prevents freezer burn. When you're ready to eat it, thaw it in the fridge overnight. Reheat in the oven or microwave until it's hot throughout. Leftover chicken is super versatile. You can make tasty wraps with fresh veggies. It also works great in salads; just shred the meat and mix it in. If you're feeling cozy, use it in soups for a warm meal. The options are endless with leftover chicken! To cook a whole chicken, use the weight as your guide. A chicken that weighs 4-5 lbs should roast for 1 hour to 1 hour and 15 minutes. The key is to check the temperature. You want it to reach 165°F (75°C) in the thickest part, usually the thigh. For larger chickens, add about 15-20 minutes for every extra pound. To keep your chicken juicy, start by rinsing and drying it well. The dry skin helps create a crispy texture. Use olive oil to coat the chicken evenly. Season it generously with salt, pepper, and smoked paprika. Stuff the cavity with lemon, orange, garlic, and herbs. This adds moisture and flavor. Also, remember to baste the chicken halfway through cooking to keep it moist. Yes, you can prep this recipe ahead of time. Rinse and dry the chicken, then season it. You can stuff it with fruits and herbs and place it in the fridge. Just cover it with plastic wrap. When you're ready, take it out and let it sit for about 30 minutes before cooking. This helps the chicken cook evenly. Roasted chicken pairs well with many sides. Some good options are: - Garlic mashed potatoes - Steamed green beans - Roasted carrots - A fresh garden salad - Creamy coleslaw These sides complement the flavors of the chicken and make a complete meal. Enjoy! Roasting a whole chicken is simple and rewarding. Start with quality ingredients like herbs and citrus. Follow the steps to season, stuff, and roast your chicken perfectly. Remember, resting the chicken enhances its juiciness. Use your leftovers in wraps or salads for easy meals. Explore flavor variations to keep things fresh and exciting. Enjoy your delicious creation and share it with loved ones. You have all the tools to make a tasty meal that impresses!

Easy Whole Roasted Chicken Simple and Savory Recipe

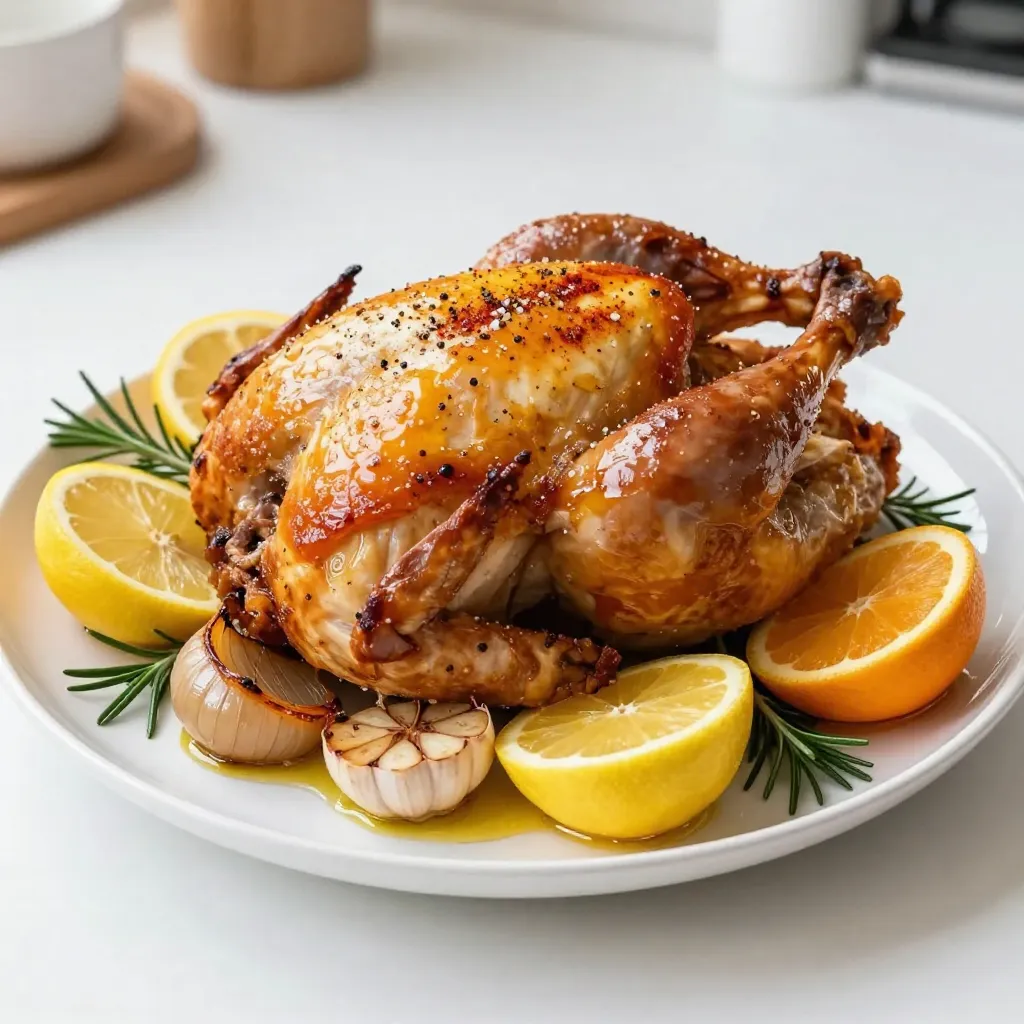
Are you ready to impress your family with a simple, savory dish? This Easy Whole Roasted Chicken recipe packs a

For the perfect baked mac and cheese, gather these key ingredients: - 8 oz elbow macaroni - 2 tablespoons unsalted butter - 2 tablespoons all-purpose flour - 2 cups whole milk - 1 teaspoon Dijon mustard - 1 teaspoon garlic powder - 1 teaspoon onion powder - Salt and pepper, to taste - 2 cups shredded sharp cheddar cheese - 1 cup shredded Gruyère cheese - 1 cup panko breadcrumbs - 1/2 cup grated Parmesan cheese - 2 tablespoons olive oil - Fresh parsley, chopped (for garnish) These ingredients create a rich and creamy dish, with a crunchy topping. When it comes to cheese, quality matters. I recommend using: - Sharp cheddar cheese for its bold flavor - Gruyère cheese for its creamy texture Combining these two cheeses gives your dish a great depth of flavor. Choose fresh cheese for the best results. Want to jazz up your mac and cheese? Consider adding: - Cooked bacon or pancetta for a savory kick - Steamed broccoli or spinach for a pop of color - Hot sauce for some heat These optional ingredients let you customize the dish to your liking. Enjoy experimenting! {{ingredient_image_2}} First, preheat your oven to 350°F (175°C). This step is key for a nice bake. While the oven warms up, bring a large pot of water to a rolling boil. Add a pinch of salt to the water. Then, toss in 8 oz of elbow macaroni. Cook it until it’s al dente, as per the package instructions. Once done, drain the pasta in a colander and set it aside. Now, let’s make the cheese sauce. In a medium saucepan, melt 2 tablespoons of unsalted butter over medium heat. When the butter is melted, add 2 tablespoons of all-purpose flour. Whisk this mix for about 2 minutes. This creates a roux, which is the base for our sauce. Next, slowly whisk in 2 cups of whole milk. Make sure to avoid lumps. Keep whisking until the mix thickens, about 5-7 minutes. You'll want a creamy texture here. Then, stir in 1 teaspoon of Dijon mustard, 1 teaspoon of garlic powder, and 1 teaspoon of onion powder. Add salt and pepper to taste. Once mixed, remove the saucepan from the heat. Now, it’s time to add cheese. Gradually stir in 2 cups of shredded sharp cheddar cheese and 1 cup of shredded Gruyère cheese. Keep stirring until the cheese melts, leaving you with a smooth sauce. In a large mixing bowl, combine the drained macaroni with your creamy cheese sauce. Stir gently but well. You want every piece of macaroni coated. Pour this mixture into a greased 9x13 inch baking dish, spreading it evenly. For the topping, mix 1 cup of panko breadcrumbs with 1/2 cup of grated Parmesan cheese and 2 tablespoons of olive oil in a separate bowl. Add a pinch of salt and stir until well combined. Sprinkle this topping over the macaroni and cheese, ensuring every bit is covered. Now, place your baking dish into the preheated oven. Bake for 25-30 minutes. You'll know it’s done when the top is golden brown and crispy. The smell will fill your kitchen with warmth. Enjoy the process as your gourmet dish comes to life! To make a creamy cheese sauce, start with a roux. Melt two tablespoons of unsalted butter in a pan. Once melted, add two tablespoons of flour. Whisk this mix for about two minutes without browning. Next, slowly add in two cups of whole milk. Be sure to whisk constantly to avoid lumps. After about five to seven minutes, you will see the sauce thicken. Once thick, stir in one teaspoon of Dijon mustard, garlic powder, and onion powder. Season with salt and pepper. Finally, add two cups of sharp cheddar and one cup of Gruyère cheese. Stir until the cheese melts and the sauce is smooth. For the best pasta, bring a large pot of water to boil. Add a generous pinch of salt to the water. This helps flavor the pasta. Next, add eight ounces of elbow macaroni and cook until it is al dente. This usually takes about eight to ten minutes. Drain the pasta in a colander and set it aside. Do not rinse the pasta; you want the starch to help the cheese sauce stick. To make a crunchy topping, mix one cup of panko breadcrumbs with half a cup of grated Parmesan cheese. Add two tablespoons of olive oil and a pinch of salt. Stir until the breadcrumbs are fully coated with oil. This mix will provide an amazing crunch when baked. Sprinkle it evenly over the mac and cheese before it goes in the oven. This ensures every bite has that delightful crunch. Pro Tips Use High-Quality Cheese: Opt for a blend of sharp cheddar and Gruyère for a richer flavor profile. The quality of the cheese can significantly enhance the overall taste of your mac and cheese. Don’t Overcook the Pasta: Cook the macaroni until just al dente, as it will continue to cook in the oven. This prevents a mushy texture and keeps the pasta firm. Add Extra Flavor: Consider incorporating additional spices like smoked paprika or cayenne pepper for a kick. You can also mix in cooked bacon or sautéed vegetables for added texture and taste. Let it Rest: Allow the mac and cheese to cool for a few minutes after baking before serving. This helps the dish set up, making it easier to serve and enjoy. {{image_4}} If you want a healthier dish, try whole wheat or gluten-free pasta. Whole wheat pasta adds fiber and a nutty flavor. It’s great for those who want to feel full longer. Gluten-free pasta is perfect for anyone with gluten sensitivities. Both options work well in this recipe. Just cook them as you would regular pasta, and follow the same steps. Want to mix it up? Consider adding bacon or veggies. Cooked bacon adds a salty, smoky taste. Just chop it up and stir it into the cheese sauce. For veggies, try spinach, broccoli, or bell peppers. Cook them lightly before adding to your dish. This enhances flavor and adds nutrients. You can enjoy a gourmet meal that’s also good for you. You can take this dish global by using unique cheeses. Try adding Gouda for a rich, creamy taste. Feta can give a salty kick, while blue cheese adds a bold flavor. Mix and match different cheeses for your own twist. Each cheese will change the dish's flavor, making it fun to experiment. Enjoy your culinary journey with every bite! To store leftover baked mac and cheese, first let it cool. Once cool, transfer it into an airtight container. This helps keep the dish fresh. You can store it in the fridge for up to three days. Make sure to cover it well to prevent it from drying out. If you want to enjoy it later, consider freezing it. When reheating, you want the mac and cheese to taste great. Preheat your oven to 350°F (175°C). Place the mac and cheese in an oven-safe dish. Add a splash of milk to keep it creamy. Cover it with foil to trap in moisture. Bake for about 20 minutes, or until heated through. You can also reheat in the microwave. Just use a microwave-safe bowl. Heat in short bursts, stirring in between, until warm. To freeze baked mac and cheese, cool it completely first. Then portion it into freezer-safe containers. You can also wrap it tightly in plastic wrap, then foil. This helps prevent freezer burn. Label the containers with the date. It can last for up to three months in the freezer. When ready to eat, thaw it overnight in the fridge before reheating. This keeps the texture nice and creamy. The best cheese for baked mac and cheese is sharp cheddar. It adds a rich flavor. Gruyère cheese works well too, giving a creamy texture. A mix of these cheeses creates a great taste. You want to use high-quality cheese. Freshly shredded cheese melts better than pre-shredded options. Yes, you can make this dish ahead of time. Prepare the mac and cheese and store it in the fridge. Just cover it tightly. You can bake it later when you're ready to serve. This makes it great for parties or busy nights. Remember to add a few extra minutes to the baking time. To prevent dry mac and cheese, don’t overcook the pasta. Cook it al dente so it stays firm. Use enough cheese in your sauce to keep it creamy. You can also add more milk if it's too thick. Lastly, cover the dish while baking helps trap moisture. Yes, a few mistakes can happen. One common mistake is not seasoning enough. Always taste the sauce before mixing it in. Another mistake is using low-quality cheese, which affects the taste. Finally, don’t skip the breadcrumbs! They add a nice crunch that makes the dish special. In this post, we explored the essential ingredients and steps to make baked mac and cheese. We discussed the best cheese choices and added tips on achieving a creamy sauce and crunchy topping. You learned about fun variations and smart storage methods. In conclusion, perfecting baked mac and cheese is easy with the right ingredients and techniques. Enjoy experimenting with flavors and share your tasty creations with friends and family!

Gourmet Crunchy Baked Mac and Cheese Delightful Dish

Are you ready to elevate your mac and cheese game? This Gourmet Crunchy Baked Mac and Cheese will delight your

To make Black Velvet Cheesecake Cookies, you will need a mix of rich and creamy ingredients. Here’s what you need: - 1 cup unsalted butter, softened - 1 cup granulated sugar - 1 cup brown sugar, packed tightly - 2 large eggs, at room temperature - 2 teaspoons pure vanilla extract - 2 cups all-purpose flour - ½ cup unsweetened cocoa powder, sifted - 1 teaspoon baking soda - ½ teaspoon fine sea salt - 1 cup cream cheese, softened - 1 cup powdered sugar, sifted - ½ teaspoon fresh lemon juice - 1 cup semi-sweet chocolate chips Each ingredient plays a key role. The butters provide creaminess and flavor. The sugars add sweetness and a nice texture. Eggs help bind the mix together. Cocoa powder gives that dark color and rich taste. Cream cheese is the star in these cookies. It makes the filling smooth and tangy. The lemon juice adds brightness to the cream cheese. Use high-quality chocolate chips for a delicious finish. Gather these ingredients, and you are ready to create a treat that is both decadent and delicious! {{ingredient_image_2}} - Setting the Temperature: Start by preheating your oven to 350°F (175°C). This step is key for even baking. - Preparing the Baking Sheet: Line a baking sheet with parchment paper. This helps prevent the cookies from sticking. - Mixing Technique: In a large bowl, use a mixer to cream together the softened unsalted butter, granulated sugar, and brown sugar. - Desired Consistency: Mix until the mixture is light and fluffy. This usually takes about 3-4 minutes. - Incorporating Ingredients: Add the eggs one at a time. Make sure each egg blends in well before the next one. - Mixing Method: After the eggs, add the pure vanilla extract. Mix until everything is combined. - Mixing Bowls: In a separate bowl, whisk together the all-purpose flour, sifted cocoa powder, baking soda, and fine sea salt. - Importance of Sifting: Sifting cocoa powder helps remove lumps and gives the cookies a smooth texture. - Folding Technique: Gradually add the dry mixture to the creamed butter and sugars. Stir gently until just combined. - Adding Chocolate Chips: Use a spatula to fold in the semi-sweet chocolate chips, being careful not to overmix. - Ingredients for Filling: In another bowl, combine softened cream cheese, sifted powdered sugar, and fresh lemon juice. - Achieving Smooth Consistency: Beat until the filling is creamy and smooth. Make sure there are no lumps. - Shaping Technique: Take a scoop of cookie dough and flatten it slightly in your hand. - Filling Method: Place a teaspoon of cheesecake mixture in the center. Carefully wrap the dough around it, sealing the filling. - Baking Time & Temperature: Place the stuffed cookies on the baking sheet. Bake them for 12-15 minutes. The edges should be set while the centers stay soft. - Checking Doneness: Keep an eye on the cookies. They should look firm but not overbaked. - Cooling Process: After baking, let the cookies cool on the sheet for about 5 minutes. - Transferring to Wire Rack: Move them to a wire rack to cool completely. This helps keep the cookies soft and chewy. - Consistency Tips: Aim for a soft and fluffy dough. Cream the butter and sugars well. This helps the cookies rise nicely. If the dough is too dry, add a tiny splash of milk. If it’s too wet, add a bit more flour. - Preventing Stickiness: To stop the dough from sticking, chill it for about 30 minutes. This makes it easier to handle. Dust your hands and work surface lightly with flour before shaping the cookies. - Achieving Creamy Texture: Use room temperature cream cheese. Cold cream cheese can make lumps. Beat it well with the powdered sugar until smooth. Add lemon juice for a fresh taste. This helps in getting a creamy and light filling. - Preventing Lumps: Always sift the powdered sugar before mixing. This helps break up any clumps. Mix until the cheesecake filling is smooth. Scrape the bowl’s sides to ensure even mixing. - Presentation Tips: Arrange the cookies neatly on a dark plate. This shows off their rich color. A light dusting of powdered sugar can make them look fancy. You can also use a drizzle of melted chocolate for a nice touch. - Garnishing Ideas: Add a few chocolate chips on top for decoration. You can also sprinkle some crushed nuts for added texture. Fresh mint leaves can bring a pop of color and flavor to your cookie display. Pro Tips Room Temperature Ingredients: Ensure your butter, eggs, and cream cheese are at room temperature. This helps in achieving a smoother batter and creamier filling. Sifting Cocoa Powder: Always sift the cocoa powder before measuring. This prevents clumps and ensures a more even distribution throughout the cookie dough. Chill the Dough: For a thicker cookie, consider chilling the cookie dough for 30 minutes before baking. This helps maintain the shape and improves texture. Don’t Overbake: Keep an eye on the cookies as they bake. They should look slightly underbaked in the center; they will continue to cook as they cool on the baking sheet. {{image_4}} You can make your Black Velvet Cheesecake Cookies even more fun by adding mint extract. Just a few drops will give your cookies a fresh twist. If you want a deeper flavor, try mixing in dark chocolate chips. They pair well with the cream cheese filling. For those needing gluten-free options, swap all-purpose flour with a gluten-free blend. This change keeps the texture right. You can also use gluten-free cookies that work well. If you prefer vegan cookies, replace butter with coconut oil. Use flax eggs instead of regular eggs. This way, you can enjoy the cookie without animal products. You can make these cookies special for the season. Add festive sprinkles on top for birthdays or holidays. You can also mix in flavors like peppermint or pumpkin spice. These additions make the cookies perfect for special times. Room Temperature Storage You can keep the cookies at room temperature. Place them in an airtight container. This keeps them fresh for about five days. If you want them warm, just microwave for a few seconds. Refrigeration Guidelines If you want to store them longer, put the cookies in the fridge. They can last up to two weeks this way. Just make sure to seal them well to avoid moisture. How to Freeze Cookies To freeze these cookies, let them cool completely first. Then, place them in a single layer on a baking sheet. Freeze for about two hours until solid. After that, transfer them to a freezer bag. Thawing Tips When ready to eat, take out the cookies. Let them sit at room temperature for about 30 minutes. You can also warm them in the microwave for a few seconds. Maximizing Freshness To keep your cookies fresh, store them in a cool, dark place. Use an airtight container to block out air and moisture. This helps maintain their soft texture. Signs of Spoilage Check for any changes in smell or texture. If the cookies feel dry or hard, they may not taste good anymore. Toss any that look or smell off to ensure you enjoy the best flavors. Black Velvet Cheesecake Cookies are rich and soft treats. They combine chocolate cookie dough with creamy cheesecake filling. The cookies have a deep, dark color and a sweet, tangy flavor. Each bite is like a bite of cake and cheesecake in one. The chocolate chips add extra sweetness and texture. Together, they create a delightful dessert perfect for any occasion. You can cut back on sugar for a less sweet cookie. Try using half the amount of granulated sugar and brown sugar. You can also use unsweetened cocoa powder to reduce sweetness. If you want the filling less sweet, use less powdered sugar. A touch of salt can help balance the flavors, too. Yes, you can use other cheeses. Mascarpone cheese works well for a creamy filling. Neufchâtel cheese is a lighter option with less fat. Ricotta can also be used, but it may change the texture. Make sure any cheese you choose is softened for easy mixing. When stored correctly, these cookies can last up to a week. Keep them in an airtight container at room temperature. If you want them to last longer, refrigerate them. They can stay fresh in the fridge for about two weeks. Yes, you can prepare the dough ahead of time. Chill the cookie dough for up to 24 hours before baking. This helps the flavors meld together. You can also make the cheesecake filling a day in advance. Just keep it in the fridge until you are ready to assemble the cookies. In this post, I shared how to make Black Velvet Cheesecake Cookies. We covered key ingredients, step-by-step instructions, and helpful tips. You learned about variations and storage options as well. These cookies combine rich flavor and a fun twist. I encourage you to try this recipe and adjust it to your taste. Enjoy the joy of baking and sharing these delicious treats with others. You'll create sweet memories with every bite.

Black Velvet Cheesecake Cookies Decadent and Delicious

Craving something truly decadent? Let me introduce you to Black Velvet Cheesecake Cookies! These rich, chocolatey treats blend the textures

- 4 boneless, skinless chicken breasts - 1 cup fresh spinach, finely chopped - 1/2 cup sun-dried tomatoes, finely chopped - 1/2 cup feta cheese, crumbled - 1/4 cup cream cheese, softened - 1 garlic clove, minced - 1 teaspoon dried oregano - 1 teaspoon salt - 1/2 teaspoon black pepper - 2 tablespoons olive oil - 1/4 cup chicken broth - Fresh basil leaves for garnish Choosing high-quality chicken breasts: Look for chicken breasts that are firm and plump. They should have a light pink color without any dark spots. This ensures freshness and better flavor. Best types of spinach and sun-dried tomatoes: Use fresh spinach for a vibrant taste. For sun-dried tomatoes, choose those packed in oil. They add rich flavor and moisture to the filling. Importance of fresh herbs and cheese: Fresh herbs like basil enhance the dish's aroma. Feta cheese adds a tangy kick. Using high-quality ingredients in your filling makes a big difference. They create a rich, savory flavor that transforms your chicken. {{ingredient_image_2}} Preheat your oven to 375°F (190°C). This step is vital. A hot oven helps the chicken cook evenly. Next, make the filling. In a medium bowl, combine these ingredients: - 1 cup fresh spinach, finely chopped - 1/2 cup sun-dried tomatoes, finely chopped - 1/2 cup feta cheese, crumbled - 1/4 cup cream cheese, softened - 1 garlic clove, minced - 1 teaspoon dried oregano - 1 teaspoon salt - 1/2 teaspoon black pepper Mix all ingredients until they form a creamy filling. This blend is packed with flavor. Now, take the chicken breasts. Slice a pocket into the thickest part. Don't cut all the way through. This keeps the filling inside. Stuff each breast generously with your filling. Press gently to pack it in, but don’t overfill. Heat 2 tablespoons of olive oil in a large skillet over medium-high heat. Once the oil is hot, add the stuffed chicken breasts. Sear each side for about 3-4 minutes until golden brown. This step adds a nice crust. Next, pour 1/4 cup of chicken broth around the chicken in the skillet. This broth keeps the chicken moist while it cooks. Carefully transfer the skillet to your preheated oven. Bake for 20-25 minutes. The chicken should reach an internal temperature of 165°F (75°C). After baking, remove the skillet from the oven. Let the chicken rest for 5 minutes. This helps the juices inside to spread out. Garnish your gourmet stuffed chicken with fresh basil leaves before serving. For a great presentation, place the chicken on a serving platter. Drizzle pan juices over the top. Scatter more basil leaves around the dish for a colorful touch. Enjoy your delicious meal! To ensure your stuffed chicken is perfect, check for doneness. Use a meat thermometer. The chicken should reach 165°F (75°C). This step is key for safe eating. To keep the chicken moist, sear it before baking. Searing adds flavor and creates a nice crust. Pour chicken broth around the chicken in the skillet. This helps retain moisture while it cooks. For a gourmet touch, arrange the stuffed chicken on a platter. Drizzle pan juices over the chicken for added flavor. Scatter fresh basil leaves for color. Pair your stuffed chicken with sides like roasted veggies or creamy mashed potatoes. A crisp salad also works well. For wine, consider a light white wine like Sauvignon Blanc. One common mistake is overstuffing the chicken. This can cause the filling to spill out during cooking. Stuff it just enough to fill the pocket without bursting. Another mistake is not letting the chicken rest before slicing. Resting helps the juices settle. If you skip this, the chicken can be dry. Always allow it to rest for about five minutes. Pro Tips Choose the Right Chicken Breasts: Look for chicken breasts that are uniform in size to ensure even cooking. Don’t Overstuff: Be cautious not to overfill the chicken breasts to prevent the filling from spilling out while cooking. Let It Rest: Allowing the chicken to rest after baking is crucial for juicy meat, as it helps the juices redistribute. Experiment with Fillings: Feel free to customize the filling with other ingredients like mushrooms, different cheeses, or herbs for unique flavors. {{image_4}} You can have fun with the stuffing! Here are some tasty ideas: - Cheese alternatives: Try goat cheese for a tangy kick. Mozzarella adds a nice stretch. - Vegetable variations: Mushrooms bring an earthy flavor. Artichokes add a unique touch. You can even use zoodles for a lighter option. If you follow a special diet, you can still enjoy this dish. - Gluten-free options: Use gluten-free breadcrumbs in the stuffing. Always check labels to be sure. - Low-carb alternatives: Skip the starches and focus on vegetables. Stuff with spinach and cheese for a filling meal. Want to make your stuffed chicken pop? Here are some ideas: - Incorporating spices and herbs: Add a pinch of paprika or thyme for extra depth. Fresh herbs like parsley or dill can also brighten the flavor. - Adding nuts or seeds for crunch: Chopped walnuts or sunflower seeds add texture. They provide a nice contrast to the creamy stuffing. To store leftovers, first let the chicken cool. Place the stuffed chicken in an airtight container. This keeps it fresh and safe. You can store it in the fridge for up to three days. If you use a glass container, it helps avoid odors. Always label the container with the date. This way, you know when it was cooked. To reheat stuffed chicken, use the oven for best results. Preheat your oven to 350°F (175°C). Place the chicken in a baking dish and add a splash of chicken broth. Cover it with foil to keep it moist. Heat for about 20-25 minutes. Check that it’s warm all the way through. You can also use a microwave, but it may dry out. Heat in short bursts, checking often. Freezing stuffed chicken is easy. First, let it cool completely. Wrap each piece tightly in plastic wrap. Then, place it in a freezer bag. Remove as much air as possible before sealing. You can freeze it for up to three months. To thaw, move it to the fridge overnight. This keeps the chicken safe and helps it stay juicy. Yes, you can prep gourmet stuffed chicken ahead of time. To do this, follow these steps: - Prepare the filling and stuff the chicken breasts. - Store them in an airtight container in the fridge. - Cook within 24 hours for best taste. You can also freeze them. Wrap each chicken breast tightly in plastic wrap. Place them in a freezer bag and store for up to three months. When ready to cook, thaw in the fridge overnight. This keeps the chicken juicy and tasty. The chicken must reach an internal temperature of 165°F (75°C). This is important for food safety. Use a meat thermometer to check the temperature in the thickest part of the chicken. When it hits this number, the chicken is safe to eat. Cooking it properly also ensures that the meat stays moist and tender. If it cooks too long, it may dry out. Always let it rest for five minutes after cooking. This helps the juices settle. Yes, grilling stuffed chicken is a great option! Here are some tips: - Preheat your grill to medium heat. - Sear the chicken on both sides for 3-4 minutes before moving it to indirect heat. - Cook until it reaches 165°F (75°C) in the center. Grilling gives a nice smoky flavor. Just be careful not to let the filling spill out while grilling. Use toothpicks to secure the opening if needed. Leftover stuffed chicken can last for about 3 to 4 days in the fridge. Store it in an airtight container to keep it fresh. Always check for any off smells or changes in texture before eating leftovers. You can also freeze leftovers. Wrap them well and store for up to three months. When ready to eat, thaw in the fridge and reheat gently to avoid drying it out. Enjoy your gourmet meal again! You learned how to make gourmet stuffed chicken with tasty ingredients. We covered choosing quality items, cooking steps, and popular stuffing ideas. I shared tips for serving and storage, ensuring your meals stay fresh. Be sure to avoid common mistakes, like overstuffing. Explore variations to keep things fun. This dish is sure to impress. Enjoy your cooking adventure and delight your family or friends with this easy, flavorful meal!

Gourmet Stuffed Chicken Savory and Flavorful Recipe

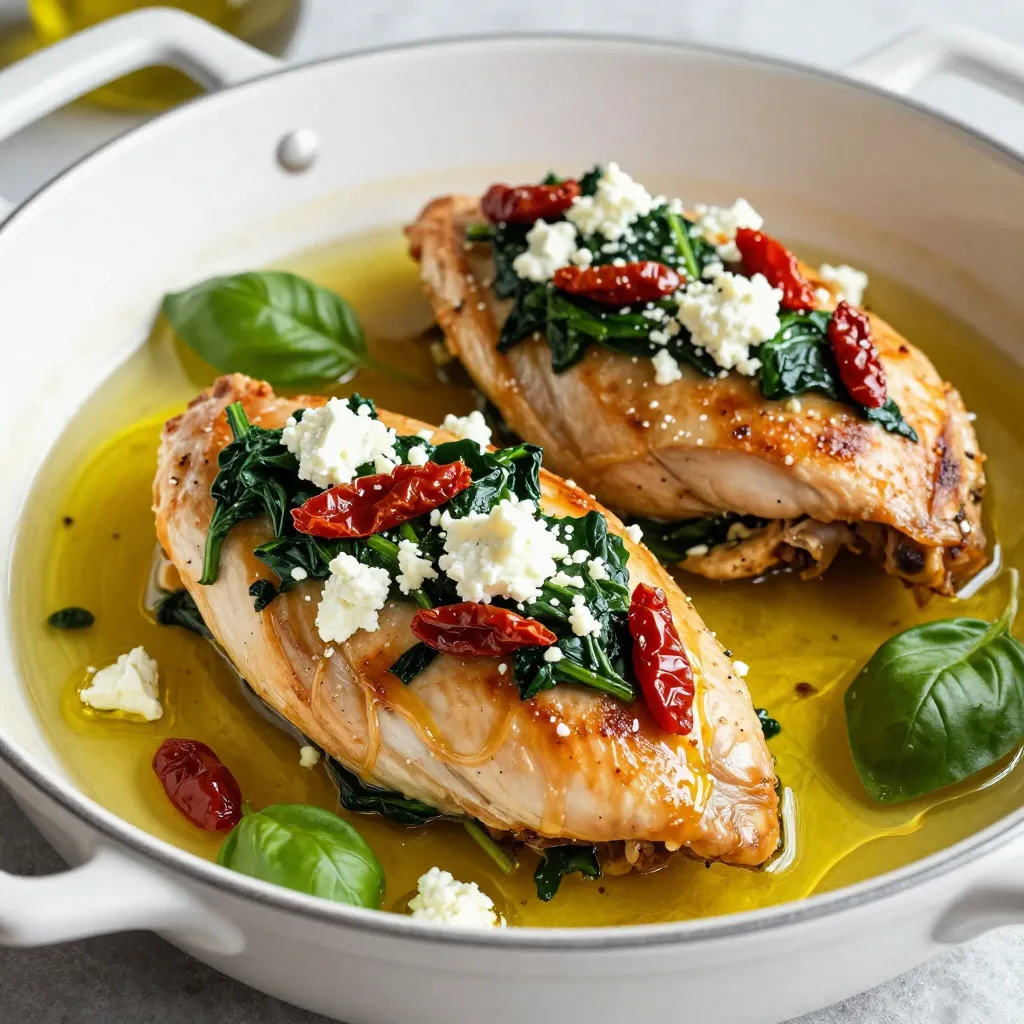
Are you ready to elevate your dinner game? This Gourmet Stuffed Chicken recipe is packed with flavor and easy to

- 1 pie crust (store-bought or homemade) - 3 large apples (such as Granny Smith or Honeycrisp), peeled, cored, and thinly sliced - 1/3 cup brown sugar - 1 tablespoon fresh lemon juice - 1 teaspoon ground cinnamon - 1/4 teaspoon ground nutmeg - 1 tablespoon all-purpose flour - 1/3 cup salted caramel sauce (homemade or store-bought) - 1 egg, beaten (for egg wash) - Sea salt flakes (for garnish) - 1 tablespoon unsalted butter, cut into small cubes - Chopped nuts (like walnuts or pecans) for added crunch - Vanilla ice cream for serving - Fresh herbs (like thyme) for a unique twist - A mixing bowl for the apple filling - A rolling pin if you make your own crust - A baking sheet lined with parchment paper - A pastry brush for the egg wash - A sharp knife or pizza cutter for slicing - An oven for baking the galette In this recipe, the combination of sweet apples and rich caramel shines. The brown sugar creates a lovely depth, while the spices add warmth. You can choose to add nuts for crunch or serve it with ice cream for extra creaminess. Having the right tools helps make this process smooth and fun. Start by peeling and slicing three large apples. I like using Granny Smith or Honeycrisp for their sweet-tart flavor. In a big bowl, mix the apple slices with 1/3 cup of brown sugar, 1 tablespoon of fresh lemon juice, 1 teaspoon of ground cinnamon, 1/4 teaspoon of ground nutmeg, and 1 tablespoon of all-purpose flour. Toss everything well so each apple slice is coated. Let this sit for about 10 minutes. This helps the apples soak up all the yummy flavors. If you're making your own pie crust, roll it out into a circle about 12 inches wide. Use a lightly floured surface to prevent sticking. If you bought a crust, just unroll it and lay it flat on a baking sheet lined with parchment paper. This makes cleanup easy later. Spoon the apple filling right into the center of your rolled-out crust. Make sure to leave about a 2-inch border around the edges. Drizzle 1/3 cup of salted caramel sauce over the apples. Fold the edges of the crust over the apples, making nice pleats for that rustic look. It should look beautiful and inviting! Preheat your oven to 400°F (200°C). Place the assembled galette in the oven and bake for 25 to 30 minutes. You want the crust to turn golden brown and the apples to be tender. When it’s done, the smell will fill your kitchen, making it hard to wait! Pick apples that are crisp and slightly tart. Granny Smith and Honeycrisp are great choices. They hold their shape well during baking. Tart apples balance the sweetness of the caramel. For a sweeter galette, use Fuji or Gala apples. Mixing different types of apples adds depth to the flavor. For the best crust, keep your ingredients cold. Use chilled butter and ice water. This helps the crust stay flaky. Roll the dough evenly to avoid thick spots. Aim for about 12 inches in diameter. Make sure to fold the edges gently to create a rustic look. Brush the crust with egg wash for a golden finish. The salted caramel sauce is key. It adds a rich flavor that complements the apples. Use just the right amount of sea salt flakes on top. This enhances the sweetness without overpowering it. Taste your apple filling before baking. Adjust the brown sugar if needed, aiming for a nice balance. {{image_4}} You can switch up the apples for other fruits. Pears work well, too. Try using a mix of apples and pears for a nice twist. Berries, like blueberries or raspberries, add a sweet and tart flavor. Just remember, if you use softer fruits, reduce the baking time. This keeps them firm but still juicy. While salted caramel is a star, you can try other sauces. Chocolate sauce adds a rich touch. A drizzle of vanilla glaze gives a sweet finish. If you want something fruity, a warm berry sauce is a tasty option. Each sauce brings its own flair to the galette. Want a gluten-free galette? Use a gluten-free pie crust. Many store brands offer great options. For a vegan twist, swap the egg wash with almond milk. Use a plant-based butter in the filling for richness. These simple changes keep the flavor while meeting dietary needs. To keep your galette fresh, store it in an airtight container. Place it in the fridge if you have leftovers. The galette will stay good for about three days. Be sure to let it cool completely before sealing. This helps keep the crust from getting soggy. When you're ready to enjoy your galette again, preheat your oven to 350°F (175°C). Place the galette on a baking sheet. Heat it for about 10 to 15 minutes. This warms it through and keeps the crust crispy. You can also use a microwave, but the crust may not stay as crunchy. To freeze the galette, let it cool fully first. Wrap it tightly in plastic wrap, then place it in a freezer bag. It can last up to three months in the freezer. When you want to eat it, thaw it in the fridge overnight. Reheat it in the oven for the best texture. You’ll know your galette is done when the crust is golden brown. Check the apples, too. They should be soft but not mushy. Bake it for 25 to 30 minutes at 400°F (200°C). Keep an eye on it in the last few minutes. The smell will also guide you. You’ll catch that sweet, warm aroma of apples and caramel. Trust your senses! Absolutely! You can use any caramel sauce you like. If you have homemade caramel, that works great. Store-bought sauces are also fine. Just make sure it's salted for that extra flavor kick. You can experiment with flavors, too. Try a vanilla or coffee-infused caramel for a twist. The key is to enjoy your galette your way! You can serve this galette with vanilla ice cream for a classic touch. Whipped cream adds a light, airy feel. You might also consider a drizzle of additional caramel sauce on top. For a fancy twist, serve it with a sprinkle of sea salt. If you want something fresh, a scoop of yogurt works well, too. Each option enhances the galette's warm, sweet flavor. To make a delicious salted caramel apple galette, start with quality ingredients and tools. I outlined the steps for preparing the filling, rolling out the crust, and baking to perfection. Remember to experiment with different fruits and sauces for fun twists. Storing leftovers properly helps maintain flavor, and reheating is easy. I hope these tips and tricks empower you to create your own tasty galette. Enjoy the process, and don't hesitate to try new ideas! You’ll impress friends and family with your baking skills.

Warm Salted Caramel Apple Galette Savory Delight

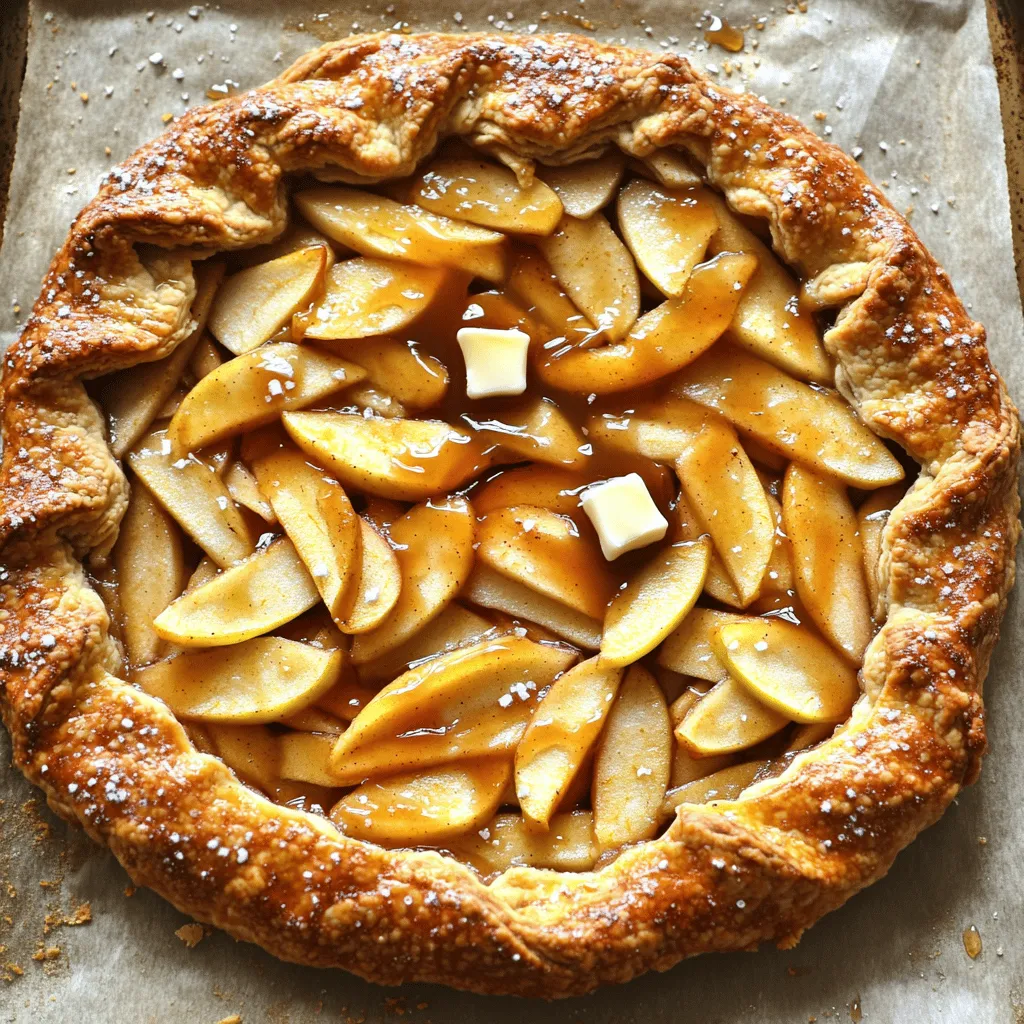
If you’re craving a sweet treat that’s easy to make and oh-so-delicious, you’ll love this Warm Salted Caramel Apple Galette!

- 1 cup unsweetened almond milk - 1/2 cup canned pumpkin puree - 1 ripe banana These main ingredients form the creamy base of your smoothie. Unsweetened almond milk makes it light yet rich. Canned pumpkin puree adds natural sweetness and a vibrant color. A ripe banana adds a nice texture and extra sweetness. - 1 scoop vanilla protein powder - 1 tablespoon almond butter - 1 teaspoon pumpkin pie spice The protein powder gives your smoothie a nutritious punch. Almond butter adds healthy fats and a creamy texture. Pumpkin pie spice brings that classic fall flavor to your drink. - 1 tablespoon maple syrup - Ice cubes If you want a sweeter smoothie, add maple syrup. Ice cubes can help chill and thicken your smoothie to your liking. Adjust these to taste for the best experience. Pour 1 cup of unsweetened almond milk into your blender. Add 1/2 cup of canned pumpkin puree. Blend these two ingredients on medium speed. You want a smooth and creamy mix. Make sure there are no lumps left. This step forms the base of your smoothie. Next, slice a ripe banana and add it to the blender. Include 1 scoop of vanilla protein powder for a protein boost. Add 1 tablespoon of almond butter for a creamy texture. Sprinkle in 1 teaspoon of pumpkin pie spice for that warm flavor. If you like it sweeter, you can add 1 tablespoon of maple syrup. Now, increase the blender speed to high. Blend until everything is fully mixed and silky smooth. If the smoothie is too thick, add a splash of almond milk or a few ice cubes. This will help you reach your preferred creaminess. Once blended, taste your smoothie. If it needs more sweetness, add a bit more maple syrup and blend briefly. Now it’s ready to pour into a glass or bowl. Enjoy the vibrant color and aroma! To make your smoothie really creamy, almond butter is key. It adds a rich texture and nutty flavor. The fat in almond butter helps blend everything smoothly. If your smoothie is too thick, just add a little more almond milk. This will help you reach that perfect thickness. You can also add ice cubes for a chillier drink. Presentation matters! Sprinkle some pumpkin pie spice on top for a nice finish. You can also add a few almond slices for a crunchy touch. Serving your smoothie in a mason jar makes it look fancy. Adding a colorful straw will make it even more fun to drink. If you want your smoothie sweeter, use maple syrup to taste. Start with one tablespoon and adjust as you blend. You can also try other sweeteners like honey or agave syrup. This way, you can make the smoothie just right for your taste. Always remember to blend briefly after adding any sweeteners to mix well. {{image_4}} You can easily switch out the almond milk. Try using coconut milk for a creamy texture. Oat milk is another great choice. Both options keep your smoothie dairy-free and add unique flavors. Want to spice things up? Adding nutmeg or ginger can bring warmth to your smoothie. These spices pair well with pumpkin. If you crave chocolate, mix in some cocoa powder. This twist gives your smoothie a rich, chocolatey taste. To amp up the protein, try different protein powders. Chocolate protein powder adds sweetness, while plant-based options keep it vegan. Greek yogurt is another great addition. It adds creaminess and extra protein, making your smoothie more filling. How long can you keep it? You can keep your High-Protein Pumpkin Pie Smoothie in the fridge for up to two days. Proper containers for storage Use an airtight container to store your smoothie. Glass jars or plastic containers work well. Steps to freeze for later If you want to freeze your smoothie, pour it into freezer-safe bags. Remove as much air as possible before sealing. Re-blending after thawing When you're ready to enjoy it, thaw the smoothie overnight in the fridge. Blend it again to restore its creamy texture. Tips to maintain flavor and consistency Always store your smoothie in the coldest part of the fridge. This keeps it fresh longer. Avoiding ingredient spoilage Use fresh ingredients when making your smoothie. This helps prevent spoilage and keeps flavors bright. This smoothie packs a healthy punch. Here’s a simple breakdown: - Calories: About 350 calories - Protein: Approximately 25 grams - Fats: Roughly 15 grams - Carbohydrates: Around 35 grams The almond milk keeps it light, while the protein powder boosts the protein content. The pumpkin adds fiber and vitamins. Almond butter provides healthy fats and extra creaminess. This mix makes a tasty treat that also fuels your body. Yes, you can make this smoothie ahead of time. I suggest blending it and storing it in the fridge. It stays fresh for one day. To keep it creamy, use a good container with a tight lid. Before drinking, give it a shake. If it gets too thick, add a splash of almond milk and blend again. Absolutely! This smoothie is great for meal replacement. With 25 grams of protein, it keeps you full and satisfied. The mix of banana, pumpkin, and almond butter gives you energy and nutrients. It’s easy to drink on the go, making it a perfect breakfast or snack. Just remember to balance it with other meals for a full diet. This blog post guides you in making a nutritious High-Protein Pumpkin Pie Smoothie. We covered key ingredients like almond milk, pumpkin puree, and ripe banana. You learned how to blend these for a smooth base and enhance flavor with protein and spices. I shared tips for achieving creaminess and personalizing sweetness. Finally, we discussed storage and nutritious value. Enjoy creating your smoothie, and feel free to mix things up! Your healthy treat awaits.

High-Protein Pumpkin Pie Smoothie Creamy and Delicious

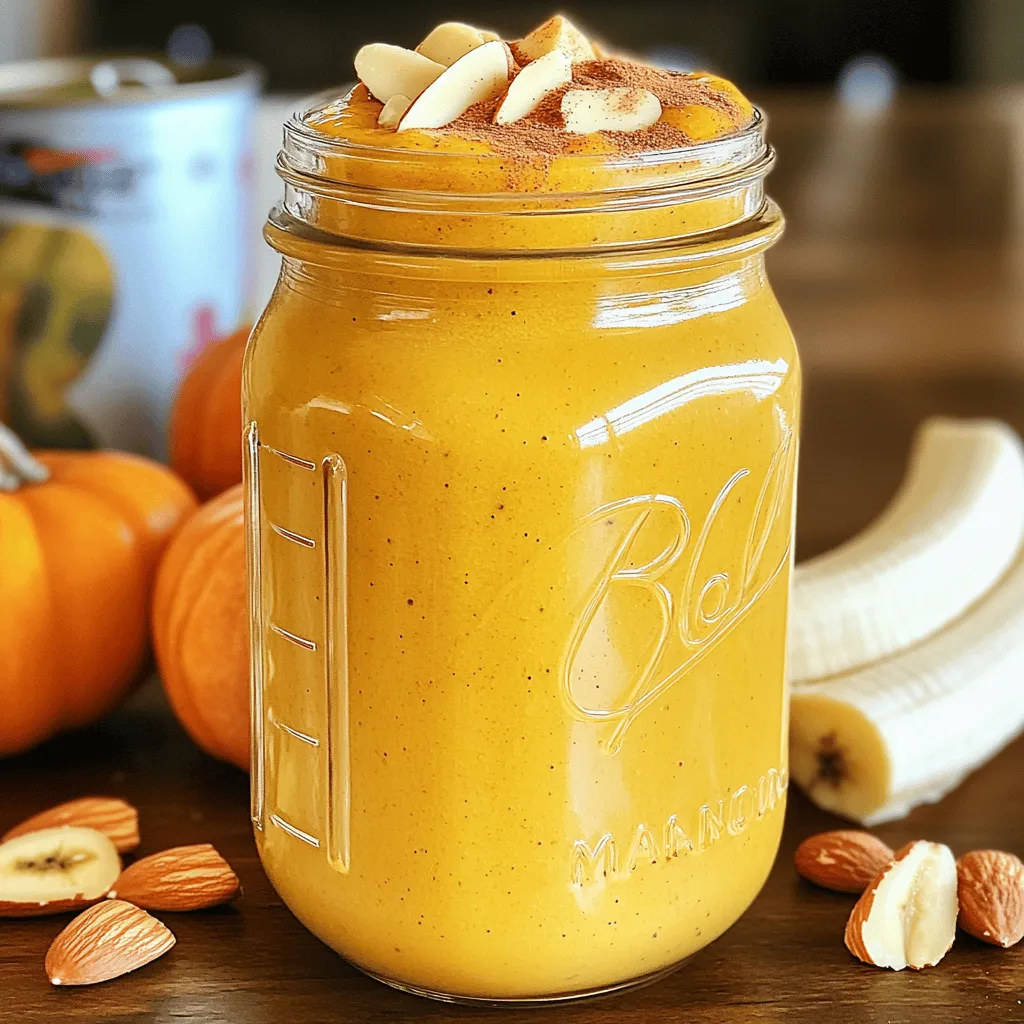
Craving a tasty treat that’s good for you? Try my High-Protein Pumpkin Pie Smoothie! This creamy drink packs a punch

Older posts
Newer posts
← Previous Page1 … Page5 Page6 Page7 … Page86 Next →

dsad

© 2026 lazychefmagic • Built with GeneratePress

Our Policies

  • Copyright Policy
  • Cookie Policy
  • GDPR Policy
  • Privacy Policy
  • Disclaimer
  • Terms Of Use

More Information

  • Home
  • About
  • Contact
  • Appetizers
  • Dessert
  • Dinner
  • Drinks
©2026, lazychefmagic About Back To Top