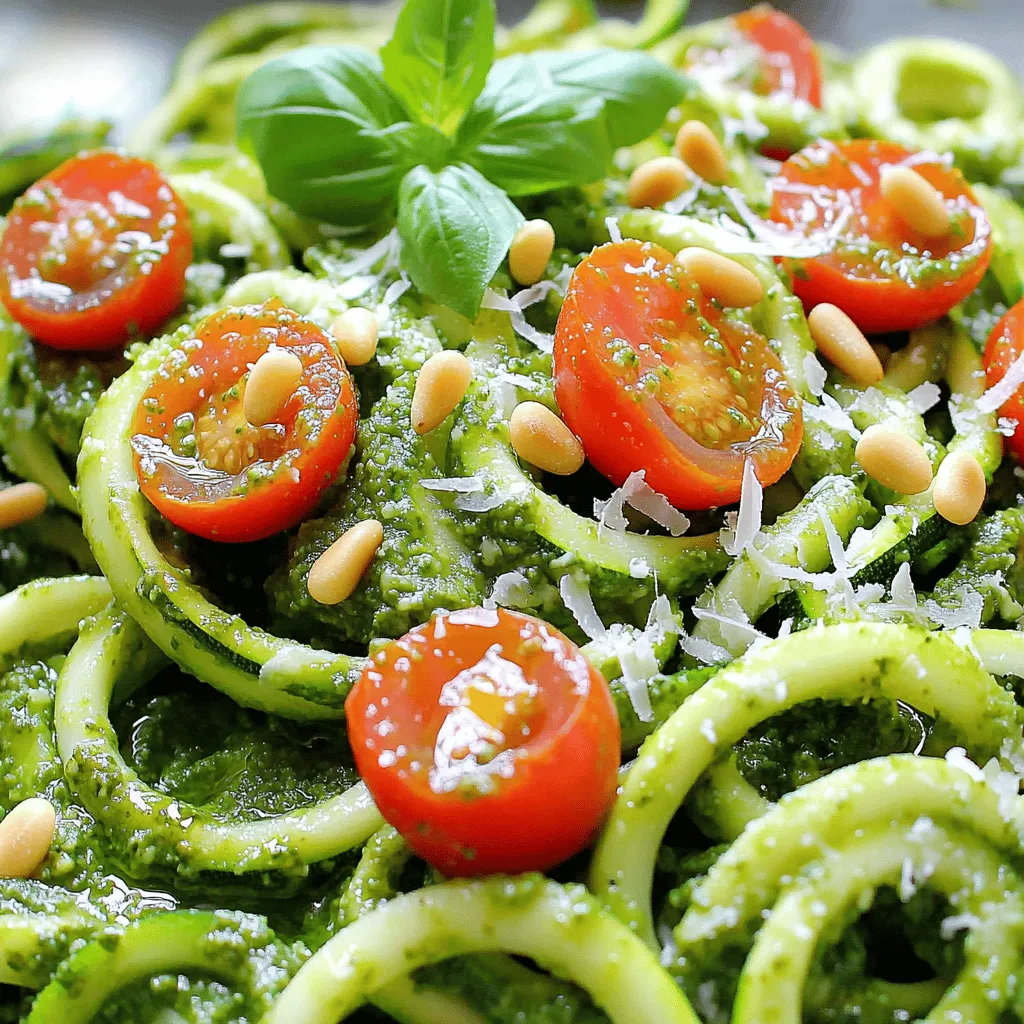
Zucchini Noodles with Pesto Fresh and Flavorful Meal
Looking for a fresh and healthy meal? Zucchini noodles with pesto pack flavor and nutrition in every bite. You can
Looking for a fresh and healthy meal? Zucchini noodles with pesto pack flavor and nutrition in every bite. You can
![To make this rich and creamy dessert, gather the following ingredients: - 2 ripe avocados, peeled and pitted - 1/2 cup unsweetened cocoa powder - 1/4 cup maple syrup (or substitute with agave syrup) - 1/4 cup almond milk (or any preferred plant-based milk) - 1 teaspoon pure vanilla extract - A pinch of sea salt - Dark chocolate shavings (for garnish) - Fresh mint leaves (for garnish) Health benefits of avocados Avocados are a great source of healthy fats. They provide fiber, which helps with digestion. Plus, they are rich in vitamins like E and K. These nutrients help keep your skin glowing and your heart healthy. Benefits of using unsweetened cocoa powder Unsweetened cocoa powder is packed with antioxidants. These can help reduce inflammation and support heart health. It also adds a deep chocolate flavor without extra sugar. Advantages of maple syrup as a sweetener Maple syrup is a natural sweetener. It has a lower glycemic index than refined sugar. This means it won’t spike your blood sugar as much. Plus, it contains minerals like manganese and zinc, which are good for your body. Explore more about these ingredients in the [Full Recipe]. To start, I grab my food processor. I add the peeled and pitted avocados, cocoa powder, maple syrup, almond milk, vanilla extract, and a pinch of sea salt. I blend these ingredients together until they become smooth and creamy. It's important to stop the processor now and then to scrape down the sides. This helps mix everything well. The goal is a silky texture, free of lumps. After blending, I take a taste. If it needs more sweetness, I add a little extra maple syrup. Then, I blend it again for a quick mix. This step ensures that the flavors meld perfectly. It is all about finding that balance of taste that works for you. Once I am happy with the flavor, I carefully transfer the mousse into individual serving bowls. It is best to cover each bowl with plastic wrap. I then place them in the fridge for at least 30 minutes. This chilling time helps the mousse firm up and allows the flavors to deepen. The mousse will be even more delicious after chilling. For the full recipe, check out the complete instructions above. To get a creamy mousse, you need ripe avocados. Ripe avocados are soft and easy to blend. They create a smooth texture that is key for this dessert. If your avocados are too firm, they won't blend well. Check for ripeness by gently pressing the skin. If it gives slightly, it's ready to use. To avoid lumps, blend the mousse on high speed. Stop the blender a few times to scrape down the sides. This ensures all the ingredients mix well. If you notice any chunks, blend longer. The goal is a silky, smooth texture without any lumps. For a beautiful dessert, presentation matters. Use clear glass cups to show off the rich color of the mousse. Drizzle extra maple syrup on top for a sweet touch. You can also layer the mousse with fresh berries for a pop of color. Serve the mousse chilled for the best taste. After blending, let it cool in the fridge for 30 minutes. This helps the flavors mix and the mousse to firm up. Want to add extra flavor? Try mixing in a little espresso or chili powder. Espresso adds depth, while chili gives a spicy kick. Both pair nicely with chocolate. For garnishes, consider fresh fruit, nuts, or seeds. Dark chocolate shavings are a classic choice. Fresh mint leaves also add a nice touch. These not only look great but enhance the flavor too. For the full recipe, refer to the previous section. {{image_4}} To make a vegan chocolate avocado mousse, focus on ingredient choices. Use ripe avocados, cocoa powder, and plant-based milk. Maple syrup or agave syrup keeps the sweetness natural. Ensure all ingredients are vegan-friendly. For a vegan version, substitute the almond milk with any preferred plant-based milk. You can also use dates instead of maple syrup for sweetness. Blend the dates with the avocados for a smooth mix. If you want a sugar-free mousse, consider sweeteners like stevia, erythritol, or monk fruit. These options keep the mousse sweet without sugar. Using sugar substitutes might change the flavor a bit. Some sweeteners can have a cooling effect. Adjust the amount based on your taste. Always taste as you blend to get the right balance. Get creative with how you serve the mousse! Try layering it in clear glasses with fresh fruits. This adds flavor and a pop of color. You can also serve it with whipped coconut cream on top. Pair it with coffee or tea for a delightful dessert experience. For a fun twist, try adding chocolate chips or nuts for crunch. To keep your chocolate avocado mousse fresh, use airtight containers. Glass jars or plastic containers work well. These containers will help maintain the mousse's creamy texture. To prevent the mousse from browning, press plastic wrap directly onto the surface before sealing. This limits air exposure, which causes browning. Your mousse will stay fresh in the fridge for about three days. After that, the quality may decline. Look for signs of spoilage, like an off smell or changes in texture. If it becomes watery or has a strange color, it's best to throw it away. Yes, you can freeze chocolate avocado mousse! To freeze, scoop the mousse into freezer-safe containers. Leave some space at the top, as it will expand when frozen. To thaw, place it in the fridge overnight. Avoid microwaving, as this can change the texture. After thawing, stir gently to restore creaminess before serving. For best results, eat the mousse within one month of freezing. Chocolate avocado mousse is a rich dessert made from ripe avocados and cocoa powder. This treat is smooth, creamy, and full of flavor. Unlike traditional mousse, which often uses eggs and cream, this recipe is dairy-free and vegan. The avocado gives it a silky texture while adding healthy fats. Yes! You can use other plant-based milks like oat, soy, or coconut milk. Each choice adds a unique taste. Almond milk is popular for its light flavor, but coconut milk gives a creamier texture. The milk you choose may change the mousse's taste slightly, so try different ones to find your favorite! Absolutely! This mousse is a healthier dessert choice. Avocados provide good fats, fiber, and vitamins. Unsweetened cocoa powder adds antioxidants. Compared to typical desserts high in sugar and fat, this mousse is lower in calories and more nutritious. It satisfies sweet cravings without the guilt. To ramp up the chocolate flavor, add more cocoa powder. Start with an extra tablespoon and blend again. You can also mix in dark chocolate chips or melted chocolate for an even richer taste. Using high-quality chocolate products enhances the mousse’s depth, making every bite pure bliss. For the full recipe, check out the steps above! This blog post covers the delicious and healthy Chocolate Avocado Mousse. We explored the simple ingredients and their great benefits. You learned step-by-step instructions for making it smooth and tasty. Plus, we shared tips for serving and storing your mousse perfectly. In closing, this dessert is easy to make and full of good flavors. Enjoy experimenting with variations and serving ideas. Your taste buds and health will thank you!](https://lazychefmagic.com/wp-content/uploads/2025/05/c3209d73-d04b-43da-94cb-a44a122d06ed.webp)
Dive into the creamy and decadent world of Chocolate Avocado Mousse! This simple yet luxurious dessert proves you can indulge
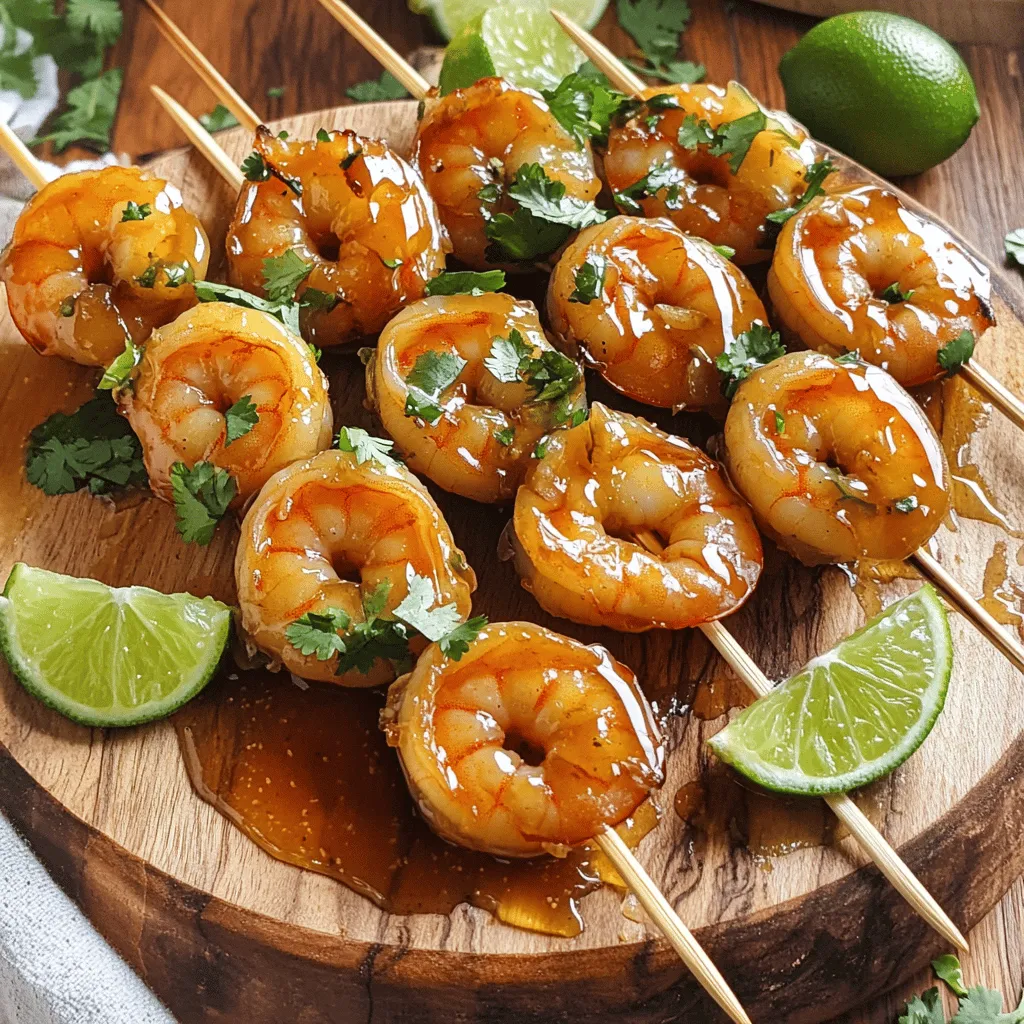
If you’re looking for a quick, tasty meal that impresses, you’ve found it! Honey Garlic Shrimp Skewers are simple to
![- Canned peaches - Brown sugar - Ground cinnamon - Yellow cake mix - Unsalted butter - Rolled oats (optional) In this Peach Cobbler Dump Cake, you only need a few simple ingredients. Canned peaches are the star of the show. They bring sweetness and moisture. Brown sugar adds depth, while ground cinnamon gives warmth. The yellow cake mix forms a perfect topping. Melted unsalted butter helps everything come together. If you want a crunchy twist, roll oats are a great choice. They add texture and flavor. - Vanilla ice cream - Whipped cream - Fresh fruit garnishes Serve this dessert warm for the best experience. A scoop of vanilla ice cream melts on top, creating a creamy contrast. Whipped cream also works well and adds lightness. For a fresh touch, use slices of peach or other fruits as garnishes. They make your dish pop with color and flavor. - 9x13 inch baking dish - Mixing bowl - Measuring cups and spoons To make this cake, you’ll need a few tools. A 9x13 inch baking dish is perfect for this recipe. Use a mixing bowl to combine your ingredients easily. Measuring cups and spoons help you get the right amounts. These tools make the process simple and fun, letting you enjoy cooking. For the full recipe, check out the details provided earlier. - Preheat the oven to 350°F (175°C). This helps the cake cook evenly. - Open your cans of peaches and drain them well. This keeps the cake from being too wet. - Grab a 9x13 inch baking dish. Make sure it is clean and ready for the cake. - Spread the drained peaches in the baking dish. Cover the bottom well with peaches. - Sprinkle brown sugar and ground cinnamon over the peaches. This adds great flavor and makes it sweet. - Carefully pour the yellow cake mix over the peaches. Spread it out but do not mix it in. - If you want extra crunch, sprinkle rolled oats over the cake mix. This is optional but tasty. - Drizzle the melted butter evenly across the cake mix. This helps it bake into a moist topping. - Put the baking dish in your preheated oven. Bake for 40-45 minutes. Look for a golden top and bubbly edges. Once baked, let it cool for a few minutes before serving. This helps the flavors mix well. You can find the Full Recipe in the earlier sections for more details. To get the best bake, keep an eye on the time. I usually bake for 40 to 45 minutes. You want the top to be golden brown. If it looks pale, add a few more minutes. To check doneness, look for bubbly edges. The center should feel firm but not dry. A toothpick can help too. Just insert it into the center. If it comes out clean, your cake is done! Using fresh peaches can change the game. They bring a bright, juicy taste. You can peel and slice about four ripe peaches. Replace the canned peaches with these fresh ones for a fun twist. Adjusting sweetness is easy. If you like it sweeter, add more brown sugar. If you prefer it less sweet, cut back a bit. Just remember, the peaches also add natural sweetness. Serve the dump cake warm. It tastes best right out of the oven. Scoop generous portions into bowls. Top each serving with a scoop of vanilla ice cream or a dollop of whipped cream. The cold cream pairs perfectly with the warm cake. For extra flair, add fresh peach slices or a sprinkle of cinnamon on top. This makes your dessert look and taste even better! For the full recipe, check out the Peach Paradise Dump Cake! {{image_4}} You can swap the peaches with other fruits. Try using cherries, blueberries, or apples. Each fruit brings a new taste. You can also mix different fruits together. For example, peaches and berries create a fresh and bright flavor. This adds fun to your dessert. If you need a gluten-free option, use a gluten-free cake mix. These mixes work well with the recipe. You can also make it vegan. Substitute the butter with coconut oil or vegan butter. For the cake mix, look for vegan options. This way, everyone can enjoy this treat. Adding spices can enhance the taste. Try mixing in some nutmeg or ginger for extra warmth. You can also include nuts like walnuts or pecans for crunch. If you love chocolate, sprinkle some chocolate chips on top. These additions make each bite special and unique. For the Full Recipe, refer to the section above. To store leftover peach cobbler dump cake, place it in an airtight container. This keeps it fresh and tasty. In the fridge, it stays good for about 3 to 4 days. If you want to enjoy it later, make sure to cover it well. Freezing peach cobbler dump cake is easy. First, let it cool completely. Then, slice the cake into portions. Wrap each slice in plastic wrap and then in aluminum foil. This helps to avoid freezer burn. You can keep it in the freezer for up to 3 months. When you’re ready to eat it, thaw in the fridge overnight. For the best texture, reheat in the oven at 350°F (175°C) for about 15 minutes. When you reheat the cake, check that it is warm throughout. I like to serve it with a scoop of vanilla ice cream or whipped cream. This adds a nice touch. If the cake seems dry, drizzle a little peach syrup over it. This helps to bring back some moisture. Enjoy your sweet treat! For the full recipe, check here: [Full Recipe]. To make Peach Cobbler Dump Cake, you start by preheating your oven to 350°F. Next, you layer drained sliced peaches in a baking dish. Then, sprinkle brown sugar and ground cinnamon over the peaches. Pour yellow cake mix on top but do not mix it. Drizzle melted butter across the cake mix and add oats if desired. Bake for 40 to 45 minutes until golden brown. Yes, you can use frozen peaches for this recipe. Just thaw and drain them before using. You may want to adjust the baking time by a few minutes, as frozen fruit can release more moisture. You can tell the cake is done when the top is golden brown and bubbly at the edges. A toothpick inserted in the center should come out clean. Keep an eye on it during the last few minutes of baking. This dessert pairs wonderfully with a scoop of vanilla ice cream or a dollop of whipped cream. Fresh peach slices also make a nice touch. For extra flavor, consider a drizzle of caramel sauce. Yes, you can prepare the ingredients ahead of time. Layer the peaches and toppings in the dish, then cover and refrigerate. Bake it just before serving for a warm and fresh dessert. In this article, we explored how to make a tasty peach cobbler dump cake. We covered the main ingredients, tools, and step-by-step instructions for baking. I shared tips for the perfect bake and ways to customize your cake, along with how to store leftovers properly. This dessert is flexible and easy to prepare. You can enjoy it warm with ice cream or make it your own with different fruits. Now, go ahead and bake your delicious peach cobbler dump cake!](https://lazychefmagic.com/wp-content/uploads/2025/05/d3717c14-90c6-49d6-a982-7117d0988247.webp)
If you crave a dessert that’s both easy and delicious, you’re in the right place! This Peach Cobbler Dump Cake
![- 1 pound Brussels sprouts, trimmed and halved - 4 tablespoons extra virgin olive oil - 4 cloves garlic, finely minced Brussels sprouts are the star here. They are small, green, and packed with nutrients. I love them for their unique flavor and texture. Extra virgin olive oil adds richness and helps the sprouts crisp up. Fresh garlic gives a strong, aromatic punch that works wonders in this dish. - 1/2 cup freshly grated Parmesan cheese - 1 teaspoon garlic powder - 1 teaspoon onion powder Parmesan cheese melts beautifully and creates a golden crust. Garlic powder and onion powder boost the flavor even more, making each bite delicious. - 1/2 teaspoon red pepper flakes - Salt and freshly cracked black pepper, to taste - Fresh parsley, finely chopped (for garnish) If you like heat, add red pepper flakes for a kick. Salt and black pepper enhance all the flavors. A sprinkle of fresh parsley at the end adds color and freshness to your dish. For the full recipe, check out the Crispy Garlic Parmesan Brussels Sprouts recipe. - Preheat your oven to 425°F (220°C). - Trim and halve the Brussels sprouts. Start with a clean cutting board. Use a sharp knife to cut off the stem ends of the Brussels sprouts. Then, slice each sprout in half from top to bottom. This helps them cook evenly and lets the flavors soak in. - Combine Brussels sprouts with oil and spices. - Toss until well coated. In a large bowl, add the halved Brussels sprouts. Pour in four tablespoons of extra virgin olive oil. Add the minced garlic, garlic powder, onion powder, and red pepper flakes if you want some heat. Season this mix with salt and freshly cracked black pepper. Now, use your hands or a spatula to toss everything together. Make sure each sprout gets a good coating of oil and spices. This step is key for that crispy texture. - Spread on a baking sheet and sprinkle cheese. - Roast for 20-25 minutes, flipping halfway. Line a baking sheet with parchment paper. This makes it easier to clean later. Spread the Brussels sprouts out in a single layer. Leave some space between them for air to circulate. Now, sprinkle half a cup of freshly grated Parmesan cheese over the top. The cheese will melt and crisp up nicely. Place the baking sheet in your preheated oven. Roast for 20 to 25 minutes. Halfway through, flip the Brussels sprouts using a spatula. This helps them brown evenly. When they turn a beautiful golden brown, they are ready to come out. Let them cool for a few minutes before serving. This enhances their crunch and flavor. Check out the [Full Recipe] for more detailed steps. To get that perfect crunch, space is key. Spread the Brussels sprouts out on the baking sheet. If they touch, they will steam instead of crisp. I love using parchment paper. It makes cleanup easy and helps the sprouts get crispy. You can play with the seasoning. If you like it spicy, add more red pepper flakes. For a sweet touch, try a balsamic reduction drizzle after roasting. It's a great way to elevate the dish. The size of the Brussels sprouts matters. Smaller ones roast faster, while larger ones may need extra time. Check for golden color and crispiness. Each oven cooks a bit differently, so keep an eye on them. Rotating the baking sheet halfway through helps them cook evenly. {{image_4}} You can switch out Parmesan cheese for other options. Try using Pecorino Romano for a sharper taste. Gruyère adds a nutty flavor, while cheddar gives a creamy richness. Mixing different cheeses can enhance the dish. Combining Parmesan with mozzarella creates a delightful blend of textures. Herbs and spices can change the taste of your Brussels sprouts. Adding thyme or rosemary brings a fresh flavor. A sprinkle of smoked paprika adds warmth and depth. For a touch of sweetness, drizzle honey or maple syrup over the sprouts before roasting. This adds a nice contrast to the savory cheese. If you want a faster option, try air frying. It cooks the sprouts quickly while keeping them crispy. Just set your air fryer to 400°F (200°C) and roast for about 15 minutes. Grilling is another great method. It gives the sprouts a smoky flavor that pairs well with the cheese. Just toss them on the grill for about 10-15 minutes, flipping halfway through. To store leftover crispy garlic Parmesan Brussels sprouts, let them cool first. Place them in an airtight container. This will help keep them fresh. Glass or plastic containers work well. If you use plastic, make sure it's BPA-free. Store the sprouts in the fridge for up to three days. When you are ready to eat your leftovers, use the oven for reheating. Preheat it to 350°F (175°C). Spread the Brussels sprouts on a baking sheet. This will help them stay crispy. Warm them for about 10-15 minutes. Flip them halfway to ensure even heating. Avoid using the microwave. It will make the sprouts soggy. Yes, you can freeze cooked Brussels sprouts. However, they may lose some crispness. To freeze, allow the sprouts to cool. Then place them in a freezer-safe bag or container. Remove as much air as possible to prevent freezer burn. They can last up to three months in the freezer. When you want to use them, thaw them overnight in the fridge. Reheat them in the oven to restore some crunch. Yes, you can use frozen Brussels sprouts! They are easy to find and save time. However, they may not crisp up as well as fresh sprouts. Frozen Brussels sprouts often contain some water, which can make them soggy. To fix this, thaw them first. Drain any excess water. You might need to adjust the cooking time too. Start with 25 to 30 minutes and check for doneness. Keep an eye on them, as they should be golden and crispy. To make these Brussels sprouts vegan, replace the Parmesan cheese. Nutritional yeast is a great option. It gives a cheesy flavor without dairy. You can also use vegan cheese shreds if you prefer. For the oil, stick with extra virgin olive oil, as it is already plant-based. These swaps keep the dish tasty and satisfying while catering to a vegan diet. Brussels sprouts are packed with nutrients. They are high in fiber, which helps digestion. They also contain vitamins C and K, which boost your immune system. Plus, they have antioxidants that fight free radicals in the body. Adding Brussels sprouts to your meals is a smart choice. They support heart health and may lower inflammation. Enjoy them roasted, steamed, or sautéed for a tasty and healthy side dish. In this post, we explored the best way to prepare Brussels sprouts. We discussed the main ingredients and how to mix and roast them for perfect flavor. You learned tips for keeping them crispy and variations to suit your taste. Remember, storing leftovers properly helps maintain freshness. Enjoy experimenting with flavors and methods. With these insights, you can create a delicious dish that everyone will love. Happy cooking!](https://lazychefmagic.com/wp-content/uploads/2025/05/856f2957-69e8-426d-934f-316a1124edf2.webp)
Do you want a side dish that wows? Try my Crispy Garlic Parmesan Brussels Sprouts! This easy recipe transforms ordinary
![To make these tasty chicken fajitas, you need: - 1 lb (450g) boneless, skinless chicken breasts, thinly sliced - 1 bell pepper (choose from red, yellow, or green for color variety), sliced - 1 medium onion, sliced into thin strips - 3 cloves garlic, minced finely - 2 tablespoons olive oil - 4-6 small flour tortillas (approximately 6-8 inches in diameter) These ingredients create a juicy, flavorful base for your fajitas. The chicken provides protein, while the peppers and onions add crunch and sweetness. The right spices make a huge difference. For the spice mix, you'll need: - 1 tablespoon chili powder - 1 teaspoon ground cumin - 1 teaspoon smoked paprika - ½ teaspoon sea salt - ½ teaspoon freshly cracked black pepper This blend gives your chicken a warm, smoky flavor. It’s simple but so effective. Add your favorite toppings for extra flavor. Consider these options: - Fresh cilantro leaves, chopped, for garnish - Lime wedges, for serving These garnishes add freshness and a zesty kick. You can also try sour cream or avocado if you like! For the full recipe, check out the Sizzling Chicken Fajitas section. Start with 1 pound of boneless, skinless chicken breasts. Thinly slice the chicken into strips. In a medium bowl, mix the chicken with chili powder, ground cumin, smoked paprika, sea salt, and black pepper. Make sure each piece is well coated with spices. This adds great flavor and makes the chicken delicious. Heat 1 tablespoon of olive oil in a large skillet over medium-high heat. Once the oil shimmers, carefully add the seasoned chicken. Cook for 5-7 minutes until the chicken turns golden brown. Check that it reaches an internal temperature of 165°F (75°C). Remove the chicken from the skillet and keep it warm on a plate. In the same skillet, add another tablespoon of olive oil. Toss in sliced onion and bell pepper. Sauté for 4-5 minutes. The veggies should soften and develop nice caramelized edges. Return the cooked chicken to the skillet. Add minced garlic and stir everything together. Cook for another 2-3 minutes to blend the flavors. Warm the flour tortillas in a separate skillet or microwave. To serve, take a warm tortilla and fill it with the chicken and vegetable mix. Top with fresh cilantro and lime wedges. Squeeze lime over the fajitas for a zesty kick. Enjoy this quick and tasty family meal! For the full recipe, you can check [Full Recipe]. To take your chicken fajitas to the next level, consider marinating the chicken. A simple marinade can add great flavor. Mix lime juice, garlic, and spices together. Let the chicken sit for at least 30 minutes. This adds zest and makes the chicken tender. You can also add more vegetables. Try zucchini or mushrooms for extra texture. One common mistake is overcooking the chicken. This can make it dry and chewy. Always check the chicken's internal temperature. It should be 165°F (75°C) to be safe and juicy. Another mistake is not using enough seasoning. Fajitas need bold flavors. Don’t skip the spices! Lastly, avoid crowding the pan. This can steam the chicken instead of searing it. Cook in batches if needed. For perfectly cooked chicken, slice it thinly. Thin pieces cook faster and stay juicy. Use high heat when cooking. This helps to sear the chicken and lock in moisture. Let the chicken rest after cooking. This allows the juices to redistribute, making it more flavorful. Always use a sharp knife for clean cuts. A clean cut helps keep the chicken tender. For more ideas, check the Full Recipe. {{image_4}} If you want to switch things up, try vegetarian fajitas. You can use mushrooms, zucchini, and eggplant. These veggies add great flavors and textures. Just slice them thin and sauté like the chicken. You can also use black beans as a protein source. They are filling and tasty. You will still get that classic fajita flavor with the right spices. You can also use other proteins in your fajitas. Beef or shrimp work well. For beef, use flank steak or sirloin, sliced thin. Cook it for about 5-7 minutes until it’s brown. For shrimp, sauté them quickly for about 2-3 minutes until pink and opaque. Both options add a nice twist to the dish. You can even mix proteins for a fun, diverse meal. Want to add more flavor? Try adding fresh lime juice for a zesty kick. You can also mix in some fresh jalapeños for heat. If you like sweetness, add some corn or pineapple chunks. These add a nice contrast to the spices. Fresh herbs like cilantro or parsley can also brighten up the dish. With all these options, you can customize your fajitas to fit your tastes. For the full recipe, check out the main section. To store leftover fajitas, let them cool to room temperature. Place them in an airtight container. Use wax paper between layers to avoid sticking. Keep them in the fridge for up to three days. For best taste, eat them soon. Reheat your fajitas in a skillet over medium heat. Add a splash of water to keep them moist. Stir them occasionally for even heating. You can also use a microwave. Place them in a microwave-safe dish and cover with a damp paper towel. Heat for about one minute, checking to avoid overheating. To freeze chicken fajitas, first cool them completely. Transfer them to freezer-safe bags. Remove as much air as possible before sealing. You can freeze them for up to three months. When ready to eat, thaw them in the fridge overnight. Reheat as described above for a tasty meal. For the full recipe, check out the earlier section. The best way to season chicken for fajitas is with bold spices. I use chili powder, cumin, and smoked paprika. These spices add warmth and depth to the chicken. Mix the spices well with the chicken to coat it evenly. Let it marinate for a few minutes for great flavor. This simple seasoning gives every bite a punch. Yes, you can use corn tortillas instead of flour. Corn tortillas have a nice taste and texture. They can also be gluten-free, which is great for some diets. Just remember to warm them up before serving. This makes them soft and easy to fold. Both options work well, so choose what you love. You know chicken is cooked through when it reaches 165°F (75°C). Use a meat thermometer to check this. The chicken should also look golden brown on the outside. If it is still pink inside, keep cooking it a bit longer. Cutting into a piece can also help—if the juices run clear, it’s done. Many side dishes go well with chicken fajitas. Here are some great options: - Mexican rice - Refried beans - Guacamole - Salsa - Fresh salad with lime dressing - Grilled corn on the cob These sides add variety and make your meal more colorful and tasty. Yes, you can make chicken fajitas ahead of time. Cook the chicken and veggies and store them in the fridge. When you are ready to eat, just reheat them. This is a great way to save time on busy nights. You can enjoy fresh fajitas with less effort. For the full recipe, check out the detailed steps. You learned how to make easy chicken fajitas with a few key ingredients. We covered steps to prepare both chicken and veggies, and how to assemble your dish. We went over tips to improve your fajitas and mistakes to avoid. You explored various options to change up the meal, and we discussed how to store and reheat leftovers. Cooking chicken fajitas can be fun and tasty. With practice, you’ll make perfect fajitas every time. Enjoy your cooking!](https://lazychefmagic.com/wp-content/uploads/2025/05/bad760b7-839d-4e1c-9478-7397337afa64.webp)
Looking for a quick and tasty meal that your whole family will love? Easy Chicken Fajitas are the answer! In
![- 2 cups cooked rice - 2 cups fresh broccoli florets - 1 cup sharp cheddar cheese, shredded - 1 cup cream of mushroom soup - 1/2 cup milk - 1 small onion, finely chopped - 2 cloves garlic, minced - 1 teaspoon paprika - Optional toppings: breadcrumbs, fresh parsley When making Cheddar Broccoli Rice Casserole, I focus on simple ingredients that pack big flavor. The cooked rice serves as a hearty base, giving the dish a comforting feel. I like using fresh broccoli florets for that bright green color and crisp texture. Sharp cheddar cheese is my go-to for that rich, cheesy flavor. I always add cream of mushroom soup for creaminess and depth. Milk helps to loosen the mixture, making it smooth. Chopping onion and garlic finely ensures they blend well, adding a sweet and savory note. I recommend paprika for a hint of warmth. You can also top with breadcrumbs for a crunchy finish. Fresh parsley adds a nice touch of color and freshness when serving. This combination makes a dish that is not just tasty but also easy to prepare. For the complete recipe, check out the Full Recipe. - Preheat the oven to 350°F (175°C). - Sauté 1 small chopped onion and 2 cloves minced garlic in olive oil. Start by heating some olive oil in a large skillet. Add the chopped onion and cook for about 3-4 minutes. You want the onion to become soft and clear. Then, add the minced garlic and cook for another minute. This step makes your kitchen smell amazing! - Incorporate 2 cups of broccoli florets and sauté briefly. - Mix 2 cups cooked rice, the sautéed vegetables, 1 cup cream of mushroom soup, 1/2 cup milk, and spices. Next, add the broccoli florets to the skillet. Sauté them for 2-3 minutes. We want them tender but still bright green. After this, take a big bowl. Combine the cooked rice, sautéed veggies, cream of mushroom soup, milk, and 1 teaspoon paprika. Don’t forget to season with salt and black pepper. Mix it all up until well combined. - Transfer mixture to a baking dish. - Top with reserved cheddar cheese and optional breadcrumbs. - Bake for 25-30 minutes until golden brown. Now, pour the mixture into a greased baking dish. Spread it evenly. Sprinkle the remaining cheddar cheese on top. If you like some crunch, add breadcrumbs. Place it in the oven and bake for 25-30 minutes. Look for that golden brown color on top. Your Cheddar Broccoli Rice Casserole will be warm and cheesy, ready to enjoy! To cook rice just right, I suggest using the absorption method. This method gives you fluffy rice without clumps. Use two cups of water for every cup of rice. Bring water to a boil, add the rice, cover, and simmer on low. This helps the rice absorb water evenly. For broccoli, keep it vibrant by sautéing it briefly. Cook it for just 2-3 minutes until it turns bright green. This way, it stays crisp and colorful in the casserole. To boost flavor, try adding spices like garlic powder or onion powder. A sprinkle of red pepper flakes can add a nice kick. Fresh herbs like thyme or basil can also brighten the dish. When it comes to cheese, sharp cheddar is great, but consider mixing it up. Gouda or Monterey Jack can add a creamy touch. For a strong flavor, try blue cheese. Serve the casserole hot from the oven for the best taste. If you want to impress, scoop it onto colorful plates. A drizzle of cream or an extra sprinkle of parsley makes it look lovely. Pair your casserole with a side salad for a fresh crunch. Garlic bread or steamed veggies also work well. These sides balance the cheesy goodness of the casserole. {{image_4}} You can easily make this dish fit your needs. For a gluten-free option, swap the cream of mushroom soup for a gluten-free brand. This way, you keep the same creamy taste without the gluten. If you want a vegan dish, use plant-based cheese instead of cheddar. You can also make a homemade vegan cream of mushroom soup. This keeps the flavor rich and warm without dairy. Feel free to change up the veggies. You can add carrots, peas, or bell peppers for more color and taste. If you want to switch the cheese, try mozzarella or gouda. Each cheese gives the dish a unique flavor. Just remember, sharper cheeses often add a stronger taste. Using seasonal produce can really elevate this dish. In spring, add fresh asparagus or peas. In the fall, consider using roasted squash for a sweet touch. To make a festive version for the holidays, add cranberries or nuts on top. This not only adds flavor but also creates a colorful presentation. For more detailed cooking tips, check [Full Recipe]. Let your casserole cool down before storing. This helps keep it fresh. To cool properly, leave it on the counter for about 30 minutes. Once it’s cool, cover it well with plastic wrap or foil. This keeps moisture in and prevents drying out. Store it in the fridge for up to three days. To reheat your casserole, use either an oven or microwave. For the oven, preheat it to 350°F (175°C). Place the casserole in a baking dish and cover it with foil. Heat for about 20 minutes or until hot. In the microwave, use a microwave-safe dish. Heat in 1-minute intervals, stirring in between. This keeps the flavors intact. If you want to save leftovers, freezing is a great option. First, let the casserole cool completely. Then, cut it into portions for easy meals later. Wrap each portion tightly in plastic wrap and place them in a freezer bag. This way, it can last for up to three months. To thaw, place it in the fridge overnight. Reheat as mentioned before for best results. Now you can enjoy Cheddar Broccoli Rice Casserole whenever you want! To keep your casserole moist, use enough liquid. You can add more milk or soup. Cover the dish with foil while baking to trap steam. This helps cook it evenly. Remove the foil for the last few minutes to brown the top. Check your casserole a few minutes early. If it looks dry, add a splash of milk. Yes, frozen broccoli works well in this dish. Just thaw it before use. Drain any excess water to avoid a soggy casserole. Cook it briefly in a pan to keep its bright color. This method helps the broccoli stay tender and flavorful. You can save time and still enjoy great taste. This casserole pairs well with many dishes. For protein, serve grilled chicken or baked fish. A fresh salad adds a nice crunch. Roasted vegetables make a colorful side. You can also try garlic bread for a cozy feel. Each option complements the creamy, cheesy flavor of the casserole. If you need a substitute, try cream of chicken soup or a homemade version. You can blend cooked mushrooms with cream for a fresh taste. Another option is to mix sour cream with chicken broth. This gives you a creamy texture without the mushrooms. Choose what fits your taste best for the perfect dish. In summary, we’ve explored a delicious Cheddar Broccoli Rice Casserole recipe. I walked you through the main ingredients, step-by-step instructions, and helpful tips to ensure perfect results. You learned about variations, storage tips, and frequent questions. This dish is versatile and fits many diets. I encourage you to try it with different ingredients. Happy cooking and enjoy sharing this tasty meal with your loved ones!](https://lazychefmagic.com/wp-content/uploads/2025/05/ceeadefc-652e-4660-a799-b39ed7d774c3.webp)
Are you craving a comforting, simple meal that packs flavor? Look no further! This Cheddar Broccoli Rice Casserole is your
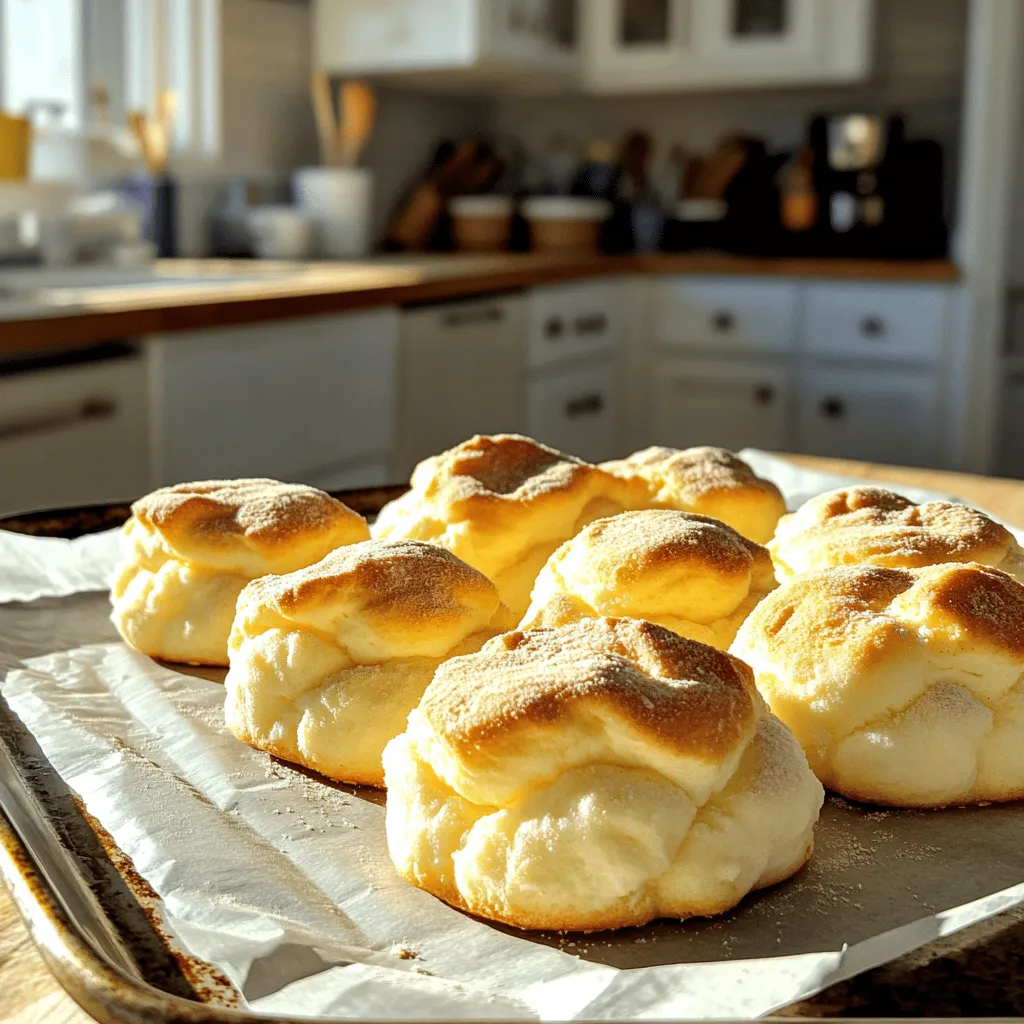
If you’re looking to enjoy a light, fluffy bread while sticking to your low-carb diet, you’ve come to the right
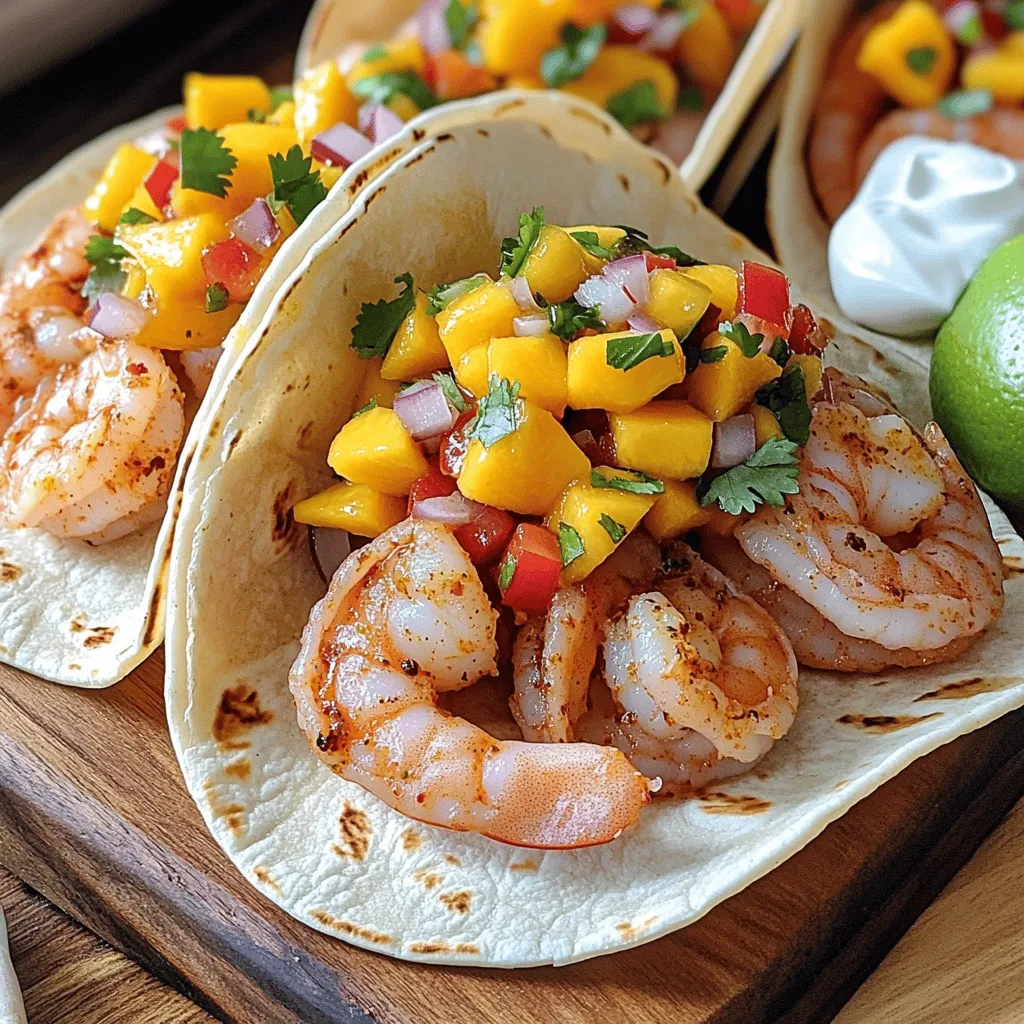
Looking for a quick and delicious meal? Try my Easy Shrimp Tacos with Mango Salsa! These tacos burst with flavors
![Using fresh peaches makes this dish shine. Choose ripe peaches that feel slightly soft. Their sweetness enhances the crisp. You will need about six peaches for the recipe. Don't skip the lemon juice; it brightens the flavor. Ground cinnamon and nutmeg add warmth and spice. Measuring your ingredients correctly is key. Use a dry measuring cup for the flour and oats. Level off the top with a straight edge for accuracy. For sugar, scoop it in and level it off too. When measuring butter, melt it first for easy pouring. If you don't have peaches, you can use nectarines or plums. Both fruits work well. For a healthier twist, try using less sugar or a sugar substitute. Almond flour can replace all-purpose flour if you need a gluten-free option. Chopped almonds can replace pecans for a different crunch. You can find the full recipe [here]. Start with six ripe peaches. Peel and slice them into thin pieces. Place the slices in a large bowl. Add half a cup of granulated sugar, one tablespoon of fresh lemon juice, one teaspoon of ground cinnamon, and a quarter teaspoon of ground nutmeg. Gently toss the peaches until they are well coated. This mix brings out the peach flavor. Once mixed, pour the peach filling into a greased 9x13-inch baking dish. Spread it out evenly for even cooking. In another bowl, combine one cup of rolled oats, one cup of all-purpose flour, and half a cup of packed brown sugar. Melt half a cup of unsalted butter and pour it into the bowl. Add a quarter teaspoon of sea salt. Mix everything until it forms a crumbly texture. If you want extra crunch, fold in half a cup of chopped pecans. This topping adds a nice contrast to the soft peaches. Preheat your oven to 350°F (175°C). Sprinkle the oat topping evenly over the peach filling. Make sure it covers all the peaches. Place the baking dish in the oven and bake for 30 to 35 minutes. You want the top to turn golden brown and the peach juices to bubble around the edges. Once done, remove the crisp from the oven and let it cool for about 10 minutes. This cooling time helps the filling set, making each bite a delight. For the full recipe, check out the detailed steps above! To make the best peach crisp, you need ripe peaches. Look for peaches that feel soft when you gently squeeze them. They should have a sweet aroma. Avoid any peaches with bruises or dark spots. Yellow and orange colors show good ripeness. If your peaches are hard, let them sit at room temperature for a few days. To boost the flavor, add a splash of vanilla extract to the peach filling. You can mix in some fresh or frozen berries for an extra zing. Using brown sugar in the topping gives it a richer taste. A sprinkle of sea salt will bring out the sweetness of the peaches. For crunch, add chopped nuts like pecans or almonds. Serve the Peachy Paradise Crisp warm, right from the oven. A scoop of vanilla ice cream on top makes it extra special. You can also add whipped cream for a lighter touch. For a pretty look, drizzle caramel or chocolate sauce over the top. Garnish with fresh mint leaves for a pop of color. This makes your dessert look as good as it tastes! {{image_4}} You can make a gluten-free peach crisp easily. Just swap all-purpose flour with almond flour or a gluten-free blend. Use gluten-free oats to keep it safe for everyone. This way, you still get a crunchy topping and tasty peaches. Your friends will love it, and they won’t notice the difference! Want to spice things up? You can add a pinch of ginger or allspice for a warm twist. Try mixing in some cardamom for a unique taste. Each spice brings its own flavor, making the crisp even more exciting. Don’t be afraid to experiment! Peach crisp is great, but you can use other fruits too. Apples, berries, or cherries work well. Mix two or three fruits for a fun flavor blend. Each fruit will add its own sweetness and tartness. This makes your crisp special each time you bake it! After enjoying your peach crisp, store any leftovers in an airtight container. This keeps the crisp fresh and tasty. Place it in the fridge for up to three days. Make sure to let it cool before sealing it. You can freeze peach crisp for later enjoyment. First, let it cool completely. Then, cut it into portions. Wrap each piece in plastic wrap and then place them in a freezer-safe bag. It can last up to three months in the freezer. When ready to eat, thaw it overnight in the fridge. To reheat peach crisp, preheat your oven to 350°F (175°C). Place the crisp in an oven-safe dish. Cover it with foil to keep it moist. Heat for about 15 to 20 minutes, or until warm. You can also microwave single portions for about 30 seconds. Enjoy it warm, maybe with a scoop of ice cream! For the full recipe, check out the Peachy Paradise Crisp. Peach crisp will last in the fridge for about 3 to 5 days. Make sure to cover it well. This keeps the crisp fresh and tasty. You might notice the topping gets a bit soft after a day. If you want that crunch, reheat it in the oven for a few minutes. Yes, you can make peach crisp ahead of time. You can prepare the filling and the topping separately. Store them in the fridge until you are ready to bake. Bake it fresh when you want to serve it. This keeps the topping nice and crisp. The best way to serve peach crisp is warm from the oven. It pairs wonderfully with vanilla ice cream. The cold ice cream melts over the warm crisp, creating a great mix. You can also add whipped cream for extra creaminess. Drizzling caramel sauce on top is a nice touch too! For the full recipe, check out the Peachy Paradise Crisp. We explored how to make a delicious peach crisp. Fresh ingredients lead to great taste. Accurate measurements and smart substitutes keep your recipe on track. I shared easy steps for prepping, making, and baking your dish. Plus, tips help you pick the best peaches and serve it nicely. Try the variations for unique flavors, and follow the storage tips to keep leftovers fresh. With these insights, you’ll impress anyone with your peach crisp skills. Enjoy your baking!](https://lazychefmagic.com/wp-content/uploads/2025/05/761c14d9-9a10-4489-908b-9004c690fb6d.webp)
If you’re craving a simple yet delicious dessert, you’ll love this Peach Crisp with Oat Topping recipe. Packed with juicy
