![- 1½ cups all-purpose flour - ½ cup unsalted butter, softened to room temperature - ¼ cup packed brown sugar - ½ teaspoon fine salt - ½ teaspoon baking powder - 1 cup pecans, roughly chopped - 1 cup pure maple syrup - 2 large eggs, at room temperature - 1 teaspoon pure vanilla extract - ½ teaspoon ground cinnamon - ¼ teaspoon ground nutmeg (optional) I love using fresh ingredients for my Maple Pecan Pie Bars. Each one plays a key role in making this dessert shine. First, the *all-purpose flour* holds everything together. It gives the crust its nice texture. The *butter* adds richness, while the *brown sugar* brings a sweet, caramel-like flavor. *Salt* enhances all the flavors. *Baking powder* helps the crust rise slightly for a light bite. The *pecans* add crunch and nutty taste, making each bar special. The *pure maple syrup* is the star here. It gives sweetness and a deep flavor to the filling. Using *large eggs* helps bind the filling, making it smooth. *Vanilla extract* adds warmth, while *ground cinnamon* gives a hint of spice. If you want more warmth, add the *ground nutmeg*. This spice is optional but makes a great addition. With these ingredients, you create a sweet and satisfying treat. For the complete recipe, check out the Full Recipe section! Start by preheating your oven to 350°F (175°C). This step is key for even baking. Grab a 9x9-inch baking pan. Lightly grease it or line it with parchment paper. This will help you lift the bars out easily later. In a medium bowl, mix together the softened butter, brown sugar, fine salt, and all-purpose flour. Use a fork or pastry cutter to blend these until you see a crumbly texture. Next, add the baking powder and mix it well. Press this crumbly mixture into the bottom of your baking pan. Make sure it forms an even layer. In a larger bowl, whisk together the pure maple syrup, eggs, vanilla extract, ground cinnamon, and ground nutmeg, if you choose to use it. Mix until everything is smooth and combined. Add the roughly chopped pecans and gently fold them in. This helps spread the pecans evenly throughout the filling. Pour the pecan filling over the pre-baked crust. Use a spatula to spread it out evenly. Place the pan back in the oven and bake for 25-30 minutes. You want the filling to set and bubble a bit around the edges. Once it's done, take it out and let it cool on a wire rack for at least 30 minutes. This cooling step helps the bars firm up. Now, you have a delicious treat ready to slice! Check the [Full Recipe] for more details. To make a great crust, use cold butter. This keeps the crust flaky. Mix the butter with brown sugar first. Then, mix in the flour, salt, and baking powder. Press the mixture firmly into the pan. This helps keep it from falling apart. Bake until it is light golden brown. Let it cool before adding the filling. This step is key for a tasty base. To cut your bars neatly, allow them to cool completely. Use a sharp knife to slice them. Wipe the knife with a damp cloth after each cut. This keeps the edges clean. For even pieces, mark where you will cut before slicing. You can also use a ruler to measure equal sizes if you want. This way, everyone gets a fair share! You can boost flavor with a few extra ingredients. A pinch of sea salt on top adds a nice touch. You can also mix in chocolate chips for sweetness. If you like warmth, add ground nutmeg. Another great option is to sprinkle in some orange zest. This adds a fresh twist to the bars. Feel free to experiment and find your favorite mix. Check the Full Recipe for more ideas! {{image_4}} You can switch up the nuts in your bars. If you love almonds, use them instead of pecans. Walnuts also add a nice taste. You can chop them up just like the pecans. This change gives your bars a new twist. Each nut brings its own flavor and crunch. Experimenting with nuts lets you find your favorite mix. Want to make your bars extra special? Try adding chocolate or caramel. You can sprinkle chocolate chips on top of the pecan filling before baking. Dark or milk chocolate works great. For caramel, drizzle it over the baked bars once they cool. This adds a rich and sweet layer. Both options make your dessert even more delightful. If you need a gluten-free option, it’s simple! Just swap the all-purpose flour for a gluten-free blend. Many blends work well in baking. Ensure the blend has a good mix of flours and starches. This change keeps the bars tasty while meeting dietary needs. You won’t miss the traditional flour at all! For the full recipe, check out the [Full Recipe]. To keep your maple pecan pie bars fresh, store them in an airtight container. Line the container with parchment paper. This will help prevent the bars from sticking. If you want to keep the bars crispy, avoid wrapping them tightly in plastic. When stored correctly, these bars last about 4 to 5 days at room temperature. If you keep them in the fridge, they will stay fresh for up to a week. Just remember to let them come back to room temperature before serving for the best taste. You can freeze maple pecan pie bars for longer storage. First, slice them into bars and let them cool completely. Wrap each bar in plastic wrap, then place them in a freezer bag. They can last for up to 3 months in the freezer. When ready to enjoy, thaw them in the fridge overnight or at room temperature for a few hours. This will help keep the flavors intact. Yes, you can make these bars ahead of time. They store well in the fridge for up to five days. Just let them cool completely before slicing. Then, place them in an airtight container. For longer storage, you can freeze them for up to three months. Just remember to wrap them tightly in plastic wrap before placing them in a freezer bag. Thaw them in the fridge overnight when ready to enjoy. If you need a substitute for maple syrup, you can use honey or agave nectar. Both options work well for sweetness. You can also use corn syrup, though it has a different flavor. If you want a deeper taste, try brown sugar mixed with water. Mix one cup of brown sugar with a quarter cup of water. Heat it until the sugar dissolves. This mix gives a nice, rich flavor to your bars. To check if the bars are done, look for these signs. The filling should be set and slightly bubbly around the edges. You can also gently shake the pan; if the center wiggles a little, it needs more time. Bake it for another few minutes, then check again. A toothpick inserted should come out mostly clean with a few moist crumbs. This way, you ensure the bars have the right texture. For the full recipe, check the earlier section! In this post, we explored how to make delicious Maple Pecan Pie Bars. We covered layers from the ingredients list to detailed baking steps. I shared tips for a perfect crust and neat cutting. You can even try fun variations, like using different nuts or adding chocolate. Always store your bars properly to keep them fresh. With these easy steps, you can impress friends and family with your baking skills. Enjoy your sweet treat!](https://lazychefmagic.com/wp-content/uploads/2025/05/44dcb549-5b28-4423-9e19-a1bfc78a1d3b.webp)
Maple Pecan Pie Bars Simple and Delicious Dessert
Looking for a dessert that’s simple yet delicious? Maple Pecan Pie Bars are the answer! With a buttery crust and
Looking for a dessert that’s simple yet delicious? Maple Pecan Pie Bars are the answer! With a buttery crust and
![- 2 pounds chicken wings - 2 tablespoons extra virgin olive oil - 1/2 cup raw honey - 1/4 cup your preferred hot sauce - 1 teaspoon fine sea salt - 1 teaspoon freshly ground black pepper - 1 teaspoon garlic powder - 1 teaspoon smoked paprika - 1/2 teaspoon cayenne pepper (optional) - Fresh cilantro leaves - Sliced green onions Gathering fresh ingredients is key to making sweet and spicy chicken wings. Start with chicken wings; they are the star of the dish. Use olive oil to help the spices stick. Honey brings sweetness, while hot sauce adds heat. You can adjust the hot sauce to match your spice level. Seasonings are just as important. Sea salt and black pepper add basic flavor. Garlic powder gives a nice kick, and smoked paprika adds a rich, smoky taste. If you like heat, add cayenne pepper for an extra punch. For garnish, fresh cilantro and sliced green onions brighten up the dish. They add color and flavor, making your wings even more appealing. This combination of ingredients makes every bite exciting and delicious. Check out the Full Recipe for all the details on how to create these wings! - Preheat the Oven Set your oven to 400°F (200°C). This high heat helps get crispy wings. - Prepare the Baking Sheet Line a large baking sheet with foil. Place a wire rack on top. This allows air to circulate. - Coat with Olive Oil and Seasonings In a bowl, add chicken wings, olive oil, sea salt, and black pepper. Mix until all wings get a nice coating. - Arrange on the Rack Spread the wings in a single layer on the wire rack. This keeps them from sticking together. - Bake Until Crispy Place the baking sheet in the oven. Bake the wings for 40-45 minutes until they are golden brown. - Flip Halfway Through At the 20-minute mark, flip the wings. This helps them cook evenly and get crispy all around. - Combine Sauce Ingredients In a small saucepan, mix honey, hot sauce, soy sauce, garlic powder, smoked paprika, and cayenne pepper. - Simmer to Blend Flavors Heat the mixture on medium. Stir it well and let it simmer for 5 minutes. This melds all the flavors together. - Toss with Sauce Once the wings are baked, place them in a bowl. Pour the sweet and spicy sauce over them. Toss well to coat. - Return to Oven Place the coated wings back on the rack. Bake for another 5-10 minutes. This helps the sauce stick and deepen the flavor. For the complete cooking experience, follow the [Full Recipe]. To get crispy wings, use a wire rack. This allows hot air to flow around the wings. It helps them cook evenly and get that nice crunch. The baking temperature is also key. I recommend 400°F (200°C). This heat cooks the wings well without drying them out. You can adjust the heat level in your sauce. If you like it mild, use less hot sauce. If you want a kick, add more cayenne pepper. You can also substitute ingredients based on what you have. For example, use maple syrup instead of honey for a different flavor. For plating, arrange the wings on a large platter. Garnish with fresh cilantro or sliced green onions for color. Serve with crunchy celery sticks. These pair well with a cool ranch or blue cheese dip. For an extra touch, add a few dipping sauces for variety. Check the [Full Recipe] for more ideas! {{image_4}} You can change the flavor of your sweet and spicy chicken wings by trying different styles. Here are two fun ideas: - BBQ Sweet and Spicy Wings Mix your sweet and spicy sauce with BBQ sauce. This adds a rich, smoky flavor. Use the same method to coat your wings. Bake them to get that crispy texture, and enjoy a different twist! - Asian-Inspired Honey Wings For these wings, swap the hot sauce with a sweet chili sauce. Add sesame oil for extra flavor. This gives your wings a sweet and slightly spicy kick, perfect for any Asian meal. You have options for how to cook your wings. Here are two popular methods: - Air Fryer Instructions Preheat your air fryer to 360°F (182°C). Toss the wings with oil and seasonings. Place them in the air fryer basket in a single layer. Cook for about 25-30 minutes. Shake the basket halfway through for even cooking. This method makes wings crispy with less oil! - Grilling Options Preheat your grill to medium heat. Marinate the wings in your sweet and spicy sauce for at least 30 minutes. Grill the wings for about 20-25 minutes, turning them often. This gives the wings a nice char and enhances the flavor. You can make your wings fit different diets with some simple swaps: - Gluten-Free Options To make gluten-free wings, use tamari instead of soy sauce. This keeps the flavor while avoiding gluten. Always check your hot sauce too, as some brands may contain gluten. - Reducing Sugar Content If you want to cut sugar, use less honey in the sauce. You can also mix in some apple cider vinegar for tang. This helps balance the sweetness while keeping the flavor of your wings tasty. For the full recipe, check out the Sweet and Spicy Chicken Wings! How to Store To keep your sweet and spicy chicken wings fresh, place them in an airtight container. This helps prevent moisture loss and keeps them tasty. Let the wings cool to room temperature before sealing them up. Best Practices for Freshness Store the wings in the fridge for up to three days. If you want to enjoy them later, use a vacuum sealer for even better storage. Oven Reheating Method To reheat wings, preheat your oven to 350°F (175°C). Spread the wings on a baking sheet lined with foil. Heat for about 15-20 minutes. This method helps keep the wings crispy. Microwave Tips If you’re in a hurry, the microwave works too. Place the wings on a microwave-safe plate. Heat for 1-2 minutes, checking often to avoid overcooking. This might make them a bit less crispy, but they will still taste great! Freezing the Wings You can freeze extra wings for later use. Place them in a single layer on a baking sheet. Freeze them until firm, then transfer them to a freezer bag. Remove as much air as possible to prevent freezer burn. Thawing Before Reheating When you’re ready to eat your frozen wings, transfer them to the fridge overnight to thaw. You can also thaw them in cold water for a quicker option. Once thawed, follow the reheating methods mentioned above. Enjoy your wings even after a few days! Bake chicken wings for 40 to 45 minutes. This time ensures they get crispy and golden. Flip the wings halfway through. This step helps them cook evenly. Always check for doneness by ensuring the internal temperature reaches 165°F (75°C). Yes, you can prep sweet and spicy wings ahead of time. Marinate them the night before. Store them in the fridge until you're ready to bake. This will enhance the flavor. For best results, bake them fresh before serving. Popular dipping sauces for chicken wings include ranch, blue cheese, and honey mustard. Each sauce offers a unique flavor to complement your wings. You can also try spicy mayo or garlic aioli for a twist. Serve a variety for your guests to enjoy! To sum it up, this guide covers everything you need for delicious sweet and spicy wings. You learned about the key ingredients and how to prep, bake, and coat them. Plus, I shared tips for crispiness and serving ideas. Remember, you can also explore different styles, cooking methods, and storage tips. Enjoy the cooking journey. You can impress everyone with your wing-making skills. Happy cooking!](https://lazychefmagic.com/wp-content/uploads/2025/05/fb8995cd-9213-4d7d-bc80-5a2a590f2e74.webp)
Get ready to elevate your game-day snacking with my Sweet and Spicy Chicken Wings Flavorful Baking Guide! In this post,
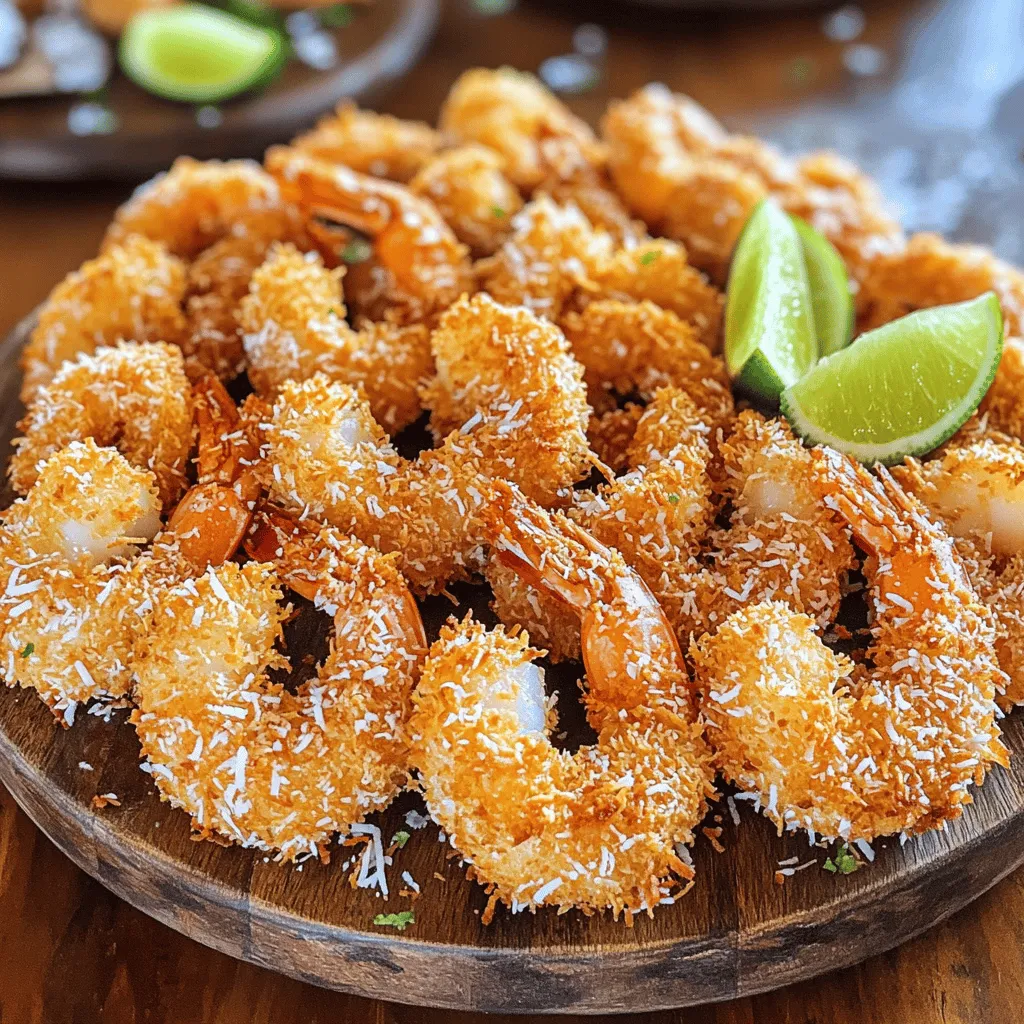
If you want to impress your family or friends, try my Crispy Coconut Shrimp recipe. It’s easy to make and
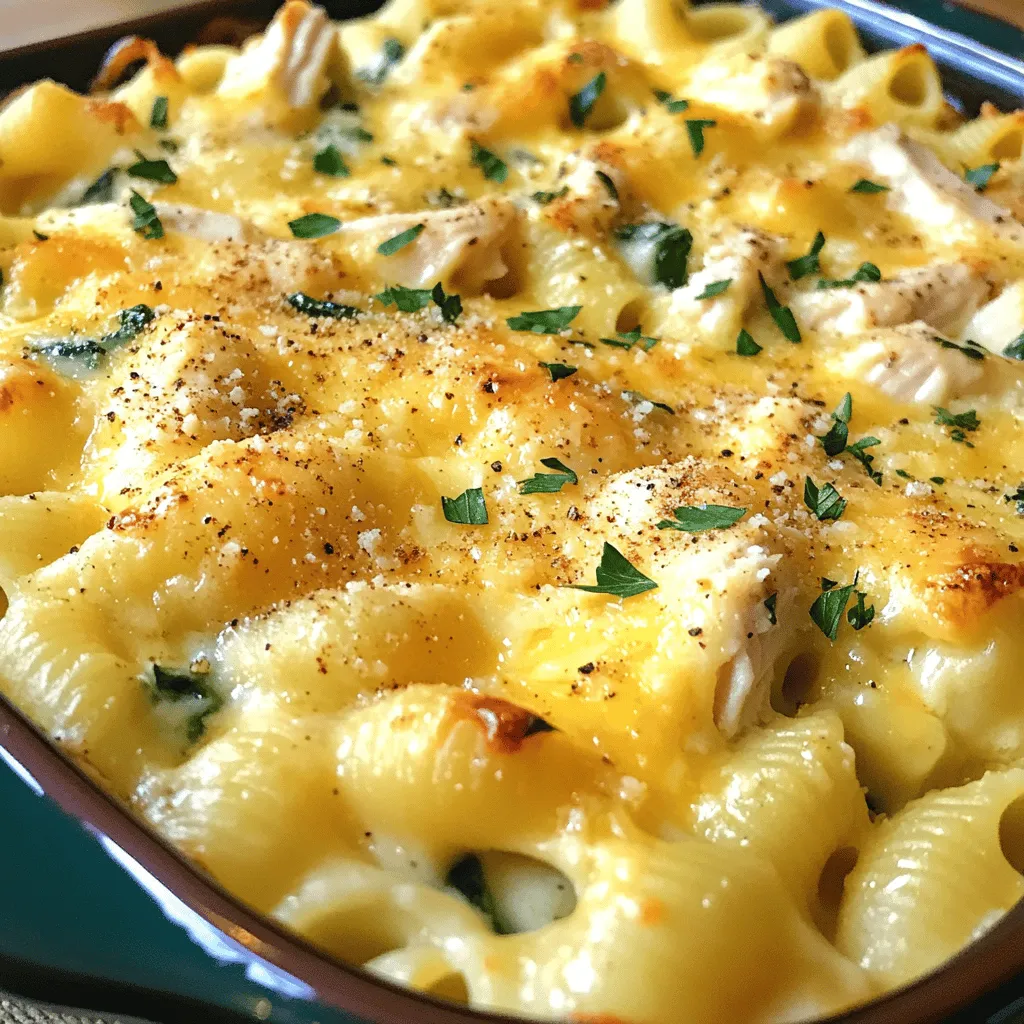
Looking for an easy and tasty meal? This Easy Chicken Alfredo Bake combines creamy Alfredo sauce with tender chicken and
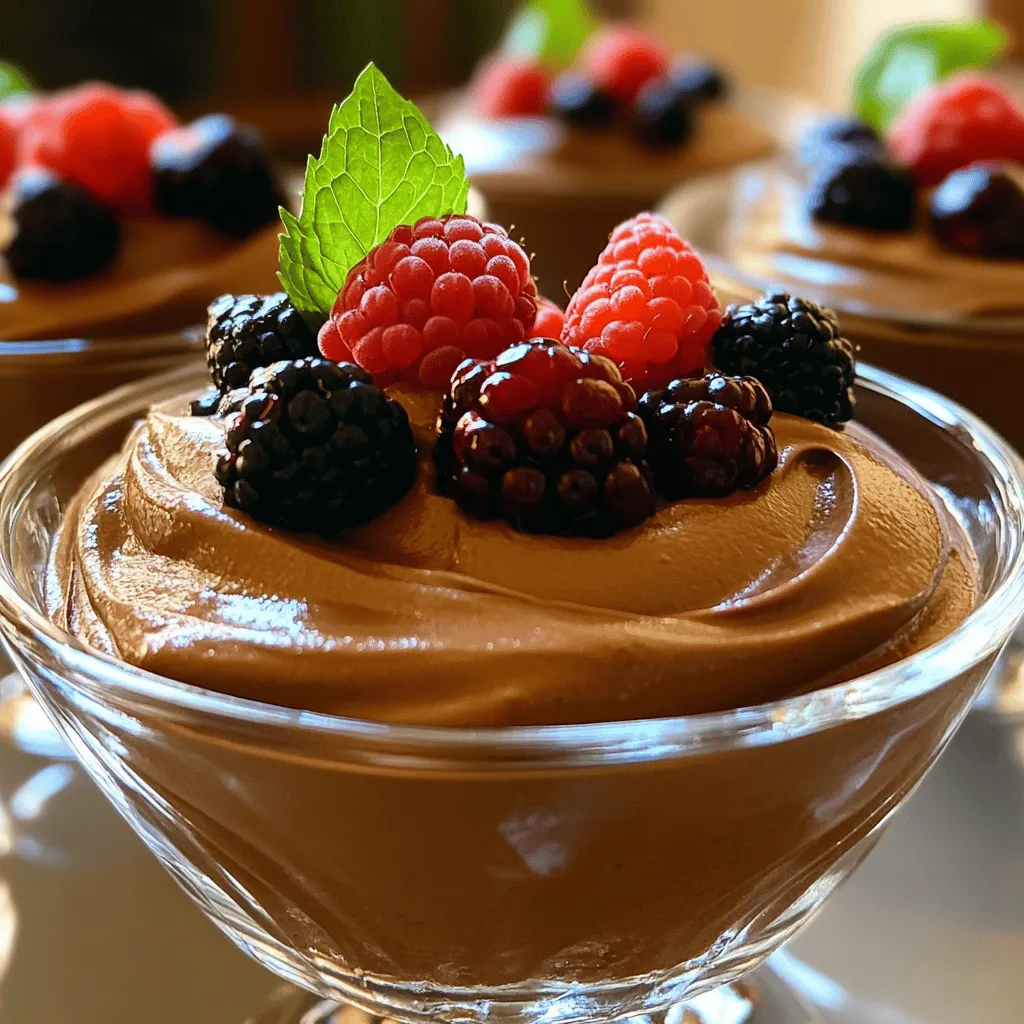
Indulge in a rich, creamy treat that’s both healthy and satisfying: vegan chocolate avocado mousse! This dessert combines ripe avocados
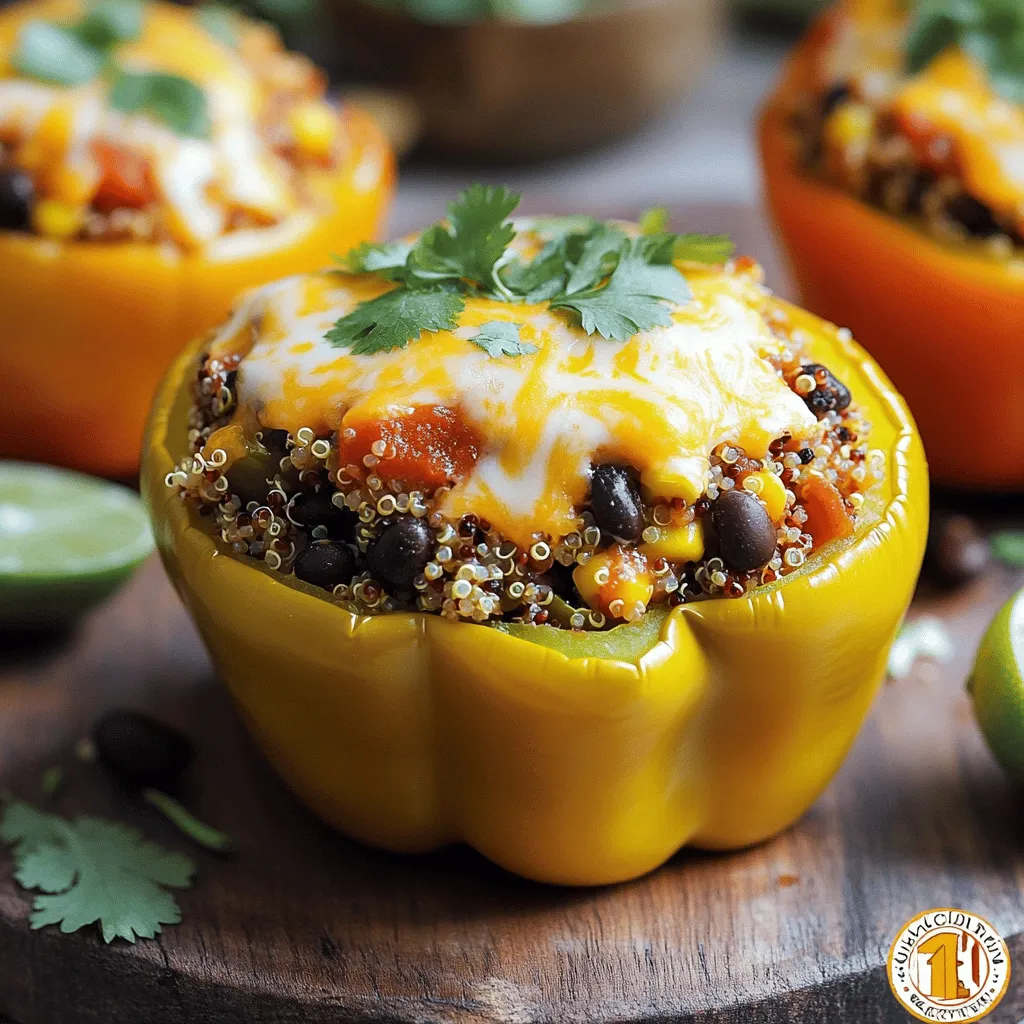
Looking for a simple meal that’s big on flavor? Cheesy stuffed bell peppers are the answer! These vibrant, colorful peppers
![- 1 cup creamy peanut butter - 1 cup packed brown sugar - 1 large egg - 1 teaspoon pure vanilla extract - 1 cup dark chocolate chips - 1/2 teaspoon baking soda - 1/4 teaspoon fine salt - 1/2 cup chopped roasted peanuts (optional) Each ingredient brings something special to these cookies. The creamy peanut butter gives rich flavor. Brown sugar adds sweetness and moisture. The egg binds everything, while vanilla adds warmth. Dark chocolate chips melt beautifully, creating gooey pockets of joy. - Alternative nut butters: You can use almond or cashew butter if needed. - Sugar alternatives: Try using coconut sugar or maple syrup for a different taste. - Egg substitutes for vegan options: Applesauce or a flax egg can work well. Feel free to mix and match these ingredients. Experimenting with substitutes can lead to new flavors. The goal is to enjoy the process and the cookies! For the complete recipe, check out the Full Recipe. 1. Preheat your oven to 350°F (175°C). 2. Prepare a baking sheet by lining it with parchment paper. This helps cookies not stick. 3. In a large mixing bowl, add 1 cup of creamy peanut butter and 1 cup of packed brown sugar. 4. Using a spatula or mixer, blend until smooth and creamy. 5. Crack 1 large egg into the mixture, and add 1 teaspoon of pure vanilla extract. 6. Stir well until the mixture is fully blended. 7. In a small bowl, whisk together 1/2 teaspoon of baking soda and 1/4 teaspoon of fine salt. 1. Slowly add the dry mixture to the wet mixture. 2. Mix until just combined. It’s fine if there are a few lumps. 3. Gently fold in 1 cup of dark chocolate chips and 1/2 cup of chopped roasted peanuts if you want. 4. Use a tablespoon or cookie scoop to drop rounded portions of dough onto the prepared baking sheet. 5. Make sure to leave about 2 inches of space between each scoop. 1. Place the baking sheet in your preheated oven. 2. Bake for 10-12 minutes. The edges should be golden brown. 3. The centers may look soft, but they will firm up while cooling. 4. Remove the cookies from the oven and let them cool on the baking sheet for about 5 minutes. 5. After that, transfer the cookies to a wire rack to cool completely. These steps will lead you to delicious peanut butter chocolate chip cookies. For more details, see the Full Recipe. To get the right texture, you have choices. For chewy cookies, use more brown sugar. For crisp cookies, use more white sugar. You can also adjust baking time. Bake shorter for chewy and longer for crisp. To prevent cookies from spreading too much, chill your dough before baking. This helps them hold their shape. Make sure to space the dough balls well on the sheet. You can add spices like cinnamon or nutmeg for a warm flavor. A little pinch can make a big difference. You can also use extracts like almond or coffee. These add depth to your cookies. For a flavor balance, pair these cookies with a glass of cold milk. The creaminess of the milk complements the peanut butter and chocolate. Use light baking sheets for even cooking. Dark sheets can cause cookies to burn. Always line your sheets with parchment paper. This helps cookies come off easily. For mixing, I recommend a sturdy spatula or a hand mixer. A good mixing bowl is key too. Choose one that is big enough to hold all your cookie dough. For the full recipe, click [Full Recipe]. {{image_4}} You can change the chocolate type in these cookies. Use milk chocolate or even white chocolate. Each type gives a different taste. You can also add dried fruits, like raisins or cranberries, for a sweet twist. Nuts, such as walnuts or almonds, can bring a nice crunch too. Get creative with mix-ins that excite your taste buds! If you need a gluten-free option, swap regular flour for almond flour. This keeps the cookies soft and tasty. For those on a keto diet, use sugar substitutes like erythritol. This allows you to enjoy these cookies without the carbs. Both options keep the flavor strong while meeting your dietary needs. You can add a seasonal touch to your cookies. For fall, mix in pumpkin spice for a cozy flavor. In winter, try peppermint or gingerbread spice to warm up those cold nights. Explore using fresh ingredients like berries in summer for a fruity flair. Each season brings a chance to refresh this classic treat. For the full recipe, check out Peanut Butter Choco Delight Cookies . Enjoy baking! To keep your peanut butter chocolate chip cookies fresh, store them at room temperature. Use an airtight container. This helps keep them soft and chewy. If you want to store them longer, you can put them in the fridge. This will keep them fresh for a week. However, they may lose some softness. For the best results, use these containers: - Airtight cookie jar - Plastic storage container - Zip-top bag Freezing cookie dough is easy. Start by scooping the dough into balls. Place them on a baking sheet lined with parchment paper. Freeze the dough balls for two hours until firm. Then, transfer them to a zip-top bag. Label the bag with the date. This way, you can enjoy fresh cookies anytime. To thaw and bake frozen cookies, do this: 1. Remove the dough from the freezer. 2. Let it sit at room temperature for about 30 minutes. 3. Preheat your oven to 350°F (175°C). 4. Bake the cookies for 12-14 minutes. These steps will help you make warm cookies whenever you want. For the full recipe, check out the Peanut Butter Choco Delight Cookies. Can I use crunchy peanut butter instead of creamy? Yes, you can use crunchy peanut butter. It adds a nice texture. The cookies will have a little extra crunch. If you love that, go for it! How do I know when the cookies are done baking? Look for golden edges. The center may seem soft, but that’s okay. They will firm up as they cool. Trust your nose; they will smell amazing! What can I do if my cookie dough is too sticky? If your dough is sticky, chill it in the fridge for about 30 minutes. This helps it firm up. You can also add a little extra flour, but don’t add too much. - Caloric content per cookie: About 100 calories per cookie. - Breakdown of macronutrients: Each cookie has roughly 5g of fat, 12g of carbs, and 2g of protein. Many bakers love these cookies! They say the taste is rich and delightful. A few readers suggest adding a pinch of sea salt on top for extra flavor. Others love adding nuts for a crunch. Personalize the recipe to fit your style! For more ideas, check the Full Recipe. This blog post covered how to make delicious peanut butter chocolate chip cookies. We shared the key ingredients and how to modify them for your needs. You learned step-by-step instructions for baking, tips to get the best texture, and fun variations to try. Remember, baking is a mix of art and science. Enjoy experimenting, and don’t be afraid to make this recipe your own. You can turn these cookies into something special. Happy baking!](https://lazychefmagic.com/wp-content/uploads/2025/05/0fd16cee-c316-41d3-af62-b3579c82d91d.webp)
If you’re looking for a sweet treat that’s easy to make and delicious, you’re in the right place! My Peanut
![- 1 cup Arborio rice - 4 cups vegetable broth - 1 cup fresh mushrooms (such as cremini or shiitake), sliced - 1 small onion, finely chopped - 2 cloves garlic, minced - ½ cup freshly grated Parmesan cheese - 2 tablespoons olive oil - 2 tablespoons unsalted butter - ½ cup heavy cream - Salt and freshly ground black pepper to taste - Fresh parsley, chopped (for garnish) For a creamy mushroom risotto, these ingredients create a rich and tasty dish. Use Arborio rice; its starch gives risotto its signature creaminess. Fresh mushrooms add depth and flavor, while the Parmesan cheese makes it rich and savory. Don't forget the fresh parsley for a pop of color! - Large heavy-bottomed skillet - Medium saucepan - Wooden spoon or spatula - Ladle - Measuring cups and spoons - Knife and cutting board These tools help you make the perfect risotto. A heavy skillet allows even heating, while a wooden spoon helps stir the rice gently. A ladle makes it easy to add broth one cup at a time. - Arborio rice: You can use Carnaroli or Vialone Nano rice. - Vegetable broth: Chicken broth works well too. - Fresh mushrooms: You can swap with dried mushrooms. Just rehydrate them first. - Heavy cream: Use half and half for a lighter version. These substitutions keep the dish flavorful and creamy. Adjust them based on what you have at home. Don't worry; the risotto will still taste amazing. For the full recipe, refer to the section above. Start by gathering all your ingredients. This makes cooking smooth and easy. Measure 1 cup of Arborio rice and set it aside. Slice 1 cup of fresh mushrooms, like cremini or shiitake. Finely chop 1 small onion and mince 2 cloves of garlic. Grate ½ cup of Parmesan cheese. Lastly, have your vegetable broth ready, warming it in a saucepan over low heat. In a large skillet, heat 2 tablespoons of olive oil and 1 tablespoon of unsalted butter over medium heat. When the butter melts, add the chopped onion. Cook for about 5 minutes until it looks clear. Don’t rush; this step builds flavor. Next, stir in the minced garlic and sliced mushrooms. Cook for another 5 minutes. Wait until the mushrooms are soft and brown. Add a pinch of salt and pepper to bring out their taste. Now, it’s time to add the Arborio rice. Stir it in and toast it for 1-2 minutes. This helps the rice soak up all the lovely flavors. Start adding the warm vegetable broth one ladle at a time. Stir it often and wait until most of the liquid is gone before adding more. Keep this up for about 18-20 minutes. You want the rice creamy and tender but still firm. When the rice is just right, take the skillet off the heat. Mix in the last tablespoon of butter, heavy cream, and grated Parmesan cheese. Stir until everything is smooth and creamy. Taste it, and add more salt or pepper if you like. Let the risotto sit for a couple of minutes to thicken slightly. For a beautiful finish, serve the risotto in shallow bowls. Top each bowl with fresh parsley and extra Parmesan. A drizzle of olive oil will make it shine. Enjoy your creamy mushroom risotto! For a full recipe, check out the [Full Recipe]. To get that rich, creamy texture in your risotto, use Arborio rice. This rice type has a high starch content. As you cook, stir the rice often. This stirring helps release the starch, making the dish creamy. Always add warm broth slowly, one ladle at a time. Wait until most of the liquid absorbs before adding more. This method keeps the rice cooked evenly and absorbs flavors well. Mixing in heavy cream and Parmesan cheese at the end adds richness and depth. One common mistake is to rush the cooking process. Don't add all the broth at once. This can lead to uneven cooking and a grainy texture. Another mistake is not stirring enough. Stirring helps develop creaminess, so don’t skip it. Also, avoid using cold broth. Keeping your broth warm helps maintain the cooking temperature. Lastly, do not skip the resting time at the end. Letting the risotto sit for a few minutes helps it thicken properly. For a stunning presentation, serve the risotto in shallow bowls. Top with freshly chopped parsley and extra Parmesan. A drizzle of olive oil adds shine and flavor. Pair it with a crisp green salad or crusty bread to balance the meal. If you want to impress, serve with a glass of white wine. You can find the full recipe for this dish to make it easy for your dinner guests! {{image_4}} To make a vegan version, swap the butter and cheese. Use plant-based butter and nutritional yeast. These changes keep the creamy texture and add a nutty flavor. Replace heavy cream with coconut cream or unsweetened almond milk for richness. This vegan creamy mushroom risotto keeps all the delicious taste. If you need a gluten-free option, use gluten-free vegetable broth. The Arborio rice is naturally gluten-free, so it works perfectly. Check that any added ingredients, like broth, are also gluten-free. You can still enjoy a creamy risotto without any gluten. Add more depth to your risotto with different herbs. Fresh thyme or rosemary can enhance the flavors. You can also mix in a splash of white wine before adding broth for a hint of acidity. For a spicy kick, try red pepper flakes. Experiment with these additions to find your perfect combination. For the full recipe, check out the original instructions, and enjoy a creamy mushroom risotto that suits your taste! To store leftover risotto, first let it cool. Place it in an airtight container. This keeps the risotto fresh and prevents it from drying out. You can store it in the fridge for up to three days. If you want to keep it longer, freezing is a great option. When you're ready to enjoy leftover risotto, add a splash of broth or water. Heat it gently on the stove over low heat. Stir often to keep it creamy. You can also use the microwave. Just cover the dish and heat in short bursts. Stir in between to avoid uneven heating. For freezing, portion the risotto into smaller containers. This makes it easy to thaw only what you need. Label each container with the date. Risotto can stay in the freezer for up to three months. To thaw, place it in the fridge overnight before reheating. This way, you can enjoy your creamy mushroom risotto whenever you crave it! For the full recipe, check the main section above. The best type of rice for risotto is Arborio rice. It has a high starch content. This starch makes your risotto creamy and rich. Other good options are Carnaroli and Vialone Nano. These varieties also provide great texture. You can find them in most grocery stores or online. You can make risotto in advance, but it may lose some creaminess. It’s best to serve risotto fresh. If you must make it ahead, cook it until just al dente. Store it in an airtight container and refrigerate. When ready to serve, reheat it gently and add a splash of broth or cream. This helps restore its creamy texture. You’ll know the risotto is done when it’s creamy and the rice is al dente. The rice should be tender but still have a slight bite. Stir the risotto as it cooks. This helps release the starch. Taste a bit towards the end of cooking. If it feels soft but firm, it’s ready. Follow the cooking time in the Full Recipe for best results. This blog post covered key elements for making delicious risotto. We explored essential ingredients, tools, and even how to make substitutions. I walked you through each step, from prepping to final touches. Tips and tricks helped ensure creamy perfection. We also discussed tasty variations and smart storage methods. Keep these insights in mind for your next risotto. Cooking can be fun and simple when you follow these steps. Enjoy creating your own unique risotto dishes!](https://lazychefmagic.com/wp-content/uploads/2025/05/a7bd5ce5-0da4-4ccd-b4fc-cc468f567392.webp)
Are you ready to make a meal that’s both easy and delicious? This Creamy Mushroom Risotto is the perfect dish
![To make the best spicy garlic shrimp tacos, you need fresh and vibrant ingredients. Here’s what you will need: - 1 pound large shrimp, peeled and deveined - 4 cloves garlic, finely minced - 2 tablespoons extra virgin olive oil - 1 teaspoon chili powder - 1 teaspoon smoked paprika - 1/2 teaspoon cayenne pepper (customize to your spice preference) - Sea salt and freshly ground black pepper to taste - 8 small corn tortillas - 1 cup shredded cabbage (choose either green or purple for color) - 1/2 cup fresh cilantro, coarsely chopped - 1 ripe avocado, sliced - 1 lime, cut into wedges These ingredients work together to create a flavorful dish. The shrimp provides protein, while the spices add a kick. Garlic brings depth, and the lime juice brightens the taste. You can make your tacos even more special with these optional toppings: - Crumbled queso fresco or feta cheese - Sliced jalapeños for extra heat - Sour cream or Greek yogurt for creaminess - Salsa or pico de gallo for a fresh twist - Pickled red onions for tang Feel free to mix and match these toppings. They let you customize each taco to your liking. To make your meal complete, consider these tasty sides: - Mexican street corn (elote) - Cilantro lime rice - Black beans with spices - Fresh fruit salad with mango and lime - Tortilla chips with guacamole These sides not only complement the tacos but also add color and variety to your table. They create a fun and festive meal that everyone will enjoy. For the full recipe, check out the details above. To start, you need to prepare the shrimp. In a mixing bowl, add the peeled shrimp, minced garlic, olive oil, chili powder, smoked paprika, cayenne pepper, salt, and pepper. Toss the shrimp well so each piece gets a nice coat of flavor. This step is key for tasty tacos. Next, heat a non-stick skillet over medium-high heat. When the skillet is hot, lay the shrimp in a single layer. Cook for about 2-3 minutes until they turn pink and start to char a bit. Flip them and cook for another 1-2 minutes. They should be fully cooked and opaque. This quick cooking keeps them juicy and full of flavor. While the shrimp cooks, grab another skillet to warm the corn tortillas. Set it to low heat. Cook each tortilla for around 30 seconds on each side. This makes them soft and easy to fold. It also boosts their flavor, making them a great base for your tacos. Now it’s time to assemble your tacos. Take a warm tortilla and lay down a small handful of shredded cabbage. Next, add a few pieces of your zesty garlic shrimp. Top it off with a couple of slices of creamy avocado. For the final touch, sprinkle fresh cilantro on top and squeeze some lime juice. Serve with extra lime wedges on the side for more zing. For the full recipe, check out the details provided. Enjoy the flavors and the fun of making these tacos! When picking shrimp, look for bright, shiny shells. Fresh shrimp should smell like the ocean, not fishy. If you can, buy shrimp that is wild-caught. These shrimp often have a better taste. Size matters too! Large shrimp work best for tacos. You want them to be plump and juicy. Not everyone likes the same level of heat. If you want milder tacos, leave out the cayenne pepper. You can also cut back on the chili powder. For those who love heat, add more cayenne or a dash of hot sauce. Taste as you go to find your perfect spice level. You can adjust it to suit your taste buds. Taco assembly is key to a great dish. Start with a warm tortilla. Add a handful of shredded cabbage for crunch. Next, pile on those flavorful shrimp. Don’t be shy! Top it with avocado slices for creaminess. A sprinkle of cilantro adds freshness. Finally, a squeeze of lime ties all the flavors together. Arrange tacos on a colorful platter for a fun presentation. For the full recipe, check the [Full Recipe]. {{image_4}} You can make these tacos vegetarian by swapping shrimp for grilled vegetables. Use zucchini, bell peppers, and mushrooms. Toss them in olive oil and season with garlic, chili powder, and salt. You’ll still get great flavor without the seafood. Another option is to use black beans. They add protein and a rich taste. Just season them with garlic and spices. If you want to try other proteins, chicken works well too. Use boneless chicken thighs for juicy tacos. Season them the same way you do the shrimp. Cook until the chicken is tender and fully done. Fish is another great choice. Use firm white fish like cod or tilapia. Season and cook just like the shrimp. You can add unique sauces to elevate your tacos. Try a creamy chipotle sauce. Mix sour cream with chipotle in adobo for a smoky kick. A mango salsa is also a fun twist. Just mix diced mango, red onion, cilantro, and lime juice. This adds sweetness to your spicy tacos. For a simple twist, drizzle lime juice over the tacos before serving. These variations keep things fresh and exciting. Explore these options for a fun taco night! Check out the Full Recipe for more inspiration. After making your spicy garlic shrimp, store any leftovers in an airtight container. Keep it in the fridge. The shrimp will stay fresh for up to two days. When you store it, make sure the shrimp is cooled down. This helps prevent moisture build-up, which can make the shrimp soggy. If you want to save your tacos for later, you can freeze them. First, let the tacos cool completely. Wrap each taco in plastic wrap or foil. Place them in a freezer-safe bag. They will last for about three months in the freezer. When you're ready to eat, just thaw and reheat. To reheat the shrimp, you can use a skillet. Heat it over medium heat. Add a splash of olive oil to keep the shrimp moist. Cook for about 2-3 minutes, stirring often, until heated through. For the tortillas, warm them in a dry skillet for about 30 seconds on each side. This will make them soft and tasty again. Enjoy your delicious leftovers! For the full recipe, check out the main article. You can use chicken or fish instead. Both options work well. If you're vegan, try jackfruit or tofu. These substitutes absorb flavor well and can mimic the texture of shrimp. Always season them well, just like you do with shrimp. Yes, you can use flour tortillas. They are soft and chewy. However, corn tortillas give a nice flavor. Choose what you like best. If you want a more traditional taste, stick to corn tortillas. The spice level is adjustable. The cayenne pepper adds heat. If you prefer milder tacos, use less cayenne. The chili powder and smoked paprika also add flavor without too much heat. Always taste and adjust to your liking. Try a cold beer or a refreshing margarita. They balance the heat well. You can also serve iced tea or sparkling water. Choose beverages that refresh your palate and complement the bold flavors. For the full recipe, check out the [Full Recipe]. In this blog post, we explored how to make tasty spicy garlic shrimp tacos. We covered the main ingredients, step-by-step cooking, and tips for perfect results. I shared ideas for tasty toppings and sides to bring your dish to life. Variations let you customize your tacos with different proteins or sauces. Don't forget the storage tips to keep leftovers fresh. Enjoying shrimp tacos is easy and fun. Try these recipes, and you’ll create exciting meals every time. Dive into these flavors and share your creations!](https://lazychefmagic.com/wp-content/uploads/2025/05/b74041a6-3a6f-4ebe-8ebb-d312e43c7fb6.webp)
Are you ready to spice up your taco night? These Spicy Garlic Shrimp Tacos are bursting with bold flavors that
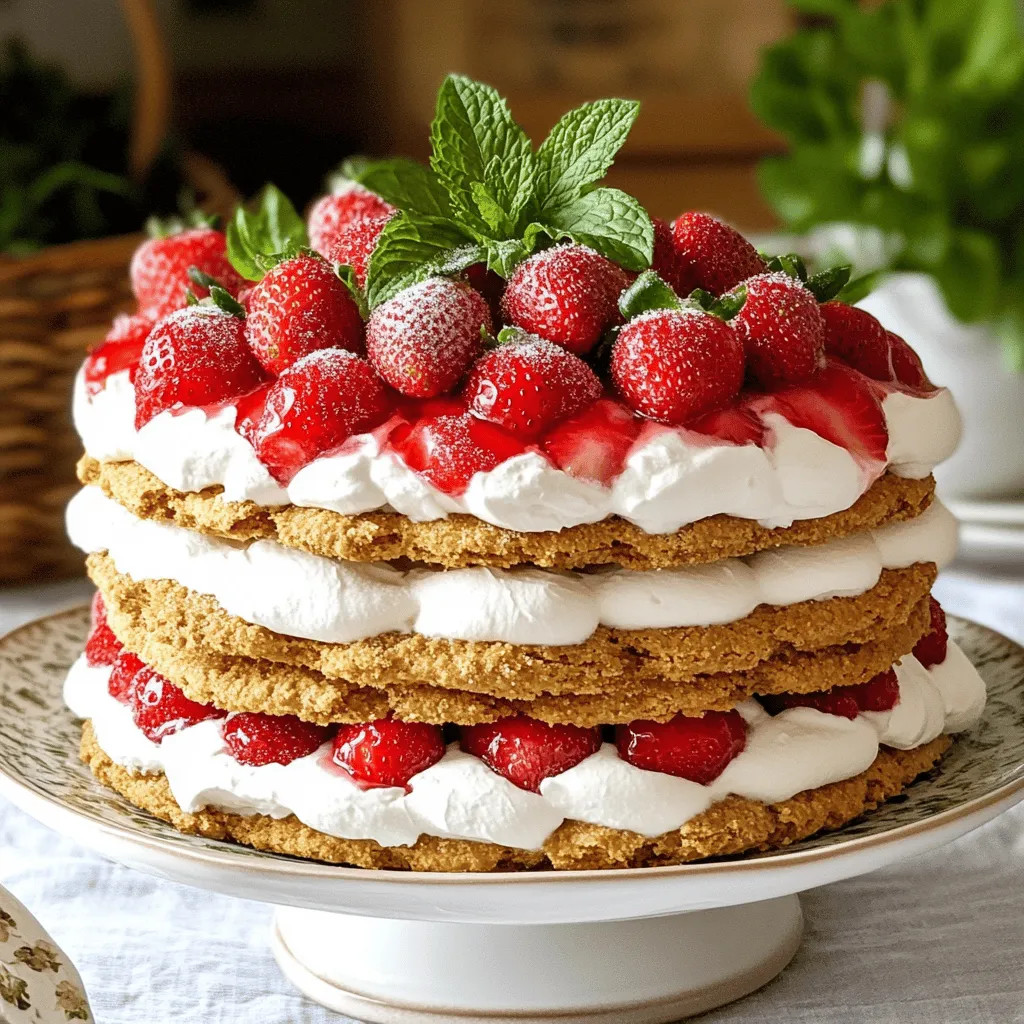
Looking for a sweet treat that’s easy and quick? You’ll love this No-Bake Strawberry Shortcake recipe! It’s creamy, fruity, and
