Skip to content
DisclaimerTerms Of UseGDPR PolicyCookie Policy

lazychefmagic

  • Home
  • Drinks
  • Appetizers
  • Dinner
  • Dessert
  • About
  • Contact
  • Privacy Policy
DisclaimerTerms Of UseGDPR PolicyCookie Policy

NO-ING-IMG

To make the best double chocolate chip bakery muffins, gather these ingredients: - 1 cup all-purpose flour - 1/2 cup unsweetened cocoa powder - 1 cup granulated sugar - 1/2 teaspoon baking soda - 1 teaspoon baking powder - 1/4 teaspoon salt - 1/2 cup unsalted butter, melted and slightly cooled - 2 large eggs, at room temperature - 1 teaspoon vanilla extract - 1/2 cup whole milk - 1 cup semi-sweet chocolate chips - 1/4 cup mini chocolate chips (for topping) Each ingredient plays a key role in creating those rich, chocolatey muffins. The all-purpose flour gives structure. Unsweetened cocoa powder adds deep chocolate flavor. The granulated sugar balances the cocoa’s bite. Baking soda and baking powder help the muffins rise. Salt enhances every sweet note. Melted butter gives moisture and richness, while eggs bind the batter. Vanilla extract adds warmth. Whole milk brings creaminess, and those chocolate chips create bursts of flavor. The mini chips on top make your muffins look even more tempting. With these ingredients, you’ll enjoy muffins that taste like they came from a bakery. First, preheat your oven to 350°F (175°C). Next, prepare a muffin tin. You can line it with paper liners or grease each cup with non-stick spray or butter. This step helps to prevent the muffins from sticking. In a large mixing bowl, sift together the following dry ingredients: - 1 cup all-purpose flour - 1/2 cup unsweetened cocoa powder - 1 cup granulated sugar - 1/2 teaspoon baking soda - 1 teaspoon baking powder - 1/4 teaspoon salt Use a whisk to mix them gently until fully combined. This ensures an even flavor in each muffin. In a separate bowl, mix the wet ingredients: - 1/2 cup unsalted butter, melted and slightly cooled - 2 large eggs, at room temperature - 1 teaspoon vanilla extract - 1/2 cup whole milk Whisk these ingredients together until the mix is smooth. Make sure everything is well blended for a rich taste. Carefully pour the wet mixture into the bowl with the dry ingredients. Stir gently with a spatula or wooden spoon. Mix until just combined; it's okay to have a few lumps. Then, gently fold in: - 1 cup semi-sweet chocolate chips This gives your muffins that gooey, chocolatey goodness. Using a 1/4 cup measuring cup, scoop the batter into the prepared muffin tin. Fill each cup about two-thirds full. This allows room for rising. Now, sprinkle: - 1/4 cup mini chocolate chips on top of each muffin for an extra treat. Bake in the preheated oven for 18-20 minutes. To check if they’re done, insert a toothpick into the center. If it comes out clean, your muffins are ready! After baking, let the muffins cool in the tin for about 5 minutes. This makes them easier to remove. Then, transfer them to a wire rack to cool completely. This keeps them moist and fluffy. To make great muffins, you should not overmix the batter. Overmixing makes muffins tough. Stir until just combined. Leave a few lumps for the best texture. Baking time and temperature matter too. Set your oven to 350°F (175°C) and bake for 18 to 20 minutes. Check with a toothpick; it should come out clean when the muffins are done. Serve your muffins warm for the best taste. A light dusting of powdered sugar adds a nice touch. For a colorful display, garnish with fresh berries. They bring freshness and look beautiful on the plate. This makes your muffins not just tasty but also appealing. {{image_4}} If you want to make nut-free muffins, skip any nuts in your mix. You can add more chocolate chips instead. This keeps every bite delicious and safe for those with nut allergies. You can make some easy swaps to make these muffins healthier. - Whole wheat flour: Use whole wheat flour instead of all-purpose flour. This adds fiber and nutrients. The muffins will still taste great! - Reduced sugar options: You can cut down the sugar by using natural sweeteners like honey or maple syrup. You may need to adjust the liquid in the recipe slightly. You can get creative with your muffins by adding extra flavors. - Nuts: If you are not going nut-free, try adding walnuts or pecans for crunch. - Fruits: Chopped bananas or berries can also brighten up the muffins. They add moisture and natural sweetness. - Other flavor extracts: A splash of almond or orange extract can give your muffins a fun twist. Just a little goes a long way! To keep your muffins fresh, store them in an airtight container. Place a paper towel at the bottom to absorb any moisture. Seal the container and keep it at room temperature for up to 2 days. If you want to keep them for longer, refrigerate them for about a week. This way, they stay soft and delicious. For long-term storage, freezing is the best option. Let the muffins cool completely. Wrap each muffin in plastic wrap tightly. Then, place them in a freezer bag or container. Label the bag with the date. They can last for up to 3 months in the freezer. When you are ready to eat them, just take out the muffins you need. Reheat muffins easily in the microwave. Place one muffin on a plate and microwave it for about 15-20 seconds. You can also heat them in the oven. Preheat the oven to 350°F (175°C) and warm the muffins for about 5-10 minutes. Enjoy them warm for the best taste! These muffins are bakery-style because they are large, fluffy, and have a rich taste. The combination of cocoa powder and chocolate chips gives them a deep chocolate flavor. The special baking method, like using high heat, helps create a nice dome shape. Plus, the mini chocolate chips on top add a sweet crunch. Yes! You can use dark chocolate or milk chocolate instead. Each type brings a unique flavor. If you like a sweeter muffin, go for milk chocolate. For a richer taste, dark chocolate works well. You can even mix different chocolates for a fun twist. To check if your muffins are done, insert a toothpick into the center of one. If it comes out clean or with a few moist crumbs, they are ready. If you see wet batter on the toothpick, bake them for another minute or two. Keep an eye on them to avoid overbaking. Yes, you can make these muffins gluten-free! Replace the all-purpose flour with a gluten-free flour blend. Make sure it contains xanthan gum for the right texture. Also, double-check that your baking powder and cocoa powder are gluten-free. This way, everyone can enjoy them. To make these muffins egg-free, use a substitute like applesauce or mashed banana. Use 1/4 cup of either for each egg. This will keep the muffins moist and tasty. You can also try a mix of ground flaxseed and water. Combine 1 tablespoon of flaxseed with 2.5 tablespoons of water, let it sit, and use it in place of one egg. You now know how to make delicious muffins with simple ingredients. The step-by-step guide helps you mix dry and wet items correctly. Remember to avoid overmixing for fluffier muffins. You can also try different flavors or healthier swaps. Store them well for fresh taste later. Enjoy the process and have fun baking! Share these muffins with friends and family, and they will love them. Your kitchen will smell amazing too. Happy baking!

Decadent Double Chocolate Chip Bakery Muffins Recipe

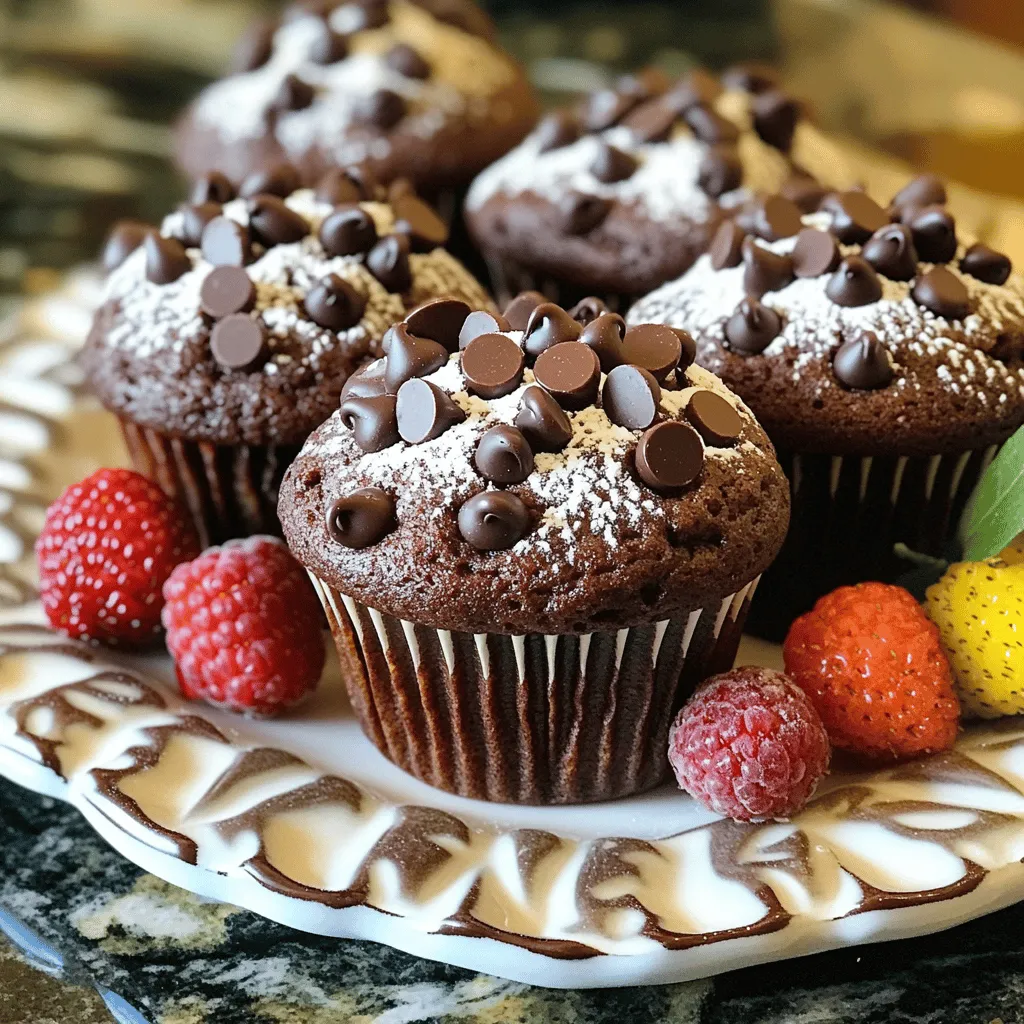
Are you ready to indulge in a sweet treat? This Decadent Double Chocolate Chip Bakery Muffins recipe brings rich, chocolatey

For Creamy Mushroom Chicken Thighs, gather these key ingredients: - 4 bone-in chicken thighs, skin-on - 2 cups mushrooms, sliced (cremini or button varieties) - 1 medium onion, diced - 3 cloves garlic, minced - 1 cup heavy cream - 1 cup chicken broth - 2 tablespoons olive oil - 1 teaspoon dried thyme - 1 teaspoon paprika - Salt and freshly ground pepper to taste - Fresh parsley, chopped (for garnish) You can swap some ingredients based on what you have. If you want a lighter dish, use half-and-half instead of heavy cream. For a different flavor, substitute chicken thighs with chicken breasts. If you can't find cremini mushrooms, regular button mushrooms work just as well. This dish serves four people. Each serving has about: - Calories: 490 - Protein: 30g - Fat: 36g - Carbohydrates: 9g - Fiber: 1g This meal packs a tasty punch while still being rich in protein. It fits well into a balanced diet if you watch portion sizes. Enjoy every bite! Start by patting the chicken thighs dry. Use paper towels to remove excess moisture. This helps the skin get crispy. Next, season both sides with salt, pepper, and paprika. Make sure to cover every part. This step adds great flavor to your dish. Now, grab a large skillet and heat olive oil over medium-high heat. Carefully place the chicken thighs skin-side down in the hot oil. Sear them for about 6 to 7 minutes. You want the skin to be golden brown and crispy. After that, flip the thighs and cook for another 5 minutes. Once they are done, take them out of the skillet and set them aside. In the same skillet, do not clean it; add the diced onion and sliced mushrooms. Sauté for about 5 to 7 minutes. Stir occasionally until the onions look clear and the mushrooms are soft. Then, add the minced garlic and dried thyme. Cook for 1 to 2 more minutes until the garlic smells great. Pour in the chicken broth and let it simmer gently. Scrape the bottom of the skillet with a wooden spoon. This helps mix in all the tasty bits. Then, stir in the heavy cream to make a rich sauce. Return the chicken thighs to the skillet, skin-side up. Lower the heat and cover the skillet. Let it cook for about 25 to 30 minutes. This makes the chicken tender and full of flavor. When done, taste the sauce and adjust the seasoning as needed. Finally, sprinkle fresh parsley on top for a nice touch before serving. To get that perfect crispy skin, start by drying the chicken thighs with paper towels. This removes excess moisture. Next, season the skin side well with salt, pepper, and paprika. When you cook, heat your skillet with olive oil until hot. Place the thighs skin-side down carefully. Let them sear without moving them for about 6 to 7 minutes. The skin will turn golden and crispy. Flip them over and cook for an extra 5 minutes. You can play with flavors to make this dish your own. For a richer sauce, add a splash of white wine when you deglaze the pan. You can swap in different herbs, like rosemary or oregano, for variety. Try adding some spinach or sun-dried tomatoes for more color and taste. If you want a bit of heat, add a pinch of crushed red pepper flakes to the sauce. Using the right tools makes cooking easier. You'll need a large skillet to cook the chicken and sauce. A good wooden spoon helps scrape up those tasty bits stuck to the pan. Use a sharp knife for dicing the onion and mushrooms quickly. A meat thermometer ensures the chicken is cooked through. Finally, have a lid handy to cover the skillet while it simmers. {{image_4}} You can change up the mushrooms in this dish. Instead of cremini or button mushrooms, try using shiitake or portobello mushrooms. Shiitake mushrooms add a rich, earthy taste, while portobello mushrooms bring a meaty texture. Mix and match different types for a fun flavor twist! Not a fan of chicken? No problem! You can swap the chicken thighs for other proteins. Try using bone-in chicken breasts for a leaner option. If you want something different, use pork chops or even turkey thighs. Each protein will soak up the creamy sauce nicely, making dinner delicious! The cream sauce can easily change to suit your taste. If you want a lighter option, use half-and-half instead of heavy cream. For a tangy twist, add some Dijon mustard or white wine to the sauce. You can also stir in some grated cheese, like Parmesan, for extra flavor. Each variation will make your dish unique and exciting! To keep your creamy mushroom chicken thighs fresh, place leftovers in a shallow dish. Cover the dish tightly with plastic wrap or foil. You can also use an airtight container. Store it in the fridge for up to three days. This helps keep the flavors intact and the chicken juicy. When you're ready to enjoy your leftovers, reheat them gently. Place the chicken thighs in a skillet over low heat. Add a splash of chicken broth or cream to keep the dish moist. Cover the skillet to help warm it evenly. Heat for about 10-15 minutes, or until it's hot throughout. You can also use the microwave, but be careful not to overcook it. If you want to save some for later, freezing is a great option. Let the chicken cool completely before freezing. Place it in a freezer-safe bag or container, and remove as much air as possible. Label it with the date. You can freeze it for up to three months. When you're ready to eat, thaw it in the fridge overnight. Then, reheat as mentioned above. Yes, you can use boneless chicken thighs. They cook faster than bone-in thighs. Adjust the cooking time to about 20-25 minutes. They will still soak up all the tasty sauce. You can serve creamy mushroom chicken thighs with several sides. Here are some great options: - Fluffy rice - Buttery mashed potatoes - Steamed vegetables - Crusty bread Each of these pairs well with the rich sauce. They will soak up the flavors nicely. To check if the chicken is done, use a meat thermometer. The internal temperature should be at least 165°F. If you don’t have a thermometer, cut into the thickest part. The juices should run clear, not pink. Yes, you can make this recipe ahead of time. Cook the chicken and sauce and let it cool. Store it in the fridge for up to three days. When ready to eat, reheat it gently on the stove. Add a splash of cream for extra richness. In this blog post, we explored the ingredients, steps, and tips for creamy mushroom chicken thighs. You learned about ingredient substitutions and nutritional facts. I shared ways to achieve crispy skin and recommended useful cooking tools. We also covered variations, storage tips, and answered common questions. Now, you can cook this dish with confidence. Experiment with flavors and enjoy every bite. Cooking is fun, so make this recipe your own!

Creamy Mushroom Chicken Thighs Delicious Dinner Idea

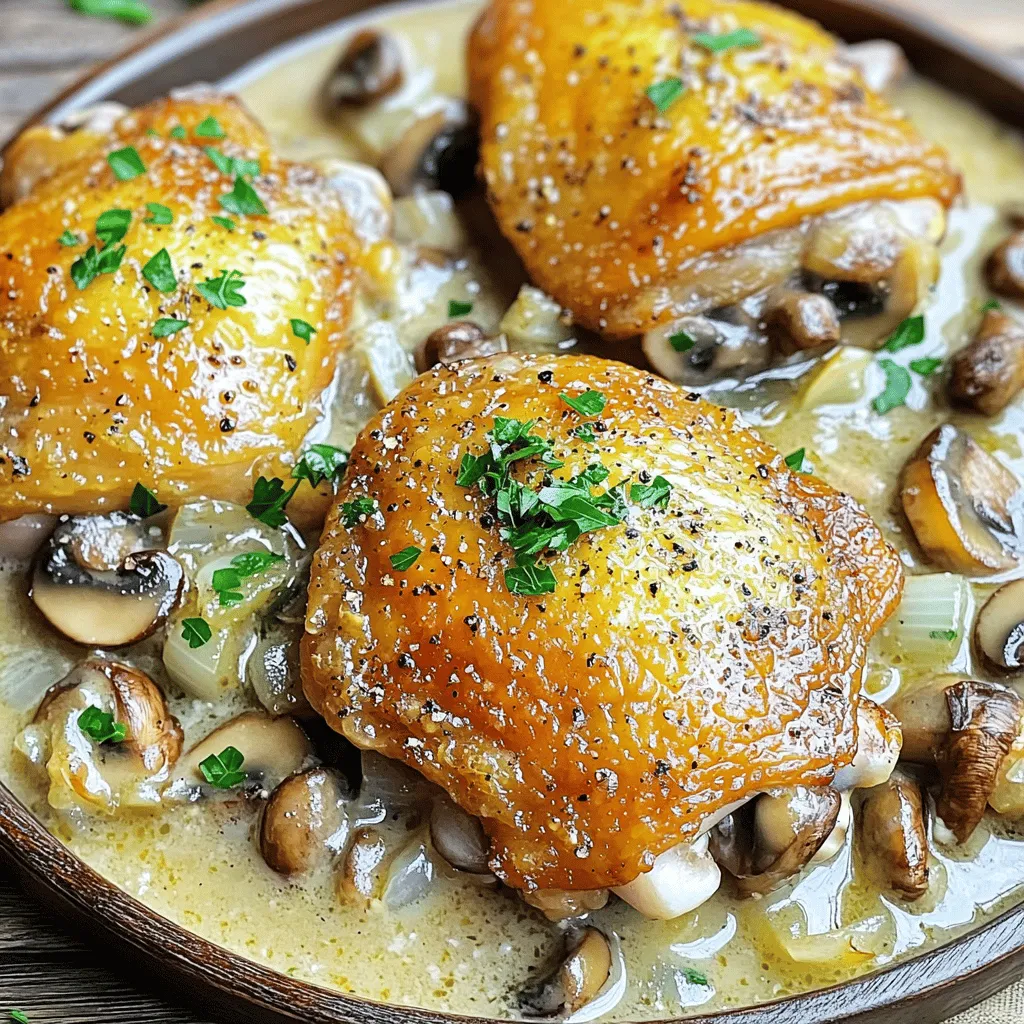
Looking for a quick and tasty dinner? Creamy Mushroom Chicken Thighs might be your new favorite meal! This dish blends

- 1 cup wild rice, rinsed and drained - 4 cups vegetable broth - 1 can (15 oz) pure pumpkin puree - 1 medium onion, finely chopped - 2 cloves garlic, minced - 2 medium carrots, diced - 1 cup celery, diced - 1 teaspoon dried thyme - 1 teaspoon ground sage - 1/2 teaspoon ground nutmeg - 1 cup coconut milk - 2 tablespoons olive oil - Salt and pepper to taste - Fresh parsley, chopped, for garnish (optional) You can switch coconut milk for almond milk or heavy cream. If you can't find wild rice, brown rice works well too. For herbs, fresh thyme or sage can replace dried options. Just remember, use three times more fresh herbs than dried. Using fresh vegetables and herbs makes a big difference. Fresh ingredients add vibrant flavors and textures. They also have more nutrients. Dried herbs can work in a pinch but may not give the same bright taste. Fresh veggies keep the dish lively and colorful. When you can, choose fresh for the best results. Start by gathering your ingredients. Chop the onion, carrots, and celery into small pieces. Rinse the wild rice under cold water. This step removes any dust and helps the rice cook evenly. Set everything aside so you have it ready. Heat two tablespoons of olive oil in a large pot over medium heat. Add the chopped onion, carrots, and celery. Sauté these vegetables for about 5-7 minutes until they soften. The onion should become translucent and smell sweet. Next, add two minced garlic cloves, one teaspoon of dried thyme, one teaspoon of ground sage, and half a teaspoon of nutmeg. Stir well for about a minute. This helps release the flavor of the herbs. Now, add the rinsed wild rice to the pot. Stir it with the vegetables to coat it well. Then, pour in four cups of vegetable broth. Bring the mixture to a boil. Once it's boiling, lower the heat, cover the pot, and let it simmer for 40-45 minutes. The rice should be tender and slightly split open when it's done. After the rice cooks, whisk in one can of pure pumpkin puree and one cup of coconut milk. Stir everything well to mix. Allow the soup to simmer for another 10 minutes. This helps the flavors blend nicely. Finally, season the soup with salt and pepper to your taste. This step is important for bringing out all the flavors. Let the soup cool for a few minutes before serving. Serve it hot in bowls, and if you like, add some fresh chopped parsley on top for a touch of color. To make the best creamy pumpkin wild rice soup, you need to balance the flavors. Use salt and pepper to enhance the taste. Add a pinch of nutmeg for warmth. You might want to try a splash of lemon juice. It can brighten the soup nicely. Adjust the seasonings slowly. Taste as you go to find your sweet spot. If the texture seems off, blend a part of the soup for creaminess. This adds a nice smooth touch. You can prepare this soup in advance. Cook it fully and let it cool before storing. Place it in airtight containers. It will last up to five days in the fridge. For longer storage, freeze it in portions. Just thaw it overnight in the fridge before reheating. When you’re ready to eat, heat it on the stove. Stir gently to mix the flavors again. If it seems too thick, add a bit of broth or water. This soup pairs well with many sides. Serve it with crusty bread for dipping. A fresh salad adds a nice crunch. You can also try it with a sprinkle of cheese on top. Fresh herbs like parsley or chives brighten the dish. If you want a kick, add some chili flakes. The creamy pumpkin soup is cozy and perfect for chilly days. Enjoy it with loved ones around the table. {{image_4}} You can make this soup even better with add-ins. If you want protein, try chicken or tofu. Both options blend well with the pumpkin and spices. For chicken, use cooked, shredded pieces. For tofu, cube it and sauté until golden. This adds texture and makes the soup heartier. To bring some heat, add red pepper flakes or cayenne pepper. A pinch goes a long way. If you love warm spices, try adding cumin or coriander. These spices pair well with pumpkin. Experiment with your favorite flavors to make the soup truly yours. Need gluten-free options? No problem! This soup is naturally gluten-free with the right broth. For a vegan twist, use vegetable broth and skip any animal proteins. You can also swap coconut milk for almond or soy milk. These choices keep the soup creamy and delicious. To keep your creamy pumpkin wild rice soup fresh, store it in an airtight container. Let the soup cool down to room temperature before sealing it. You can refrigerate the soup for up to four days. If you want to save it for longer, freezing is a great option. Pour the cooled soup into freezer-safe containers, leaving some space at the top for expansion. Label the containers with the date before placing them in the freezer. When it's time to enjoy your soup again, take it out of the fridge or freezer. If frozen, let it thaw overnight in the fridge. To reheat, pour the soup into a pot and warm it over medium heat. Stir it often to prevent sticking. If you prefer to use a microwave, pour the soup into a microwave-safe bowl. Heat in short bursts of one to two minutes, stirring in between, until hot. In the fridge, your creamy pumpkin wild rice soup will stay good for about four days. If frozen, you can keep it for up to three months. For the best taste, try to eat the soup within this time. Always check for any signs of spoilage, like off smells or changes in color, before eating. How do I make the soup thicker? To thicken the soup, you can add more wild rice. Cook an extra half cup of wild rice and stir it in. You can also use a blender. Blend a portion of the soup and mix it back in. This gives a creamy texture. If you like, add more pumpkin puree too. It will boost thickness and flavor. Can I make this in a slow cooker or Instant Pot? Yes, you can easily make this soup in a slow cooker. Just add all the ingredients except for the coconut milk and pumpkin puree. Set it on low for 6-8 hours. Stir in the coconut milk and pumpkin puree before serving. For an Instant Pot, sauté the vegetables first. Then, add all the ingredients and cook on high pressure for 20 minutes. Quick and easy! What are the nutritional benefits of ingredients in the soup? This soup is packed with healthy ingredients. Wild rice is high in fiber and protein. Pumpkin puree is full of vitamins A and C. It’s good for your eyes and skin. Carrots add beta-carotene, which helps with vision. Celery provides hydration and fiber. Coconut milk offers healthy fats, giving you energy. Overall, this soup is nutritious and comforting! This blog post covers how to make a delicious pumpkin soup. We talked about key ingredients like wild rice and vegetables. I shared tips on cooking and perfecting flavors. You learned about serving ideas and variations to suit your tastes. In closing, this soup is versatile and easy to make. Enjoy it fresh or make it ahead. Don't forget, you can modify the recipe to fit your needs. Enjoy creating your own version of this cozy dish!

Creamy Pumpkin Wild Rice Soup Cozy and Flavorful Dish

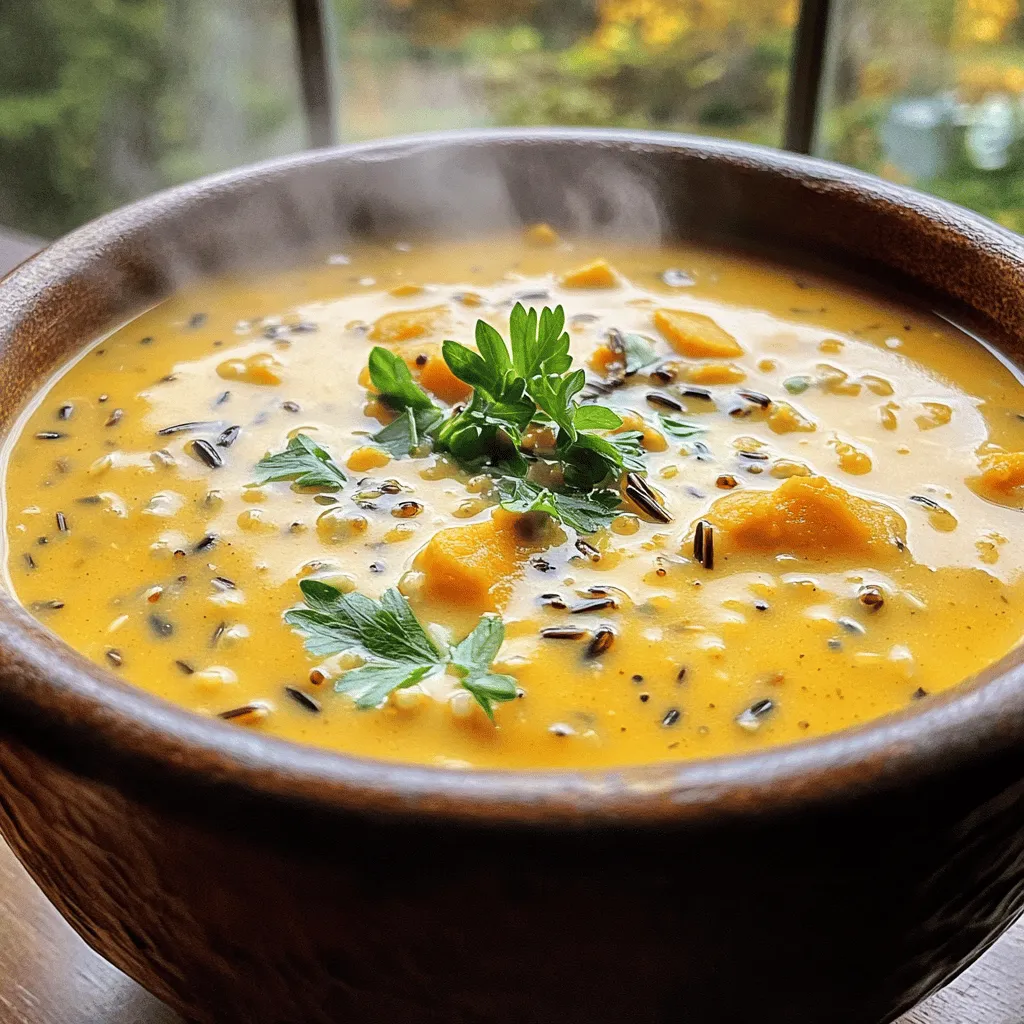
Warm up your day with a bowl of Creamy Pumpkin Wild Rice Soup! This cozy dish blends rich pumpkin with

- 1 pound large shrimp, peeled and deveined - 4 tablespoons unsalted butter - 5 cloves garlic, finely minced - 1 cup assorted bell peppers, sliced (red, yellow, and green) - 1 cup snap peas, trimmed - 2 tablespoons low-sodium soy sauce - 1 tablespoon honey - Salt and freshly cracked black pepper to taste - 1 teaspoon crushed red pepper flakes (for heat) - Fresh parsley, chopped To start, you need to melt the butter. Take a large skillet or wok and set it over medium heat. Add 4 tablespoons of unsalted butter. Let it melt completely, but keep an eye on it. You want it bubbling, not burning. When the butter melts, it's time to add the garlic. Use 5 cloves of finely minced garlic. Sauté the garlic for about 30 seconds. Stir it constantly until it becomes fragrant and lightly golden. Be careful here; burnt garlic can ruin the dish. Next, add 1 pound of large shrimp that are peeled and deveined. Season them with a pinch of salt and freshly cracked black pepper. Cook the shrimp for about 2 to 3 minutes. Turn them frequently so they cook evenly. You'll know they are ready when they turn pink and opaque. This part is quick, so don’t walk away! Now, it's time for the veggies. Add 1 cup of assorted sliced bell peppers and 1 cup of trimmed snap peas to the skillet. Stir-fry these for another 2 to 3 minutes. You want the vegetables to stay crunchy and bright. They add color and nutrients, making the dish even better. After your shrimp and veggies are cooked, it's time to add the sauces. Drizzle 2 tablespoons of low-sodium soy sauce and 1 tablespoon of honey over everything. If you like heat, sprinkle in 1 teaspoon of crushed red pepper flakes. Toss everything together to coat the shrimp and veggies in the sauce. Let it cook for another minute. This helps the flavors blend. Finally, remove the skillet from the heat and sprinkle fresh chopped parsley on top before serving. Sautéing garlic is key for great flavor. Start by melting butter in a pan. Once it bubbles, add minced garlic. Stir it constantly for about 30 seconds. Look for a light golden color. Be careful not to let it burn. Burnt garlic tastes bitter and ruins the dish. Cooking shrimp can be tricky. They should turn pink and opaque when done. Cook them for 2-3 minutes, turning them often. Under-cooked shrimp can be unsafe to eat. Always check that they are fully cooked before serving. Feel free to swap or add vegetables. Broccoli, snap peas, or zucchini work well. You can also use carrots for a sweet crunch. Just cut them into small pieces for quick cooking. This stir-fry is flexible to your tastes. Enjoy making it your own! {{image_4}} To add heat to your dish, you can make a spicy garlic butter shrimp stir-fry. Simply include the crushed red pepper flakes. Adjust the amount based on your heat level preference. You can also add a splash of sriracha or chili oil for extra kick. This combination enhances the garlic flavor while keeping your shrimp tender. If you love broccoli, use it as a base for your shrimp stir-fry. Just add one cup of fresh or frozen broccoli florets when you add the bell peppers. Cook until it turns bright green and tender but still crisp. Broccoli adds nutrition and a nice crunch, making your dish even more satisfying. For those following paleo or keto diets, adjust your recipe to fit your needs. Replace the honey with a sugar-free sweetener like erythritol or omit it altogether. Use coconut aminos instead of soy sauce for a soy-free option. This keeps the dish flavorful while fitting into your dietary choices. You can also serve the shrimp stir-fry over cauliflower rice for a low-carb alternative. To store leftovers, let the dish cool down. Place the shrimp stir-fry in an airtight container. This helps keep it fresh. You can store it in the fridge for up to three days. Be sure to label the container. This way, you’ll know when you made it. When you want to reheat, use a skillet on medium heat. Add a splash of water or broth. This keeps the shrimp from drying out. Stir and heat for about five minutes. Keep an eye on it to avoid overcooking. You can also use the microwave. Heat it in short bursts of 30 seconds. Stir in between to ensure even heating. If you have extra, freezing is a great option. Place the cooled stir-fry in a freezer-safe bag. Remove as much air as you can before sealing. Label the bag with the date. You can freeze it for up to three months. When ready to eat, thaw it overnight in the fridge. Reheat as mentioned above for the best taste. You can serve garlic butter shrimp stir-fry with several sides. Here are some ideas: - Steamed rice - Quinoa - Noodles - Cauliflower rice - A fresh green salad These sides will balance the rich flavors of the dish. Yes, you can use frozen shrimp. Just make sure to thaw them first. Place them in the fridge overnight or run them under cold water for a quick thaw. Using frozen shrimp saves time and still gives great results. To lower the sodium, use low-sodium soy sauce. You can also reduce the amount of soy sauce in the recipe. Adding fresh herbs or citrus juice can enhance flavor without adding salt. You can change up the flavors in many ways: - Add ginger for warmth. - Use lime juice for a citrus twist. - Mix in fresh herbs like cilantro or basil. - Include other veggies, like broccoli or carrots. These variations keep the dish exciting and fresh! This blog covered how to make garlic butter shrimp stir-fry in simple steps. You learned about key ingredients, cooking methods, and tips for perfecting the dish. Don’t forget the optional ingredients and garnishes that can enhance flavors! If you want to try different ways, we shared tasty variations. Proper storage lets you enjoy leftovers too. Embrace your cooking journey, and make this dish your own! With these tools and ideas, you’ll impress everyone at your table.

Minute Garlic Butter Shrimp Stir-Fry Quick Delight

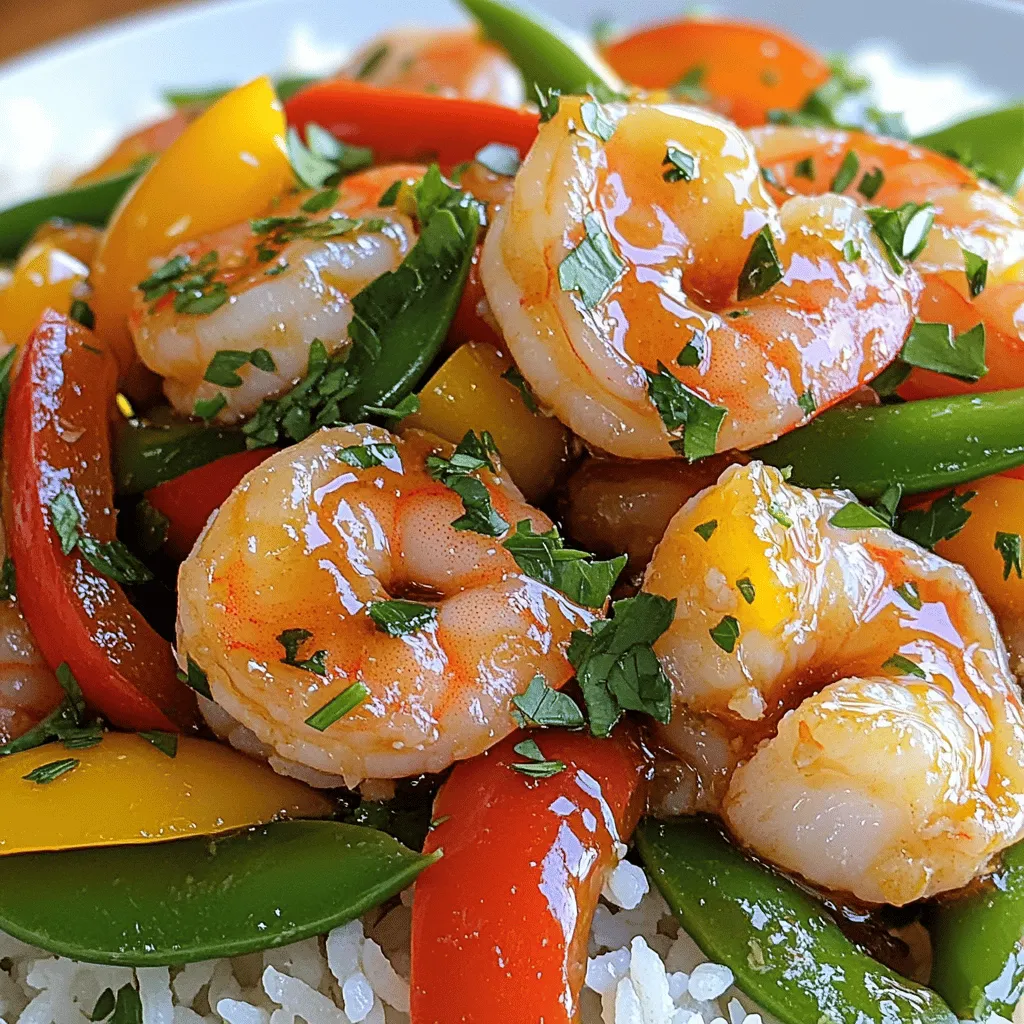
If you’re craving a quick, tasty meal, my Minute Garlic Butter Shrimp Stir-Fry is just for you! In just a

- 2 medium apples, peeled and diced - 1 cup all-purpose flour - 1/2 cup granulated sugar - 1 teaspoon baking powder - 1/2 teaspoon ground cinnamon - 1/4 teaspoon ground nutmeg - 1/4 teaspoon salt - 1/2 cup buttermilk (or your preferred milk) - 1 large egg - 1 teaspoon pure vanilla extract - 1 tablespoon fresh lemon juice - Cooking spray or a light coating of oil for the air fryer - 1 cup powdered sugar - 2 tablespoons milk - 1/2 teaspoon pure vanilla extract I recommend using Granny Smith or Honeycrisp apples. These apples have a nice tart flavor. Their firmness helps them hold up well in the fritters. You can also try Fuji apples for a sweeter taste. Choose apples that are crisp and fresh for the best results. They will add great texture and flavor to your fritters. First, take two medium apples. I like Granny Smith or Honeycrisp for their tart taste. Peel and dice them into small pieces. Toss the diced apples in a bowl with one tablespoon of fresh lemon juice. This keeps them from turning brown and adds a nice zing to your fritters. Set them aside while you get the rest ready. In a large bowl, sift together one cup of all-purpose flour, half a cup of granulated sugar, one teaspoon of baking powder, half a teaspoon of ground cinnamon, a quarter teaspoon of ground nutmeg, and a quarter teaspoon of salt. Mix these well. This blend gives the fritters a sweet and spicy flavor. In another bowl, whisk together half a cup of buttermilk, one large egg, and one teaspoon of pure vanilla extract. Make sure this mixture is smooth. It will add moisture and flavor to the fritters. Pour the wet mixture into the bowl with the dry ingredients. Gently stir until just mixed. Avoid over-mixing. Now, fold in the diced apples carefully. Make sure every piece is coated in the batter. This adds fruitiness in every bite. Before cooking, preheat your air fryer to 350°F (175°C) for about five minutes. This helps the fritters cook evenly. A preheated air fryer makes a big difference in the final texture. Using a tablespoon or a cookie scoop, drop spoonfuls of batter into the air fryer basket. Leave enough space between each fritter for air to flow. Lightly spray the tops with cooking spray. This helps them brown nicely. Air fry for about 10 to 12 minutes, flipping them halfway through. You want them golden brown on both sides. While the fritters cool, make the glaze. In a medium bowl, mix one cup of powdered sugar, two tablespoons of milk, and half a teaspoon of pure vanilla extract. Whisk until smooth. If the glaze is too thick, add a bit more milk. If it’s too thin, add more powdered sugar. Drizzle the vanilla glaze over the fritters once they cool slightly. You can use a spoon or dip the tops directly into the glaze for a fun twist. Serve them warm, and they pair perfectly with your favorite coffee or tea. A sprinkle of extra powdered sugar or cinnamon makes for a lovely presentation. Enjoy every bite! To make sure your fritters cook just right, preheat your air fryer to 350°F. This step is key. It helps the fritters rise and brown evenly. Keep space between each fritter in the basket. This allows air to flow well. Flip them halfway through cooking for an even finish. Aim for a golden brown color. Trust me; texture matters! You can change up the flavor of your fritters easily. Try adding chopped nuts, like walnuts or pecans, for a crunchy bite. Diced raisins or cranberries can add sweetness too. For a spiced twist, mix in a bit of cardamom or ginger. You can even swap apples for pears for a different taste. Get creative and have fun with it! One common mistake is over-mixing the batter. This can make your fritters tough. Mix until just combined for soft fritters. Another issue is not cooling the fritters before glazing. If you glaze them hot, the glaze will melt away. Lastly, don’t skip the cooking spray. It helps achieve that lovely golden crust. Avoid these pitfalls for the best fritter experience! {{image_4}} You can make gluten-free apple fritters easily. Just swap the all-purpose flour for a gluten-free blend. Look for one that works well in baking. This change allows everyone to enjoy these tasty treats. The flavor stays rich and delicious, even without gluten. For a twist, add spices to your fritters. Consider using cardamom or ginger for a kick. You can also mix in chopped nuts, like walnuts or pecans. This adds a nice crunch and extra flavor. Each bite becomes a fun surprise. The vanilla glaze is just the start. Try a caramel sauce for a sweet touch. A dusting of cinnamon sugar can also enhance the taste. You might like to add fresh fruit or a scoop of ice cream on top. These options let you customize your fritters and impress your friends! To store leftover fritters, first let them cool to room temperature. Place them in an airtight container. You can layer them with parchment paper to avoid sticking. Store the container in the fridge for up to three days. This keeps them fresh and tasty. To reheat your fritters, use an air fryer for best results. Set the air fryer to 350°F (175°C). Heat the fritters for about 3 to 5 minutes. This will make them warm and crispy again. You can also use a microwave, but the fritters may lose their crunch. If you use the microwave, heat them for 20 to 30 seconds. You can freeze apple fritters for longer storage. After they cool, wrap each fritter tightly in plastic wrap. Place them in a freezer-safe bag or container. They can last for up to three months in the freezer. When ready to eat, thaw them in the fridge overnight. Then reheat them in the air fryer to restore their texture. The best apples for fritters are Granny Smith or Honeycrisp. Their tartness adds great flavor. Granny Smith apples stay firm and provide a nice contrast to the sweet glaze. Honeycrisp apples are juicy and sweet, perfect for a balanced bite. You can also mix both types for extra flavor. Yes, you can use any milk you like. Whole milk or almond milk works great. If you want to mimic buttermilk, add a little vinegar or lemon juice to your milk. Let it sit for 5-10 minutes. This makes a good substitute and keeps your fritters moist. Your fritters are done when they are golden brown. You can also use a toothpick to check. Insert it into the center of a fritter. If it comes out clean, they are ready. Keep an eye on them to avoid overcooking. Yes, you can prepare the batter ahead of time. Store it in the fridge for up to 24 hours. When ready, just air fry the fritters. This saves time and helps you enjoy fresh fritters any time you want! In this blog post, we explored making delicious apple fritters. You learned about key ingredients and the best apple varieties to use. We followed a clear step-by-step guide for preparing and cooking the fritters. Tips and variations helped you customize your fritters. I hope you feel ready to create these tasty treats at home. Enjoy experimenting and sharing them with friends or family!

Savory Air Fryer Apple Fritters with Vanilla Glaze

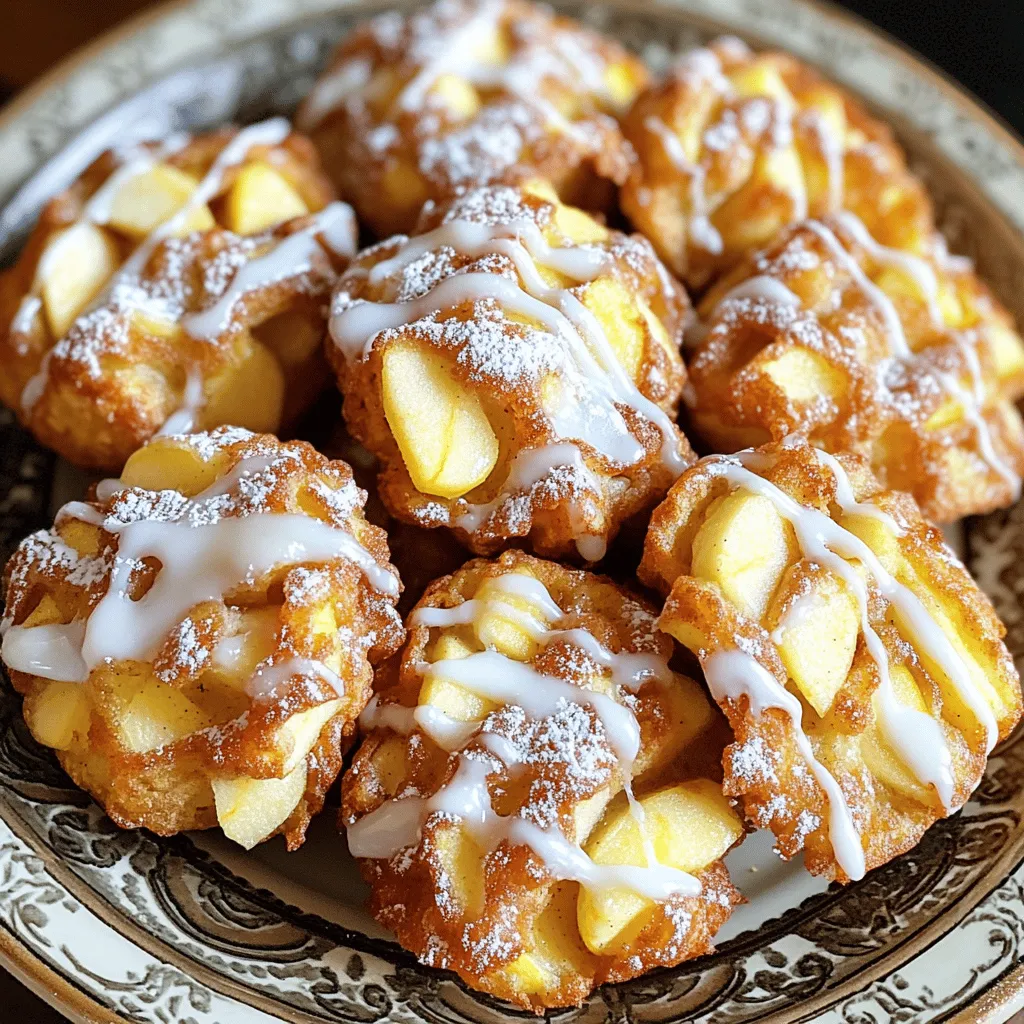
Discover the joy of making Savory Air Fryer Apple Fritters with Vanilla Glaze! These sweet and crunchy treats are easy

- 2 cans black beans, drained and rinsed - 1 can diced tomatoes (with juices) - 1 cup corn kernels (fresh or frozen) - 1 medium onion, diced - 3 cloves garlic, minced - 1 red bell pepper, diced - 2-3 chipotle peppers in adobo sauce, minced The base of this chili is rich and hearty. Black beans give it protein and fiber. Diced tomatoes add sweetness and acidity. Corn kernels bring texture and a bit of sweetness, too. Onion and garlic boost flavor. Red bell pepper adds color and crunch. Chipotle peppers give that perfect spicy kick. - 1 tablespoon ground cumin - 1 tablespoon chili powder - 1 teaspoon smoked paprika - Salt and pepper to taste The spices transform this dish. Ground cumin adds warmth. Chili powder brings heat and depth. Smoked paprika gives a lovely smoky flavor. Don’t forget salt and pepper to enhance all the tastes. - 1 cup cornmeal - 1 cup buttermilk (or substitute with milk and 1 tablespoon lemon juice) - 1 large egg - 1 teaspoon baking powder - 1 teaspoon sugar - 1/2 teaspoon salt This cornbread crumble is the best part. Cornmeal makes it hearty. Buttermilk keeps it moist and rich. The egg binds it, while baking powder helps it rise. Sugar adds a touch of sweetness, and salt balances all the flavors. - Sauté Onion and Red Bell Pepper: In a large pot, warm 1 tablespoon of olive oil over medium heat. Add 1 diced onion and 1 diced red bell pepper. Cook for about 5 minutes. The onion should look clear and soft. - Add Garlic and Spices: Next, stir in 3 minced garlic cloves, 1 tablespoon of ground cumin, 1 tablespoon of chili powder, and 1 teaspoon of smoked paprika. Add 2-3 minced chipotle peppers in adobo sauce. Stir for 1-2 minutes until you smell the spices. - Incorporate Beans, Tomatoes, Corn, and Broth: Add 2 cans of drained black beans, 1 can of diced tomatoes with juices, 1 cup of corn kernels, and 2 cups of vegetable broth to the pot. Season with salt and pepper to taste. - Bring to a Boil: Increase the heat to high until the mixture bubbles. - Cook Time and Stirring Instructions: Once boiling, reduce the heat to low. Let the chili simmer uncovered for about 30 minutes. Stir it every 5-10 minutes to stop it from sticking to the pot. Taste the chili and adjust seasoning if needed. - Preheat Oven and Mix Dry Ingredients: While the chili cooks, preheat your oven to 400°F (200°C). In a bowl, whisk together 1 cup of cornmeal, 1 teaspoon of baking powder, 1 teaspoon of sugar, and 1/2 teaspoon of salt. - Combine Wet Ingredients with Dry: In a separate bowl, mix 1 cup of buttermilk and 1 large egg until well blended. Slowly pour this into the dry mix, stirring gently. Don’t overmix; this keeps the cornbread light. - Transfer to Baking Dish and Bake: Pour the cornbread batter into a greased baking dish. Spread it evenly. Bake for 20-25 minutes until the top is golden and a toothpick comes out clean. Let it cool a bit, then crumble it into pieces. - Ladling Chili and Topping with Cornbread Crumble: Use a ladle to serve the chili into bowls. Top each bowl with a generous amount of the cornbread crumble for a crunchy finish. Enjoy your meal! To make your chili just right, you can adjust the spices. If you like heat, add more chipotle peppers. For less heat, use fewer peppers. Taste as you go, and you'll know what works best for you. Adding extra ingredients can also enhance flavor. Try adding bell peppers or fresh herbs. These boost the taste and add colorful flair. For a light and fluffy cornbread, don’t overmix the batter. Mix just until wet and dry ingredients blend, and let it rest a moment before baking. You can also use different toppings. Try adding cheese, jalapeños, or herbs for added flavor. Each brings a new twist to the cornbread. Garnishing your chili can make it look amazing. Consider fresh cilantro, a dollop of sour cream, or sliced jalapeños on top. Serve lime wedges on the side for a zesty kick. For sides, cornbread is a classic choice, but you can serve rice or tortilla chips too. These pair well and add texture to your meal. {{image_4}} You can make this chili vegan by swapping a few ingredients. Instead of using buttermilk, you can mix plant-based milk with lemon juice. Use a flax egg instead of a regular egg. Just mix one tablespoon of ground flaxseed with three tablespoons of water. Let it sit until it thickens. For broth, choose a vegetable stock that meets your needs. This keeps the chili tasty and vegan-friendly. Do you want a twist on your chili? Try adding different beans like pinto or kidney beans. You can also add veggies like zucchini or carrots for more color and crunch. Adjust the spice level to your liking. Add more chipotle peppers for heat or a squeeze of lime for brightness. Each change can make your chili unique. If you need a gluten-free option, look for gluten-free cornmeal. This works well in your cornbread crumble. You can also infuse flavors into your cornbread. Add cheese, jalapeños, or herbs to the batter. This adds a fun twist and can change the whole dish. Each variation lets you create something new and delicious. - Best Practices for Refrigeration: Let the chili cool down before storing. Place it in an airtight container. It will keep well in the fridge for up to five days. The flavors will deepen over time. - Freezing Chili and Cornbread Crumble: You can freeze the chili too. Use a freezer-safe container and leave some space for expansion. It will stay fresh for up to three months. For the cornbread crumble, store it separately. This keeps the texture nice. Wrap it tightly in plastic wrap or foil. - How to Reheat Chili Without Losing Flavor: To reheat the chili, place it in a pot on low heat. Stir it often to avoid sticking. Add a splash of water or broth if it looks thick. This keeps it moist and tasty. - Keeping Cornbread Crisp: For the cornbread crumble, heat it in the oven. Preheat to 350°F (175°C). Spread the crumble on a baking sheet. Bake for about 5-10 minutes until it's warm and crisp again. This will make every bite enjoyable. Chipotle Black Bean Chili lasts about 4 to 5 days in the fridge. Store it in an airtight container. This keeps it fresh and helps avoid spills. Yes, you can make this chili in a slow cooker. Just sauté the veggies first for more flavor. Then, add all the ingredients to the slow cooker. Cook on low for 6-8 hours or on high for 3-4 hours. You can serve this chili with rice, tortilla chips, or a side salad. For a fun twist, try pairing it with avocado slices or fresh cilantro. Yes, dried beans work too! Soak them overnight and cook them until soft. You may need to adjust the cooking time. Add them early in the chili process. To make the cornbread crumble dairy-free, use almond milk or oat milk instead of buttermilk. You can also add a splash of vinegar to mimic the tanginess of buttermilk. In this post, I shared how to make delicious Chipotle Black Bean Chili topped with cornbread crumble. You learned about the key ingredients, spices, and simple steps to prepare this dish. I also provided tips for perfecting the chili and cornbread, plus some tasty variations. Remember, cooking is about fun and creativity. Don't hesitate to try new flavors and enjoy the process. With these insights, your chili night will surely impress everyone at the table. Happy cooking!

Chipotle Black Bean Chili with Cornbread Crumble Delight

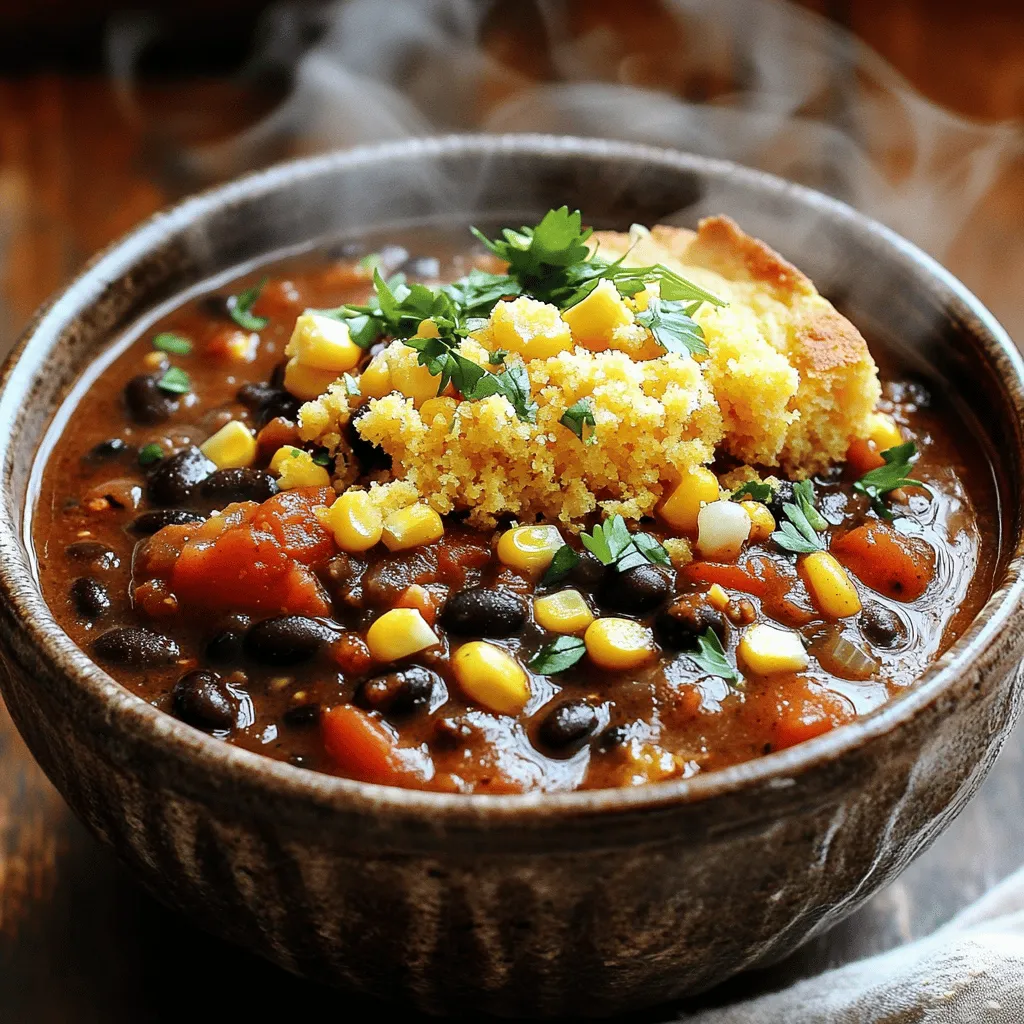
Are you ready to spice up your dinner with a hearty and flavorful dish? My Chipotle Black Bean Chili with

- 2 cups leftover turkey, shredded - 1 cup cooked pasta (fusilli or penne) - 1 cup frozen mixed vegetables - 1 can condensed cream of mushroom soup - 1/2 cup sour cream - 1 cup shredded cheddar cheese - 1 tablespoon olive oil - Seasonings (garlic powder, onion powder, salt, pepper) - 1/2 cup breadcrumbs (optional) - Fresh parsley for garnish For this casserole, I love using leftover turkey. It packs in flavor and saves time. You can use any cooked turkey, but shredded pieces work best. Pair it with cooked pasta like fusilli or penne. These shapes hold the sauce well. Next, frozen mixed vegetables add color and nutrition. They are easy to use and need no prep. I often choose a mix with peas, carrots, and corn for a nice touch. A can of condensed cream of mushroom soup adds creaminess. This soup binds all the ingredients together. Sour cream also boosts creaminess, making the dish rich and comforting. Cheddar cheese brings a tasty, sharp flavor. It melts well and gives the dish a gooey texture. Save some for topping, as it adds a nice golden crust. For seasoning, garlic powder and onion powder provide depth. Adjust salt and pepper to your taste. If you want a crunchy top, sprinkle breadcrumbs on before baking. Fresh parsley finishes it off, adding a pop of color and flavor. These ingredients come together to create a warm, hearty meal. Enjoy this simple yet delicious way to use your turkey leftovers! {{ingredient_image_2}} First, you need to preheat your oven to 350°F (175°C). This helps the casserole cook evenly. Next, grab a 2-quart casserole dish. Lightly grease it with olive oil. This step keeps the food from sticking later. In a large mixing bowl, combine 2 cups of shredded leftover turkey and 1 cup of cooked pasta. I like using fusilli or penne for the best texture. Add 1 cup of frozen mixed vegetables, like carrots, peas, and corn. Then, pour in 1 can of condensed cream of mushroom soup and 1/2 cup of sour cream. This mix gives the dish a creamy base. Now, add 1 teaspoon each of garlic powder and onion powder for flavor. Season with salt and pepper to taste. Stir everything together until well mixed. Now it’s time for cheese! Gently fold in 1 cup of shredded cheddar cheese. Make sure it’s well distributed throughout the mix. Save a small handful of cheese for the topping later. Transfer the turkey mixture into your greased casserole dish. Smooth it out to make an even layer. If you want a crunchy topping, sprinkle 1/2 cup of breadcrumbs over the top. Then, add the reserved cheddar cheese for extra flavor. Place the casserole in the oven and bake it for 25-30 minutes. You want it bubbly and the cheese to be golden brown. To prevent sticking, lightly grease your casserole dish with olive oil. This step helps your turkey casserole release easily when served. For even cooking, make sure your ingredients are mixed well. Use a large bowl to combine everything. Evenly spread the turkey mixture in the dish for a balanced bake. Boost the taste of your casserole with spices. Garlic powder and onion powder add depth and flavor. You can also try adding herbs like thyme or rosemary for a fresh twist. If you want a zesty bite, consider a splash of hot sauce or Dijon mustard. These small changes can make a big difference. For a crispy topping, sprinkle breadcrumbs over the cheese before baking. This adds a delightful crunch. If you like extra creaminess, add more sour cream or cheese to the mix. Use a mix of cheeses for varied flavors. A blend of cheddar and mozzarella offers a great melt and taste. Pro Tips Use Fresh Ingredients: While frozen vegetables work well, using fresh ones can enhance the flavor and texture of your casserole. Experiment with Cheeses: Try mixing different types of cheese, such as mozzarella or gouda, for a unique taste profile. Meal Prep Friendly: This casserole freezes well! Make a double batch and freeze one for a quick meal later. Flavor Boost: For an added depth of flavor, consider adding a splash of Worcestershire sauce or hot sauce to the mixture. {{image_4}} You can switch up this recipe easily. Try using different proteins if you have them. Cooked chicken or ham works great, too. For veggies, use what you love! Fresh bell peppers, broccoli, or spinach are all good choices. If you want more flavor, add some cooked bacon bits or sausage. Need a gluten-free option? Use gluten-free pasta instead of regular pasta. You can also swap the cream of mushroom soup for a gluten-free version or a homemade sauce. For a dairy-free dish, try using plant-based sour cream and cheese. These swaps keep your casserole tasty. Cheese can change the whole dish! Instead of cheddar, try mozzarella or gouda for a milder flavor. If you want something sharp, go for blue cheese or feta. Want a little kick? Add some pepper jack cheese. You can also mix in different sauces, like Alfredo or pesto, for a new twist on your casserole. To keep your leftover turkey casserole fresh, store it in the fridge. First, let it cool down to room temperature. Then, cover it tightly with plastic wrap or aluminum foil. You can also use an airtight container. This helps to keep the flavors strong and the texture nice. Your casserole will stay good for about 3 to 4 days in the fridge. If you want to save your casserole for later, freezing is a great option. To freeze it, follow these steps: - Allow the casserole to cool completely. - Place it in a freezer-safe dish or wrap it tightly in plastic wrap. - You can also use a freezer bag. Just make sure to squeeze out the air. - Label it with the date to keep track. When you’re ready to eat, thaw it in the fridge overnight. To reheat, place it in the oven at 350°F (175°C) until it’s hot all the way through. This usually takes about 30-40 minutes. You can cover it with foil to avoid burning the top. To enjoy your casserole at its best, reheat it carefully. Here are some tips: - Preheat your oven before adding the casserole. - Add a splash of broth or water if it seems dry. - Cover with foil for even heating. - Bake until it’s bubbly and the cheese is melted again. This way, you’ll bring back the comfort and flavor of the casserole, making it just as tasty as the first time! You can prepare this casserole a day in advance. Start by mixing the turkey, pasta, and vegetables as usual. After adding the soup, sour cream, and spices, place the mixture in a greased dish. Cover it tightly with plastic wrap. Store it in the fridge, and bake it when you are ready. This makes dinner easy and stress-free. Yes, you can. Fresh vegetables add a nice crunch and flavor. You can use diced carrots, peas, or green beans. Just chop them into small pieces. Cook them slightly before adding them to your casserole. This helps them cook evenly in the oven. Frozen vegetables are convenient, but fresh ones can brighten the dish. This casserole pairs well with simple side dishes. A fresh green salad adds crispness and balance. You can also serve steamed broccoli or green beans for a healthy touch. Garlic bread is another great option. It brings warmth and complements the creamy casserole well. Food safety is key. You should not leave the casserole out for more than two hours. After that, harmful bacteria can grow. If the room is warm, like in summer, reduce that time to one hour. Always cover it and store it in the fridge if not eaten right away. You learned how to make a tasty leftover turkey casserole. With simple steps and key ingredients, anyone can create this dish. Remember to mix your turkey, pasta, and veggies well for big flavor. Use the tips for texture and flavor to make it special. Try different ingredients for new takes on this recipe. Store leftovers right to keep their taste. Now it's time for you to enjoy your homemade casserole!

Leftover Turkey Casserole Comfort Food Delight

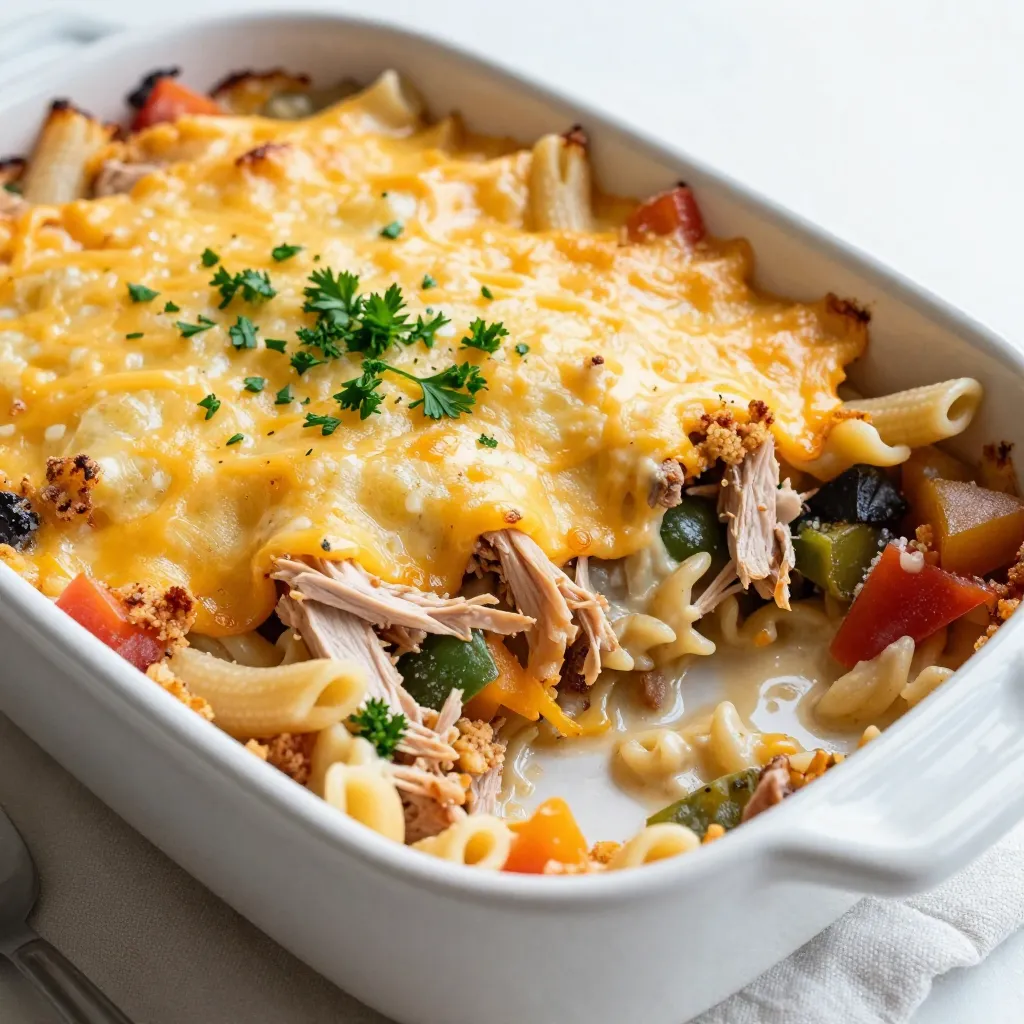
If you’ve got leftover turkey, I’ve got the perfect recipe for you! My Leftover Turkey Casserole is the ultimate comfort

- 1 cup crushed graham crackers - 3 tablespoons melted butter - 2 tablespoons granulated sugar - 16 oz cream cheese, softened - 1 cup powdered sugar - 1 teaspoon vanilla extract - ¼ teaspoon peppermint extract - 1 cup whipped cream - Mini chocolate chips (for garnish) - Crushed candy canes (for garnish) Each ingredient plays a special role in making these mini peppermint cheesecake bites rich and creamy. The graham crackers form a sweet and crumbly crust. The melted butter and sugar bind them together, giving them a nice texture. Cream cheese adds that wonderful creamy base. It pairs perfectly with the sweetness of powdered sugar and the warmth of vanilla extract. The peppermint extract brings in that festive flavor, making every bite delightful. Whipped cream is the secret to lightness in the cheesecake. It makes the filling fluffy and airy. The mini chocolate chips and crushed candy canes are not just for looks; they add crunch and a burst of flavor. With these ingredients, you’ll create bites that are sure to impress. {{ingredient_image_2}} - Preheat the oven to 325°F (160°C). - Line a mini muffin tray with cupcake liners. - In a medium bowl, combine 1 cup of crushed graham crackers, 3 tablespoons of melted butter, and 2 tablespoons of granulated sugar. - Mix until it looks like wet sand. - Take about 1 tablespoon of this mixture and press it into each liner. - Bake for 5 minutes and then cool them on a wire rack. - In a large bowl, beat 16 ounces of softened cream cheese until smooth. - Gradually add 1 cup of powdered sugar, 1 teaspoon of vanilla extract, and ¼ teaspoon of peppermint extract. - Mix until all ingredients combine well and the mixture is smooth. - Carefully fold in 1 cup of whipped cream with a spatula until fluffy and creamy. - Spoon or pipe the cheesecake mixture into each muffin liner over the cooled crust. - Fill them generously to create a nice dome shape. - Place the tray in the refrigerator and let the bites set for at least 2 hours. - Before serving, sprinkle mini chocolate chips and crushed candy canes on top for a festive touch. To get a great crust, your mixture must look like wet sand. Combine the crushed graham crackers, melted butter, and sugar well. This step is key for a solid base. After mixing, press the mixture firmly into each muffin liner. This will help the crust hold together when baked. Adjust the peppermint extract to find your perfect taste. If you want a stronger mint flavor, add a bit more extract. On the other hand, try using vanilla or almond extract for a different twist. You can also use citrus zest for a fresh, bright taste. For a festive touch, arrange the cheesecake bites on colorful platters. You can use festive decorations, like whole candy canes or sprigs of mint. To make them sparkle, sprinkle edible glitter or colorful sprinkles on top. This little detail adds charm to your dessert and makes it extra special. Pro Tips Chill Your Tools: For a smoother cheesecake filling, chill your mixing bowl and beaters in the refrigerator before use. This helps maintain a cooler temperature while mixing, resulting in a creamier texture. Use Room Temperature Ingredients: Ensure your cream cheese is at room temperature before mixing. This prevents lumps and creates a smoother filling. Don't Overmix: When folding in the whipped cream, be gentle. Overmixing can deflate the airiness, resulting in a denser cheesecake bite. Garnish Creatively: In addition to mini chocolate chips and crushed candy canes, consider adding a drizzle of chocolate sauce or a dollop of whipped cream for extra flair when serving. {{image_4}} You can change up the flavor of these cheesecake bites in fun ways. Consider a chocolate peppermint twist. For this, add cocoa powder to the cream cheese mixture. It gives a rich taste that pairs well with peppermint. You can also create seasonal fruit toppings. Try fresh berries or sliced strawberries. They add color and freshness to the bites. If you need a gluten-free version, swap the crust ingredients. Use gluten-free graham crackers or almond flour instead. Mix these with melted butter and sugar as before. This keeps the delicious taste while making it safe for everyone. You can switch up the toppings too. Instead of mini chocolate chips and crushed candy canes, try chopped nuts or caramel syrup. Sliced almonds or walnuts add a nice crunch. Drizzling with chocolate sauce gives a sweet touch. Use your favorite toppings to make these bites your own! To keep your mini peppermint cheesecake bites fresh, store them in the fridge. Place them in an airtight container. This method keeps them creamy and prevents drying. If you want to store them longer, you can freeze them. Wrap each bite in plastic wrap, then place them in a freezer-safe bag. This method helps preserve their taste and texture for later enjoyment. Mini peppermint cheesecake bites last about five days in the fridge. After this, they may start to lose their flavor and texture. If frozen, they can last up to three months. Just be sure to label your containers with the date you made them. This way, you will know when to enjoy them at their best. If your cheesecake bites feel a bit firm after storage, don’t worry. You can restore their creamy texture. Simply let them sit at room temperature for about 15 minutes before serving. This helps soften them. For added flavor, you can top them with fresh whipped cream before serving. This little touch makes them feel fresh and exciting again. Yes, you can make these cheesecake bites a day in advance. Prepare them as directed and chill them in the fridge. This helps the flavors blend well. Just remember to add toppings before serving for the best look. You can tell they are set when they feel firm to the touch. Gently press the tops with your finger. If they spring back, they are ready. They should also look slightly glossy and smooth. You can use mascarpone cheese or Greek yogurt as substitutes. Mascarpone gives a rich flavor, while Greek yogurt makes it lighter. Both options will change the taste a bit, but they'll still taste great. Leftover cheesecake bites make a tasty snack. You can also crumble them on top of ice cream or mix them into a yogurt parfait. Another option is to blend them into a shake for a sweet treat. In this post, we explored how to make delightful mini peppermint cheesecake bites. We covered all the ingredients, step-by-step instructions, and tips for best results. You can easily customize flavors and enhance presentation for any occasion. Remember to store your bites properly for maximum freshness. Whether you plan to share or enjoy them solo, these treats are sure to impress. Creating them is simple and fun, making your dessert game stronger. Enjoy making these tasty bites your own!

Mini Peppermint Cheesecake Bites Rich and Creamy Delight

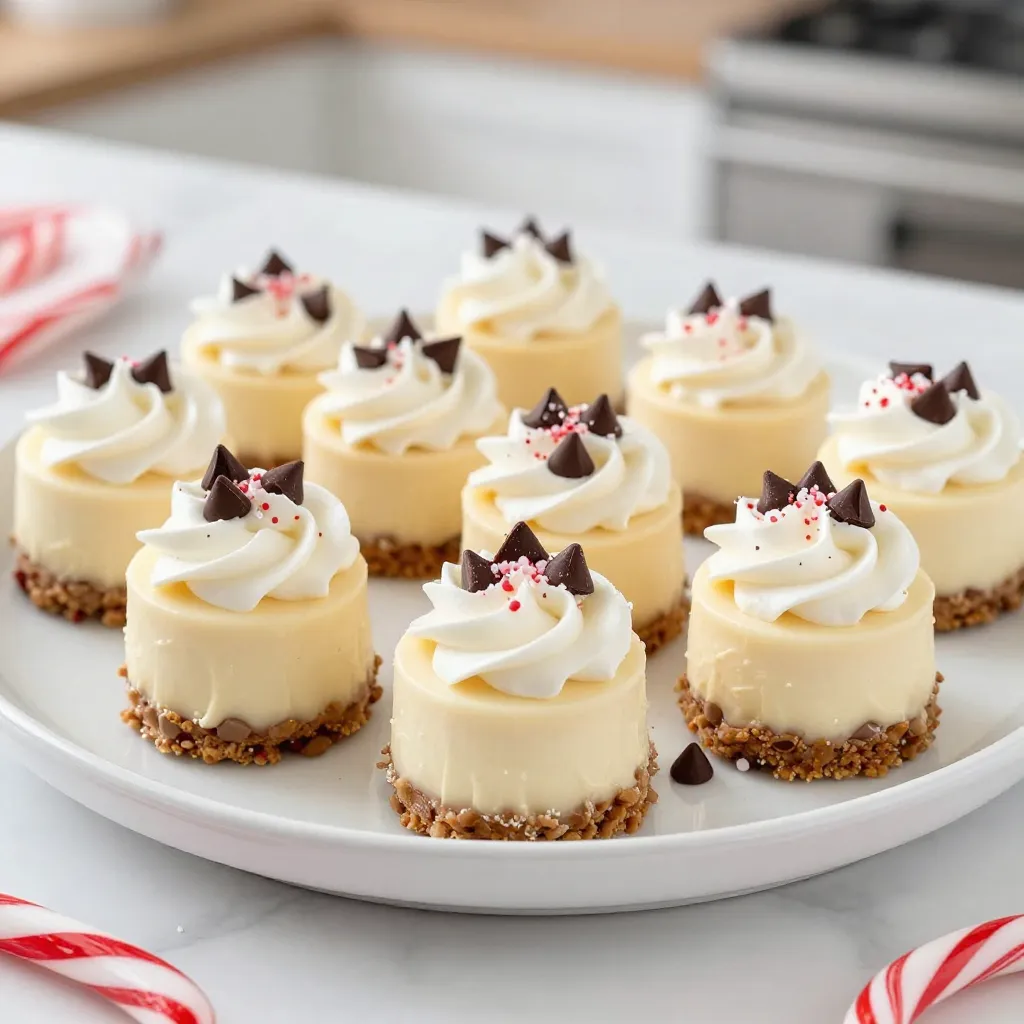
If you’re craving a sweet treat that’s rich and creamy, look no further! These Mini Peppermint Cheesecake Bites are perfect

- 2 lbs boneless, skinless chicken thighs - 1 cup creamy coconut milk - 1/2 cup peanut butter (smooth or crunchy) - 1/4 cup soy sauce (or tamari for gluten-free) - 1 large red bell pepper, thinly sliced - 1 cup fresh broccoli florets - 1/2 cup green onions, chopped (for garnish) - 2 tablespoons red curry paste - 1 tablespoon packed brown sugar - 3 cloves garlic, finely minced - 1 tablespoon fresh ginger, grated Gather these ingredients before you begin. Each one plays a vital role in making the dish rich and flavorful. The chicken thighs provide a tender base. Coconut milk and peanut butter create a creamy sauce. Soy sauce adds depth. The red curry paste brings a kick. Fresh veggies add color and crunch. This mix makes for a delightful meal everyone will enjoy. {{ingredient_image_2}} To start, grab a medium bowl. Add 1 cup of creamy coconut milk and 1/2 cup of peanut butter. Whisk them together until smooth. Next, mix in 1/4 cup of soy sauce and 2 tablespoons of red curry paste. These add great flavor! Don’t forget to add 3 cloves of minced garlic and 1 tablespoon of grated fresh ginger. Whisk until everything is well combined. Take 2 lbs of boneless, skinless chicken thighs. Arrange them evenly in the bottom of your crockpot. Pour the smooth peanut sauce over the chicken. Make sure every piece is well coated. Now, layer 1 large sliced red bell pepper and 1 cup of fresh broccoli florets on top. This adds color and crunch! Secure the lid on your crockpot. Set it to cook on low for 6-7 hours or on high for 3-4 hours. Check the chicken for doneness; it should be tender enough to shred easily. When the time is up, use two forks to shred the chicken right in the crockpot. Mix the chicken with the sauce and vegetables for a tasty meal. - For peanut butter, always choose smooth or crunchy based on your taste. - Fresh produce makes a big difference in flavor. Use vibrant red bell pepper and firm broccoli. - The chicken is done when it shreds easily with two forks. - To shred chicken, use two forks and pull apart the meat in opposite directions. - Add spices like cayenne or paprika for a kick. - Adjust the heat by adding more or less red curry paste. Pro Tips Choose Your Chicken Wisely: For the best flavor and texture, opt for boneless, skinless chicken thighs as they remain tender and juicy throughout the cooking process. Peanut Butter Preference: Use creamy peanut butter for a silky sauce or crunchy for added texture. Both will provide a deliciously nutty flavor! Customize the Veggies: Feel free to add or substitute other vegetables like snap peas or carrots to make the dish your own while keeping it colorful and nutritious. Garnish for Flavor: Don't skip the garnishes! Chopped green onions, roasted peanuts, and lime wedges enhance the dish with freshness and crunch. {{image_4}} You can change the main protein in this dish to suit your taste. - Substituting chicken for tofu: Tofu works well in this recipe. Use firm tofu and press it to remove extra water. Cut it into cubes and follow the same steps as the chicken. The sauce will soak into the tofu, giving it a rich flavor. - Using shrimp or beef options: Shrimp cooks quickly. Add it during the last hour of cooking. For beef, use thin slices of flank steak. Add it at the start so it becomes tender. You can easily make this meal plant-based. - Omitting animal products completely: Skip the chicken and use tofu as mentioned. You can also add more veggies. This keeps the dish hearty and satisfying. - Substituting with plant-based ingredients: Replace the chicken with mushrooms or tempeh. Use vegetable broth instead of chicken broth for a deeper flavor. Adding or swapping ingredients can change the taste. - Adding different vegetables: Feel free to toss in carrots, snap peas, or zucchini. These add color and crunch to the dish. - Using alternative sauces or seasonings: Try using almond butter instead of peanut butter. You can also switch the soy sauce for coconut aminos for a sweeter taste. To store leftovers, place the chicken in an airtight container. Make sure it cools first. Seal it tightly to keep out air and moisture. You can store the leftovers in the fridge for up to four days. This way, the flavors remain fresh and tasty. To freeze the dish, let it cool completely before packing. Use freezer-safe bags or containers. Ensure you remove as much air as possible. This helps prevent freezer burn. You can freeze it for up to three months. When you want to enjoy it again, thaw in the fridge overnight. Reheat it in a pot on the stove or in the microwave. For reheating, heat it gently on low to avoid overcooking. Stir occasionally to ensure even heating. Serve with steamed rice or noodles for a full meal. Adding fresh veggies on the side gives a nice crunch. Don’t forget to garnish with green onions and peanuts for extra flavor! It takes about 6 to 7 hours on low. If you choose high, it takes 3 to 4 hours. Either way, the chicken should be tender and ready to shred. This long cooking time helps the flavors blend well. Yes, you can! Use tamari instead of soy sauce. Tamari is a gluten-free option. Check other ingredients for hidden gluten. Many brands offer gluten-free peanut butter and red curry paste. I recommend rice or noodles as a base. You can also serve it with fresh veggies or a salad. Lime wedges add a nice touch. Chopped peanuts and green onions make great toppings too. Enjoy this meal with friends or family for a fun dinner! This blog post covered the delicious Crockpot Thai Peanut Chicken. We explored key ingredients like chicken thighs, coconut milk, and peanut butter. Then, we walked through easy steps to prepare the dish and shared tips for choosing the best ingredients. You can try new protein options and adjust flavors as you like. Store your leftovers safely to enjoy later. With this guide, you'll create tasty meals that please everyone. Dive into the kitchen and make this recipe shine!

Crockpot Thai Peanut Chicken Simple and Flavorful Meal

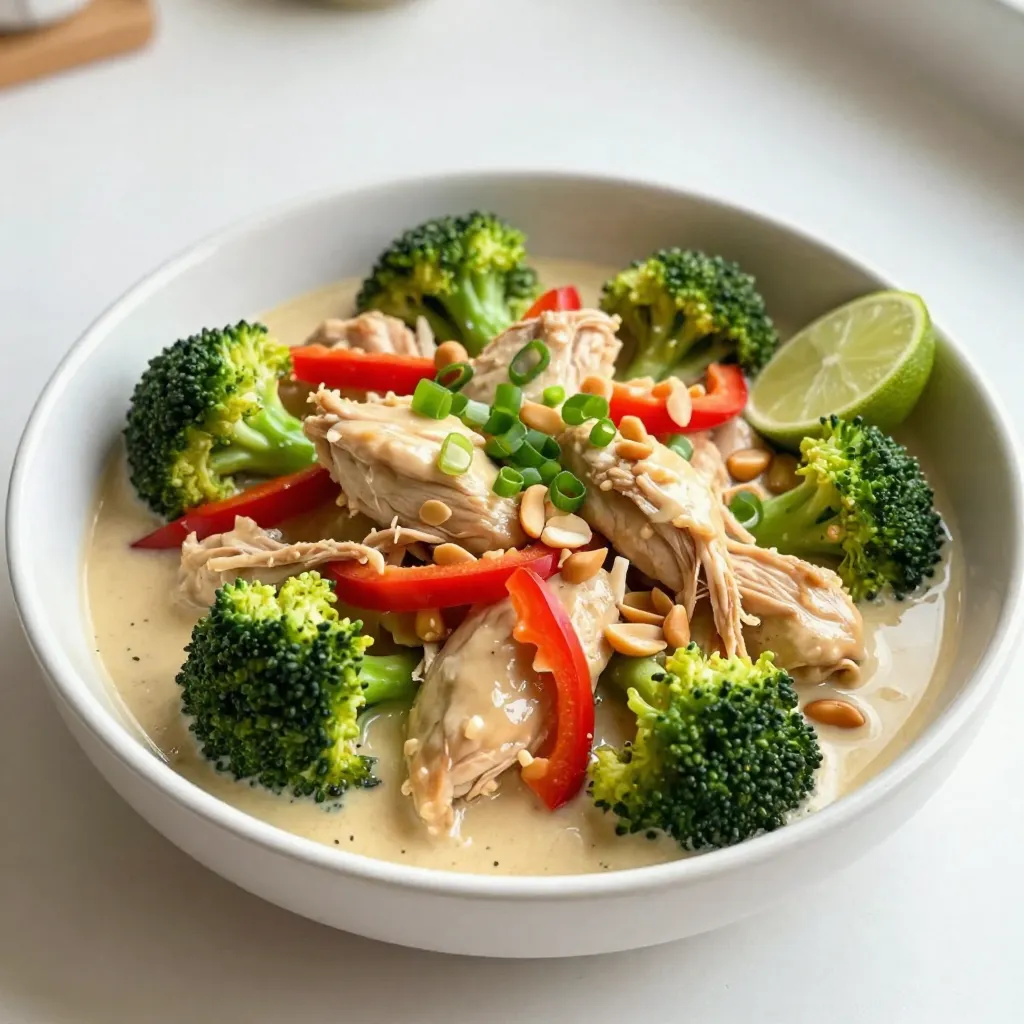
Are you ready to create a meal that’s easy to make yet bursts with flavor? My Crockpot Thai Peanut Chicken

- 1 can (15 oz) chickpeas, thoroughly drained and rinsed - 2 tablespoons extra virgin olive oil - 2 tablespoons everything bagel seasoning - 1 teaspoon garlic powder - ½ teaspoon onion powder - Salt and freshly cracked black pepper to taste - Baking sheet - Parchment paper - Mixing bowl - Kitchen towels or paper towels To make crispy everything bagel roasted chickpeas, gather these ingredients first. The chickpeas serve as the base. Draining and rinsing them is key. This step removes extra salt and improves flavor. Next, you need the olive oil. It helps the spices stick and enhances crispiness. Everything bagel seasoning brings that classic flavor. Garlic and onion powders add depth. Finally, use salt and pepper to taste. For tools, start with a baking sheet. Lining it with parchment paper saves cleanup time. A mixing bowl helps combine your ingredients easily. Kitchen towels or paper towels will help dry the chickpeas. By preparing these items, you set yourself up for success in making this tasty snack. - Step 1: Preheat the Oven First, set your oven to 400°F (200°C). This heat will help the chickpeas get nice and crispy. Line a baking sheet with parchment paper to make cleanup easy and prevent sticking. - Step 2: Prepare the Chickpeas Take your can of chickpeas and drain them well. Rinse them under cold water. Spread the rinsed chickpeas on a clean towel. Gently pat them dry. This step is very important. If the chickpeas are wet, they won’t crisp up. - Step 3: Coat the Chickpeas In a large mixing bowl, add the dried chickpeas. Pour in two tablespoons of extra virgin olive oil. Toss the chickpeas gently until they are fully coated in oil. This helps the seasoning stick. - Step 4: Add Seasoning Now, sprinkle the everything bagel seasoning, garlic powder, onion powder, and a pinch of salt and pepper over the chickpeas. Mix well using your hands or a spatula. Make sure each chickpea gets a good amount of seasoning. - Step 5: Arrange for Roasting Transfer the seasoned chickpeas to the lined baking sheet. Spread them out in a single layer. Avoid crowding them; otherwise, they will steam and not roast. - Step 6: Roast Place the baking sheet in your preheated oven. Roast the chickpeas for about 25-30 minutes. Halfway through, give the pan a gentle shake. This helps them brown evenly. - Step 7: Cool and Enhance Crispiness When the chickpeas are golden brown and crispy, take them out of the oven. Let them cool on the baking sheet for a few minutes. They will get crunchier as they cool down. - Step 8: Serve and Enjoy Now it’s time to dig in! You can eat these crispy chickpeas as a snack or use them as a topping for salads or soups. They add a great crunch and flavor. Enjoy your delicious creation! To get the best crunch from your chickpeas, you need to dry them well. After rinsing, spread them on a towel. Pat them gently until no water remains. This step is key for crispiness. Next, set your oven to 400°F (200°C). This temperature helps the chickpeas roast perfectly. You can customize your everything bagel blend to suit your taste. Try adding more garlic or onion powder. You can also mix in spices like cayenne or paprika for some heat. This adds a nice kick and makes your chickpeas extra tasty. These crispy chickpeas pair well with salads and soups. Sprinkle them on top for added crunch. You can also enjoy them as a snack on their own. Serve them in a bowl or on a bed of greens for a pretty touch. They make every meal more fun and flavorful! {{image_4}} You can spice up your chickpeas in many ways. For a kick, use chili powder or cayenne. These spices add heat and flavor. If you love herbs, try oregano or thyme. These herbs bring a fresh taste. Feel free to mix and match. Find a blend that you love! If you are gluten-free, check your seasoning. Most everything bagel seasonings are safe. Just read the label. For vegan diets, this recipe is already vegan. The chickpeas and seasonings are plant-based. Enjoy these snacks without worry! Want to try something new? Swap chickpeas for other legumes like black beans or lentils. They will roast well too. You can also change the oil. Use avocado oil or coconut oil instead of olive oil. Each oil brings its own flavor. Experiment to find what you like best! Store your crispy chickpeas in an airtight container. This keeps them fresh for longer. I recommend using a glass jar or a plastic container with a tight lid. Proper storage helps maintain their crunch. The roasted chickpeas last about 3 to 5 days at room temperature. After that, they may lose their crispiness. To bring back the crunch, reheat your chickpeas in the oven. Preheat your oven to 350°F (175°C). Spread the chickpeas on a baking sheet and heat for about 10 minutes. This method ensures they regain their texture. You can also use a microwave, but this may make them softer. If you choose the microwave, heat them for just a minute or two. Yes, you can freeze roasted chickpeas! Place them in a freezer-safe bag. Make sure to remove as much air as possible before sealing. They can last up to 3 months in the freezer. To thaw, take the bag out and let it sit at room temperature for a few hours. For best results, reheat them in the oven after thawing. This keeps them crispy and tasty. Roasted chickpeas can last for about 1 week when stored correctly. Keep them in an airtight container at room temperature. They may lose some crispiness but will still taste great. If you want to keep them fresh longer, consider refrigerating them. This can extend their life to about 2 weeks. Yes, you can use fresh chickpeas. However, they must be cooked first. Fresh chickpeas need to be soaked overnight and boiled until tender. This process takes more time than using canned chickpeas, which are ready to go. You should use canned chickpeas for this recipe. They are pre-cooked, making the process quick and easy. Look for chickpeas that are low in sodium for a healthier option. If you prefer, you can use dried chickpeas after cooking them. Yes, crispy roasted chickpeas are a healthy snack. They are high in protein and fiber, which helps keep you full. The healthy fats from olive oil add flavor without too many calories. Plus, they are a great alternative to chips or other snacks. Yes, you can use an air fryer! Set it to 400°F (200°C) and cook for about 15-20 minutes. Shake the basket halfway through to ensure even cooking. The air fryer gives a great crispy texture and is faster than the oven. You can make your own blend if you don’t have everything bagel seasoning. Combine equal parts sesame seeds, poppy seeds, garlic powder, and onion powder. Add a pinch of salt for flavor. You can also try other spices like smoked paprika or chili powder for a different kick. Roasting chickpeas is easy and fun. You start with simple ingredients and tools. Preheat the oven and prepare your chickpeas. Coat them with olive oil and seasonings. Roast until crispy and enjoy them as a snack or topping. Remember, crispiness relies on drying the chickpeas well. You can customize the flavors to suit your taste. Try different seasonings or beans for variety. Whether serving them fresh or storing them, roasted chickpeas are a healthy choice. Explore these tips and enjoy your crunchy creations!

Crispy Everything Bagel Roasted Chickpeas Recipe

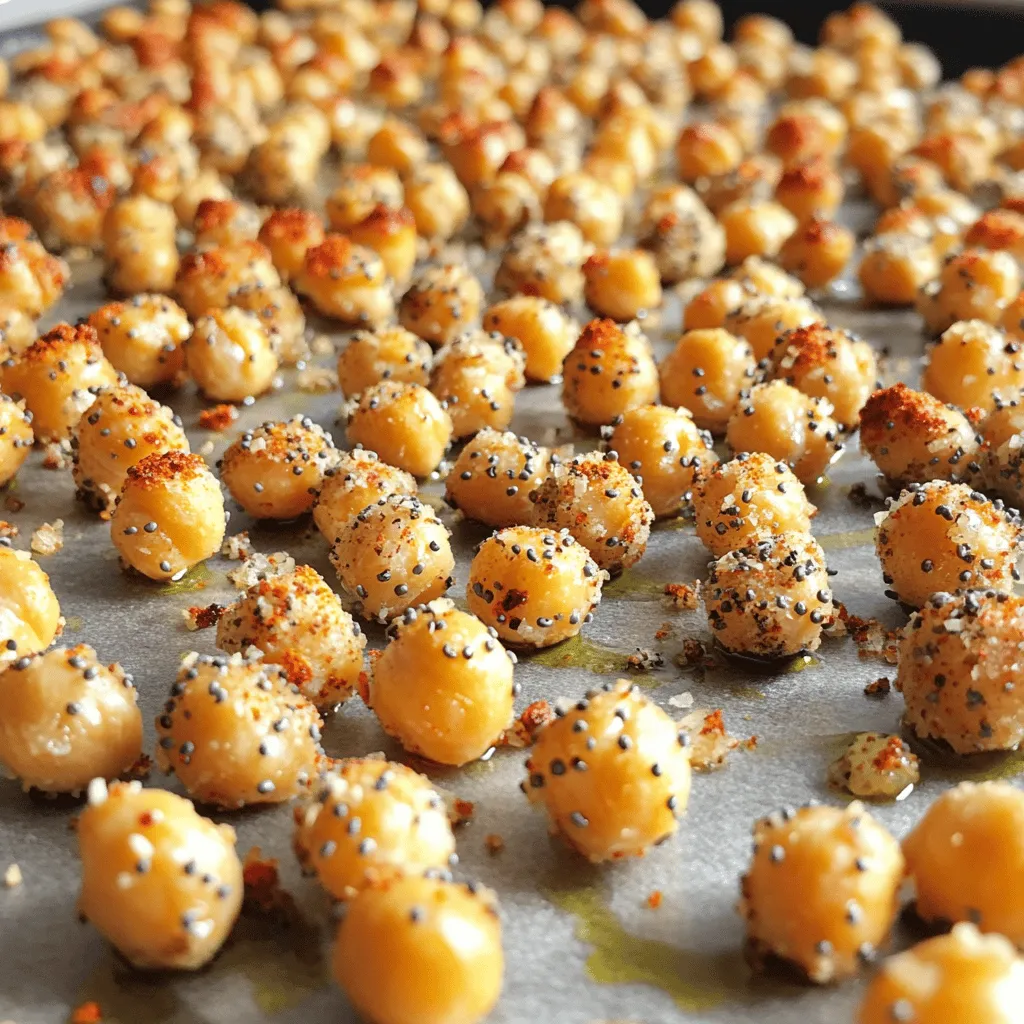
If you’re looking for a delicious snack that’s crisp, flavorful, and easy to make, this Crispy Everything Bagel Roasted Chickpeas

Older posts
Newer posts
← Previous Page1 … Page6 Page7 Page8 … Page86 Next →

dsad

© 2026 lazychefmagic • Built with GeneratePress

Our Policies

  • Copyright Policy
  • Cookie Policy
  • GDPR Policy
  • Privacy Policy
  • Disclaimer
  • Terms Of Use

More Information

  • Home
  • About
  • Contact
  • Appetizers
  • Dessert
  • Dinner
  • Drinks
©2026, lazychefmagic About Back To Top