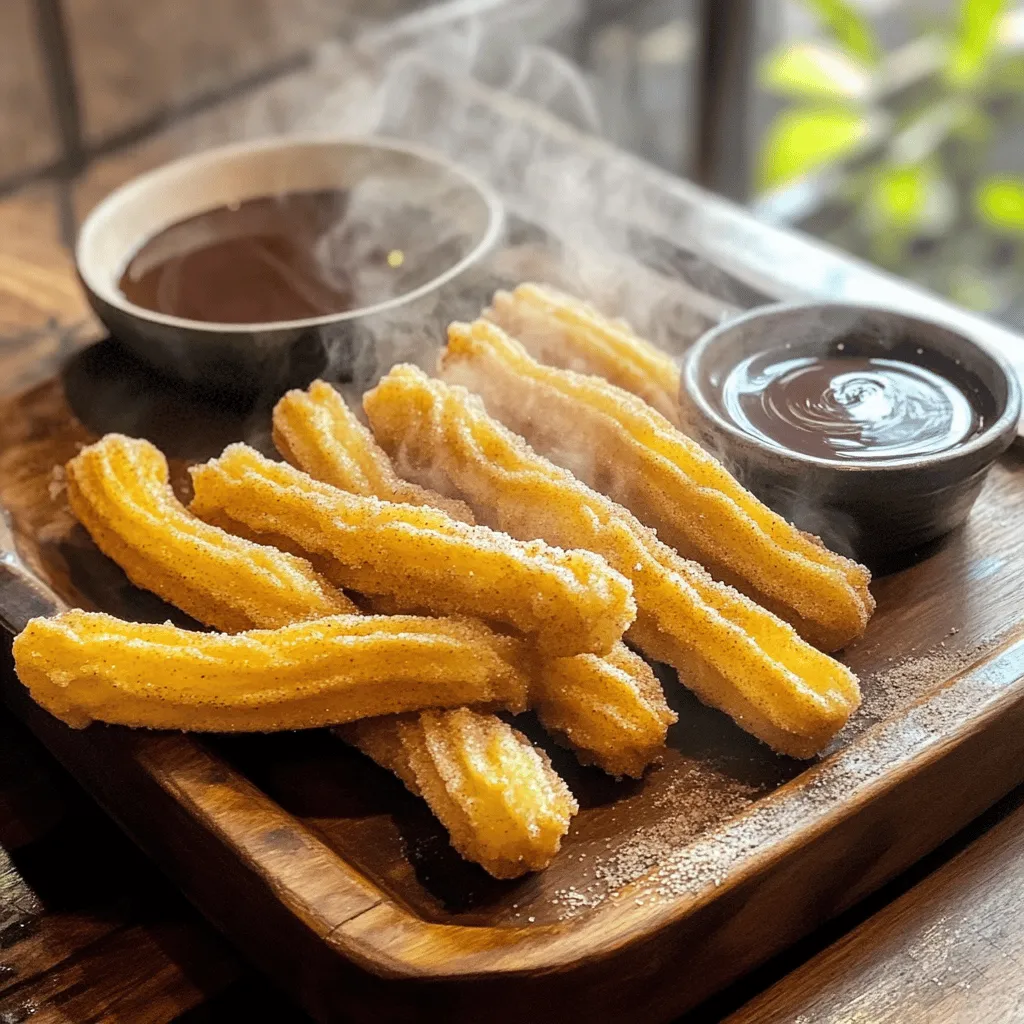
Cinnamon Sugar Churros Delightful Snack Recipe
Cinnamon sugar churros are a delightful snack that you can easily make at home! Their crispy outside and soft inside
Cinnamon sugar churros are a delightful snack that you can easily make at home! Their crispy outside and soft inside
![- 1 cup cream cheese, softened - 1/2 cup powdered sugar - 1 teaspoon pure vanilla extract - 1/2 cup heavy whipped cream - 1 cup graham cracker crumbs - 1/4 cup unsalted butter, melted - Fresh seasonal fruit (strawberries, blueberries, raspberries) - Optional chocolate chips or caramel sauce To make these tasty no-bake cheesecake bites, you need simple and fresh ingredients. Start with cream cheese. It should be softened, so it blends easily. The powdered sugar adds sweetness. The vanilla extract gives a lovely flavor. Heavy whipped cream makes the filling light and fluffy. For the crust, graham cracker crumbs are a must. They give a nice crunch. The melted butter helps hold the crumbs together. Lastly, add toppings. Fresh fruit like strawberries or blueberries adds color and taste. You can also drizzle chocolate or caramel sauce for extra fun. These ingredients come together for an easy and delicious treat. For the full recipe, check out the details on how to mix and chill these bites! - Step 1: Beat the softened cream cheese in a bowl. Use an electric mixer to make it smooth. - Step 2: Gradually add the powdered sugar and vanilla. Mix until it's creamy and lump-free. - Step 3: In a clean bowl, fold in the heavy whipped cream. Use a spatula to keep it fluffy. - Step 4: Mix the graham cracker crumbs with melted butter. Stir until it looks like damp sand. - Step 5: Press the crust mixture into a mini muffin tin. Use about one tablespoon for each cup. - Step 6: Fill each crust with the cream cheese mixture. Smooth the top with a spatula. - Step 7: Refrigerate the bites for at least two hours. This helps them firm up well. Enjoy the ease of making these no-bake cheesecake bites! For the full recipe, check out the Full Recipe. - Make sure your cream cheese is at room temperature. This helps it blend easily. - Gently fold in the whipped cream. This keeps the mixture light and fluffy. To get the best texture, always use softened cream cheese. Cold cream cheese can cause lumps. When you fold in the whipped cream, do it slowly. This keeps air in the mixture, making each bite creamy. - Arrange the cheesecake bites on a decorative platter. It adds a nice touch. - Garnish each bite with a sprig of mint. This adds color and freshness. A beautiful presentation makes your treats even more appealing. Use a bright platter to show off the bites. The mint adds a pop of green that looks great. - Think about adding flavors like citrus zest or chocolate. This can change the taste of your bites. Adding a dash of lemon or orange zest can elevate the flavor. If you love chocolate, try mixing in chocolate chips. This small change can make a big difference in taste. For the full recipe, check out the details above. {{image_4}} You can easily change the flavors of your no-bake cheesecake bites. One fun option is chocolate. To make chocolate no-bake cheesecake bites, add 1/2 cup of melted chocolate to the cream cheese mixture. This gives a rich, sweet treat that chocolate lovers will adore. Another great choice is fruit-infused cheesecake bites. You can use lemon or raspberry for a fresh twist. For lemon, add the zest of one lemon and a tablespoon of lemon juice to the cream cheese. For raspberry, mix in raspberry puree to the filling for a fruity punch. You can make these bites fit many diets. For gluten-free options, use gluten-free graham crackers in your crust. This keeps the taste and texture while being safe for those with gluten allergies. If you want vegan adaptations, substitute regular cream cheese with plant-based cream cheese. Use coconut whipped cream instead of heavy whipped cream. These swaps keep the bites creamy and delicious without dairy. Hosting a party? Create a DIY customize-your-bite station. Set out different toppings like crushed nuts, fresh fruit, and chocolate chips. Let your guests build their own cheesecake bites. This makes for a fun and interactive dessert experience, where everyone can create their perfect treat. For the full recipe, check the section above to get started today! To keep your no-bake cheesecake bites fresh, store them in an airtight container. Place the container in the fridge. They will stay good for up to five days. Be sure not to stack them, as this can ruin their shape. If you want to enjoy them later, chill them right after making. If you have leftovers, freezing is a great option. First, let the cheesecake bites cool completely in the fridge. Then, place them in a single layer on a baking sheet. Freeze them for about two hours. Once they're firm, transfer them to a freezer bag or container. They can last up to three months in the freezer. For the best taste, eat your cheesecake bites within five days if stored in the fridge. If frozen, try to eat them within three months for the best flavor and texture. Always check for any signs of freezer burn or spoilage before enjoying. Feel free to explore the [Full Recipe] for more details on making these tasty treats! No-bake cheesecake bites can last up to five days in the refrigerator. Store them in an airtight container. If you want them to last longer, you can freeze them. They will stay fresh in the freezer for about two months. Just make sure to wrap them well to avoid freezer burn. Yes, you can use different types of crusts. Some great options include: - Oreos for a chocolatey flavor - Nuts, like almonds or pecans, for a crunchy base - Gluten-free cookie crumbs for a gluten-free option Feel free to experiment with what you like best! You can get creative with toppings! Some ideas include: - Drizzling melted chocolate or caramel sauce - Adding crushed cookies for extra crunch - Sprinkling shredded coconut for a tropical twist - Using different fruits, like kiwi or mango, for a fresh taste Mix and match to find your favorite combination! Absolutely! You can prepare no-bake cheesecake bites ahead of time. Make them up to two days in advance. Just store them in the fridge until you’re ready to serve. For longer storage, freeze them and let them thaw in the fridge overnight before serving. This makes it easy to enjoy a sweet treat anytime! For the full recipe, check here. You learned how to make no-bake cheesecake bites, starting with key ingredients like cream cheese and graham crackers. Following simple steps, you can create a tasty dessert. With tips on texture, presentation, and ways to customize your treats, you have the tools to impress. Remember, these bites are easy to adapt for various diets and occasions. Whether served at a party or a family dinner, enjoy your delicious creations!](https://lazychefmagic.com/wp-content/uploads/2025/05/def8c3ec-d310-4fdc-ba35-94d0c1fab19b.webp)
If you crave a sweet treat that’s quick and easy, these No-Bake Cheesecake Bites are perfect! With just a few
![- All-purpose flour: This will form the base of your pizza dough. It gives the crust that nice chewy texture. Using high-quality flour helps your dough rise well. - Yeast: Active dry yeast is key. It makes your dough rise and gives it fluffiness. Make sure your water is warm but not too hot to keep the yeast alive. - Fresh vegetables: Bell peppers, onions, and mushrooms add crunch and flavor. Use a mix of colors for a bright look. Freshness makes a big difference in taste. - Cheese: Shredded mozzarella is classic. It melts beautifully and complements the veggies. You can mix in other cheeses for unique flavors. - Seasonings: Italian seasoning, with herbs like oregano and basil, brightens the dish. It adds depth to the sauce and toppings. - Other vegetables: Feel free to add spinach, zucchini, or artichokes. Each brings its own taste and texture. Experiment to find your favorite mix! - Different cheese alternatives: Try goat cheese, feta, or vegan cheese. Each will change the flavor profile and can cater to different diets. - Suggested sauces: While pizza sauce is traditional, consider pesto or barbecue sauce. Each sauce can add a fun twist to your veggie pizza. For the complete recipe, check out the [Full Recipe]. To make great pizza, start by activating the yeast correctly. In a small bowl, mix warm water, sugar, and active dry yeast. Stir gently and wait about 5-10 minutes. You want the mixture to get frothy. This means your yeast is alive and ready to work. Next, mix your dry and wet ingredients. In a large bowl, put the all-purpose flour and fine salt together. Make a well in the flour and pour in the frothy yeast mixture and olive oil. Use a wooden spoon or your hands to blend the ingredients until a soft dough forms. Now it's time to shape your pizza. First, punch down the dough to release air. Roll it out on a floured surface. Aim for about 12 inches in diameter or shape it to fit your baking sheet. Once shaped, layer the sauce and toppings for the best flavor. Move the rolled dough to a baking sheet or pizza stone. Spread pizza sauce evenly over the dough, leaving a small edge. Sprinkle shredded mozzarella on top, followed by bell peppers, red onions, mushrooms, and black olives. Finally, dust Italian seasoning over the entire pizza. For baking, set your oven to 475°F (245°C). This high heat gives you a great crust. Bake the pizza for 12-15 minutes. Keep an eye on it. Look for a golden-brown crust and melted cheese. Check the doneness of the crust and cheese. The crust should be firm and crispy. The cheese should be bubbly and slightly browned. Once done, take it out of the oven and let it cool for a few minutes before slicing. Enjoy your delicious veggie pizza! For the full recipe, refer to the Delicious Veggie Pizza section. To make a delicious veggie pizza, focus on a crispy crust. Start by rolling out the dough thinly. A thinner base allows for better cooking. Pre-bake the crust for 5 minutes before adding toppings. This step helps remove moisture and keeps the crust crisp. Preventing sogginess from toppings is key. Choose fresh, less watery veggies like bell peppers and onions. Pat dry any veggies that hold water, like mushrooms. Use just enough sauce to cover the dough. A thin layer prevents a soggy base. Storing pizza properly keeps it fresh. Wrap leftover slices in foil or plastic wrap. Place them in an airtight container. Store in the fridge for up to three days. If you want to keep it longer, freeze the slices. Just remember to wrap them well to avoid freezer burn. Reheating pizza can be tricky. The best method is using an oven. Preheat the oven to 375°F (190°C). Place the pizza on a baking sheet and cover it with foil. Heat for about 10-15 minutes. This method keeps the crust crisp and the cheese melty. You can also use a skillet for a quick reheat, adding a few drops of water. Cover it with a lid and heat on low for 5-7 minutes. This method steams the toppings while crisping the crust. {{image_4}} To make a vegan version of this delicious veggie pizza, you need to swap out a few key ingredients. Instead of cheese, use a dairy-free cheese alternative. Look for brands that melt well, such as cashew or almond-based cheeses. They add a creamy texture without the dairy. Next, for the crust, use the same dough but skip the olive oil. You can also add a touch of nutritional yeast for a cheesy flavor. Recommended vegan toppings include: - Sliced bell peppers - Red onions - Mushrooms - Spinach - Artichokes - Zucchini These toppings not only taste great but also add vibrant colors. You can also sprinkle some fresh herbs, like basil or oregano, for extra flavor. For a gluten-free pizza, you need to change the flour. Use gluten-free flour blends, which you can find at most stores. Make sure the blend contains xanthan gum. This helps the dough stick together. To prepare the dough, follow the same steps as the regular dough. Just mix the gluten-free flour with warm water, yeast, and salt. Knead it gently, as gluten-free dough can be more delicate. When it comes to toppings, you might want to choose gluten-free options, too. Look for sauces that are certified gluten-free. Some great gluten-free toppings are: - Fresh vegetables like bell peppers and olives - Mozzarella or vegan cheese - Fresh herbs like basil and parsley This way, everyone can enjoy a slice of pizza, no matter their dietary needs. For the full recipe, check back to the main article. When I crave veggie pizza, I always seek out local spots that shine. Here are some of my favorites: - Green Slice Pizzeria: They offer a fantastic veggie pizza loaded with fresh toppings. Users rave about their roasted zucchini and basil pesto. This unique combo gives the pizza a fresh twist. - Veggie Haven Pizza: Known for their colorful veggie blend, their pizza is a feast for the eyes. Reviewers love the crispy crust and the generous cheese. Don't miss their garlic-infused olive oil drizzle! - Fresh Dough Pizzeria: This spot uses fresh, local produce for toppings. Customers say their bell pepper and onion medley is a must-try. The crust here is thin and perfectly crunchy. Even famous chains offer tasty veggie pizzas worth trying. Here’s a quick look at some of the best: - Pizza Hut: Their Veggie Lover's pizza is classic and reliable. It features a mix of mushrooms, onions, and olives. Many find it a great value for the variety and taste. - Domino’s: Known for quick service, their Pacific Veggie is a fan favorite. It packs spinach, tomatoes, and feta cheese. Reviewers often mention how flavorful it is, thanks to the garlic sauce. - Papa John’s: Their Garden Fresh pizza is a solid choice. It comes with a variety of veggies, including green peppers and mushrooms. Many love how they keep the crust fluffy and light. For the full recipe to make your own delicious veggie pizza at home, check out the [Full Recipe]. Yes, you can freeze your veggie pizza. First, let it cool completely. Then, slice it into pieces for easy serving. Wrap each slice tightly in plastic wrap. Place the wrapped slices in a freezer-safe bag or container. This helps keep them fresh. You can freeze the pizza for up to three months. To reheat, simply bake from frozen at 375°F (190°C) until hot. Veggie pizza offers many health benefits. It is rich in vitamins and minerals. Fresh vegetables add fiber, which aids digestion. You get antioxidants from colorful toppings like bell peppers and tomatoes. Choosing whole-grain crust can boost your nutrient intake. Plus, you control the cheese and sauce amounts, making it easier to enjoy a balanced meal. Leftover veggie pizza can last in the fridge for 3 to 4 days. Store it in an airtight container or wrap it in foil. Ensure it cools before storing to keep the crust crispy. When you're ready to eat, reheat the slices in the oven for the best taste. You can also use the microwave, but it may make the crust soft. For further details, check the Full Recipe for specific storage techniques. Making veggie pizza at home is fun and rewarding. We covered essential ingredients like flour, fresh veggies, and cheeses. Remember to mix and activate yeast for perfect dough. Customizing with extra toppings and sauces can elevate flavors. Don’t forget to check baking times for a crispy crust. Finally, explore local spots and chains for great veggie pizza options. With your new skills and knowledge, you can create a tasty, customized pizza any time! Enjoy your culinary adventure!](https://lazychefmagic.com/wp-content/uploads/2025/05/deaa3714-a51b-4a51-b042-6e70e85a4153.webp)
If you’re craving a fresh and flavorful delight, my delicious veggie pizza should be your next culinary adventure! Packed with
![To create savory sweet potato black bean chili, you need the following ingredients: - 2 medium sweet potatoes, peeled and diced into 1-inch cubes - 1 can (15 oz) black beans, thoroughly rinsed and drained - 1 can (14 oz) diced tomatoes, including juice - 1 cup vegetable broth (low-sodium recommended) - 1 red bell pepper, diced - 1 green bell pepper, diced - 1 medium onion, finely chopped - 3 cloves garlic, minced or pressed - 2 tablespoons extra virgin olive oil - 2 tablespoons chili powder (adjust to taste) - 1 teaspoon ground cumin - 1/2 teaspoon smoked paprika - Salt and pepper, to taste - Optional toppings: chopped fresh cilantro, ripe avocado slices, lime wedges Sweet potatoes are rich in vitamins A and C. They boost your immune system and improve skin health. Black beans are high in fiber and protein, making them filling and nutritious. They support heart health and digestion. Bell peppers provide vitamin C and antioxidants, which fight free radicals. Onions and garlic have anti-inflammatory properties and enhance flavor. Together, these ingredients create a healthy and hearty meal. You can swap ingredients based on your needs: - Sweet Potatoes: Use butternut squash or carrots for a different flavor. - Black Beans: Substitute with kidney beans or pinto beans if desired. - Vegetable Broth: Chicken broth works well for a non-vegetarian option. - Bell Peppers: Any color of bell pepper will work, or you can use zucchini. - Garlic: Garlic powder can replace fresh garlic in a pinch. Feel free to customize this recipe to suit your taste and pantry. For the full recipe, check out the details in the earlier section. To make sweet potato black bean chili, start by gathering all the ingredients. You will need: - 2 medium sweet potatoes, peeled and diced into 1-inch cubes - 1 can (15 oz) black beans, thoroughly rinsed and drained - 1 can (14 oz) diced tomatoes, including juice - 1 cup vegetable broth (low-sodium recommended) - 1 red bell pepper, diced - 1 green bell pepper, diced - 1 medium onion, finely chopped - 3 cloves garlic, minced or pressed - 2 tablespoons extra virgin olive oil - 2 tablespoons chili powder (adjust to taste) - 1 teaspoon ground cumin - 1/2 teaspoon smoked paprika - Salt and pepper, to taste - Optional toppings: chopped fresh cilantro, ripe avocado slices, lime wedges Make sure your veggies are ready. This step sets you up for a smooth cooking process. 1. In a large pot or Dutch oven, heat the olive oil over medium heat. 2. Once hot, add the onion and sauté for about 5 minutes. Cook until the onion is soft and clear. 3. Next, stir in the garlic, chili powder, cumin, and smoked paprika. Cook for another minute. This makes the spices smell nice. 4. Now, add the sweet potatoes and both bell peppers to the pot. Toss them well to coat with the spices. 5. Pour in the diced tomatoes with their juice and the vegetable broth. Stir well and bring this mixture to a gentle simmer. 6. Lower the heat, cover the pot, and let it simmer for 20-25 minutes. The sweet potatoes should be tender. 7. When the sweet potatoes are soft, stir in the rinsed black beans. Let the chili simmer for 5 more minutes. 8. Taste the chili and add salt and pepper. If you like more heat, add more chili powder. Take the pot off the heat and let the chili cool slightly. This helps all the flavors blend. For serving, ladle the chili into bowls. Top each bowl with fresh cilantro, avocado slices, and a squeeze of lime juice. These toppings add a fresh taste and color to your dish. Enjoy your savory sweet potato black bean chili! For the complete recipe, check out the [Full Recipe]. To make your sweet potato black bean chili shine, add layers of flavor. Here are some tips: - Use fresh herbs: Cilantro adds a nice touch. Add it before serving. - Add a splash of lime juice: This brightens the dish. Use it right before serving. - Experiment with spices: Try adding cayenne for heat or smoked paprika for depth. - Sauté vegetables longer: Cooking onions and peppers until soft deepens their flavor. When making chili, some mistakes can ruin your dish. Here are a few to watch for: - Not rinsing canned beans: It can leave a slimy texture. Always rinse before adding. - Overcooking sweet potatoes: They should be tender but not mushy. Keep an eye on them. - Skipping salt: Salt enhances flavors. Taste and adjust as needed. - Ignoring cooking time: Let the chili simmer long enough to meld the flavors. Pair your chili for a delightful meal. Here are some serving ideas: - Serve with cornbread: It complements the chili and adds a nice crunch. - Top with avocado: Creamy avocado balances the spices and adds richness. - Offer tortilla chips: They add a fun crunch and make for great scooping. - Try a side salad: A fresh salad can balance the dish with crisp greens. For the full recipe, check out the Sweet Potato Black Bean Chili. Enjoy your cooking journey! {{image_4}} You can boost the protein in sweet potato black bean chili by adding meat or plant-based options. For a hearty version, consider ground turkey or chicken. Brown the meat with the onion before adding other ingredients. If you prefer plant-based protein, try adding lentils or quinoa. Both options mix well and add texture. Adjusting the spice level is easy and fun. If you want a mild chili, stick to the original recipe. For a spicy kick, add more chili powder or a dash of cayenne pepper. You can also toss in diced jalapeños for fresh heat. Just remember to taste as you go, so you find the right balance for your palate. This chili is naturally vegetarian due to its plant-based ingredients. To make it vegan, ensure that any toppings are dairy-free. Use avocado and cilantro for richness instead of sour cream. You can also explore adding a vegan cheese on top for a creamy finish. This way, everyone can enjoy a bowl of delicious chili! For the full recipe, check out the Sweet Potato Black Bean Chili details. You can store leftover sweet potato black bean chili in the fridge. Use an airtight container. It stays fresh for up to five days. Make sure to let it cool before sealing. This helps keep the flavors intact. If you want to keep the chili longer, freezing is a great option. Let the chili cool completely first. Pour it into freezer-safe bags or containers. Remove as much air as possible. This helps prevent freezer burn. You can freeze it for up to three months. To reheat, you have a few options. You can use the microwave or heat it on the stove. For the stove, place it in a pot over medium heat. Stir occasionally until hot. If it seems thick, add a splash of vegetable broth. This helps it return to a nice, smooth texture. Enjoy your meal again! For the full recipe, check out the detailed instructions above. To make this chili in a slow cooker, start by prepping your ingredients. Chop the sweet potatoes, bell peppers, and onion. Then, in a pan, heat olive oil. Sauté the onion and garlic until soft. Add the spices next. Stir for one minute. Transfer this mix to your slow cooker. Add the sweet potatoes, bell peppers, diced tomatoes, and vegetable broth. Finally, cover and cook on low for 6-8 hours. Add the black beans during the last 30 minutes. This method lets the flavors blend deeply. Yes, you can use fresh beans, but they need cooking. Start by soaking beans overnight. This helps them cook faster. Use about 1 cup of dry beans. Cook them separately before adding to your chili. This ensures they are tender. Add them in the last 30 minutes of cooking. This way, they absorb all the flavors without becoming mushy. Toppings elevate the chili's taste and texture. Here are some great options: - Chopped fresh cilantro - Creamy avocado slices - A squeeze of fresh lime juice - Shredded cheese (if desired) - Sour cream or Greek yogurt for a creamy touch Feel free to mix and match! These toppings add color and flavor, making every bite special. For the full recipe, check [Full Recipe]. This blog post covers everything you need for making Sweet Potato Black Bean Chili. You learned about the key ingredients and their benefits. We discussed cooking steps, tips, and common mistakes. I also shared variations for flavors and dietary needs, plus how to store leftovers. Enjoy trying new flavors and make this recipe yours. Happy cooking!](https://lazychefmagic.com/wp-content/uploads/2025/05/9ec1e037-0e12-4fab-ac44-2dd1eb6cf5ac.webp)
Looking for a warm and filling meal? You’ll love my savory Sweet Potato Black Bean Chili! This dish is packed
![- 8 oz elbow macaroni - 2 tablespoons unsalted butter - 2 tablespoons all-purpose flour - 2 cups milk (whole or 2%) - 1 cup sharp cheddar cheese, shredded - 1 cup mozzarella cheese, shredded - 1/2 cup cream cheese, softened - 2 tablespoons honey - 1 teaspoon black pepper (adjust to taste) - 1/2 teaspoon paprika - Salt to taste - Chopped fresh parsley for garnish When I create my Creamy Honey Pepper Mac and Cheese, I start with these simple ingredients. Each one plays a key role in making this dish rich and flavorful. The elbow macaroni provides the perfect base. The combination of cheddar and mozzarella cheese gives it that gooey, creamy texture that everyone loves. You can easily customize this dish. If you want a different flavor, try gouda or pepper jack cheese instead. For those who need gluten-free options, use gluten-free pasta. If you are avoiding dairy, swap cream cheese and milk for dairy-free versions. This way, everyone can enjoy this creamy delight, no matter their diet! For the full recipe, check out the complete steps and tips. First, grab a large pot and fill it with water. Add salt to the water, then bring it to a boil. Once the water is bubbling, add 8 oz of elbow macaroni. Cook it according to the package instructions until it is al dente. This usually takes around 7-9 minutes. After cooking, drain the pasta in a colander and set it aside. Make sure it is not sticky. In the same pot, keep the heat on medium. Add 2 tablespoons of unsalted butter and let it melt completely. Next, sprinkle in 2 tablespoons of all-purpose flour. Whisk this mix for about 1-2 minutes until it turns a light golden color. Now, slowly pour in 2 cups of milk while whisking. Keep stirring to avoid lumps. Cook this mixture for about 4-5 minutes until it thickens and simmers. Lower the heat to the lowest setting. Add 1 cup of sharp cheddar cheese, 1 cup of mozzarella cheese, and 1/2 cup of softened cream cheese. Stir until all the cheese melts, creating a smooth sauce. Now it's time to make it sweet and spicy. Mix in 2 tablespoons of honey, 1 teaspoon of black pepper, and 1/2 teaspoon of paprika. Taste and add salt as needed. Gently fold the drained macaroni into the cheese sauce, making sure every piece is well coated. Use a ladle to portion the creamy mac and cheese into bowls. For a pretty finish, sprinkle chopped fresh parsley on top. This adds a nice color and flavor. If you want to see the full recipe, check out the complete guide on Creamy Honey Pepper Mac and Cheese. Cooking pasta al dente is key. This means the pasta should be firm when bitten. It holds up better in the sauce. If you cook it too soft, it turns mushy. I always check the package for the right time. For creaminess, adjust the cheese quantities. If you like it extra cheesy, add more sharp cheddar or mozzarella. Each cheese brings a unique taste and texture. Cream cheese also helps make it smooth and velvety. To boost the flavor, consider adding spices. A pinch of garlic powder or onion powder can make a big difference. Paprika adds a nice touch as well. Fresh herbs can elevate the dish. Try adding chopped basil or thyme. They bring freshness and brightness. You can mix the herbs right into the cheese sauce for extra flavor. Serving suggestions matter. Use charming bowls for a rustic look. You can also portion it onto plates for a fancier vibe. Drizzle honey and cracked black pepper on top before serving. This adds a sweet and spicy touch. It also makes the dish look beautiful. A sprinkle of fresh parsley finishes it off nicely, making it pop with color. For the Full Recipe, check out the details to create this creamy delight! {{image_4}} You can change up the taste of your creamy honey pepper mac and cheese. One great way is to add cooked bacon or ham. The salty meat gives a nice contrast to the sweet honey. Just chop it up and stir it into the cheese sauce. Mixing in vegetables also adds flavor and color. Think about using spinach or jalapeños. Spinach adds a nice earthiness, while jalapeños can bring a spicy kick. You can cook these veggies lightly before adding them to the mix. This way, they blend well with the creamy sauce. If you want a plant-based dish, you can make vegan options. Use cashew cheese or nutritional yeast instead of dairy cheese. Almond milk or coconut milk works well too. These swaps keep the creamy texture and add flavor. For a low-carb version, try using cauliflower instead of pasta. Steam the cauliflower until it's tender. Then, mix it into the cheese sauce. This gives you a tasty meal without the carbs from pasta. You can also change how you serve this dish. For a crispy top, bake it in the oven. After mixing the pasta with the sauce, pour it into a baking dish. Top it with breadcrumbs or extra cheese and bake until golden. If you want to keep it simple, serve it as a side dish. It pairs well with grilled chicken or a fresh salad. You can also make it a main course by adding a protein like chicken or shrimp. For the complete recipe, check out the Full Recipe link. To keep your creamy honey pepper mac and cheese fresh, cool it down first. Let it sit at room temperature for about 30 minutes. Once cool, pack it in an airtight container. This will help keep it tasty. I recommend using glass or plastic containers with tight lids. These work well to keep out air and moisture. When you're ready to enjoy your leftovers, reheating is key. You don't want your mac and cheese to dry out. The best way is to use a stovetop. Place the mac and cheese in a pan with a splash of milk. Heat over low heat while stirring. This keeps it creamy and delicious. If you choose the microwave, cover the bowl with a damp paper towel. Heat in short bursts, stirring in between to prevent drying. You can freeze creamy honey pepper mac and cheese for later. First, let it cool completely. Then, scoop it into freezer-safe bags or containers. Press out as much air as you can before sealing. When it’s time to eat, thaw it in the fridge overnight. To reheat, follow the stovetop method for best results. This way, you will get that creamy texture back! You can add heat to your mac and cheese in fun ways. One easy method is to use hot sauce. Try a splash of your favorite sauce when mixing in the cheese. You can also add chopped jalapeños for a fresh kick. If you want more flavor, try crushed red pepper flakes. Start with a small amount and taste as you go. This way, you can find the perfect level of spice for your dish. Yes, you can prep this dish ahead of time. Cook the pasta and make the cheese sauce. After mixing, let it cool and store it in the fridge for up to two days. When you’re ready to eat, just reheat it on the stove or in the oven. If it seems thick, add a splash of milk to loosen it up. This will help keep it creamy and delicious. Creamy Honey Pepper Mac and Cheese pairs nicely with many side dishes. A simple green salad adds freshness. Roasted vegetables bring a nice crunch and flavor contrast. You could also serve it with grilled chicken for a heartier meal. For a fun twist, try it with garlic bread for extra comfort. These sides will make your meal even more tasty. For the complete recipe of Creamy Honey Pepper Mac and Cheese, visit [Full Recipe]. This blog post covered everything you need to make Creamy Honey Pepper Mac and Cheese. We discussed the key ingredients, simple steps, and tips to perfect the dish. You learned how to substitute ingredients and variations to fit different diets. Remember to store leftovers properly and reheat them carefully. Enjoy experimenting with flavors and serving styles. This mac and cheese can be a hit at any meal, whether as a side or the main dish. Your kitchen adventure awaits!](https://lazychefmagic.com/wp-content/uploads/2025/05/44066b8e-0ce2-4afb-acd6-5597885c8062.webp)
Get ready to elevate your mac and cheese game with my Creamy Honey Pepper Mac and Cheese! This simple delight
![- 8 ounces spaghetti or your favorite pasta - 1 pound shrimp, peeled and deveined - 4 cloves garlic, minced - 1/4 cup olive oil - 1 tablespoon lemon zest (freshly grated) - 1/4 cup fresh lemon juice - 1/2 teaspoon red pepper flakes (optional for heat) - Salt and freshly ground black pepper, to taste - 1/4 cup fresh parsley, finely chopped - Grated Parmesan cheese, for serving (optional) When I make Lemon Garlic Shrimp Pasta, I love the fresh taste of lemon and garlic. This dish is quick and easy, making it perfect for busy weeknights. The shrimp adds protein, while the pasta gives you that comforting feel. You can adjust the red pepper flakes to your heat level. Some like it spicy, while others prefer it mild. - Calories per serving: This dish has about 450 calories. - Fat: 20 grams - Carbs: 50 grams - Protein: 25 grams This meal is balanced and satisfying. The shrimp gives you protein, while the pasta offers carbs for energy. The olive oil adds healthy fats, and the lemon juice gives a nice zing. Enjoy this dish knowing it is not only tasty but also good for you! For the full recipe and step-by-step instructions, check out the [Full Recipe]. Cooking the pasta Start by boiling a large pot of salted water. Once it reaches a rolling boil, add 8 ounces of spaghetti. Cook until it is al dente, about 8 to 10 minutes. Don't forget to save 1/2 cup of the pasta water before draining. Sautéing the garlic In a large skillet, pour in 1/4 cup of olive oil and heat it over medium heat. Add 4 cloves of minced garlic. Stir it for about 1 minute. The garlic should smell fragrant but not brown. Adding shrimp to the skillet Next, toss in 1 pound of peeled and deveined shrimp. Make sure every shrimp is in the oil and garlic mix. Seasoning and cooking instructions Season the shrimp with salt, black pepper, and red pepper flakes if you like some heat. Cook the shrimp for 2 to 3 minutes on each side. They should turn pink and opaque when done. Incorporating lemon flavors Now, lower the heat a bit. Add 1 tablespoon of lemon zest and 1/4 cup of fresh lemon juice to the shrimp. Stir everything well. If it looks dry, add a splash of the reserved pasta water. Final mixing with pasta Carefully add the drained spaghetti to the skillet. Toss everything together. You want the pasta to be well coated with the lemon garlic sauce and shrimp. To make sure your shrimp are perfectly cooked, focus on the color. Cook them until they turn pink and opaque. This usually takes about 2-3 minutes on each side. Overcooking makes shrimp tough, so be careful. Preventing garlic from burning is key to great flavor. Cook it on medium heat and stir it often. Once the garlic is fragrant, it’s time to add your shrimp. This way, you keep that nice garlic taste without the bitter burn. For presentation, serve your pasta in deep bowls. This adds a cozy feel. Sprinkle fresh parsley on top for a burst of green. You can also add lemon wedges on the side for a pop of color. If you like heat, add extra red pepper flakes right before serving. Pair your Lemon Garlic Shrimp Pasta with a light salad or garlic bread. A chilled glass of white wine complements the dish well, too. It brings out the lemon and garlic flavors nicely. To reheat leftover Lemon Garlic Shrimp Pasta, use a skillet. Heat it on low and add a splash of water or broth. This helps keep the pasta moist. Stir gently until heated through. If you want to freeze the pasta, let it cool first. Then, place it in an airtight container. It can last up to three months in the freezer. To thaw, move it to the fridge overnight before reheating. {{image_4}} You can easily switch up the pasta in this dish. Try whole wheat, penne, or even gluten-free pasta. Each type adds its own unique touch. If you prefer a different seafood, shrimp is not your only option. You can use scallops, crab meat, or even lobster. Each choice will change the flavor in fun ways. For gluten-free pasta, look for brands made from rice or chickpeas. These options taste great and work well in this recipe. If you want a vegan version, skip the shrimp and use chickpeas or tofu instead. Both options are rich in protein and will fill you up. To boost flavor, add fresh veggies like spinach or cherry tomatoes. They add color and nutrition. If you want more heat, sprinkle in extra red pepper flakes or a dash of hot sauce. It makes the dish exciting and adds a kick! I love using spaghetti for this dish. It holds the sauce well. You can also use linguine or fettuccine if you prefer. Just make sure to cook it until al dente for the best texture. Yes, you can use frozen shrimp. Just thaw them first. Place them in cold water for about 15 minutes. This helps them cook evenly. To reheat, add a splash of water or olive oil. Heat it gently in a skillet over low heat. Stir often to keep it moist and tasty. Absolutely! This dish is great for meal prep. Just store the pasta and shrimp in separate containers. Reheat them together for the best taste. Yes, you can! Try adding fresh basil or thyme for a different twist. A pinch of paprika or cayenne can also add nice heat. Feel free to get creative! For the full recipe, check out the detailed cooking steps. To make Lemon Garlic Shrimp Pasta, follow these simple steps. First, bring a large pot of salted water to a boil. Add 8 ounces of spaghetti and cook it until it's al dente. Remember to save 1/2 cup of the pasta water before draining the rest. Next, heat 1/4 cup of olive oil in a large skillet over medium heat. Add 4 cloves of minced garlic. Stir it for about a minute until it smells nice, but don't let it brown. Now, toss in 1 pound of peeled and deveined shrimp. Season with salt, black pepper, and 1/2 teaspoon of red pepper flakes if you like some heat. Cook for 2-3 minutes on each side until the shrimp turn pink. After that, lower the heat. Add 1 tablespoon of lemon zest and 1/4 cup of fresh lemon juice to the skillet. Stir everything well. If it looks dry, add a splash of the reserved pasta water. Carefully add the drained spaghetti to the skillet and mix it all together. Make sure the pasta is coated with the sauce and shrimp. Finally, take the skillet off the heat. Sprinkle in 1/4 cup of finely chopped fresh parsley. Serve right away, adding more parsley and grated Parmesan cheese on top if you want. For more details, check out the [Full Recipe](#). Enjoy your meal! In this article, we covered how to make a tasty Lemon Garlic Shrimp Pasta. I shared the essential ingredients, steps for cooking, and key tips for perfecting the dish. You learned about variations and how to adapt recipes for different diets. This dish is not only easy to make but also packed with flavor. Try it tonight. You’ll enjoy a fresh, satisfying meal. Keep experimenting with flavors and ingredients to make it your own. Happy cooking!](https://lazychefmagic.com/wp-content/uploads/2025/05/516d7fb3-badf-4030-b6a6-c3b6e5aad3ef.webp)
Are you ready to impress your dinner guests with a quick and tasty dish? Lemon Garlic Shrimp Pasta is a
![Here’s what you need to make peach upside down mini cakes. Gather these simple ingredients: - 2 large ripe peaches, sliced into thin wedges - 1/4 cup unsalted butter, melted and slightly cooled - 1/2 cup packed brown sugar - 1 cup all-purpose flour - 1 teaspoon baking powder - 1/2 teaspoon baking soda - 1/4 teaspoon fine sea salt - 1/2 cup granulated sugar - 1/4 cup plain yogurt (can substitute with Greek yogurt) - 1 large egg, at room temperature - 1 teaspoon pure vanilla extract Each ingredient plays a key role. The ripe peaches bring sweetness and flavor. The butter adds richness, while brown sugar creates a lovely caramel base. Flour gives the cakes structure. Baking powder and baking soda are essential for lift. Salt balances the sweetness. Using yogurt keeps the cakes moist. The egg binds everything together. Finally, vanilla extract adds a warm, inviting aroma. For the full recipe, refer to the detailed steps that follow. Enjoy your baking adventure! Start by preheating your oven to 350°F (175°C). This step sets the stage for our mini cakes to bake perfectly. A hot oven helps the cakes rise nicely and form a golden crust. Next, prepare your muffin tin. Use a standard muffin tin or a mini cake pan. Lightly grease it with butter or cooking spray. This ensures that your cakes slide out easily after baking. 1. In a small bowl, mix the melted butter and brown sugar. Stir until smooth. Pour this mixture into the bottom of each muffin cup. Spread it evenly for a nice layer. 2. Now, take your peach slices and arrange them on top of the brown sugar. Overlap them slightly for a pretty look. This adds charm to your cakes. 3. In another bowl, combine the flour, baking powder, baking soda, and salt. Whisk these dry ingredients together. This helps to evenly distribute the baking powder and soda. 4. In a large bowl, beat the granulated sugar and yogurt together. Use an electric mixer or a whisk. Mix until creamy, then add the egg and vanilla extract. Blend well. 5. Gradually add the dry mix to the wet mix. Stir gently until just combined. Be careful not to overmix. This keeps the cakes light and fluffy. 6. Now, using a spoon or a cookie scoop, fill each muffin cup with batter. Only fill them about two-thirds full. This allows room for the cakes to rise. 7. Place the muffin tin in your preheated oven. Bake for 20-25 minutes. The mini cakes should turn a lovely golden-brown. Use a toothpick to test for doneness; it should come out clean. 8. Once baked, take the mini cakes out of the oven. Let them cool in the pan for about 5 minutes. This helps them hold their shape. 9. Finally, carefully invert the cakes onto a wire rack or serving platter. Do this while they are still warm. This reveals the beautiful peach topping. Enjoy your Peach Upside Down Mini Cakes! For all the details, check the Full Recipe. To bake mini cakes evenly, keep these tips in mind: - Use room temperature ingredients. This helps the batter mix well. - Rotate the pan halfway through baking. This ensures all cakes get even heat. - Check doneness early. Ovens vary, so stick a toothpick in to test. To prevent sticking, follow this advice: - Grease the muffin tin well. Use butter or cooking spray generously. - Let cakes cool briefly in the pan. About five minutes will help them release. For a beautiful finish, try these ideas: - Dust with powdered sugar. This adds a lovely touch and sweetness. - Drizzle with honey. A sweet touch makes the cakes shine. Enhance your mini cakes by serving with: - A scoop of ice cream. Vanilla pairs well with peach flavors. - A dollop of whipped cream. This adds a creamy texture that balances the cake. For the full recipe and specific steps, check out [Full Recipe]. {{image_4}} You can swap peaches for different fruits. Consider using pineapples, apples, or berries. Each fruit brings its own sweet taste. Mixing fruits can create fun flavors. Try a peach and raspberry mix for a tart twist. The options are endless, so get creative! If you need gluten-free cakes, use almond flour or a gluten-free mix. This gives a great taste and texture. For a vegan option, switch the egg for flaxseed meal mixed with water. Use a plant-based yogurt to keep it creamy. These swaps let everyone enjoy this treat. Need more cakes? Simply double or triple the recipe. You can make these mini cakes for a big crowd. If you want larger cakes, pour the batter into a round cake pan. Adjust your baking time to ensure they cook evenly. No matter the size, these cakes will impress! To keep your Peach Upside Down Mini Cakes fresh, use airtight containers. Place the cooled cakes inside, and seal them well. Store them in the fridge for up to five days. This keeps them moist and tasty. Avoid stacking them directly on top of each other to prevent damage. If you want to save some cakes for later, freezing is a great option. First, let the mini cakes cool completely. Then, wrap each cake tightly in plastic wrap. Place them in a freezer-safe bag or container. Label the bag with the date. These cakes can last up to three months in the freezer. When you’re ready to enjoy, just pull them out and thaw in the fridge overnight. To enjoy your cakes warm, preheat your oven to 350°F (175°C). Place the cakes on a baking sheet. Heat them for about 10-15 minutes. This method brings back their fresh taste. You can also use a microwave. Heat each cake for about 20-30 seconds. However, the oven method gives a better texture. Enjoy your delicious treat! You can replace the butter with applesauce. This swap cuts fat and boosts moisture. Use whole wheat flour instead of all-purpose flour. This adds fiber and nutrients. You can also reduce the sugar by a third. The peaches add sweetness too! Yes, you can use canned peaches. Choose peaches in juice, not syrup. Drain them well to avoid excess liquid. Canned peaches may be softer, but they still taste great. They save time and add good flavor! These mini cakes last for about three days at room temperature. Store them in an airtight container. If you want them to last longer, refrigerate them. They can stay fresh for a week in the fridge. Yes, you can prepare the mini cakes a day ahead. Bake them, then let them cool completely. Store them in an airtight container. Before serving, warm them in the oven to refresh their taste. You can use sour cream instead of yogurt. Greek yogurt is also a great option. If you need a dairy-free choice, try almond milk mixed with a bit of vinegar. This will mimic the tangy taste of yogurt. For more details and steps, check the Full Recipe. You’ve learned how to make peach upside-down mini cakes with simple ingredients. I shared step-by-step instructions, tips for success, and ideas for variations. You can adapt the recipe to fit your kitchen needs and preferences. Whether you enjoy them fresh or want to store them, these cakes are easy to handle. Remember to experiment with flavors and find what you love. I hope you feel inspired to bake and enjoy these tasty treats!](https://lazychefmagic.com/wp-content/uploads/2025/05/87839e84-32ab-487b-97a7-abaf213d56f9.webp)
Looking for a sweet treat that’s easy to make? These Peach Upside Down Mini Cakes are a delightful way to
![- 1 cup sushi rice - 8 ounces sushi-grade tuna, diced - 1 ripe avocado, thinly sliced - 2 tablespoons rice vinegar - 1 tablespoon sugar - 1 teaspoon salt - 1 tablespoon sesame oil - 1 tablespoon sriracha - 1 teaspoon soy sauce - Sesame seeds for garnish - Green onion, finely chopped - Seaweed sheets, cut into small squares (optional) When you make Crispy Rice and Spicy Tuna Bites, you need fresh ingredients. Sushi rice gives your bites that perfect sticky texture. Sushi-grade tuna is key for great flavor and safety. Make sure your avocado is ripe. This ensures a creamy finish to your dish. For seasonings, rice vinegar adds tang. Sugar balances the flavor. Salt brings out the best taste in your rice. Sesame oil adds a nice nutty hint. Sriracha gives your tuna a spicy kick. Soy sauce deepens the umami flavor. Garnishes like sesame seeds and green onions add crunch and color. Seaweed sheets are optional but fun. They give a nice touch and extra flavor. You can find the full recipe in the article. - Rinse the sushi rice until the water runs clear. This step is crucial. It removes extra starch. Clean rice leads to better texture. - Cook the sushi rice with water until tender. Add 1 ¼ cups water to 1 cup rice. Bring to a boil, then simmer for 18-20 minutes. The rice should absorb all the water. - Combine rice vinegar, sugar, and salt in a saucepan. Use 2 tablespoons vinegar, 1 tablespoon sugar, and 1 teaspoon salt. - Heat until dissolved, then cool. Stir gently as it heats. This mixture will add flavor to the rice. - Form the sushi rice into compact shapes. Take a scoop of rice and mold it tightly in your hands. Aim for rectangles or squares. - Top with avocado and spicy tuna mixture. Place a thin avocado slice on each rice piece. Spoon the spicy tuna mix generously on top. This method gives you a great snack that impresses. You can find the full recipe for more details. To make perfect sushi rice, rinsing is key. Wash the sushi rice under cold water. Keep rinsing until the water runs clear. This step removes excess starch. It helps the rice become fluffy and sticky. After rinsing, measure 1 cup of rinsed rice with 1 ¼ cups of water. This ratio ensures the rice cooks well. Bring it to a boil. Then, lower the heat and cover. Let it simmer for 18 to 20 minutes. When done, let it rest off the heat for about 10 minutes. This will help the rice stay moist. For spicy tuna, start with 1 tablespoon of sriracha. Taste the mix. If you want more heat, add more sriracha. Balance the spice with soy sauce and sesame oil. Soy sauce adds umami, while sesame oil gives a nutty flavor. Mix these ingredients well to create a balanced taste. When forming the rice bites, wet your hands. This prevents the rice from sticking. Take a small scoop and press it into a compact shape. Aim for rectangles or squares for even bites. Top each rice shape with a slice of avocado. Then, add a spoonful of the spicy tuna mix. For a great look, place the bites on small squares of seaweed. Finally, garnish with green onions and sesame seeds. This adds color and crunch to your dish. {{image_4}} You can swap tuna for other proteins. Salmon works great and adds a different taste. Crab is another fantastic choice for those who love seafood. For a vegetarian option, consider using marinated tofu or chickpeas. Both choices give the same texture without the fish. Add variety to the flavors by using different sauces. Try a spicy mayo or ponzu sauce for a citrus kick. You can also sprinkle in some chili flakes for extra heat. For added crunch and taste, toss in shredded carrots or cucumber slices. These vegetables bring freshness and a nice bite. Pair your bites with tasty dipping sauces. Soy sauce, wasabi, or even a sweet chili sauce work well. For a fun twist, arrange the bites on a colorful platter. You can add some edible flowers or herbs for a pop of color. This makes your dish stand out at parties and gatherings. Explore the [Full Recipe] for more ideas and tips to perfect your Crispy Rice and Spicy Tuna Bites! To keep your Crispy Rice and Spicy Tuna Bites fresh, place them in an airtight container. This method protects the flavors and keeps them from drying out. Store the container in the refrigerator. The ideal temperature is around 35°F to 40°F. Enjoy the leftovers within two days for the best taste. If you want to save the rice and toppings for later, freezing is a good option. For the rice, let it cool completely. Then, pack it into a freezer-safe bag. Remove as much air as you can before sealing. For the spicy tuna, store it in a separate container. This way, you keep the flavors fresh. You can freeze the tuna for up to three months. When you're ready to enjoy your bites again, reheating is key. The best method is to use a microwave. Heat the rice bites in short bursts of 15-20 seconds. Check to see if they are warm enough. For a crisper texture, you can reheat them in a pan on low heat. Keep an eye on them to avoid burning. This method will help maintain the flavor and texture of your bites. Using regular rice will change the dish's texture and flavor. Sushi rice is sticky and firm. It holds its shape better, making it perfect for bites. Regular rice may not stick together as well. If you use regular rice, try short-grain rice for a better result. To make this recipe gluten-free, choose gluten-free soy sauce. Tamari is a great option. Check the label to ensure it is gluten-free. You can also use coconut aminos as a soy sauce substitute. Both options keep the flavor without gluten. You can serve these bites with several tasty sides. A fresh cucumber salad adds crunch. Edamame is also a nice touch. For drinks, try green tea or a light beer. These pair well with the spicy tuna and rice. This article covers everything you need for making delicious crispy rice and spicy tuna bites. You learned about the main ingredients, seasonings, and optional garnishes. I explained the step-by-step instructions for preparing, assembling, and perfecting your sushi bites. Plus, you got tips on variations, storage, and reheating. Enjoy crafting these flavorful bites that impress at any gathering. You now have the tools to get creative with this recipe!](https://lazychefmagic.com/wp-content/uploads/2025/05/4ec810bd-963e-45f3-84d9-44d506013c4a.webp)
Looking for a fun and tasty snack? Crispy Rice and Spicy Tuna Bites offer the perfect bite-sized treat! With their

Get ready to indulge in a treat that combines two beloved flavors: S’mores and cookies! My Brown Butter S’mores Cookies
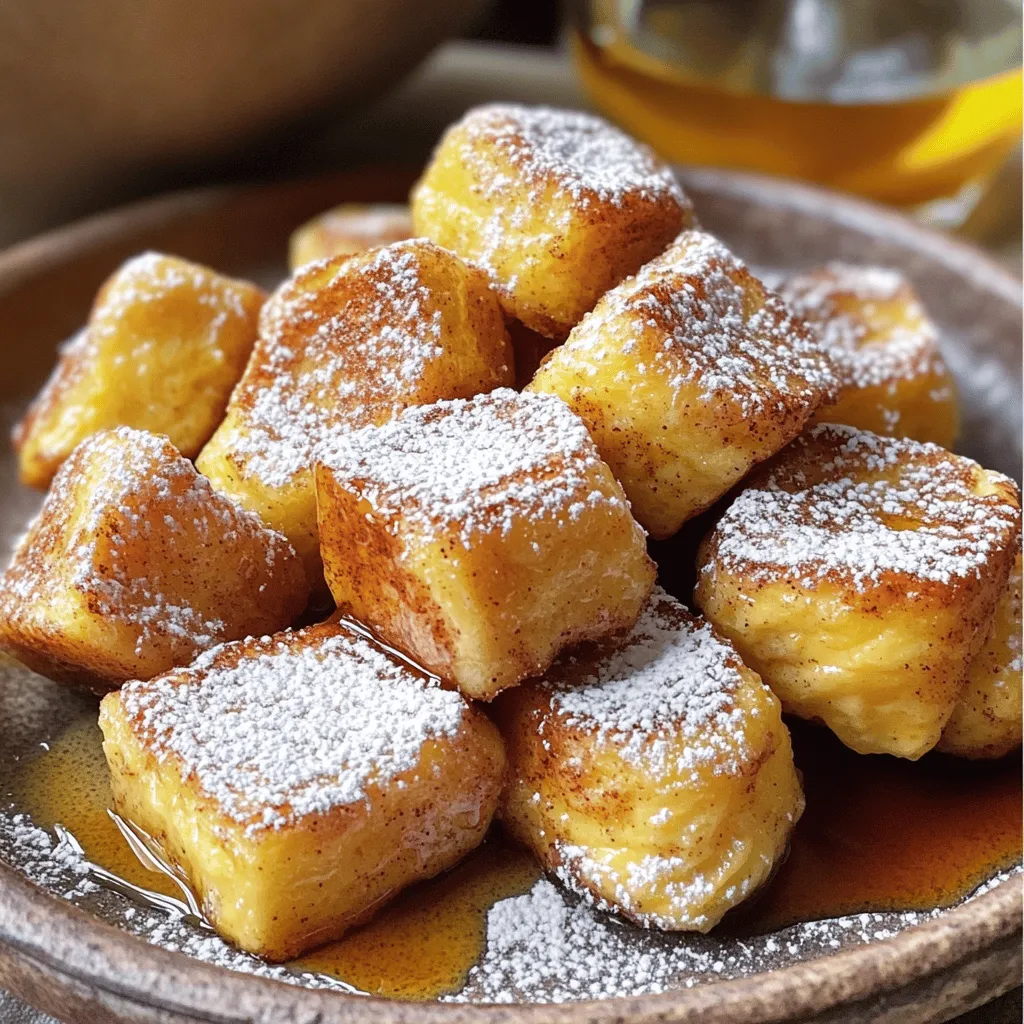
Looking for a fun twist on breakfast? Try these Cinnamon Roll French Toast Bites! They combine two favorite treats into
