Skip to content
DisclaimerTerms Of UseGDPR PolicyCookie Policy

lazychefmagic

  • Home
  • Drinks
  • Appetizers
  • Dinner
  • Dessert
  • About
  • Contact
  • Privacy Policy
DisclaimerTerms Of UseGDPR PolicyCookie Policy

NO-ING-IMG

- 2 cups all-purpose flour - 1/4 cup granulated sugar - 1 packet instant yeast (2 1/4 teaspoons) - 1/2 teaspoon salt - 1/2 cup milk - 1/4 cup unsalted butter - 1 large egg - 1 cup cream cheese - 1/2 cup powdered sugar - 1 teaspoon vanilla extract - 1 1/2 cups fresh strawberries - 1 egg wash (1 egg whisked with 1 tablespoon water) - Optional: Whipped cream for serving Gather these ingredients before starting. You want everything ready to go. The flour gives the rolls structure. Sugar adds sweetness. Yeast makes the dough rise. Salt balances the flavors. Milk and butter keep the rolls soft. The egg binds the dough. Cream cheese makes the filling rich. Powdered sugar sweetens the filling and the drizzle. Vanilla adds depth. Fresh strawberries give a burst of flavor. The egg wash creates a golden crust. Whipped cream is a fun touch when serving. These ingredients combine to create a warm, sweet treat. You will love how they come together in the Full Recipe. To start, I combine warm milk, melted butter, and granulated sugar in a medium bowl. I sprinkle yeast on top and let it sit for about five minutes. This step wakes up the yeast, making it frothy and bubbly. Next, I whisk together flour and salt in a large bowl. I make a well in the center and pour in the yeast mix and a large egg. I stir it with a spatula until the dough forms. Then, I transfer the dough to a floured surface. I knead it for five to seven minutes until it feels smooth. After kneading, I shape the dough into a ball and place it in a greased bowl. I cover it with a towel and let it rise in a warm spot for about an hour. While the dough rises, I prepare the cheesecake filling. In a medium bowl, I mix cream cheese, powdered sugar, and vanilla extract. I blend these until the mixture is creamy and smooth. Once mixed, I gently fold in diced strawberries. This adds a fresh burst of flavor that pairs perfectly with the creaminess of the cheese. I set this mixture aside for later. Once the dough has risen, I punch it down to release any air bubbles. On a floured surface, I roll the dough into a rectangle about 12 by 18 inches. Now, I spread the cheesecake filling evenly over the dough, avoiding the edges. Starting from one long edge, I roll the dough tightly away from me. I use a sharp knife to slice the log into twelve equal pieces. Next, I arrange the rolls cut side up in a greased baking dish, leaving space for them to grow. I preheat my oven to 350°F (175°C). Before baking, I brush the tops of the sweet rolls with an egg wash. This gives them a lovely golden color. I then place the baking dish in the oven and bake for 25 to 30 minutes. I know they are done when they turn golden brown. After baking, I let the rolls cool for about ten minutes. For a sweet touch, I drizzle a simple icing made from powdered sugar and a splash of milk over the top before serving. For the full recipe, check the detailed instructions earlier. To make the best dough, always use warm ingredients. Warm milk and butter help the yeast work well. This gives the rolls a nice rise. Knead the dough properly too. Kneading builds elasticity, which makes the rolls soft and fluffy. Aim for about 5 to 7 minutes of kneading. Want more flavor? Try adding lemon zest to the dough or filling. This gives a bright taste that pairs well with strawberries. You can also garnish the rolls with fresh mint. Mint adds a fresh twist and looks great on the plate. When serving, arrange the sweet rolls on a nice platter. Add fresh strawberries around them for color. A dollop of whipped cream on the side makes it even better. For drinks, I suggest a cup of hot tea or cold milk. Both drinks complement the sweet rolls well. For all the details on how to make these delightful rolls, check out the Full Recipe. {{image_4}} You can change the flavors in your sweet rolls for a fun twist. For a blueberry cheesecake sweet roll, swap out strawberries for fresh blueberries. Make sure to mash them slightly for a nice spread. The sweet, tart flavor of blueberries blends well with the creamy filling. Another option is the chocolate-strawberry fusion roll. Add cocoa powder to the dough for a chocolate base. You can also fold in chocolate chips into the cheesecake filling. This mix creates a rich, decadent treat. If you need gluten-free options, use almond flour or a gluten-free blend. This keeps the rolls soft and tasty. Just check that the flour mix includes xanthan gum for the right texture. For vegan adaptations, replace the egg with a flax egg. Mix one tablespoon of ground flaxseed with three tablespoons of water. Let it sit until it thickens. Use plant-based cream cheese and dairy-free milk. These swaps keep the rolls light and fluffy. These variations and modifications allow everyone to enjoy strawberry cheesecake sweet rolls. Check out the Full Recipe for all the details. To keep your strawberry cheesecake sweet rolls fresh, store them in an airtight container. Place parchment paper between the rolls to prevent sticking. This method keeps them soft for about three days. If you want to enjoy these rolls later, freezing is a great option. Wrap each roll tightly in plastic wrap. Then, place them in a freezer bag. They can last up to three months. When you’re ready to eat, just thaw them in the fridge overnight. To restore softness, reheat the rolls gently. Preheat your oven to 350°F (175°C). Place the rolls on a baking sheet and cover them with foil. Heat for about 10-15 minutes. This keeps them warm and fluffy. You can also use a microwave on low power for 15-20 seconds if you’re in a hurry. Enjoy your sweet rolls warm and tasty! Yes, you can use frozen strawberries. They work well in the filling. Just remember to thaw them first. Drain any excess liquid to avoid a soggy filling. Fresh strawberries give a brighter taste, but frozen ones can be handy. They may be softer, but they still taste great in the rolls. You can make these rolls ahead of time. Prepare the dough and filling, then assemble the rolls. Cover them tightly and store in the fridge for up to 24 hours. When ready to bake, let them sit at room temperature for 30 minutes. This helps them rise before baking. You can also freeze the unbaked rolls. Just thaw and let them rise before baking. If your dough doesn’t rise, check a few things. First, make sure your yeast is fresh. Old yeast may not activate. Next, the warm milk should be around 110°F (43°C). Too hot or too cold will kill the yeast. Lastly, make sure you cover the dough in a warm spot. If it still doesn’t rise, you can try again with new ingredients. Yes, you can make the filling without cream cheese. Use ricotta cheese or mascarpone for a lighter option. You can also mix in a bit of yogurt for tanginess. For a sweeter taste, consider using whipped cream instead. Each option offers a different flavor and texture, so feel free to experiment! You now have a clear plan for making sweet rolls with a cheesecake twist. We covered the ingredients, step-by-step instructions, and tips to get the best results. Flavor variations and storage tips ensure you can share these rolls with friends. Remember, baking is all about having fun and experimenting. Enjoy each bite, and try different flavors along the way. Your kitchen will soon smell amazing, and your taste buds will thank you!

Strawberry Cheesecake Sweet Rolls Delightful and Warm

Imagine waking up to the heavenly scent of warm strawberry cheesecake sweet rolls. You can make this dream a reality

To create a hearty Dwarven Feast stew, gather the following fresh ingredients: - 1 pound beef stew meat, cubed - 1 pound lamb shoulder, cubed - 4 large carrots, peeled and chopped - 3 medium potatoes, diced - 2 medium onions, finely chopped - 4 cloves garlic, minced - 1 cup beef broth - 1 cup vegetable broth - 2 tablespoons high-quality olive oil - 2 teaspoons dried thyme - 2 teaspoons smoked paprika - Salt and pepper to taste - Fresh parsley for garnish - 1 cup roasted chestnuts, roughly chopped Each ingredient plays a vital role in building flavor. The beef and lamb create a rich base. Carrots and potatoes add sweetness and heartiness. Onions and garlic provide depth. Broths help blend everything together. Spices like thyme and smoked paprika add warmth and earthiness, while chestnuts bring a unique texture. Fresh parsley brightens the dish as a garnish. For the full recipe, follow my detailed instructions to bring this stew to life. Start by getting your ingredients ready. Chop the vegetables first. Peel four large carrots and cut them into thick rounds. Dice three medium potatoes into chunks. Finely chop two medium onions and mince four cloves of garlic. Next, cube one pound of beef stew meat and one pound of lamb shoulder into bite-sized pieces. This prep work makes cooking much easier. Now, let’s cook. In a large, heavy pot, heat two tablespoons of high-quality olive oil over medium heat. Once it shimmers, add the onions and garlic. Sauté them for about four to five minutes until the onions turn translucent. Stir often to avoid burning. Next, raise the heat to medium-high and add the cubed beef and lamb. Brown the meat on all sides for about eight to ten minutes. Make sure not to overcrowd the pot; you want a good sear. If needed, do this in batches. Once the meat is brown, it's time to combine everything. Add the chopped carrots, diced potatoes, and one cup of roasted chestnuts to the pot. Stir well to mix all the ingredients. Pour in one cup of beef broth and one cup of vegetable broth. Make sure the liquid covers the ingredients by about an inch. This helps create a rich, tasty stew. Next, add two teaspoons of dried thyme and two teaspoons of smoked paprika. Season with salt and freshly cracked pepper. Stir to coat everything evenly. Now, raise the heat until it boils. Once it boils, reduce the heat to low. Cover the pot and let it simmer for one and a half to two hours. Stir occasionally. If the stew gets too thick, add more broth or water. After the time is up, taste the stew. Adjust the seasoning with more salt and pepper if needed. Serve hot, garnished with fresh chopped parsley for a great finish. For a true Dwarven experience, serve it in rustic bowls with crusty bread on the side. Enjoy this hearty meal! To make your Dwarven Feast even better, consider these seasoning ideas: - Add a splash of red wine for depth. - Use smoked salt for a more robust taste. - Experiment with different spices like cumin or coriander. When it comes to herbs, fresh herbs bring vibrant flavors. Fresh parsley or thyme can brighten your stew. Dried herbs work well too, but they may need more time to release their flavors. If using dried herbs, add them earlier in the cooking process. Browning the meat properly is key. Use a heavy pot and heat it well before adding meat. This creates a nice crust and locks in flavors. Brown the meat in batches if needed. Overcrowding the pot leads to steaming, not browning. For the right stew consistency, aim for a thick, hearty texture. If your stew is too thick, add more broth or water. If it's too thin, let it simmer longer with the lid off. Stir often to prevent sticking. Serve your Dwarven Feast in rustic bowls or on wooden platters. This adds to the hearty feel of the dish. For a lovely touch, use a sprig of fresh parsley on top. Pair your stew with crusty bread for dipping. This classic combo not only fills the belly but also enhances the meal's warmth and comfort. Enjoy the rich flavors and cozy vibes! {{image_4}} You can switch out the beef and lamb in this stew. Chicken works well. It adds a lighter taste. Pork also makes a great option. If you want a vegetarian meal, use hearty mushrooms. They give a nice texture. For a vegan option, try tofu or tempeh. Both soak up flavors well. Seasonal vegetables can really change the stew. Use root veggies like parsnips or turnips in winter. In summer, add zucchini or bell peppers for freshness. You can also swap broths. Try chicken broth for a lighter flavor. For more depth, use a rich mushroom broth. Experimenting will keep your stew exciting! Spices can enhance the stew's taste. Try adding a pinch of cayenne for heat. A splash of soy sauce or Worcestershire sauce adds umami. You might also stir in some herbs like rosemary or bay leaves. Grains can be a great addition too. Barley or lentils will make it heartier. They also soak up the broth nicely. To store leftovers safely, let the stew cool first. Once cooled, spoon it into airtight containers. Glass or plastic containers work well. Be sure to label them with the date. This way, you know when to eat them. Leftovers can last in the fridge for up to three days. Freezing stew is easy. Use freezer-safe bags or containers. Leave some space for the stew to expand as it freezes. For best results, freeze it in single-serving portions. When you're ready to eat, thaw it overnight in the fridge. This keeps the flavor fresh and tasty. Reheat the stew on the stove for best taste. Use a medium heat setting and stir often. This helps keep the stew’s texture intact. You can also use a microwave for quick heating. Just be sure to cover it to avoid splatters. Enjoy your warm Dwarven Feast! A Dwarven Feast is a hearty meal often shared among friends and family. It has roots in Dwarven culture, known for its love of rich flavors and communal dining. Traditionally, these feasts celebrate bounty and togetherness, featuring robust dishes like stews, meats, and breads. The Dwarven Feast reflects a deep bond with the earth, sourcing ingredients from the land. This meal promotes warmth and connection, making it perfect for gatherings. Preparing a Dwarven Feast takes about 20 minutes for prep. The total cooking time is around 2 hours. You will need to sauté vegetables and brown meat before simmering the stew. This slow cooking method helps the flavors develop and ensures tender meat. Patience is key to achieving that rich, deep taste. Yes, you can make Dwarven Feast ahead of time. Stews often taste better the next day. The flavors blend and deepen overnight. Store the stew in the fridge and reheat when ready to serve. Making it in advance saves time and allows you to enjoy the feast with less stress. Serve Dwarven Feast in rustic bowls or on wooden platters. This adds a touch of charm. Pair the stew with crusty bread for dipping. A sprinkle of fresh parsley on top elevates the dish visually. A side of pickles or roasted vegetables also complements the flavors well. Absolutely, you can customize the Dwarven Feast recipe. Swap meats or add different vegetables based on your taste. Use chicken or a mix of mushrooms for a vegetarian option. Adjust the spices to create your own flavor profile. The key is to maintain the heartiness while making it your own. Check the Full Recipe for ideas on ingredient swaps. The Dwarven Feast recipe combines rich meats, hearty vegetables, and bold flavors. We explored ingredient preparation, cooking steps, and essential tips to enhance your stew. I shared variant options, from meat swaps to vegan choices. Storing and reheating methods ensure you enjoy every bite later. Now, you can create this warming dish for any gathering. Embrace your creativity and make it your own. Enjoy the comfort of the Dwarven Feast!

Dwarven Feast Hearty and Flavorful Stew Recipe

Welcome to my cozy kitchen! Today, I will share my favorite Dwarven Feast recipe. This hearty and flavorful stew brings
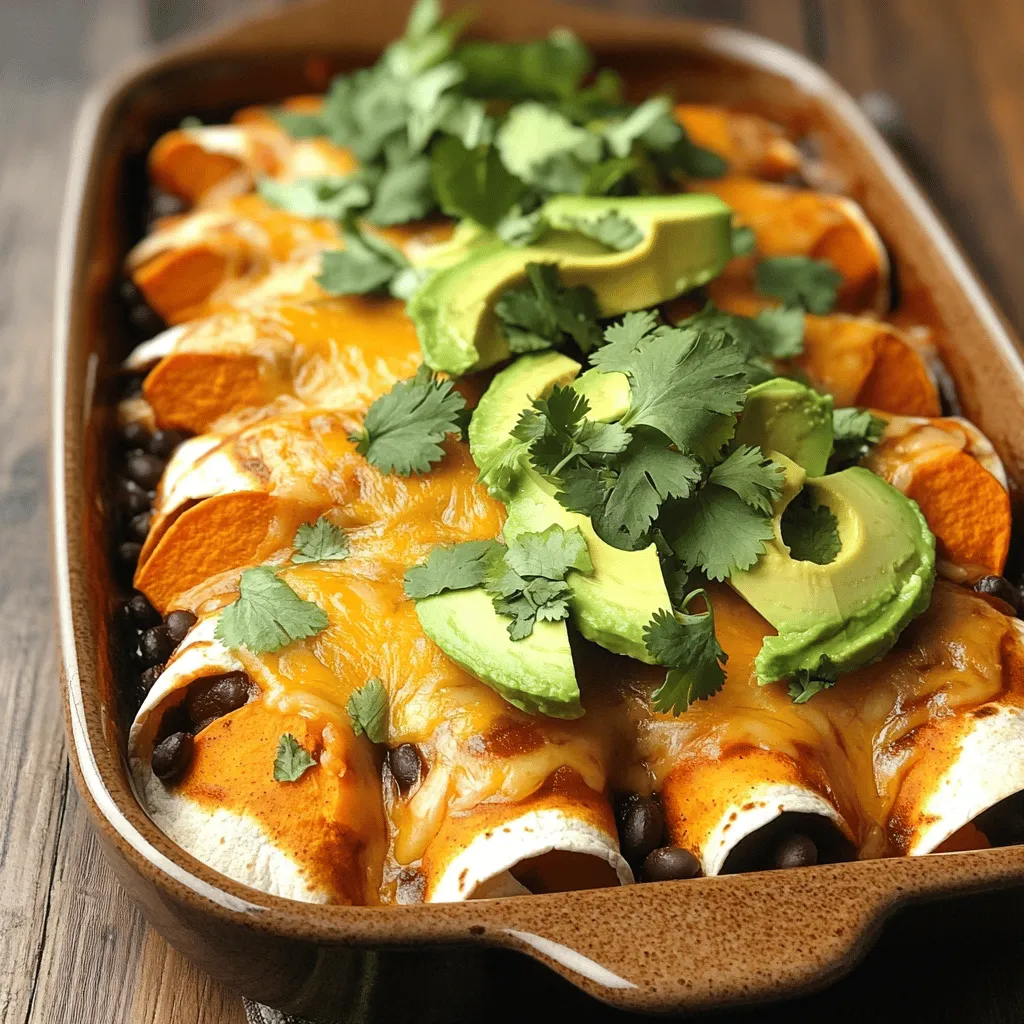
- 2 cups cooked chicken, shredded - 8 oz cream cheese, softened to room temperature - 1 cup shredded cheddar cheese, divided - 1 cup sour cream - 1 can (10 oz) enchilada sauce, divided - 8 small flour tortillas - 1 teaspoon garlic powder - 1 teaspoon ground cumin - ½ teaspoon chili powder - Salt and pepper to taste - Fresh cilantro leaves, for garnish To make these Easy Cream Cheese Chicken Enchiladas, you will first need the main ingredients. Shredded chicken gives you a great base. You can use leftover chicken or rotisserie chicken. Cream cheese brings creaminess. The cheddar adds a nice cheesy flavor. Sour cream helps bind everything together. The enchilada sauce adds spice and moisture. Next, you will want to mix in the seasonings. Garlic powder gives a rich taste. Ground cumin adds warmth. Chili powder brings a touch of heat. Adjust salt and pepper to your liking. Finally, don't forget the garnish! Fresh cilantro adds color and a burst of freshness. It makes the dish look and taste even better. You can find the full recipe above for step-by-step guidance on making these delicious enchiladas. - Preheat the Oven: Set your oven to 350°F (175°C). - Prepare the Baking Dish: Spread about ¼ cup of enchilada sauce on the bottom of a 9x13-inch baking dish. This helps keep the enchiladas from sticking. - Combine Ingredients: In a bowl, mix together the cooked chicken, softened cream cheese, ½ cup of shredded cheddar cheese, sour cream, garlic powder, cumin, chili powder, and a pinch of salt and pepper. - Mix Thoroughly: Stir until everything blends into a creamy filling. This part is key for great flavor. - Fill & Roll Tortillas: Take a flour tortilla and place about ¼ cup of the chicken mixture in the center. Roll it up tightly and place it seam-side down in the baking dish. - Arrange in Baking Dish: Repeat this process until all tortillas are filled and snugly fit in the dish. - Add Remaining Sauce and Cheese: Pour the rest of the enchilada sauce over the rolled tortillas. Make sure all are well covered. Then sprinkle the remaining cheddar cheese on top. - Baking Time: Bake in the oven for 25-30 minutes, until the cheese is bubbly and golden brown. - Cool and Slice: Once baked, take the dish out and let it cool for a few minutes. This makes it easier to slice. - Garnish and Serve: Before serving, add fresh cilantro on top for a nice touch. Follow these steps for a tasty meal! For full details, check out the Full Recipe. - Flour vs. Corn Tortillas: Which to use? I prefer flour tortillas for these enchiladas. They are soft and easy to roll. Corn tortillas are good too, but they can break. If you love corn, use them! - How to warm tortillas for easier rolling To warm tortillas, heat them in a pan for 10-15 seconds each side. You can also wrap them in a damp paper towel and microwave for 30 seconds. This makes them soft and easy to roll. - Adding Spice: Optional ingredients for heat If you like heat, add jalapeños or cayenne pepper to the filling. You can also use spicy enchilada sauce. This adds a nice kick! - Using Different Cheeses: Variations for cheese lovers Try mixing different cheeses for fun flavors. Pepper jack cheese adds spice. Mozzarella makes it super gooey. Experiment with what you love! - Substitutions: Low-fat cream cheese or chicken alternatives For a lighter dish, use low-fat cream cheese. You can also use shredded turkey for a leaner option. Both keep the creaminess but cut calories. - Add Vegetables: Mix in spinach or peppers Adding veggies boosts the nutrition. Spinach, bell peppers, or zucchini mix in well. You can sneak in extra greens without losing flavor. For more cooking tips, check out my [Full Recipe]. {{image_4}} - Replace Chicken with Beans: You can use black beans or pinto beans. This makes a tasty, meatless option. - Additional Veggies: Add zucchini, mushrooms, or bell peppers for extra flavor and nutrition. These veggies blend well with the creamy filling. - Adding Jalapeños: Slice fresh or pickled jalapeños into the filling. This adds a nice heat and flavor to your enchiladas. - Spicy Enchilada Sauce: Use a spicy store-bought sauce or make your own. A homemade blend can include tomatoes, chili powder, and garlic for a kick. - Extra Cheese Options: Try using pepper jack or mozzarella cheese. These cheeses melt beautifully and add depth to the dish. - Cheese Sauce Topping: For an ultra-creamy touch, drizzle cheese sauce over the enchiladas before baking. This option is great for cheese lovers! Feel free to mix and match these ideas to create your perfect enchiladas! You can explore more about these options in the Full Recipe. To store leftovers, place the enchiladas in an airtight container. This keeps them fresh and tasty. You can also cover them tightly with plastic wrap. Store them in the fridge. For the best taste, eat them within 3 to 4 days. The flavors will stay good, but the texture may change over time. If you want to keep the enchiladas longer, freezing is a great option. Wrap each enchilada in foil or plastic wrap. Place them in a freezer-safe bag. Make sure to remove as much air as possible. You can freeze them for up to 3 months. When you are ready to enjoy, simply thaw them overnight in the fridge. To reheat, you can bake them straight from frozen. Cover with foil and heat at 350°F (175°C) for about 30-40 minutes. If they are thawed, bake for 20 minutes until warm. These methods help keep your Easy Cream Cheese Chicken Enchiladas delicious and ready to eat! Yes, you can prepare these enchiladas in advance. Just follow these tips: - Assemble the enchiladas but do not bake them yet. - Cover the dish tightly with foil or plastic wrap to keep them fresh. - Store them in the fridge for up to 24 hours. When you are ready, uncover and bake them as directed. To create a balanced meal, consider these sides: - Mexican rice brings a nice texture. - Refried beans add protein and fiber. - Guacamole offers a creamy contrast. - Corn salad gives freshness and color. These options will make your meal fun and tasty. Absolutely! You can use other proteins like: - Ground turkey for a lighter option. - Shredded beef for a hearty flavor. - Black beans for a vegetarian choice. These alternatives fit well in this easy recipe. You can make your own enchilada sauce with simple ingredients. Here’s a quick recipe: - 1 can of tomato sauce - 1 tablespoon chili powder - 1 teaspoon cumin - Salt and pepper to taste Mix these and simmer for about 10 minutes. You can also use salsa if you need a quick substitute. Yes! You can easily make these enchiladas gluten-free: - Use corn tortillas instead of flour. - Check your enchilada sauce for gluten. Many brands are gluten-free. With these swaps, everyone can enjoy this dish. This recipe for Easy Cream Cheese Chicken Enchiladas offers tasty flavors with simple steps. We covered each ingredient, from the chicken to the spices, and how to assemble and bake the dish. I shared tips for storage, making it ahead of time, and even variations like vegetarian options. Whether you're feeding a crowd or just yourself, these enchiladas are sure to please. Enjoy the satisfaction of creating a delicious meal everyone will love!

Easy Cream Cheese Chicken Enchiladas Simple Recipe

Are you ready to make a delicious meal that’s easy and quick? My Easy Cream Cheese Chicken Enchiladas Simple Recipe

To make the best Vegan Chocolate Avocado Pudding, gather these simple ingredients: - 2 ripe avocados, pitted and peeled - 1/2 cup unsweetened cocoa powder - 1/2 cup maple syrup (or agave syrup) - 1/4 cup almond milk (or any plant-based milk of your choice) - 1 teaspoon vanilla extract - A pinch of salt - 1/4 cup dairy-free dark chocolate, melted - Fresh berries and mint leaves for garnish (optional) Using ripe avocados is key. They give the pudding a creamy texture and rich flavor. Cocoa powder adds deep chocolate notes while sweeteners like maple syrup balance the taste. Plant-based milk keeps it smooth and light. A hint of vanilla extract brings warmth to the dish. The salt is small but mighty. It enhances all the flavors. Adding dairy-free dark chocolate makes the pudding decadent. For garnishes, fresh berries or mint can brighten up the dish. They also add a fun pop of color. This list makes it easy to create a rich and creamy treat. Check out the Full Recipe to see how to bring these ingredients together. To make the avocado mixture, start by placing ripe avocados in a blender. Add unsweetened cocoa powder, maple syrup, almond milk, vanilla extract, and a pinch of salt. Blend on high until everything is smooth. If the mixture is thick, stop blending to scrape the sides. This helps get a creamy texture without lumps. Aim for a silky finish that feels rich and velvety. Once your avocado mixture is smooth, it’s time to add the melted chocolate. Pour the warm melted chocolate into the blender while it runs on low speed. This helps blend it in evenly. You want the chocolate to mix fully for that deep, rich flavor. Taste it now! If it needs more sweetness, add a touch more maple syrup. After mixing, spoon the pudding into bowls. Cover them with plastic wrap or lids. Refrigerate for at least 30 minutes. This chilling time thickens the pudding, making it even creamier. When ready to serve, top with fresh berries and mint leaves. They add color and a fresh taste. Enjoy your rich and creamy vegan chocolate avocado pudding! For the full recipe, check the section above. To get that rich, creamy texture, I recommend using a high-speed blender. A food processor works too, but it might take longer to blend. The key is to ensure your avocados are ripe. Overripe fruit can make the pudding too watery. Common mistakes include not blending long enough or adding too much liquid. If the mix feels too thick, add more almond milk slowly. Always stop to scrape down the sides of your blender to make sure everything mixes well. You can adjust the sweetness easily. Start with the amount of maple syrup in the recipe. After blending, taste your pudding. If you want it sweeter, add a little more syrup. Remember, the chocolate can also add sweetness. Try using agave syrup instead of maple syrup for a different flavor. Each sweetener has a unique taste, so feel free to experiment until you find your favorite mix. When it comes to serving, let your creativity shine! Spoon the pudding into cute cups or bowls. Top with fresh berries for color and flavor. Mint leaves add a nice touch too. For a fun twist, layer the pudding in clear glasses with granola for added crunch. You can also drizzle a bit of melted dark chocolate on top for an extra indulgent flavor. For the full recipe, check the details above! {{image_4}} You can easily change the flavor of your pudding. For a warm touch, add spices like cinnamon or a bit of chili powder. A dash of cinnamon gives a cozy feel. Chili powder adds a fun kick. Just mix these spices in with the other ingredients before blending. This simple change makes your pudding more exciting. If you want to try other sweeteners, you have options. Coconut sugar, agave syrup, or date syrup can work well. Each sweetener brings its own flavor. Coconut sugar adds a hint of caramel. Date syrup is rich and thick. You can adjust the amount based on your taste. This lets you cater to different diets and preferences. Choosing the right chocolate is key. Look for dairy-free dark chocolate brands. Brands like Enjoy Life or Hu make great options. They are rich in flavor and have no dairy. You can also try cacao nibs for a crunchy texture. This way, your pudding stays creamy and tasty. Enjoy experimenting with different chocolates for unique flavors. To keep your vegan chocolate avocado pudding fresh, store it in an airtight container in the fridge. This helps prevent it from absorbing other smells. Always cover the container tightly to keep it creamy. It will stay good for about 3 to 5 days. If you see any browning on the top, just stir it back in. The pudding will still taste great! Yes, you can freeze this pudding! Just put it in a freezer-safe container. Make sure to leave some space at the top for expansion. It can last up to 2 months in the freezer. When you want to eat it, move it to the fridge overnight to thaw. It might change in texture slightly, but it will still taste delicious. Once thawed, the pudding may seem a bit firmer. To fix this, blend it again with a splash of almond milk. This will help bring back its smooth and creamy texture. You can also let it sit at room temperature for a while before serving. Enjoy your rich and creamy treat! For the full recipe, check the top of the article. Yes, you can easily make this pudding nut-free. Instead of almond milk, use oat milk, soy milk, or coconut milk. These options provide a creamy texture without nuts. Each choice enhances the flavor while keeping it rich and smooth. You can even use rice milk if you prefer something lighter. Avocados bring many health benefits to desserts. They are rich in healthy fats that help your heart. They also provide fiber, which keeps your digestion running smoothly. Avocados are packed with vitamins like E, K, and C. These nutrients help your skin and boost your immune system. Plus, they add a creamy texture without dairy. This pudding lasts up to four days in the fridge. Make sure to store it in an airtight container to keep it fresh. If you notice any discoloration, it’s best to eat it right away. The taste will still be great, but the look might change a bit. Enjoy it within the week for the best flavor and texture. For the full recipe, check the earlier section. This blog post detailed how to make a creamy, healthy avocado chocolate pudding. We covered essential ingredients and step-by-step instructions to achieve a smooth texture. You learned tips on sweetness adjustments and serving ideas. In short, this pudding is easy to make and delicious. With variations, you can tailor it to your taste. Enjoy making this treat and share it with friends!

Vegan Chocolate Avocado Pudding Rich and Creamy Treat

Craving a dessert that’s both rich and good for you? Look no further! This vegan chocolate avocado pudding is a

- 2 medium sweet potatoes, peeled and diced into 1-inch cubes - 1 can (15 oz) black beans, rinsed and drained - 1 cup corn kernels (fresh or frozen) - 1 teaspoon ground cumin - 1 teaspoon chili powder - Salt and black pepper, to taste - 2 cups enchilada sauce (store-bought or homemade) - 8 small corn tortillas - 1 cup shredded cheese (cheddar or Monterey Jack recommended) - Fresh cilantro, chopped (for garnish) - 1 ripe avocado, sliced (for topping) These ingredients come together to create a rich and tasty dish. Sweet potatoes add a natural sweetness and creaminess. Black beans give protein and fiber, while corn adds a nice crunch. The spices bring warmth and depth to the flavor. You can use your favorite enchilada sauce or even make your own. I love a homemade sauce with fresh tomatoes and spices. The tortillas hold everything together, while the cheese melts on top for that gooey finish. If you want to switch things up, try different toppings. Fresh avocado slices add creaminess, while cilantro gives a fresh burst. You can find the Full Recipe for a step-by-step guide on how to combine these ingredients into a delicious meal. - Preheating the oven: Start by setting your oven to 375°F (190°C). This step warms the oven for baking. - Cooking sweet potatoes: Fill a pot with water and add a pinch of salt. Bring it to a boil. Toss in the diced sweet potatoes. Cook them for about 10-12 minutes or until they are soft. Drain the sweet potatoes and let them cool a bit. - Mixing the filling ingredients: In a large bowl, combine the cooked sweet potatoes with black beans and corn. Add ground cumin, chili powder, salt, and pepper. Stir well until everything is mixed and coated in spices. - Preparing tortillas for rolling: Warm the tortillas in a dry skillet on medium heat. Heat each side for about 30 seconds. This makes them soft and easy to roll without breaking. - Assembling the enchiladas: Spread 1/2 cup of enchilada sauce on the bottom of a greased 9x13-inch dish. Take one tortilla, add about 1/3 cup of the sweet potato mix in the center, sprinkle some cheese on top, and roll it tightly. Place it seam-side down in the dish. Repeat with all tortillas. - Topping with sauce and cheese: Pour the rest of the enchilada sauce over the rolled tortillas. Make sure they are fully covered. Sprinkle the remaining cheese on top. - Baking instructions: Cover the dish with aluminum foil. Bake it for 20 minutes. After that, remove the foil and bake for another 10-15 minutes until the cheese is melted and bubbly. Enjoy your flavorful sweet potato black bean enchiladas! For the complete cooking instructions and ingredients, check out the Full Recipe. To make your enchiladas shine, try making homemade enchilada sauce. It’s simple and tasty! Just blend tomatoes, garlic, onions, and spices. You can control the heat and flavors this way. This sauce adds depth and freshness. When it comes to cheese, you can choose between cheddar and Monterey Jack. Both melt well and add creaminess. Cheddar gives a sharp flavor, while Monterey Jack is milder. Mix them for extra taste! For a beautiful presentation, serve your enchiladas on a colorful platter. Drizzle with extra enchilada sauce for a vibrant look. Add lime wedges for a zesty touch. Fresh cilantro can brighten the dish. Pair your enchiladas with sides like Mexican rice or a fresh salad. Corn on the side also works great. These options will enhance your meal and make it more filling. Enjoy your flavorful delight! {{image_4}} You can change up beans in this recipe. Try pinto or kidney beans for a twist. Each bean brings its own taste and texture. They also add protein and fiber. Feel free to mix in other veggies. Spinach, zucchini, or bell peppers work well. They add color and nutrition. You can even use roasted veggies for a smoky flavor. For a vegan option, skip the cheese and use plant-based cheese. You can also use avocado or cashew cream for creaminess. This keeps the dish rich and satisfying without the dairy. If you need gluten-free tortillas, choose corn ones. They fit perfectly with the flavors in these enchiladas. Just make sure they are labeled gluten-free to avoid any issues. These variations help you tailor the dish to your needs. Remember, cooking is all about creativity and personal taste! For the complete recipe, see the Full Recipe section. To store leftover enchiladas, let them cool first. Place them in an airtight container. You can keep them in the fridge for up to three days. When you're ready to eat, simply reheat them in the oven or microwave. This helps keep the flavors fresh and tasty. To freeze enchiladas, wrap them well in plastic wrap. Place them in a freezer-safe container or bag. They can last up to three months in the freezer. When you want to enjoy them, thaw in the fridge overnight. Reheat them in the oven at 350°F (175°C) until warm. This method helps keep them delicious with great texture. For the full recipe, check out the Sweet Potato Black Bean Enchiladas with Creamy Avocado Topping! You can pair these enchiladas with a fresh salad or rice. A simple green salad adds crunch. You might also enjoy a side of guacamole or salsa. These options boost flavor and color on your plate. For a drink, try a refreshing agua fresca or a light beer. They balance the dish well and enhance your meal experience. Yes, you can use various beans for your enchiladas. Pinto beans or kidney beans work well. They provide a different taste and texture. Feel free to experiment with your favorite beans. Each type brings its unique flavor while still complementing the sweet potatoes. Just make sure to rinse and drain any canned beans you choose. To add spice, you can increase the chili powder in your filling. Adding diced jalapeños or serrano peppers also works great. You might also include a dash of hot sauce in the enchilada sauce. Taste as you go, so you find the right heat level for you. A sprinkle of cayenne pepper can also elevate the spice factor. Absolutely! You can make the enchiladas a day ahead. Assemble them and cover tightly with foil. Store them in the fridge until you are ready to bake. Just add a few extra minutes to the baking time if they are chilled. This makes it easier for busy nights while still enjoying a homemade meal. For the best flavor, add toppings right before serving. For the full recipe, check out the section above! Sweet potato black bean enchiladas are packed with flavor. Here are the main ingredients you'll need: - 2 medium sweet potatoes, peeled and diced into 1-inch cubes - 1 can (15 oz) black beans, rinsed and drained thoroughly - 1 cup corn kernels (fresh or frozen) - 1 teaspoon ground cumin - 1 teaspoon chili powder - Salt and freshly ground black pepper, to taste - 2 cups enchilada sauce (your choice of store-bought or homemade) - 8 small corn tortillas - 1 cup shredded cheese (cheddar or Monterey Jack recommended) - Fresh cilantro, chopped (for garnish) - 1 ripe avocado, sliced (for topping) These ingredients blend well together. The sweet potatoes add a soft texture. Black beans provide protein and richness. Corn adds sweetness, while spices give depth. Now, let's dive into how to make these tasty enchiladas: 1. Preheat the Oven: Start by preheating your oven to 375°F (190°C). This helps the enchiladas cook evenly. 2. Cook the Sweet Potatoes: In a large pot, bring salted water to a boil. Add the diced sweet potatoes. Cook for about 10-12 minutes until they are fork-tender. Drain and let them cool slightly. 3. Mix the Filling: In a large bowl, combine the cooked sweet potatoes, black beans, corn, ground cumin, chili powder, and salt and pepper. Stir until everything is well mixed. 4. Prepare the Tortillas: To make the tortillas easier to roll, warm them in a dry skillet over medium heat for about 30 seconds on each side. This keeps them from tearing. 5. Assemble the Enchiladas: Spread about 1/2 cup of enchilada sauce on the bottom of a greased 9x13-inch baking dish. Take one tortilla and spoon about 1/3 cup of the sweet potato mixture onto the center. Sprinkle a little cheese on top. Roll it tightly and place it seam-side down in the dish. Repeat this for all tortillas. 6. Top with Sauce and Cheese: Pour the remaining enchilada sauce over the rolled enchiladas. Make sure they are completely covered. Finish by sprinkling the remaining cheese on top. 7. Bake: Cover the dish with aluminum foil and bake for 20 minutes. Remove the foil and bake for another 10-15 minutes, until the cheese is melted and bubbly. 8. Serve: Let the enchiladas cool for a few minutes. Garnish with chopped cilantro and avocado slices before serving. For a lovely presentation, serve the enchiladas on a colorful platter. Drizzle with extra enchilada sauce and add lime wedges. This adds a zesty touch and makes the dish more inviting. Enjoy this delightful recipe and make it your own! To sum up, you learned about making delicious sweet potato black bean enchiladas. From the key ingredients like sweet potatoes and black beans to spices that add flavor, every step matters. You also saw tips on storage and variations for dietary needs. Remember, cooking is fun, and good food brings joy. Try this recipe, adapt it to your taste, and enjoy. You’ll impress friends and family with a warm dish everyone will love.

Sweet Potato Black Bean Enchiladas Flavorful Delight

Are you ready to dive into a dish that’s both tasty and healthy? Sweet Potato Black Bean Enchiladas are a

- Chicken Wings (2 lbs) - Baking Powder (1 tablespoon) - Garlic Powder (1 teaspoon) - Onion Powder (1 teaspoon) - Smoked Paprika (1 teaspoon) - Salt (1/2 teaspoon) - Black Pepper (1/2 teaspoon) - Cayenne Pepper (1/4 teaspoon, optional) - Olive Oil (2 tablespoons) - Fresh Herbs for garnish To make crispy air fryer chicken wings, you need simple and fresh ingredients. Start with two pounds of chicken wings. The wings should be clean and dry. Baking powder is key for crispiness. Use one tablespoon to help create that crunch. You will also need garlic powder, onion powder, and smoked paprika. Each adds flavor and depth. The salt and black pepper enhance the taste. If you like heat, add cayenne pepper. Use it sparingly for a spicy kick. Finally, olive oil helps the spices stick and adds richness. Fresh herbs make a lovely garnish. Parsley or cilantro work well. You can find the full recipe for cooking these wings to perfection in the recipe section. First, take your chicken wings and pat them dry. Use paper towels to soak up moisture. This step is key for crispiness. If the wings are wet, they won’t get crispy. Moisture creates steam, which makes wings soggy. Next, grab a large bowl. Combine the baking powder, garlic powder, onion powder, smoked paprika, salt, black pepper, and optional cayenne pepper. Stir well to mix. You want the spices to spread evenly. This ensures every bite is full of flavor. Now, add the dry wings into the bowl with the spice mix. Drizzle the olive oil over the wings. Toss everything together until the wings are coated well. Use your hands or a spoon to mix. This helps the spices stick to the wings. Set your air fryer to preheat at 400°F (200°C). Let it heat for about 5 minutes. Preheating is important. It gives the wings that nice, crispy texture right from the start. Place the wings in a single layer in the air fryer basket. If your air fryer is small, cook in batches. Cook the wings for 25-30 minutes. Flip them halfway through. This helps them brown evenly and stay crispy. If you want extra crunch, raise the temperature to 420°F (215°C) for the last 5 minutes. Keep a close eye on them. They can burn quickly at this heat. The extra time makes a big difference in crispiness. After cooking, let the wings rest for a few minutes. This helps keep them juicy. Before serving, sprinkle fresh herbs on top. They add color and flavor. Serve the wings on a platter with your favorite dipping sauces. You can find the full recipe at Crispy Air Fryer Chicken Wings. To get your chicken wings extra crispy, follow these tips: - Suggested Cooking Times: Cook the wings for 25-30 minutes at 400°F (200°C). Flipping them halfway helps. For more crunch, raise the heat to 420°F (215°C) for the last 5 minutes. - Use of Baking Powder: Adding baking powder is key. It helps the wings crisp up nicely. Just one tablespoon will do the trick! Flavor matters in every bite. Here are some ideas: - Adding Different Spices: Feel free to mix in your favorite spices. Try chili powder for heat or Italian herbs for a twist. - Marinating Options: Marinate the wings for at least 30 minutes. Use lemon juice, soy sauce, or hot sauce for added depth. Don't forget the sauce! Here are some tasty ideas: - Best Dipping Sauces: Classic choices include ranch, blue cheese, or honey mustard. - Pairing Ideas: Pair your wings with celery sticks or carrot sticks. They add crunch and freshness! For the full recipe, check out the detailed instructions above! {{image_4}} You can change the flavor of your crispy air fryer chicken wings easily. Here are two popular options: - Buffalo Style: To make buffalo wings, toss your cooked wings in a mixture of hot sauce and melted butter. This adds a spicy kick and a rich flavor. You can adjust the hot sauce amount based on how spicy you want them. - Honey BBQ Wings: For a sweet twist, mix honey with your favorite BBQ sauce. Toss the cooked wings in this sauce for a sticky, sweet finish. It pairs well with the crispy texture, making each bite delightful. If you don’t have an air fryer, you can still enjoy these wings. Here are two great alternatives: - Oven-Baked Version: Preheat your oven to 425°F (220°C). Spread the seasoned wings on a baking sheet lined with parchment paper. Bake them for 40-45 minutes, flipping halfway, until they are crispy and golden. - Deep-Fried Option: Heat oil in a deep fryer to 375°F (190°C). Carefully add the wings and fry for about 10-12 minutes or until golden brown. This method gives you super crispy wings, but it adds more oil to the dish. Servings can enhance your wing experience. Here are some ideas: - Side Dishes that Complement Wings: Serve wings with celery sticks and carrot sticks. They add crunch and freshness. A side of creamy ranch or blue cheese dressing is perfect for dipping. - Presentation Ideas: For a fun presentation, arrange the wings in a large bowl or platter. Sprinkle freshly chopped herbs on top for color. You might add some lemon wedges or extra dipping sauces for variety. To store your chicken wings, let them cool first. Place them in an airtight container. Use parchment paper to separate layers if needed. This keeps them crisp and fresh. You can also wrap them in foil. Store in the fridge for up to four days. For best taste and texture, eat them within two days. To reheat your chicken wings, use an air fryer for the best results. Set it to 350°F (175°C) and cook for about 5-7 minutes. Check them often to avoid overcooking. You can also use an oven. Preheat it to 375°F (190°C) and bake for 10-15 minutes. Always make sure they are heated through. To keep them crispy, avoid microwaving, as it makes them soggy. Enjoy your tasty wings with your favorite sauces! It takes about 25 to 30 minutes to cook air fryer chicken wings. Set your air fryer to 400°F (200°C). Flip the wings halfway through for even cooking. For extra crispiness, raise the temperature to 420°F (215°C) in the last 5 minutes. Yes, you can use frozen chicken wings. However, you should defrost them first. Place the wings in the fridge overnight or use the defrost setting in your microwave. After defrosting, follow the same steps as in the recipe for perfect results. Olive oil is a great choice for air fryer chicken wings. It adds flavor and helps achieve that crispy texture. You can also use avocado oil or canola oil. These oils have high smoke points, making them ideal for air frying. Preheating the air fryer is important. It helps the wings cook evenly and gives them a nice crisp. Heat your air fryer to 400°F (200°C) for about 5 minutes before adding the wings. This step makes a big difference in texture. To make your chicken wings spicier, add more cayenne pepper to the spice mix. You can also use hot sauce or chili powder for extra heat. Toss the wings in your favorite spicy sauce after cooking for a flavorful kick. For more details, check the [Full Recipe]. You've learned how to make crispy air fryer chicken wings from start to finish. We covered the key ingredients, steps, and helpful tips to achieve that perfect crunch. You can try different flavors, cooking methods, and serving ideas to make this dish your own. Remember, proper storage and reheating ensure you enjoy every bite later. With these simple instructions, you can impress your family or friends with delicious wings any time. Enjoy your cooking adventure and happy eating!

Crispy Air Fryer Chicken Wings Flavorful and Easy Recipe

Are you craving crispy chicken wings that don’t require a messy fryer? Look no further! My easy and flavorful air

To make garlic butter shrimp pasta, you will need: - 8 oz (225g) spaghetti or linguine: Choose your favorite pasta shape. - 1 lb (450g) shrimp, peeled and deveined: Fresh shrimp works best, but frozen can work too. - 4 tablespoons unsalted butter, divided: Butter adds richness to the dish. - 4 cloves garlic, minced: Fresh garlic gives a strong flavor. You can add these for extra flavor and visual appeal: - 1 teaspoon red pepper flakes: Adjust based on how spicy you want it. - 1/2 cup cherry tomatoes, halved: They add sweetness and color. - 1/4 cup fresh parsley, finely chopped: This brings freshness to the dish. - Grated Parmesan cheese: Optional for a savory finish. These ingredients create a dish that is both simple and full of flavor. You’ll enjoy how they come together to make a fantastic meal! If you want to see the full recipe, check out the "Full Recipe" section. Start by boiling a large pot of salted water. Use enough water to allow the pasta to move freely. Once it boils, add the spaghetti or linguine. Cook it according to the package directions until it is al dente, which means it should still have a little bite. Reserve one cup of the starchy pasta water before draining it. Set the pasta aside while you prepare the shrimp. Next, heat a large skillet over medium heat. Add 2 tablespoons of butter and let it melt completely. When the butter starts to bubble, add minced garlic and red pepper flakes. Sauté this for about one minute. You want the garlic to smell nice but not brown. After that, increase the heat to medium-high. Add the shrimp, which should be seasoned with salt and pepper. Cook the shrimp for 2 to 3 minutes on each side. They should turn pink and opaque. Once cooked, take the shrimp out of the skillet and place them on a plate. In the same skillet, lower the heat a bit. Add the remaining 2 tablespoons of butter. Toss in the halved cherry tomatoes, lemon juice, and lemon zest. Sauté everything for about 3 to 4 minutes. You want the tomatoes to soften and burst, letting their juices flow into the pan. Now, return the cooked shrimp to the skillet. Add the drained pasta and mix everything together. Gradually add the reserved pasta water, a little at a time. This will help you get the sauce to the right smoothness, coating all the pasta well. This method makes a rich garlic butter sauce that clings to the pasta. For the complete details, refer to the Full Recipe. To cook shrimp well, heat your skillet on medium-high. This helps shrimp cook fast and evenly. Cook them for 2-3 minutes per side. Look for a pink color and opaque look. Overcooking makes them tough, so watch closely! For seasoning, use salt and pepper for a simple taste. You can also add lemon juice for a fresh kick. If you love spice, try adding more red pepper flakes. Adjust the amount to match your taste. The sauce is key to this dish. Use pasta water to make it creamy. After cooking the pasta, save some water before draining. Add a little to the sauce while mixing. This water helps the sauce stick to the pasta. Balance your sauce with the pasta. You want enough sauce to coat each strand. If it feels dry, add more pasta water until it looks smooth and rich. To make your dish look great, add a sprig of parsley on top. This adds color and freshness. You can also serve lemon wedges on the side. They add a pop of color and flavor. For sides, a simple green salad works well. It adds crunch and freshness to your meal. You could also serve garlic bread for a comforting touch. Enjoy your beautiful dish! {{image_4}} You can change up your garlic butter shrimp pasta by trying different pasta shapes. Use fusilli, penne, or even zucchini noodles for a fun twist. Each shape holds sauce differently, giving you a unique experience. If you want to swap proteins, chicken or scallops work great. You can even go with tofu or mushrooms for a vegetarian option. Each choice brings its own flavor and texture to the dish. Adjusting spice levels in this dish is easy. If you like it spicy, add more red pepper flakes. For a milder version, use less or skip them altogether. You can also add fresh herbs to change the flavor. Basil or thyme can give your pasta a fresh taste. Experiment with different herbs to find your favorite mix. For those who need gluten-free options, use gluten-free pasta. There are many brands that taste great and hold up well in this dish. If you’re looking for vegan substitutions, try using plant-based butter and skip the shrimp. You can use chickpeas or lentils as a protein source. They add a nice texture and flavor, making the dish still enjoyable. Don’t forget to check the Full Recipe for all the details. To keep your garlic butter shrimp pasta fresh, store it right. First, let the dish cool down to room temperature. Then, place the pasta in airtight containers. This helps keep moisture in and prevents it from drying out. Make sure to label the containers with the date. You can store the pasta in the fridge for up to three days. If you want to keep it longer, freeze it. It will last up to two months in the freezer. When you're ready to enjoy your leftovers, reheating is key. For the microwave, place the pasta in a microwave-safe bowl. Add a splash of water or broth to help with moisture. Heat on medium for one to two minutes, stirring halfway through. For the stovetop, heat a skillet over low heat. Add a little butter or oil, then add the pasta. Stir gently until heated through. This method helps keep the shrimp and pasta from getting tough. Enjoy your meal just as you did the first time! You can serve garlic butter shrimp pasta with many great side dishes. Here are some ideas: - A fresh green salad adds crunch and balance. - Garlic bread or a crusty baguette works well for dipping. - Roasted vegetables, like asparagus or broccoli, add color and flavor. - A light white wine, such as Sauvignon Blanc, pairs nicely. These sides enhance the meal and make it more delightful. Yes, you can use frozen shrimp. Just be sure to thaw them first. To thaw shrimp: 1. Place them in a bowl of cold water for about 15-20 minutes. 2. You can also leave them in the fridge overnight for a slower thaw. Once thawed, cook the shrimp as you would fresh. This keeps your dish simple and tasty. To add heat to your garlic butter shrimp pasta, try these tips: - Increase the amount of red pepper flakes. - Add diced fresh chili peppers for a bold kick. - Try a dash of hot sauce while cooking. Start with a small amount, then taste and adjust as needed. You want to enjoy the spice without overwhelming the other flavors. You can find the full recipe for garlic butter shrimp pasta in the section titled "Full Recipe." This detailed guide will help you create a delicious meal step by step. This blog post guides you through making garlic butter shrimp pasta. You learned about ingredients, cooking steps, and helpful tips. We shared fun variations and storage info, too. Now, you know how to create a tasty dish that suits your taste. Enjoy experimenting with flavors and share your creations. Simple adjustments can make it your own. Have fun cooking!

Garlic Butter Shrimp Pasta Simple and Flavorful Dish

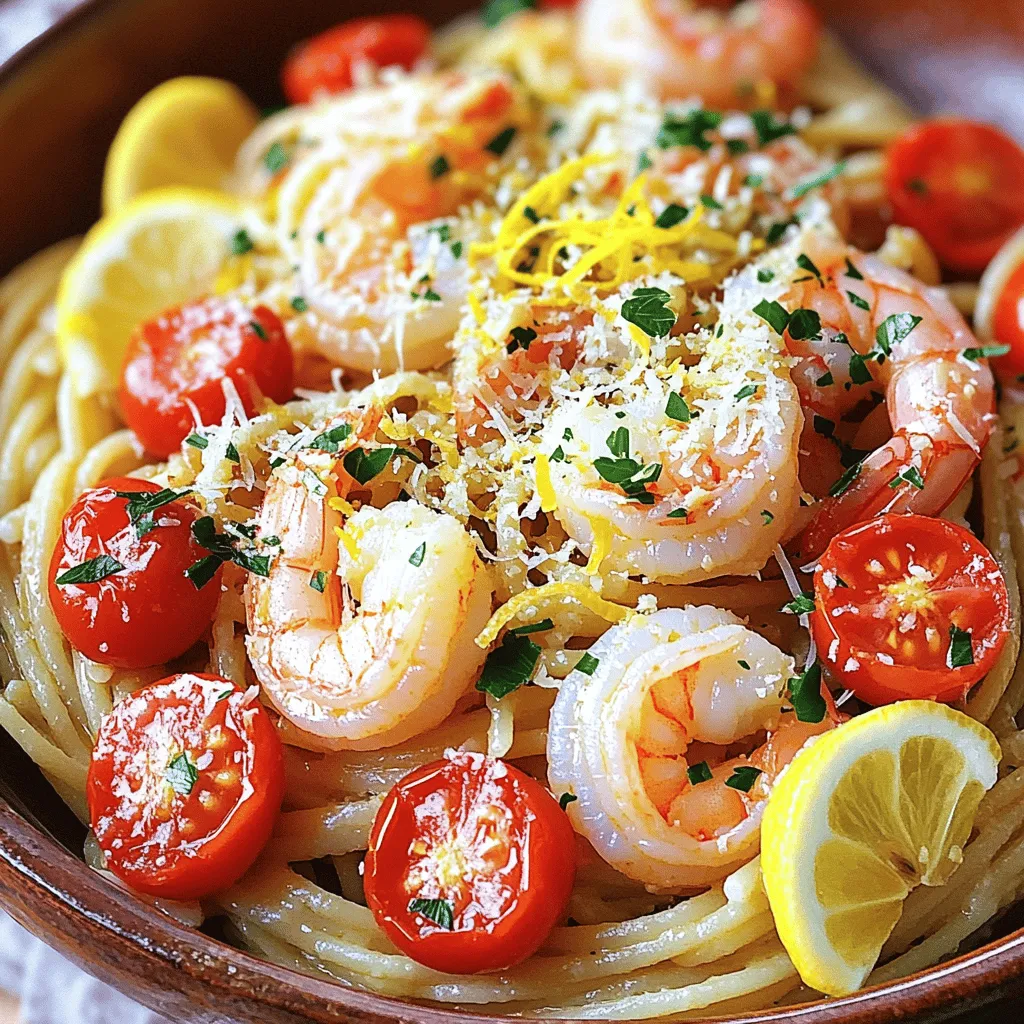
Welcome to my kitchen! Today, we’re diving into a dish that’s both simple and bursting with flavor: Garlic Butter Shrimp

To make these muffins, gather these essential ingredients: - 2 cups gluten-free all-purpose flour - 1 tablespoon baking powder - ½ teaspoon baking soda - ½ teaspoon salt - ½ cup coconut sugar (or any preferred granulated sweetener) - 2 large eggs - 1 cup unsweetened almond milk (or your choice of milk) - 1/3 cup melted coconut oil (substitutable with vegetable oil) - 1 teaspoon vanilla extract - 1 cup fresh blueberries (or frozen, if fresh are unavailable) - Zest of 1 lemon (for a refreshing flavor) - Optional: ¼ cup chopped walnuts or pecans (for delightful crunch) These ingredients combine to create a tasty and moist muffin. Each one plays a key role in flavor and texture. For this recipe, you will need a few simple tools: - Mixing bowls - Whisk - Muffin tin - Measuring cups and spoons - Toothpick (for testing doneness) - Cooling rack These tools help you mix, bake, and cool your muffins. Having them ready will make your baking process smooth. Finding gluten-free ingredients can be easy. Here are some tips: - Check your local grocery store. Many have a gluten-free section. - Look for certified gluten-free labels on products. - Visit specialty health food stores for a wider selection. - Buy in bulk online for cost savings on gluten-free flour. By following these tips, you can find what you need for your gluten-free blueberry muffins. Happy baking! Start by preheating your oven to 350°F (175°C). This step makes sure your muffins bake evenly. While the oven heats up, prepare your muffin tin. You can use paper liners or grease each cup lightly. This helps the muffins pop out easily after baking. In a large bowl, combine the dry ingredients. Whisk together 2 cups of gluten-free all-purpose flour, 1 tablespoon of baking powder, ½ teaspoon of baking soda, ½ teaspoon of salt, and ½ cup of coconut sugar. Make sure there are no lumps. Mixing these well gives your muffins a great texture. In another bowl, crack 2 large eggs and beat them. Then, add 1 cup of almond milk, ⅓ cup of melted coconut oil, 1 teaspoon of vanilla extract, and the zest of 1 lemon. Mix these until smooth. This mixture brings moisture and flavor to your muffins. Pour the wet mixture into the dry ingredients slowly. Stir gently to combine. It’s okay if the batter has a few lumps. Now, fold in 1 cup of blueberries and ¼ cup of chopped walnuts or pecans, if you like. Be careful not to overwork the batter. This keeps your muffins light and fluffy. Using a scoop or spoon, fill each muffin cup about three-quarters full. Place the muffin tin in the oven and bake for 18-20 minutes. To check if they’re done, insert a toothpick in the center. If it comes out clean or with a few crumbs, your muffins are ready. Once baked, take the muffins out of the oven. Let them cool in the tin for about 5 minutes. Then, gently move them to a wire rack. This step helps them cool completely and keeps them from getting soggy. Enjoy the sweet aroma while they cool! You can find the full recipe [Full Recipe]. When you bake gluten-free, some things can go wrong. Here are common mistakes to avoid: - Overmixing the batter: This can make your muffins tough. Mix just until combined. - Not measuring flour correctly: Use a scale or spoon to scoop flour. Too much can ruin your muffins. - Using old baking powder: Check the date on your baking powder. Fresh ingredients give better rise. To make muffins soft, follow these tips: - Use almond milk: It adds moisture without extra fat. - Add coconut oil: This keeps muffins tender. It also helps with flavor. - Include lemon zest: This brightens the taste and balances the sweetness. These steps lead to muffins that are both moist and fluffy. How you present your muffins matters. Here are a few ideas: - Serve warm: Warm muffins taste best and have a nice texture. - Add a sprinkle of powdered sugar: This adds a sweet touch and looks pretty. - Pair with Greek yogurt: This makes a creamy contrast and adds protein. For a delightful treat, enjoy your muffins with tea or coffee. For the full recipe, check the recipe section above. {{image_4}} You can easily make vegan gluten-free blueberry muffins. To do this, just replace the eggs with flax eggs. Mix 1 tablespoon of ground flaxseed with 2.5 tablespoons of water for each egg. Let it sit for five minutes until it thickens. Use a plant-based milk, like almond or oat milk, and you are all set. This keeps the muffins moist and delicious without eggs. For a dairy-free version, stick to your favorite plant-based milk. Almond milk, soy milk, or oat milk work well. Instead of regular butter, use coconut oil or any dairy-free butter. This keeps the flavor rich while ensuring no dairy sneaks in. These swaps make your muffins safe for those with dairy allergies. Feel free to get creative with fruits and add-ins. Try using raspberries or chopped strawberries instead of blueberries. You can add nuts like walnuts or pecans for a crunchy bite. If you want a sweet twist, add chocolate chips or dried fruit like cranberries. Mixing in lemon or orange zest can also brighten the flavor. Customizing your muffins makes each batch special and fun! You can find the full recipe above to get started on your own batch of gluten-free blueberry muffins. Enjoy experimenting! To keep your gluten-free blueberry muffins fresh, store them in an airtight container. This helps to lock in moisture. You can leave them at room temperature for up to three days. For longer storage, place them in the fridge. Just remember, cold storage may dry them out a bit. If you want to save muffins for later, freezing is a great option. First, let the muffins cool completely. Then, wrap each muffin tightly in plastic wrap. After that, place them in a freezer-safe bag or container. This method keeps them fresh for up to three months. When you're ready to eat, just thaw them in the fridge overnight. To enjoy your muffins warm, you can reheat them easily. Preheat your oven to 350°F (175°C). Place the muffins on a baking sheet and cover them with foil. Heat for about 10-15 minutes. You can also use the microwave. Heat each muffin for about 15-20 seconds. Enjoy them warm for the best flavor! For the full recipe, check out the earlier section. I recommend using a gluten-free all-purpose flour. It blends well and gives a nice texture. Look for blends with xanthan gum for extra binding. To cut sugar, you can reduce the coconut sugar by half. You can also use ripe bananas or applesauce for natural sweetness. These options keep the muffins moist and flavorful. Yes, you can use frozen blueberries! They work great in this recipe. Just toss them in flour before adding them to the batter. This helps prevent them from sinking to the bottom. Homemade muffins last for about 2-3 days at room temperature. Store them in an airtight container to keep them fresh. You can also freeze them for up to three months. Yes, these muffins are gluten-free and safe for those with celiac disease. Ensure all ingredients are labeled gluten-free to avoid cross-contamination. Yes, you can substitute eggs with unsweetened applesauce. Use 1/4 cup of applesauce for each egg. This keeps the muffins moist while making them egg-free. You can also use flaxseed meal mixed with water as an alternative. For the complete recipe, check out the [Full Recipe] section above! You learned how to make gluten-free blueberry muffins with key ingredients and tools. We covered step-by-step baking and tips to avoid common mistakes. You now know how to customize your muffins with vegan or dairy-free options. Plus, you have storage tips to keep them fresh. Enjoy your baking journey and create delightful treats that everyone can share!

Gluten-Free Blueberry Muffins Simple and Delicious Recipe

Are you ready to bake the perfect gluten-free blueberry muffins? This simple and delicious recipe will guide you step-by-step to

To make a bowl of Coconut Curry Lentil Soup, you'll need a few simple and fresh ingredients. Here’s what you’ll gather: - 1 cup red lentils, thoroughly rinsed - 1 can (14 oz) full-fat coconut milk - 4 cups vegetable broth - 1 medium onion, finely diced - 3 cloves of garlic, minced - 1 tablespoon fresh ginger, grated - 2 tablespoons curry powder - 1 teaspoon ground turmeric - 1 teaspoon ground cumin - 1 tablespoon extra virgin olive oil - 1 cup carrots, diced into small cubes - 1 cup fresh spinach or kale, roughly chopped - Salt and black pepper, to taste - Fresh cilantro, for garnish - Juice of 1 fresh lime Each ingredient plays a role in creating a rich and hearty soup. The red lentils give a nice texture and protein boost. Coconut milk adds a creamy base and a hint of sweetness. The spices, like curry powder and turmeric, bring warmth and depth to every spoonful. Fresh veggies like carrots and greens not only add color but also nutrients. When you gather these ingredients, think about the flavors you want in your bowl. This soup is about comfort and warmth. Each bite can feel like a hug on a chilly day. If you want the full experience of this dish, check out the Full Recipe. You’ll find all the steps to create this delightful meal! To start, gather all your ingredients. You need red lentils, coconut milk, vegetable broth, onion, garlic, ginger, curry powder, turmeric, cumin, olive oil, carrots, spinach or kale, salt, black pepper, cilantro, and lime juice. Make sure to rinse the lentils well to remove any debris. Dice the onion and carrots into small pieces. Mince the garlic and grate the ginger. This step helps your soup cook evenly and quickly. Now, heat the olive oil in a large pot over medium heat. Once the oil shimmers, add the diced onion. Sauté it for about five minutes until it turns soft and translucent. Next, add the minced garlic and grated ginger. Stir them together for one to two minutes. They should smell great, but don’t let the garlic burn. Then, sprinkle in the curry powder, turmeric, and cumin. Mix well to coat the onions. Let the spices cook for about one minute to release their flavors. After that, carefully pour in the vegetable broth. Turn up the heat until it boils. Once boiling, add the rinsed lentils and diced carrots. Reduce the heat to low and cover the pot. Let it simmer for 15 to 20 minutes. The lentils should be tender by then. When the lentils and carrots are cooked, stir in the full can of coconut milk. Add the chopped spinach or kale next. Let the soup simmer for another five minutes. This gives the greens time to soften and blend with the soup. Taste it now and season with salt and black pepper. Squeeze in the fresh lime juice for a zesty kick. Serve the soup hot in bowls. Garnish with fresh cilantro for extra flavor and color. You can find the Full Recipe if you want to refer back to the steps. Enjoy your warm, comforting bowl of Coconut Curry Lentil Soup! To get the best flavor from your Coconut Curry Lentil Soup, start with fresh spices. They bring out the full taste. Use a heavy pot for even heat. It helps cook the lentils and veggies just right. - How to achieve the best flavor: - Sauté the onion until soft. This builds a sweet base. - Add garlic and ginger next. Their aroma will fill your kitchen. - Toast the spices briefly before adding liquid. This unlocks rich flavors. - Recommended cooking utensils: - A large pot with a lid works best. - A wooden spoon helps mix without scratching the pot. - Use a measuring cup for the lentils and broth. Avoid cooking lentils too long. Overcooked lentils turn mushy. Keep an eye on them after 15 minutes. Also, don’t skip the lime juice. It adds brightness to the soup. Serve your soup with warm bread or over rice. A dollop of yogurt on top adds creaminess. Fresh cilantro as a garnish gives a nice touch. Enjoy your comforting bowl of Coconut Curry Lentil Soup! For the full recipe, check out the detailed instructions above! {{image_4}} You can easily change some ingredients in this soup. If you don’t have red lentils, use green or brown lentils. They work well too. You can swap the carrots for zucchini or sweet potatoes. These veggies add different flavors and textures. If you want more protein, add chickpeas or tofu. For the broth, you can use chicken broth instead of vegetable broth. This will add a richer taste. Spice levels can change based on your taste. If you like it mild, cut back on the curry powder. Start with one tablespoon and add more if needed. You can also add a bit of coconut sugar to balance the heat. For a spicy kick, add chili flakes or fresh jalapeños. Adjust the spices as you cook, so you get the perfect flavor. This soup is already vegan and gluten-free. All the ingredients are plant-based and safe for gluten-free diets. If you want to add more richness, try using a different nut milk. Almond or cashew milk can add a different flavor. Make sure to check labels for gluten-free options if you use packaged ingredients. This way, everyone can enjoy this tasty dish. You can find the full recipe [Full Recipe]. You can store Coconut Curry Lentil Soup in the fridge. It stays fresh for about 3 to 5 days. Make sure to let it cool down first. Pour it into an airtight container. This keeps the soup from drying out or picking up other odors. If you want to keep it longer, you can freeze the soup. Use freezer-safe containers or bags. The soup lasts for up to 3 months in the freezer. Just remember to leave some space in the container. The soup will expand when it freezes. When you're ready to enjoy the soup again, take it out of the fridge or freezer. If frozen, let it thaw in the fridge overnight. To reheat, pour it into a pot over low heat. Stir often to keep it from sticking. You can add a splash of vegetable broth for creaminess. Heat until it's warm throughout, then serve! For quick reheating, use the microwave in short bursts, stirring in between. Enjoy your flavorful comfort bowl! For the full recipe, check the earlier section. Coconut Curry Lentil Soup lasts about 5 to 7 days in the fridge. Store it in an airtight container. This soup tastes even better after a day or two, as the flavors meld together. Yes, you can add meat or seafood to this soup. Chicken or shrimp work well. Cook them separately and mix them in before serving. This adds protein and a new flavor twist. You can serve this soup with rice or warm naan. A simple side salad adds freshness. Consider pairing it with yogurt or a tangy chutney for extra taste. Absolutely! This soup is great for meal prep. Make a big batch and store it in portions. Just reheat when you need a quick meal. It saves time and is full of flavor. Yes, you can use dried lentils. However, they will take longer to cook than red lentils. Make sure to soak them for a few hours or overnight for the best results. Adjust the cooking time accordingly to ensure they are tender. For the complete recipe, check out the [Full Recipe]. This blog post shares a simple recipe for Coconut Curry Lentil Soup. You learned the key ingredients and step-by-step instructions to make it. I also provided tips for flavor, storage, and common mistakes. Variations allow flexibility for your taste and diet needs. Making this soup is easy and rewarding. You can enjoy it fresh or save it for later. Experiment with spices and ingredients to make it your own. Enjoy a warm bowl today!

Coconut Curry Lentil Soup Flavorful Comfort Bowl

Warm up your taste buds with my Coconut Curry Lentil Soup, a perfect comfort bowl! This rich and creamy soup

Chicken and Sauce Components - 2 boneless, skinless chicken breasts, cut into thin strips - 1 cup teriyaki sauce (store-bought or homemade) - 1 tablespoon sesame oil Vegetable Selections - 1 cup broccoli florets, washed and trimmed - 1 red bell pepper, sliced into thin strips - 1 cup shredded carrots, preferably fresh - 2 green onions, finely chopped - 1 tablespoon sesame seeds, toasted if possible Rice Requirements - 2 cups jasmine rice, cooked and fluffily prepared - Salt and black pepper to taste When making teriyaki chicken bowls, the ingredients are key. The chicken and sauce form the base. You can use fresh chicken breasts for the best flavor. The teriyaki sauce can be homemade or store-bought, depending on your time and taste. Sesame oil adds a nice touch of richness. For the vegetables, you want a mix that’s bright and crunchy. Broccoli, bell pepper, and carrots give good color and texture. Green onions and sesame seeds add extra flavor and crunch. Finally, jasmine rice serves as the perfect base. Cook it well to keep it fluffy. This combination of ingredients makes for a dish that looks and tastes great. For the full recipe, check out the details above. Marination Process To make the chicken tasty, we first marinate it. Take your sliced chicken and place it in a bowl. Pour half of the teriyaki sauce over the chicken. Mix it well so each piece gets coated. Cover the bowl with plastic wrap. Put it in the fridge for at least 20 minutes. This helps the chicken absorb the flavors. Cooking Techniques After marinating, heat the sesame oil in a skillet over medium-high heat. When the oil is hot, add the marinated chicken. Cook the chicken for about 5-7 minutes. Stir it often so it cooks evenly. You want the chicken to be golden brown and fully cooked. Lightly sprinkle salt and black pepper to boost the flavor. Stir-Frying Techniques Use the same skillet for the vegetables. Do not wash it; this keeps the chicken flavor. Add the broccoli, red bell pepper, and shredded carrots. Stir-fry these veggies for about 3-5 minutes. You want them to be tender but still have a little crunch. This keeps their color and nutrients. Timing for Tenderness Keep an eye on the veggies while cooking. You want them to soften but not turn mushy. Stir-frying at the right time ensures they taste fresh and look bright. This adds a lovely contrast to the chicken. Layering Components Start assembling your bowls with cooked jasmine rice. Place a generous scoop of rice at the bottom. Next, add the teriyaki chicken and the colorful vegetables on top. This creates a beautiful layer of flavors and textures. Garnishing Tips Finish by adding chopped green onions and toasted sesame seeds. This adds a burst of flavor and a nice crunch. For extra flair, drizzle a bit of teriyaki sauce over the top. This makes your bowl look even more appetizing. Enjoy creating your mouthwatering teriyaki chicken bowls! For the full recipe, visit the main recipe section. Homemade vs. Store-Bought Sauce You can use store-bought teriyaki sauce for quick meals. It saves time and still tastes great. However, homemade sauce can give you a richer flavor. To make your own, mix soy sauce, sugar, garlic, and ginger. Adjust the ingredients to match your taste. Adjusting Sweetness Levels If you like a sweeter taste, add more sugar or honey. If you prefer a savory kick, reduce the sugar. Experiment until you find your perfect balance. Sweetness can change the whole dish! Grilling vs. Stir-Frying Grilling your chicken adds a unique smoky flavor. It gives the dish a nice char. Stir-frying is faster and keeps the chicken juicy. Both methods work well, so choose one based on your mood or equipment. Instant Pot or Slow Cooker Options Using an Instant Pot can save time. Cook the chicken in a few minutes and still get great flavor. A slow cooker is perfect for meal prep. Just set it in the morning and enjoy later. Both methods make meal time easier. Remember, you can find the full recipe to guide you through making these delicious teriyaki chicken bowls! {{image_4}} Gluten-Free Options You can easily make this dish gluten-free. Just use gluten-free soy sauce or tamari instead of regular teriyaki sauce. Check the labels to ensure all ingredients are gluten-free. This small swap keeps the flavor while making it safe for those with gluten allergies. Vegan Substitutes For a vegan version, replace chicken with tofu or tempeh. Marinate the tofu in the same teriyaki sauce. Use extra firm tofu for better texture. You can also add more vegetables to boost flavors and nutrients. Think about mushrooms, snap peas, or zucchini for a lovely mix. Alternative Vegetables Feel free to get creative with your veggies. Instead of broccoli, try bok choy or snap peas. You can also use carrots, zucchini, or bell peppers for color and crunch. This keeps your bowl fresh and exciting each time you make it. Different Protein Choices Switch up the protein to suit your taste. You can use shrimp, beef, or even seitan for a plant-based option. Each protein brings its own flavor and texture. Adjust the cooking time based on what you choose. Chicken cooks quickly, while beef may need a bit longer. For the full recipe, check the details above. - Under Refrigeration: Store your teriyaki chicken bowls in airtight containers. This keeps the flavors fresh. Place them in the fridge within two hours of cooking. They can last for about three to four days. Make sure to separate the rice from the chicken and veggies if possible. This helps keep everything at its best. - Freezing Tips: For longer storage, freeze the chicken and veggies together. Use freezer-safe bags or containers. Remove as much air as possible to avoid freezer burn. These bowls can stay good for up to three months. Label them with the date for easy tracking. Thaw in the fridge overnight before reheating. - Best Methods for Leftovers: The microwave is quick and easy. Heat in short bursts, stirring in between. This helps to heat evenly. If you prefer, you can reheat on the stovetop. Just add a splash of water or broth to avoid drying out. Heat over medium-low until warmed through. - Flavor Retention Techniques: To keep the flavors strong, add a dash of fresh teriyaki sauce when reheating. This adds moisture and taste. You can also sprinkle fresh green onions or sesame seeds before serving. This little touch enhances the dish and makes it feel fresh again. How Do You Make Homemade Teriyaki Sauce? Making teriyaki sauce at home is simple. You need soy sauce, honey, garlic, and ginger. Mix these in a pot over medium heat. Stir until the honey dissolves. Let it simmer for a few minutes to thicken. This homemade sauce tastes fresh and rich, perfect for your chicken. Can I Use Other Types of Rice? Yes, you can use other rice types! Brown rice adds a nutty flavor. Sushi rice gives a sticky texture. Quinoa is a great gluten-free option too. Each type will change the dish a bit, but all work well with teriyaki chicken. What Are the Best Sides to Serve with Teriyaki Chicken Bowls? Great sides include steamed edamame, cucumber salad, and miso soup. You can also serve pickled vegetables for a crunchy bite. Each side complements the chicken’s flavor and adds color to your meal. Can I Prep the Chicken Ahead of Time? Absolutely! You can marinate the chicken the night before. Just keep it in the fridge until you’re ready to cook. This saves time and boosts flavor, making your meal even better. How Long Do Leftovers Last? Leftovers last about three to four days in the fridge. Store them in an airtight container to keep them fresh. Reheat in the microwave or on the stove for a quick meal anytime. You learned about making tasty teriyaki chicken bowls. We covered the right ingredients, cooking steps, and tips for extra flavor. You can also adjust recipes for diets or try new ingredients. Storing and reheating leftovers is easy with proper techniques. Embrace these ideas to make your own delicious teriyaki bowls at home. With practice, you'll impress friends and family with your cooking skills. Enjoy each bite and have fun in the kitchen!

Mouthwatering Teriyaki Chicken Bowls Easy Family Meal

Are you ready to make a family meal that’s both easy and delicious? My Mouthwatering Teriyaki Chicken Bowls recipe is

Older posts
Newer posts
← Previous Page1 … Page73 Page74 Page75 … Page86 Next →

dsad

© 2026 lazychefmagic • Built with GeneratePress

Our Policies

  • Copyright Policy
  • Cookie Policy
  • GDPR Policy
  • Privacy Policy
  • Disclaimer
  • Terms Of Use

More Information

  • Home
  • About
  • Contact
  • Appetizers
  • Dessert
  • Dinner
  • Drinks
©2026, lazychefmagic About Back To Top