Skip to content
DisclaimerTerms Of UseGDPR PolicyCookie Policy

lazychefmagic

  • Home
  • Drinks
  • Appetizers
  • Dinner
  • Dessert
  • About
  • Contact
  • Privacy Policy
DisclaimerTerms Of UseGDPR PolicyCookie Policy

NO-ING-IMG

To make chocolate avocado mousse, you need just a few simple ingredients. Here’s what you'll need: - 2 ripe avocados - 1/4 cup unsweetened cocoa powder - 1/4 cup maple syrup or honey - 1/4 cup almond milk or non-dairy milk - 1 teaspoon pure vanilla extract - A pinch of fine sea salt - Dark chocolate shavings for garnish Each ingredient plays a key role in creating the rich and creamy texture of this dessert. Ripe avocados provide a smooth base and healthy fats, while cocoa powder gives the classic chocolate flavor. The maple syrup or honey adds sweetness, and almond milk helps blend everything together. Using pure vanilla extract enhances the overall taste, while the pinch of sea salt balances the sweetness. Finally, dark chocolate shavings on top add a nice touch and extra flavor. For the full recipe, check out the details and let your kitchen shine! - Start by slicing the ripe avocados in half. - Carefully remove the pits with a spoon or knife. - Scoop the flesh into the bowl of a food processor. - Add the cocoa powder, maple syrup, almond milk, vanilla, and salt to the processor. - Blend all the ingredients on high speed. - Keep blending until the mixture is smooth and creamy. - If needed, pause to scrape down the sides of the bowl. - Taste the mousse to check the sweetness. - If you want it sweeter, add more maple syrup and blend again. - Scoop the mousse into serving bowls or glasses. - Place the mousse in the refrigerator for at least 30 minutes. - This chilling time helps the mousse set and enhances the flavors. - Before serving, add dark chocolate shavings on top for garnish. You can check the [Full Recipe] for more details and tips! Enjoy your rich and creamy chocolate avocado mousse! To make smooth mousse, use ripe avocados. Look for avocados that yield slightly when you press them. This means they are soft enough to blend well. If they are hard, wait a few days for them to ripen. The right texture makes a big difference in taste. For blending, I recommend using a high-quality food processor. It creates a silky-smooth texture. If you don't have one, a strong blender can work too. Just make sure to pause and scrape down the sides often. This ensures everything mixes evenly. Presentation matters. Serve your mousse in small, clear glasses. This lets the rich color shine through. You can also layer it with fresh fruits or whipped cream for added fun. For garnishing, sprinkle dark chocolate shavings on top. They add a nice touch and extra chocolate flavor. Fresh mint leaves or vibrant berries also work well. These little touches make your mousse not just tasty, but pretty too. {{image_4}} You can change the sweetener in your chocolate avocado mousse. Agave syrup is a great option. It adds sweetness without a strong flavor. Stevia is another choice. It is low-calorie and natural. You can also try different syrups to enhance flavors. Maple syrup gives a rich taste. Honey can add a floral note. Each sweetener changes the mousse slightly. Experiment to find your favorite mix! Adding spices can elevate your mousse. A dash of cinnamon adds warmth. If you like heat, a pinch of cayenne gives a nice kick. You can also mix in fun ingredients. Coconut adds creaminess and a tropical touch. Peanut butter brings a savory flavor to the mousse. Just blend in the extras with your base mix. These small tweaks make a big difference! To keep your chocolate avocado mousse fresh, store it in an airtight container. This method prevents air from getting in and causing browning. You can also press plastic wrap directly onto the mousse's surface to minimize exposure to air. The mousse stays tasty for up to three days in the fridge. If you want to save some mousse for later, freezing works well. First, scoop the mousse into an airtight container. Leave a little space at the top, as it will expand when frozen. You can freeze the mousse for up to one month. When you are ready to enjoy it, thaw it in the fridge overnight. If it seems a bit thick, blend it again with a splash of almond milk. This step helps restore its creamy texture before serving. Want to impress? Serve with fresh toppings right after thawing for a delightful dessert experience. Chocolate avocado mousse is healthy because it uses avocados. Avocados are full of good fats. These fats help keep your heart healthy. They also have vitamins like K, E, and C. Plus, avocados have fiber, which helps with digestion. Unlike heavy cream, avocados are lower in calories. This makes the mousse a guilt-free treat. Yes, you can use different types of chocolate. Dark chocolate gives a rich flavor. Milk chocolate is sweeter and creamier. White chocolate adds a unique taste but lacks cocoa's health benefits. You can mix different chocolates to find your favorite blend. Just remember that each type changes the mousse's taste. You can keep the mousse in the fridge for about three days. Make sure to store it in an airtight container. This helps prevent it from drying out or absorbing other smells. If you notice any browning, just give it a quick stir. The mousse will still taste great! Yes, chocolate avocado mousse is gluten-free. All the ingredients used are naturally gluten-free. If you substitute any ingredients, make sure those are also gluten-free. This mousse is perfect for those with gluten sensitivities. Enjoy it without worry! For the complete recipe, check out the Full Recipe section. In this post, we covered how to make a creamy chocolate avocado mousse. You need ripe avocados, cocoa powder, and sweeteners. I shared tips for creating a smooth texture and ways to serve it nicely. You can also try different flavors and store leftovers easily. This mousse is not just tasty; it’s healthy too! Enjoy this fun, simple recipe, and impress your family and friends with your new dessert skills. It's a sweet treat worth sharing!

Chocolate Avocado Mousse Rich and Creamy Delight

If you love chocolate and creamy desserts, you’re in for a treat! This Chocolate Avocado Mousse is rich, smooth, and

- Chicken and Tortillas - Use 2 cups of cooked, shredded chicken. It adds flavor and protein. - Choose 8 small flour tortillas. They are soft and easy to roll. - Cheese Varieties - Select 1 cup each of shredded cheddar and mozzarella cheese. These cheeses melt well and create a creamy texture. - Spices and Seasonings - Add 1 teaspoon of ground cumin and chili powder. These spices bring warmth and depth to the dish. - Use 1 small onion and 2 cloves of garlic. They add aroma and sweetness to the filling. - Garnishes for Serving - Fresh cilantro, chopped, works great as a garnish. It adds color and freshness. - Serve with sour cream for a creamy touch. It balances the spices well. - Suggested Sides for a Complete Meal - Pair your enchiladas with rice and beans. They make a hearty and satisfying meal. - Add a simple salad with lettuce, tomatoes, and a light dressing. It brings freshness to your plate. Preheat the Oven Start by preheating your oven to 350°F (175°C). This is a key step to ensure your enchiladas bake evenly and come out tasty. Sauteing Onions and Garlic Next, heat olive oil in a large skillet over medium heat. Add the finely chopped onion. Sauté until it looks soft and clear, about 3-4 minutes. Stir it often so it doesn’t burn. After that, add minced garlic along with ground cumin and chili powder. Cook this mix for one minute. You will smell a lovely aroma! Combining Chicken with Spices Now, add the shredded chicken to your skillet. Season it with salt and pepper. Pour in half of the enchilada sauce and mix well. This step lets the chicken soak up all those amazing flavors. Filling and Rolling Techniques To fill the tortillas, take one and put a scoop of the chicken mix and some cheese in the center. Roll it tightly, then place it seam-side down in a greased baking dish. Do this for all the tortillas. Arranging in Baking Dish Once you fill all the tortillas, pour the rest of the enchilada sauce over them. Spread it evenly. Don’t forget to sprinkle the reserved cheese on top! Cooking Time and Temperature Place the baking dish in your preheated oven. Bake for 20-25 minutes. You want the cheese to melt and get bubbly. It should be slightly golden on top. Tips for Achieving Perfectly Melted Cheese To get that perfect cheese melt, make sure your oven is at the right temperature. If you want extra crispness, you can broil the enchiladas for a minute or two at the end, but watch them closely. This process makes creating easy chicken enchiladas simple and fun. Enjoy your cooking! For the complete details, you can check the Full Recipe. - Overfilling Tortillas: This can lead to messy enchiladas. Use just enough filling to allow for easy rolling. If you overstuff, the tortillas may tear or spill out during baking. Keep it simple and manageable. - Not Seasoning Chicken Properly: Chicken should be flavorful. Always season it with salt and pepper. You can also add spices like cumin and chili powder. This makes the filling burst with taste. - Additional Spice Suggestions: If you love heat, add more chili powder or cayenne pepper. You can also mix in smoked paprika for a deeper flavor. Fresh lime juice adds a zesty kick, too. - Alternatives to Enchilada Sauce: If you want something different, try salsa verde or a creamy white sauce. BBQ sauce can give a sweet twist. Play with flavors to find what you love best. {{image_4}} You can change the protein in your enchiladas. Try using ground beef or turkey instead of chicken. For a vegetarian option, mix in black beans or lentils. Both choices taste great and give a nice twist to the recipe. If you need gluten-free options, choose corn tortillas. They hold up well and add a nice flavor. You can also find gluten-free flour tortillas at the store. These swaps keep your meal tasty and suitable for everyone. To mix up the flavor, add some fun ingredients. You can toss in diced bell peppers or chopped jalapeños for heat. Fresh corn adds a sweet crunch, while olives bring a salty touch. If you want something creamy, try drizzling a white sauce on top before baking. This sauce can be made with sour cream, cream cheese, or a mix of both. It makes your enchiladas rich and delicious. For more details, check the Full Recipe. To keep your easy chicken enchiladas fresh, use these tips: - Best Practices for Refrigeration: Let the enchiladas cool to room temperature. Place them in an airtight container. They can stay in the fridge for 3 to 4 days. Make sure to separate layers with parchment paper to avoid sticking. - Freezing Instructions: You can freeze enchiladas for up to 3 months. Wrap each enchilada in plastic wrap. Place them in a freezer-safe bag or container. Label the bag with the date for easy tracking. When you're ready to enjoy the leftovers, here’s how to heat them up: - Oven vs. Microwave Methods: The oven method gives the best results. Preheat the oven to 350°F (175°C). Place the enchiladas in an oven-safe dish, cover with foil, and heat for 20 minutes. For the microwave, place the enchiladas on a plate. Heat in 1-minute intervals until warm, but the texture may not be as good. - How to Keep Enchiladas Moist: To keep your enchiladas moist, add a splash of broth or extra enchilada sauce before reheating. Cover tightly with foil when using the oven. This traps steam and keeps them soft. To make enchiladas, combine cooked chicken, cheese, and spices in a tortilla. You can use homemade sauce or store-bought. Homemade sauce offers a fresh taste. To make it, mix tomatoes, spices, and broth. Cook until thick. This sauce can elevate your dish. Yes, you can make chicken enchiladas ahead of time. Prepare the enchiladas and place them in a baking dish. Cover and store in the fridge for up to two days. When ready to bake, pour on the sauce and add cheese. Enchiladas and burritos differ in size and sauce. Enchiladas use smaller tortillas, while burritos are larger and filled to the brim. Enchiladas are baked with sauce on top, while burritos are often wrapped and served without sauce. For detailed steps, check out the Cheesy Chicken Enchiladas Recipe. In this blog post, we covered how to make delicious chicken enchiladas. We discussed the main ingredients, the step-by-step process, and shared tips for perfecting your dish. Remember to avoid common mistakes, like overfilling tortillas. Don’t hesitate to swap in different proteins or sauces for variety. Enjoy your meal prep and feel confident serving these at dinner. With practice, you’ll master enchiladas that impress everyone at the table. Happy cooking!

Easy Chicken Enchiladas Flavorful and Quick Meal

Looking for a quick and tasty meal? You’ve come to the right place! My Easy Chicken Enchiladas are not only

- 2 cups elbow macaroni - 4 cups shredded sharp cheddar cheese - 1 cup shredded mozzarella cheese - 1/2 cup grated Parmesan cheese - 4 tablespoons unsalted butter - 1/4 cup all-purpose flour - 4 cups milk (whole or 2%) - 1 teaspoon garlic powder - 1 teaspoon onion powder - 1/2 teaspoon smoked paprika - Salt and pepper to taste - 1 cup breadcrumbs (preferably Panko for added crunch) - 2 tablespoons fresh parsley, chopped (for garnish) When I create baked macaroni and cheese, I start with these ingredients. Each one plays a key role in making the dish rich and creamy. If you want to change up the flavor, try different cheeses. Gouda or Gruyère can add a nice twist. If you prefer a lighter option, use low-fat cheese. For those who need gluten-free options, look for gluten-free pasta. Most brands offer elbow macaroni that works well. Just be sure to cook it carefully, as gluten-free pasta can be softer. Use the [Full Recipe] for more details on how to combine these ingredients into a delicious meal. - Preheat your oven to 350°F (175°C). This is the perfect temperature for baking. - Bring a large pot of salted water to a boil. Add 2 cups of elbow macaroni. Cook according to the package. Aim for al dente, which means firm but not hard. Once cooked, drain the pasta and set it aside. - Melt 4 tablespoons of unsalted butter in a large saucepan over medium heat. Wait until the butter is bubbly. - Slowly whisk in 1/4 cup of all-purpose flour to make a roux. Cook for one minute to remove the raw taste of flour. - Gradually pour in 4 cups of milk while whisking. Keep whisking for about 5-7 minutes until the sauce thickens to a creamy consistency. This is key for a rich cheese sauce. - Reduce the heat to low. Stir in 3 cups of sharp cheddar cheese, 1 cup of mozzarella, and 1/2 cup of grated Parmesan cheese. Keep stirring until the cheese melts and the sauce is smooth. - Gently fold the cooked macaroni into the cheese sauce. Make sure each piece is well-coated. - Pour the mixture into a greased 9x13 inch baking dish, spreading it evenly. - Sprinkle the remaining cheese on top. Add 1 cup of breadcrumbs for a crunchy finish. - Bake in the preheated oven for 25-30 minutes. Look for a golden brown top and bubbly edges. This means it's done. Use these steps to create a creamy and delicious baked macaroni and cheese. For the full recipe, check out the details above. Enjoy! To get that rich, creamy texture, focus on your cheese. Use fresh cheese instead of pre-shredded. Pre-shredded cheese often has additives that prevent melting well. For a smooth melt, combine sharp cheddar and mozzarella. The sharpness adds flavor, while mozzarella gives stretch. Timing is key when cooking the pasta. Always cook the elbow macaroni until it is al dente. This means it should be firm to the bite. The pasta will continue to cook in the oven. If overcooked, it can become mushy in your baked dish. Spices can lift your mac and cheese to new heights. I recommend adding a touch of smoked paprika for warmth. Garlic powder and onion powder also add depth. For a kick, try a pinch of cayenne pepper. Adjust the seasoning by tasting as you go. This helps create a flavor that suits your palate. You can also mix in extras like cooked bacon, sautéed onions, or steamed broccoli. These ingredients add flavor and nutrition. Don’t be afraid to play with flavors until you find the right balance. Serving mac and cheese can be both fun and stylish. You can serve it straight from the baking dish for a cozy feel. For a fancier look, scoop individual portions onto plates. Garnishing is key for visual appeal. A sprinkle of fresh parsley adds color and freshness. You might also drizzle a little olive oil on top for shine. A dash of smoked paprika can add a pop of color, too. These small touches can make your dish look as good as it tastes! For the full recipe, be sure to check out the entire guide. {{image_4}} You can easily change the flavor of your baked macaroni and cheese. Adding proteins like bacon or chicken makes it heartier. Simply cook the bacon until crispy, then crumble it into the dish. For chicken, use cooked, shredded pieces mixed right into the cheese sauce. This adds a lovely depth of flavor. Vegetables bring nutrition and color. Think about adding broccoli, spinach, or peas. Steam the veggies lightly before mixing them in. This way, they stay bright and tasty in your dish. Need a vegan or dairy-free option? You can use plant-based cheeses made from nuts or soy. Substitute milk with almond or oat milk for a creamy base. This keeps the dish rich without dairy. For gluten-free needs, swap regular pasta for gluten-free elbow macaroni. There are many great brands available. You can also use gluten-free flour for your roux. Baked macaroni and cheese can take on flavors from around the world. Try adding Italian spices like oregano and basil for a Mediterranean twist. You can mix in sun-dried tomatoes for a burst of flavor. For a Mexican version, add jalapeños, cumin, and pepper jack cheese. Top it with crushed tortilla chips for crunch. This gives your mac and cheese a fun, spicy kick. Each variation makes the dish unique and exciting. Try different ingredients to find your favorite twist on this classic comfort food. Explore the Full Recipe to discover how to create these delicious variations. To keep your baked macaroni and cheese fresh, store it in the fridge. Place it in an airtight container. This helps maintain its creamy texture. It's best to eat leftovers within three to four days. When reheating, use the oven if you can. Preheat it to 350°F (175°C). Place the mac and cheese in a baking dish. Add a splash of milk to keep it moist. Cover with foil to prevent drying. Heat for about 20 minutes, or until hot. This method keeps it creamy and delicious. If you want to save leftovers longer, you can freeze baked macaroni and cheese. First, let it cool to room temperature. Then, place it in an airtight container or freezer bag. Make sure to remove as much air as possible. This helps avoid freezer burn. For best results, eat it within two to three months. When you're ready to eat, thaw it in the fridge overnight. You can also use the microwave for a quick thaw. Reheat it in the oven for the best texture. Just like before, add some milk and cover it to keep it creamy. Now you have a plan for enjoying your rich and creamy delight at any time! How long does baked macaroni and cheese last in the fridge? Baked macaroni and cheese lasts about three to five days in the fridge. Store it in an airtight container. This keeps it fresh and tasty for your next meal. Can you make baked macaroni and cheese ahead of time? Yes, you can make it ahead of time. Prepare the dish and store it in the fridge before baking. Just cover it well. When ready, bake it straight from the fridge, adding a few extra minutes to the cook time. Can I use pre-shredded cheese? Yes, you can use pre-shredded cheese. It saves time and works well. However, fresh cheese melts better and tastes richer. So, choose based on your needs. How do I prevent mac and cheese from drying out? To prevent drying, add a bit more milk before baking. Cover the dish with foil while it bakes. This keeps the steam in, making it creamy and moist. What is the best type of baking dish to use? A 9x13 inch baking dish is ideal for this recipe. It allows even baking and gives a good crust on top. For best results, use a glass or ceramic dish. Do I need a specific type of pasta for this recipe? Elbow macaroni is the classic choice. It holds cheese well and cooks evenly. You can also try cavatappi or shells if you like. They add fun shapes to your dish. We've covered all you need for a great baked mac and cheese. You learned the key ingredients, simple steps, and variations to make it your own. Remember to choose a pasta that cooks well and to melt your cheese just right. These tips will help you serve up a creamy dish everyone will love. Keep experimenting with flavors and enjoy your cooking journey! Your baked mac and cheese will shine at every meal.

Baked Macaroni and Cheese Rich and Creamy Delight

If you’re craving a comfort food classic, look no further! This baked macaroni and cheese recipe delivers a rich and

- 1 pound flank steak, thinly sliced against the grain - 2 cups broccoli florets - 1/4 cup soy sauce - 2 tablespoons oyster sauce - 2 tablespoons cornstarch - 1 tablespoon brown sugar - 1 tablespoon freshly grated ginger - 3 cloves garlic, minced - 1 cup beef broth - 2 tablespoons sesame oil - 1 tablespoon vegetable oil - Salt and pepper to taste - Cooked rice or noodles for serving - Optional garnishes: sesame seeds, sliced green onions Gather these ingredients before you start. The flank steak is key for tender bites. Broccoli adds great color and crunch. The soy sauce and oyster sauce blend well for a rich taste. Brown sugar and ginger bring a nice sweetness and warmth. Garlic packs a punch of flavor. Beef broth adds depth. Sesame oil gives a nutty finish. Don’t forget salt and pepper to season! Once you have all your ingredients, you are ready to create a dish that feels fancy but is easy to make. You can serve this meal over rice or noodles. For a pretty touch, sprinkle sesame seeds or green onions on top. If you want to see how to put it all together, check out the Full Recipe. Start by whisking together these ingredients in a bowl: - 1/4 cup soy sauce - 2 tablespoons oyster sauce - 2 tablespoons cornstarch - 1 tablespoon brown sugar - 1 tablespoon freshly grated ginger - 3 cloves garlic, minced - 1 cup beef broth This savory sauce brings rich flavors to your meal. Mix until smooth. Next, set your Instant Pot to Sauté mode. Add 1 tablespoon of vegetable oil. When the oil is hot, add 1 pound of flank steak. Season it lightly with salt and pepper. Sauté for about 2-3 minutes. Stir often until the beef turns a nice brown color. Now, pour the sauce over the browned beef. Stir well to coat all the pieces. Close the Instant Pot lid tightly. Set the steam release valve to sealing. Select the Manual or Pressure Cook setting. Adjust the time to 10 minutes on high pressure. When cooking is done, let the pot naturally release pressure for 5 minutes. Then, carefully switch the steam release valve to venting. Open the lid and add 2 cups of broccoli florets. Close the lid again. Switch back to Sauté mode. Cook for an extra 2-3 minutes. Stir occasionally until the broccoli is tender and bright green. Now, your Instant Pot Beef and Broccoli is ready to shine. Enjoy this quick dinner delight! For more details, check the Full Recipe. To get that perfect browning on the beef, start by using a hot Instant Pot. Set it to Sauté mode and add vegetable oil. Wait until the oil shimmers before adding the beef. This step is key. Sauté the beef for just 2-3 minutes. Stir it often to prevent burning. You want a nice brown crust, as it adds flavor. Don't overcrowd the pot, as this can steam the beef instead of browning it. For bright and crunchy broccoli, timing is everything. Add the florets after the beef has cooked. Switch the Instant Pot back to Sauté mode. Cook the broccoli for just 2-3 minutes. Stir gently to coat it in the sauce. This keeps its vibrant green color and crisp texture. If you cook it too long, it turns mushy and dull. Want to boost the flavor? Try adding a splash of rice vinegar for tang. You can swap out the soy sauce for tamari to make it gluten-free. Want some heat? Add a pinch of red pepper flakes or some sliced jalapeños. You can also mix in sesame seeds for added crunch. Feel free to experiment with these suggestions to make this dish your own! For the full recipe, check out the section above. {{image_4}} You can swap out the beef for chicken or tofu. Chicken breast works well. Just cut it into bite-sized pieces. If you prefer tofu, use firm tofu and cube it. Both options cook quickly and stay tender. Adjust cooking times if needed. Chicken may take a minute less under pressure. Tofu is already soft, so you can skip browning it. This gives you tasty options for any diet. You can change the sauce for new flavors. Try adding hoisin sauce for a sweet twist. For heat, mix in some chili paste or sriracha. You can also use tamari instead of soy sauce for a gluten-free version. If you want a tangy flavor, add a bit of rice vinegar. Each change gives a unique taste to this dish. Feel free to experiment and find your favorite! Think about how you want to serve this dish. It pairs well with rice or noodles. For a fresh touch, add a salad on the side. You can also serve it in a bowl to show off the colors. Garnish with green onions or sesame seeds for flair. This not only looks nice but also adds flavor. The way you present your meal can make it feel special. Store your leftover beef and broccoli in an airtight container. Glass or plastic containers work well. Keep them in the fridge for up to three days. Make sure to let the dish cool before sealing it. This helps keep the food fresh and safe. To reheat beef and broccoli, use the microwave for quick results. Place it in a microwave-safe dish. Cover it with a lid or wrap to keep moisture. Heat in 30-second bursts, stirring often. This way, the beef stays juicy, and the broccoli stays bright. You can also reheat it on the stove. Use a pan over low heat, adding a splash of water or broth to keep it moist. You can freeze beef and broccoli for later meals. Let the dish cool completely first. Then, pack it in a freezer-safe container or bag. Be sure to remove as much air as possible. You can store it for up to three months. When ready to eat, defrost it overnight in the fridge. Reheat it gently on the stove or in the microwave. Enjoy that delicious taste anytime! The total time is about 30 minutes. This includes 15 minutes for prep and 15 minutes for cooking. You sauté the beef for a few minutes, then cook under pressure for 10 minutes. After that, you add broccoli and sauté for a few more minutes. Yes, you can make it gluten-free! Use tamari instead of soy sauce. Ensure your oyster sauce is gluten-free as well. You can also find cornstarch that is certified gluten-free. You can use sirloin or ribeye instead. For a lighter option, try chicken breast or tofu. Both will work well with the sauce and broccoli. Yes, this dish is great for meal prep! Cook a big batch and store it in airtight containers. It keeps well in the fridge for up to four days. You can also freeze it for later. Serve it over warm rice or noodles for a complete meal. You can garnish with sesame seeds or sliced green onions for a nice touch. Present it in shallow bowls for an elegant look. You can find the Full Recipe [here](#). This will guide you through every step and show you how to make this tasty dish! You now have everything you need to make a delicious Instant Pot beef and broccoli. We covered the key ingredients, guided you through each step, and shared tips for perfecting your dish. Whether you choose beef, chicken, or tofu, this recipe is easy to adapt. Remember to store leftovers properly and enjoy them later. Cooking doesn’t have to be hard. With a little practice, you’ll impress everyone with your skills. Enjoy your meal!

Instant Pot Beef and Broccoli Quick Dinner Delight

Are you looking for a quick and tasty dinner idea? Instant Pot Beef and Broccoli is your answer! This dish

For this recipe, you need: - 4 chicken thighs (bone-in and skin-on for enhanced flavors) Chicken thighs are juicy and tender. They soak up flavors well, making them perfect for our dish. The marinade is key to a tasty honey garlic chicken. Here are the ingredients: - 1/4 cup honey - 1/4 cup low-sodium soy sauce - 4 cloves garlic, finely minced - 1 tablespoon fresh ginger, finely minced - 1 tablespoon olive oil - 1 tablespoon rice vinegar - 1 teaspoon sesame oil - Salt and pepper to taste This marinade balances sweet and savory. Honey adds sweetness, while soy sauce gives saltiness. Garlic and ginger boost flavor and aroma. To finish your dish, use these garnishes: - 2 green onions, thinly sliced (for garnish) - 1 tablespoon sesame seeds (for garnish) These garnishes add color and crunch. They also enhance the overall presentation of your honey garlic chicken thighs. For the full recipe, check out the detailed instructions. First, gather your ingredients for the marinade. You need honey, soy sauce, garlic, ginger, olive oil, rice vinegar, sesame oil, salt, and pepper. Combine these in a mixing bowl. Whisk them until smooth. This mix brings sweet and savory notes to the chicken. Next, take your chicken thighs. Place them in a large resealable bag or a shallow dish. Pour the marinade over the chicken. Make sure each piece is well coated. Seal the bag or cover the dish tightly. Refrigerate for at least 30 minutes. For best results, let the chicken marinate for two hours. This enhances the flavors and makes the chicken juicy. Once you’re ready to cook, preheat your oven to 400°F (200°C). This step is key for even cooking. After marinating, remove the chicken from the fridge. Discard the used marinade but reserve a small amount for basting. Now, line a baking sheet with parchment paper. This keeps the chicken from sticking and makes cleanup a breeze. Place the chicken thighs skin-side up on the sheet. This way, the skin crisps nicely while baking. Put the baking sheet in the hot oven. Bake the chicken for about 25 minutes. This initial cooking helps the chicken start to cook through and crisp up. After 25 minutes, take the chicken out. Use the reserved marinade to baste the chicken. This adds a lovely glaze and extra flavor. Return the chicken to the oven and bake for another 15-20 minutes. The skin should turn golden brown, and the internal temperature should reach 165°F (75°C). When done, take the chicken out and let it rest for five minutes. This helps keep the juices inside. Before serving, sprinkle sliced green onions and sesame seeds on top. This makes the dish look and taste even better. For the full recipe, check the section above! When making honey garlic chicken thighs, pick bone-in, skin-on thighs. The bone adds flavor and moisture. Skin-on thighs get crispy and hold the sauce better. Look for thighs that are plump and have a nice color. Fresh chicken always tastes best. You can tweak the flavors to suit your taste. Want it sweeter? Add more honey. Like it spicy? Toss in some red pepper flakes or sriracha. If you prefer a tangy taste, boost the rice vinegar. Experiment with ginger too. Fresh ginger gives a bright flavor, while ground ginger offers warmth. Cook the chicken at 400°F (200°C) for best results. Bake for about 25 minutes before basting. Then, baste the chicken and cook for another 15-20 minutes. Always check the internal temperature; it should reach 165°F (75°C) for safety. Let the chicken rest for 5 minutes after baking. This helps the juices stay inside. For more details, refer to the Full Recipe. {{image_4}} You can add veggies to your honey garlic chicken for a full meal. Use bell peppers, broccoli, or snap peas. Simply chop the vegetables into bite-sized pieces. Toss them in the same marinade as the chicken. When you arrange the chicken on the baking sheet, add the veggies around it. They will roast while the chicken cooks. This adds color and nutrients to your dish. If you love heat, try this spicy twist. Add chili flakes or sriracha to your marinade. Start with a small amount and taste as you go. You can also use fresh jalapeños for extra flavor. This version gives your chicken a nice kick. It’s a great way to mix sweet and spicy flavors together. For a hands-off meal, consider the slow cooker. Prepare your marinade as usual and coat the chicken thighs. Place them in the slow cooker with the marinade. Cook on low for 6-8 hours or high for 3-4 hours. The chicken becomes tender and full of flavor. This method is perfect for busy days when you want a tasty dinner without much effort. For a full recipe, check the Honey Garlic Chicken Thighs section. After cooking, let the chicken thighs cool to room temperature. Place them in an airtight container. They will stay fresh in the fridge for up to four days. Always label your container with the date. This way, you know how long they have been stored. If you want to keep leftovers longer, freezing is a great option. Wrap each chicken thigh tightly in plastic wrap. Place the wrapped thighs in a freezer-safe bag or container. They can last up to three months in the freezer. Remember to label the bag with the date. When you're ready to eat, thaw them overnight in the fridge. To reheat, you can use the oven, microwave, or stovetop. For the oven, preheat it to 350°F (175°C). Place the chicken on a baking sheet and cover it with foil to keep it moist. Heat for about 15-20 minutes or until warm. If using a microwave, place the chicken in a microwave-safe dish. Cover it and heat in short bursts. Check often to avoid drying it out. On the stovetop, use a little oil in a pan over medium heat. Cook for about 5-7 minutes, turning occasionally. Enjoy your Honey Garlic Chicken Thighs just as tasty as when freshly made! For the full recipe, check out the earlier sections. You should marinate the chicken for at least 30 minutes. For the best flavor, aim for 2 hours. This time lets the chicken soak up all that yummy honey and garlic goodness. Some folks even marinate it overnight! Just remember to keep it in the fridge while it’s soaking. Yes, you can use boneless chicken thighs. They cook faster than bone-in thighs. Just check the internal temperature to ensure they reach 165°F (75°C). The taste will still be great, so feel free to use what you have! I love to serve this dish with fluffy jasmine rice. It soaks up the sauce well. You can also pair it with sautéed green veggies like bok choy or green beans. This adds color and nutrients to your meal. If you want a salad, a simple cucumber salad works great, too. For the full recipe, check out the details above! We explored how to make delicious honey garlic chicken thighs. You learned about the key ingredients, step-by-step cooking methods, and helpful tips. Variations let you get creative. Proper storage ensures your meal lasts. In the end, this dish is easy to customize. I hope you feel inspired to try it. Enjoy making this tasty meal for yourself or others!

Honey Garlic Chicken Thighs Flavorful and Easy Recipe

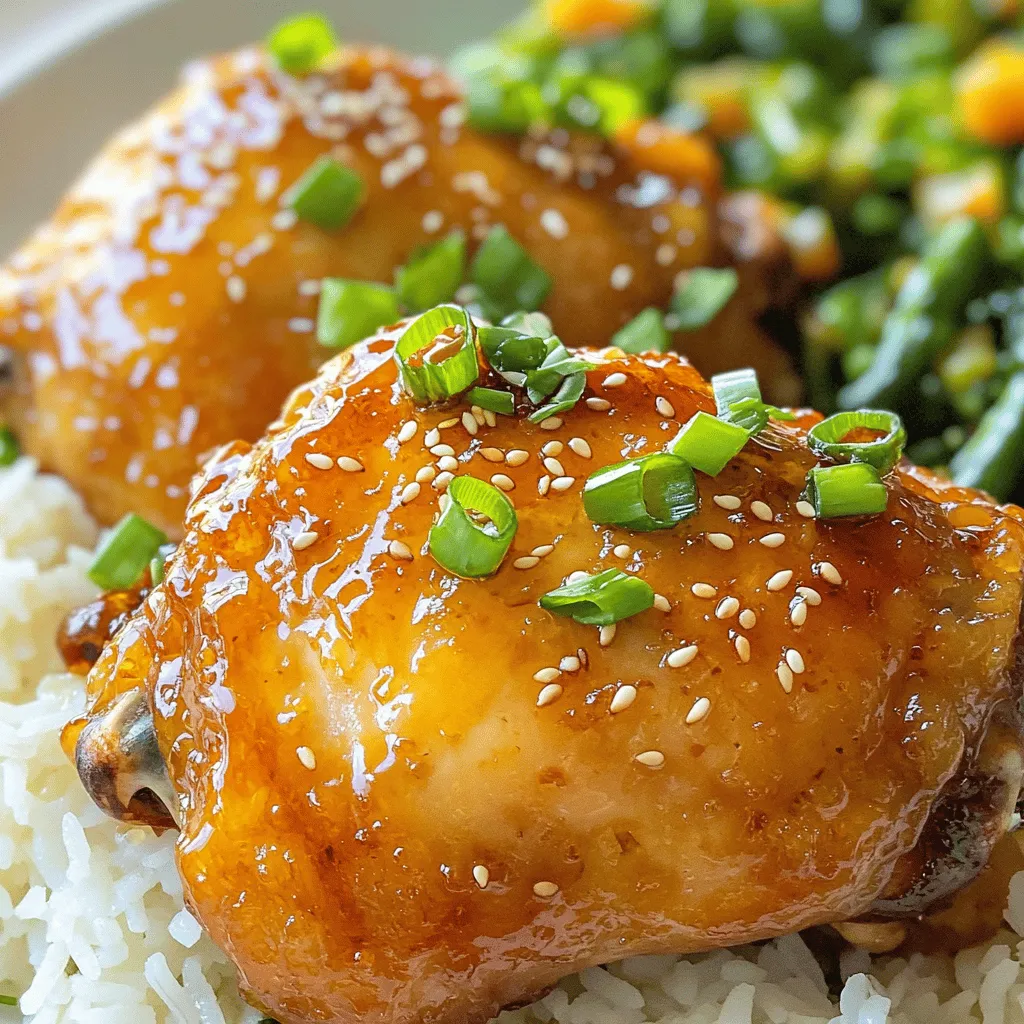
If you’re craving a dish that’s both tasty and simple, look no further! This Honey Garlic Chicken Thighs recipe combines

- 1 pint cherry tomatoes - 8 ounces fresh mozzarella balls (bocconcini) - A handful of fresh basil leaves - 2 tablespoons balsamic glaze - 1 tablespoon extra virgin olive oil - Salt and freshly cracked black pepper to taste - Skewers (6-8 inch) The main ingredients for our Caprese salad skewers are bright and fresh. Cherry tomatoes bring sweetness. Fresh mozzarella balls add creaminess. Basil leaves lend a wonderful aroma and flavor. Together, they create a burst of taste in every bite. For additional flavor, we drizzle balsamic glaze over the skewers. This adds a sweet tang. Extra virgin olive oil enhances the overall richness. A sprinkle of salt and black pepper brings all the flavors together. Lastly, use skewers that are 6-8 inches long for easy handling. This recipe is simple and quick. You can find the Full Recipe at the end of the article. The fresh ingredients make these skewers a perfect snack or appetizer for any gathering. They are not just delicious; they are colorful and fun to eat! - Rinse cherry tomatoes and basil leaves. - Pat dry to remove excess moisture. Start with fresh ingredients. The cherry tomatoes should be bright and firm. Fresh basil needs to be vibrant and fragrant. After rinsing, make sure to dry them well. Too much water can make the skewers soggy. - Thread cherry tomato, basil leaf, and mozzarella ball. - Repeat the pattern, leaving space at the ends. Grab a skewer and start with a cherry tomato. Next, add a basil leaf; you can fold it if it’s too big. Then, slide on a mozzarella ball. Keep repeating this pattern. Make sure to leave space at both ends for easy handling. - Drizzle with olive oil and balsamic glaze. - Allow flavors to soak into the skewers. Place the assembled skewers on a clean plate. Drizzle olive oil over them first, then add balsamic glaze. Let the flavors soak in for a few minutes. This step makes the dish even tastier! - Sprinkle with salt and freshly cracked black pepper. Don't skip this step! A light sprinkle of salt and fresh pepper brings out the best flavors. Adjust the amount based on your taste. - Arrange skewers on a serving platter. - Drizzle remaining balsamic glaze before serving. Lay the skewers on a nice platter. For a touch of elegance, add a little more balsamic glaze on top right before serving. This makes it look great and adds extra flavor. You can find the full recipe for these delicious skewers to guide you through each step. To make your skewers look great, insert them upright in a glass or vase. This adds height and makes it easy for guests to grab one. You can use uncooked rice or dried beans in the glass for support. It keeps the skewers steady and looks fun on your table. The taste of your skewers depends on fresh ingredients. Choose ripe cherry tomatoes and creamy mozzarella balls. Fresh basil leaves will add a bright flavor. For the best taste, opt for high-quality balsamic glaze. This will bring a sweet and tangy touch to your dish. Caprese salad skewers work well as an appetizer or side dish. Pair them with wine or sparkling water for a refreshing drink. The flavors of the skewers blend nicely with a chilled drink, making them perfect for parties or casual meals. Enjoy these fresh bites at any gathering! {{image_4}} You can easily switch things up with your Caprese salad skewers. For a creamy twist, add ripe avocado slices. The rich texture pairs well with the fresh flavors. If you want a savory kick, try adding prosciutto. Its saltiness will enhance each bite. You can also change your herbs. Instead of basil, use fresh mint for a bright flavor. Arugula offers a peppery touch that adds depth. Dressing can elevate your skewers from good to great. While balsamic glaze is classic, you might want to try pesto. It adds a fresh, herby taste. Italian vinaigrette can bring a zesty flair, making your skewers pop. For a unique twist, experiment with flavored olive oils. A garlic-infused oil can add an extra layer of taste. If you're catering to dietary needs, don't worry! Make these skewers vegan by using plant-based cheese. This keeps the dish flavorful without dairy. If gluten is a concern, choose gluten-free skewers. You can find these in most grocery stores. This way, everyone can enjoy your delicious creation! For the full recipe, check out the Caprese Delight Skewers. You can store your Caprese salad skewers in the fridge for up to 2 days. Place them in an airtight container to keep them fresh. This way, you can enjoy them later without losing flavor. Assemble your skewers up to 1 day in advance. Just remember to keep the balsamic glaze separate until you're ready to serve. This keeps the ingredients from getting soggy. To refresh flavors, drizzle a bit of olive oil or balsamic glaze before serving. Adding fresh basil leaves right before serving also boosts taste and looks. Enjoy your quick and tasty snack! Typically, they last up to 2 days in the fridge. This makes them a great snack for parties or picnics. Just keep them in an airtight container to stay fresh. Yes, you can assemble them a few hours ahead of serving. This saves time and stress when guests arrive. Just remember to keep them cool until it's time to eat. Use 6-8 inch wooden or bamboo skewers for best results. These sizes work well for easy handling. Plus, they are sturdy enough to hold the ingredients. Yes, try feta or cheddar for different flavors. Each cheese brings a unique taste. Mixing cheeses can add a fun twist to your skewers. While it enhances flavor, you can use just olive oil if desired. The olive oil adds richness, while balsamic glaze gives a sweet touch. Choose based on your taste preference. Pair with drinks like wine or a refreshing salad for a complete meal. The skewers are light and work well as an appetizer or side dish. Enjoying them with a bubbly drink makes it even better. In this post, we explored how to make delicious Caprese salad skewers. Key ingredients include cherry tomatoes, fresh mozzarella, and basil. We also covered tips for presentation and variations to keep things fresh. Remember, quality ingredients matter for great taste. You can serve these skewers as a fun appetizer or side dish. Feel free to get creative with flavors and pairings. Enjoy making and sharing this simple yet classy dish that everyone will love!

Quick Caprese Salad Skewers Fresh and Flavorful Snack

Looking for a fresh and tasty snack? Try these Quick Caprese Salad Skewers! With just a few simple ingredients, you

For these tasty tacos, you need just a few main ingredients: - 1 large head of cauliflower, cut into bite-sized florets - 8 small corn or flour tortillas, warmed - 1 ripe avocado, sliced into thin wedges - 1 cup red cabbage, finely shredded - 1/2 cup fresh cilantro, chopped - 1 lime, cut into wedges To make the cauliflower flavorful, use these seasonings: - 2 tablespoons extra virgin olive oil - 1 teaspoon smoked paprika - 1 teaspoon ground cumin - 1/2 teaspoon garlic powder - 1/2 teaspoon onion powder - Salt and freshly ground black pepper to taste The combination makes the cauliflower shine. When you roast it, these flavors will blend beautifully. Feel free to add some fun toppings: - Hot sauce for a spicy kick - Additional lime wedges for extra zest You can serve the tacos on a bright platter. Adding more cilantro on top makes it look great. This dish is simple but so satisfying. For the full recipe, check out the instructions above. First, set your oven to 425°F (220°C). This high heat helps the cauliflower roast well. While the oven warms, prepare your ingredients. Cut the cauliflower into bite-sized florets. Place them in a large bowl for seasoning. Drizzle 2 tablespoons of extra virgin olive oil over the florets. Sprinkle in 1 teaspoon of smoked paprika, 1 teaspoon of ground cumin, 1/2 teaspoon of garlic powder, and 1/2 teaspoon of onion powder. Add salt and pepper to taste. Toss them well until each floret is coated. Line a baking sheet with parchment paper for easy cleanup. Spread the cauliflower in a single layer on the sheet. Roast for 25-30 minutes. Stir halfway through for even browning. The cauliflower should be tender and golden brown when done. While the cauliflower roasts, heat a skillet over medium heat. Take your tortillas and warm each side for about 30 seconds. This makes them soft and flexible. You want them just warm enough to hold your tasty filling. Once the cauliflower is roasted, grab your warm tortillas. On each tortilla, place a generous scoop of the roasted cauliflower. Add sliced avocado, a handful of shredded red cabbage, and a sprinkle of chopped cilantro. Serve with lime wedges for a zesty touch. If you like it spicy, add some hot sauce on the side. For the full recipe, check out the section above. Enjoy your beautiful, tasty tacos! To make cauliflower tacos great, start by cutting the cauliflower into small, even florets. This helps them cook evenly. Roasting at 425°F (220°C) gives you a nice, crispy texture. I like to toss the florets with olive oil and spices. This coating helps them get golden and flavorful. Stir them halfway through roasting. This ensures every piece cooks well and develops a nice color. These tacos shine when served with fresh sides. I love adding a simple salad with greens and a zesty dressing. You can also try black beans for protein. They add a nice contrast in flavor and texture. If you want something crunchy, add tortilla chips with salsa. For a cooling touch, a dollop of vegan sour cream works well too. For the perfect meal, consider pairing these tacos with rice. Cilantro lime rice adds a nice twist. You can also serve roasted vegetables for added nutrients. If you enjoy a bit of heat, spicy pickled jalapeños can give your meal a kick. These additions make the meal more exciting and satisfying. For the full recipe, dive deeper into these delicious vegan cauliflower tacos! {{image_4}} You can switch up the filling to keep things fresh. Try using roasted chickpeas or black beans for added protein. Both options pack a flavor punch and add texture. You could also use jackfruit for a pulled meat-style taco. It absorbs seasonings well and gives a meaty feel. Each option brings new taste and nutrition to your meal. If you need gluten-free tacos, corn tortillas are the best choice. They are tasty and safe for those with gluten issues. You can also use lettuce wraps for a crunchy, low-carb option. Just remove the stems from large lettuce leaves. Fill them with roasted cauliflower, and you have a fresh, gluten-free taco. Want to spice things up? Add more heat with jalapeños or a spicy salsa. You could also use different seasonings like chili powder or curry powder for a unique twist. For a smoky flavor, try chipotle powder or smoked salt. Mix and match to create your perfect bite. Each change offers a new taste adventure! Check the Full Recipe for more ideas. After enjoying your vegan cauliflower tacos, you may have some leftovers. To store them, place the tacos in an airtight container. Make sure to keep the tortillas and fillings separate. This helps prevent sogginess. Store the container in the fridge for up to three days. When you're ready to enjoy your leftover tacos, reheating is simple. Heat a skillet over medium heat. Place the taco fillings in the pan and warm them for about 5 minutes. For the tortillas, you can wrap them in foil and place them in the oven at 350°F (175°C) for 10 minutes. This keeps them soft and warm. If you want to save your tacos for later, freezing is an option. To freeze, prepare the taco fillings but do not warm the tortillas. Place the cooled filling in a freezer-safe bag. Squeeze out the air and seal it tightly. You can freeze the filling for up to two months. When you're ready to eat, thaw the filling in the fridge overnight. Then, warm it up and serve it with fresh tortillas. Enjoy your tasty vegan cauliflower tacos straight from your freezer! Check out the Full Recipe for more details. Cauliflower is packed with nutrients. It is low in calories but high in fiber. This makes it great for digestion and weight loss. It also has vitamins C and K, which help your body fight illness. Cauliflower contains antioxidants, which protect your cells from damage. Plus, it is a good source of folate, which supports healthy cell growth. Yes, you can prepare these tacos ahead. Roast the cauliflower and store it in the fridge for up to three days. When you are ready to eat, reheat the cauliflower in the oven or microwave. Warm the tortillas just before serving. This way, you can enjoy fresh-tasting tacos in no time. You can easily adjust the recipe for various diets. For gluten-free eaters, use corn tortillas instead of flour. You can also swap cauliflower with other veggies like mushrooms or sweet potatoes. If you want more protein, add black beans or lentils to the filling. Make sure to check the seasoning to keep it flavorful. If you want to change up the tortillas, try lettuce wraps for a low-carb option. You could also use rice paper for a unique twist. If you prefer a grain base, use quinoa or brown rice. Each option brings its own taste and texture, making your tacos fun and exciting. These vegan cauliflower tacos offer a fun and tasty meal. We covered main ingredients, seasoning, and toppings. I shared step-by-step instructions for roasting and assembling. You learned tips for the best texture and meal pairings. We explored variations, storage methods, and even answered common questions. In closing, enjoy creating these delicious tacos. Mix and match ingredients to make them your own. Cooking should be fun and easy!

Vegan Cauliflower Tacos Flavorful and Simple Meal

Tired of the same old taco night? How about spicing things up with vegan cauliflower tacos? These flavorful and simple

- 1 pound boneless, skinless chicken thighs, cut into 1-inch cubes - 1/4 cup coconut milk - 2 tablespoons soy sauce - 2 tablespoons honey - 1 tablespoon sriracha sauce (adjust to your spice preference) - 1 tablespoon fish sauce - 1 teaspoon freshly grated ginger - 2 garlic cloves, finely minced - 1 teaspoon fresh lime juice For this recipe, I love using boneless, skinless chicken thighs. They stay juicy and tender when grilled. The marinade is where the magic happens. Coconut milk gives a creamy base, while soy sauce adds umami. Honey brings sweetness, and sriracha adds heat. Fish sauce adds depth to the flavor. - A handful of fresh cilantro leaves, for garnish - Lime wedges, for an additional zing Garnishes make a big difference in how your dish looks and tastes. Fresh cilantro adds a burst of color and freshness. Lime wedges give a tangy kick that brightens the flavors of the skewers. I always encourage you to use them! - Wooden or metal skewers - Grill or grill pan You can use either wooden or metal skewers, but if you choose wooden ones, soak them in water first. This stops them from burning on the grill. A grill or grill pan is essential for that perfect char on the chicken. It gives the skewers a delicious smoky flavor that everyone will love. For the full recipe, check out the details above! To make the chicken juicy and tasty, we need a good marinade. Start by mixing these ingredients in a bowl: - 1/4 cup coconut milk - 2 tablespoons soy sauce - 2 tablespoons honey - 1 tablespoon sriracha sauce - 1 tablespoon fish sauce - 1 teaspoon freshly grated ginger - 2 garlic cloves, finely minced - 1 teaspoon fresh lime juice Whisk them well until smooth. Next, add 1 pound of cubed chicken thighs to the marinade. Stir to coat the chicken evenly. Cover the bowl and put it in the fridge. Marinate for at least 1 hour for good flavor. If you have time, let it sit for up to 4 hours. This wait makes the chicken more flavorful and tender. If you’re using wooden skewers, soak them in water for 30 minutes. This step stops them from burning on the grill. While they soak, preheat your grill to medium-high heat. Once soaked, take the skewers out of the water. Start threading the marinated chicken pieces onto the skewers. Make sure to leave a small gap between each piece. This gap helps the chicken cook evenly. Now it's time to grill! Place the skewers on the hot grill. Grill for about 10 to 12 minutes. Be sure to turn them occasionally. This helps them cook evenly and get those nice grill marks. To check if the chicken is done, use a meat thermometer. The chicken should reach an internal temperature of 165°F. When it is cooked, take the skewers off the grill and let them rest for a few minutes. This resting time makes the chicken juicy and delicious. Serve your sweet and spicy Thai chicken skewers with garnishes like fresh cilantro and lime wedges. Enjoy these tasty bites! For the full recipe, check out the detailed instructions above. To get the best taste, marinate the chicken for at least one hour. For deeper flavors, aim for four hours. This lets the chicken soak up the marinade. If you like more heat, add extra sriracha. Just a little can boost the spice without overpowering the dish. If grilling isn’t an option, you can bake or broil the skewers. Baking works well at 400°F for about 20 minutes. Broiling gives a nice char; just keep an eye on them. Make sure to turn the skewers halfway through cooking. This ensures even cooking and great flavor. For a festive look, serve the skewers on a bright plate. Arrange lime wedges and cilantro around them. This adds color and freshness. You can also use skewers to create shapes or patterns on the plate. Garnishes like sesame seeds or sliced chilies can add a fun touch, too. {{image_4}} You can switch up the protein for a new taste. Shrimp or tofu work great in this recipe. Shrimp cooks quickly and adds a nice flavor. Tofu soaks in the marinade well and is perfect for a vegetarian option. If you want to change the marinade, you can try a peanut sauce. Just mix peanut butter, soy sauce, and a bit of lime juice. This adds a creamy texture and nutty flavor to your skewers. Or, use a teriyaki sauce for a sweeter taste. Both options keep the dish exciting and fresh. These skewers pair well with rice or noodles. Serving them on a bed of jasmine rice soaks up the sauce. You can also toss them with stir-fried noodles for a hearty meal. Adding vegetables to the skewers makes them colorful and healthy. Bell peppers, onions, or zucchini work well. Just cut them into bite-sized pieces and add them to the skewers. This not only adds flavor but also makes the dish more appealing. You can find the full recipe [here]. After enjoying your sweet and spicy Thai chicken skewers, you may have some leftovers. First, let the skewers cool down to room temperature. This step is important. Placing hot food directly into the fridge can raise the temperature inside, which is not safe. For storage, use airtight containers. Glass or plastic containers work well. Make sure they are sealed tightly to keep the chicken fresh. Store the skewers in the fridge for up to three days. If you want to keep them longer, consider freezing them. Wrap each skewer in plastic wrap and place them in a freezer bag. They can last up to three months in the freezer. To enjoy your leftover skewers, reheating them properly is key. The best method is to use an oven or an air fryer. Preheat your oven to 350°F. Place the skewers on a baking sheet. Heat them for about 10-15 minutes. This method keeps the chicken juicy. If you use an air fryer, set it to 350°F as well. Heat the skewers for about 5-7 minutes. Both methods help maintain the texture and flavor of your chicken skewers. Avoid using a microwave, as it can make the chicken rubbery. For extra flavor, drizzle a bit of lime juice over the reheated skewers. This simple touch can brighten the dish and enhance the taste. Yes, you can use chicken breast. Chicken breast is leaner, so it cooks faster. This means it can dry out if overcooked. Chicken thighs are juicier and more forgiving. They stay tender and flavorful, even if cooked a bit longer. If you choose breast, watch the cooking time closely. You can marinate the chicken for 1 to 4 hours. Marinating for at least 1 hour lets the flavors soak in. For a bolder taste, go for 4 hours. However, don’t marinate for more than 12 hours. The meat can become too soft and mushy if left too long. These skewers pair well with many sides. Here are some tasty options: - Jasmine rice or coconut rice - Stir-fried veggies or a fresh salad - Peanut sauce or sweet chili sauce for dipping - Cold beer or Thai iced tea to drink For a full recipe, check out the Sweet and Spicy Thai Chicken Skewers. Enjoy! You now know how to make delicious sweet and spicy Thai chicken skewers. Start with boneless chicken thighs and a tasty marinade of coconut milk, honey, and sriracha sauce. After marinating, grill your skewers and add fresh garnishes like cilantro and lime. Remember, you can swap ingredients and pair them with rice or veggies. Store leftovers carefully and reheat to keep them tasty. Enjoy making this dish for any occasion. Your friends and family will love it!

Sweet and Spicy Thai Chicken Skewers Easy Recipe

Are you ready to fire up your grill and treat your taste buds? These Sweet and Spicy Thai Chicken Skewers

To make creamy mushroom risotto, you need a few key ingredients. These items create the rich flavors and creamy texture you crave. - 1 cup Arborio rice - 4 cups vegetable broth - 2 cups mushrooms (cremini or button), sliced thinly - 1 small onion, finely diced - 2 cloves garlic, minced - 1 cup fresh spinach, roughly chopped - 1 cup grated Parmesan cheese (or for a vegan option, substitute with nutritional yeast) - 2 tablespoons olive oil - 2 tablespoons butter (or vegan butter if preferred) - Salt and freshly ground black pepper to taste - Fresh parsley, chopped, for garnish These ingredients come together to create a dish that's both delicious and simple. Each one plays an important role in building the flavors. For example, Arborio rice is essential for a creamy texture, while the broth adds depth. Mushrooms bring an earthy taste, and Parmesan cheese or nutritional yeast provides richness. When you combine these ingredients in the right way, you make a warm and filling meal. This creamy mushroom risotto is perfect for any occasion. You can find the Full Recipe if you need a detailed guide on how to put everything together. Warming the broth is key for great risotto. If the broth is cold, it slows down cooking. Use a medium saucepan over low heat. Keep it hot, but don’t let it boil. This warmth helps the rice cook evenly and absorb flavors well. Start by heating olive oil in a large skillet. Add one tablespoon of butter as it melts. Dice the onion finely and add it to the pan. Sauté for about three to four minutes. You want the onion soft and clear. Next, add minced garlic and sliced mushrooms. Cook this mix for five to seven minutes. Stir often until the mushrooms are tender and their moisture is released. Now, it’s time to toast the Arborio rice. Pour the rice into the skillet and stir well. You want each grain coated in oil and butter. Toast the rice for one to two minutes. This step enhances flavor and prepares the rice for cooking. Use the ladle method to add broth. Pour one ladle of warm broth into the rice mixture. Stir it often, letting the rice soak up most of the liquid before adding more. This gradual process is essential for creamy risotto. Continue this for about 18 to 20 minutes. The rice should be creamy but still firm, or al dente. In the last five minutes, fold in chopped spinach and the remaining butter. Stir until the spinach wilts into the risotto. Remove the skillet from heat and mix in grated Parmesan cheese. This makes the risotto rich and creamy. Taste and add salt and pepper to your liking. Finish with a sprinkle of fresh parsley for color. Enjoy your creamy mushroom risotto! For the Full Recipe, check the detailed instructions above. To make creamy risotto, stir often while you cook. This helps the rice release its starches, making it creamy. Add broth one ladle at a time. Wait until the rice absorbs most of the liquid before adding more. This method ensures even cooking. Check the rice for doneness. You want it to be al dente. Al dente means the rice is firm but not hard. It should have a slight bite when you chew it. This texture keeps the risotto interesting. One big mistake is overcooking the rice. If you cook it too long, it turns mushy. Keep an eye on your cooking time and the rice's texture. Another common error is using cold broth. Always warm your broth before adding it. Cold broth slows down cooking and affects the risotto's creaminess. Presentation matters when serving risotto. Use individual bowls for a nice touch. Drizzle a little olive oil on top for shine. You can also sprinkle extra Parmesan and parsley for color. For sides, pair your risotto with a fresh salad or grilled veggies. It goes well with a crisp white wine, like Sauvignon Blanc. This combination enhances the dish’s flavors. {{image_4}} For a fun twist, try different mushrooms in your risotto. You can use shiitake, portobello, or oyster mushrooms. Each type brings its own flavor. Mixing mushrooms can create a rich taste. Just remember to slice them thinly for even cooking. If you want a vegan risotto, substitute Parmesan cheese with nutritional yeast. It gives a cheesy taste without dairy. You can also use coconut cream or cashew cream for a rich texture. These options ensure your risotto stays creamy without animal products. Feel free to add more veggies for color and nutrition. Peas and asparagus work well and add a nice crunch. You can also mix in cooked chicken or shrimp for added protein. Just stir them in during the last few minutes of cooking. This makes your risotto heartier and even more delicious. How do you store leftover risotto? Place leftover risotto in an airtight container. Make sure it is cool before sealing. Store it in the fridge. It can stay fresh for up to three days. What are the best practices for reheating? To reheat, add a splash of broth or water. Heat it in a pan over low heat. Stir often to keep it creamy. You can also use a microwave. Just cover it and heat in short bursts. Can you freeze risotto? Yes, you can freeze risotto. However, it may lose some creaminess when thawed. What are the instructions for freezing and thawing? To freeze, let the risotto cool completely. Then, place it in a freezer-safe container. Label it with the date. For thawing, move it to the fridge overnight. Reheat gently on the stove, adding broth to restore creaminess. How long does creamy mushroom risotto last? When stored properly, risotto lasts about three days in the fridge. If frozen, it can last for about two months. What are the signs of spoilage to look out for? Look for off smells or a dry texture. If it has an unusual color, it's best to throw it away. Always trust your senses when it comes to food safety. No, you cannot use regular rice. Arborio rice is special. It has a high starch content. This starch gives risotto its creamy texture. Regular rice does not have this quality. It will not absorb liquid the same way. You will not achieve that rich, smooth feel. Stick with Arborio rice for the best results. To reheat risotto, use low heat on the stove. Add a splash of broth or water. Stir it often to keep it creamy. You can also use the microwave. Add a bit of liquid and cover it. Heat it in short bursts, stirring in between. This keeps your risotto from drying out. The secret lies in patience and stirring. Add broth slowly, one ladle at a time. Stir often to keep the rice moving. This helps release the starch. It creates that creamy texture we love. Taste the rice to ensure it is al dente. To make risotto ahead, cook it until just al dente. Let it cool completely before storing. Place it in an airtight container. When ready to eat, reheat it gently. Add broth to restore creaminess. This way, you save time without losing flavor. For detailed steps and measurements, check the Full Recipe. It guides you through each phase with ease. You’ll have a delicious dish to serve! Making creamy mushroom risotto is both fun and rewarding. You learned about key ingredients like Arborio rice, broth, and mushrooms. I guided you step-by-step, from warming the broth to adding finishing touches. Remember to avoid common mistakes, such as using cold broth or overcooking the rice. You can play with variations too, adding different veggies for taste. Lastly, proper storage keeps leftovers tasty for longer. Enjoy your delicious creation!

Creamy Mushroom Risotto Delicious and Simple Recipe

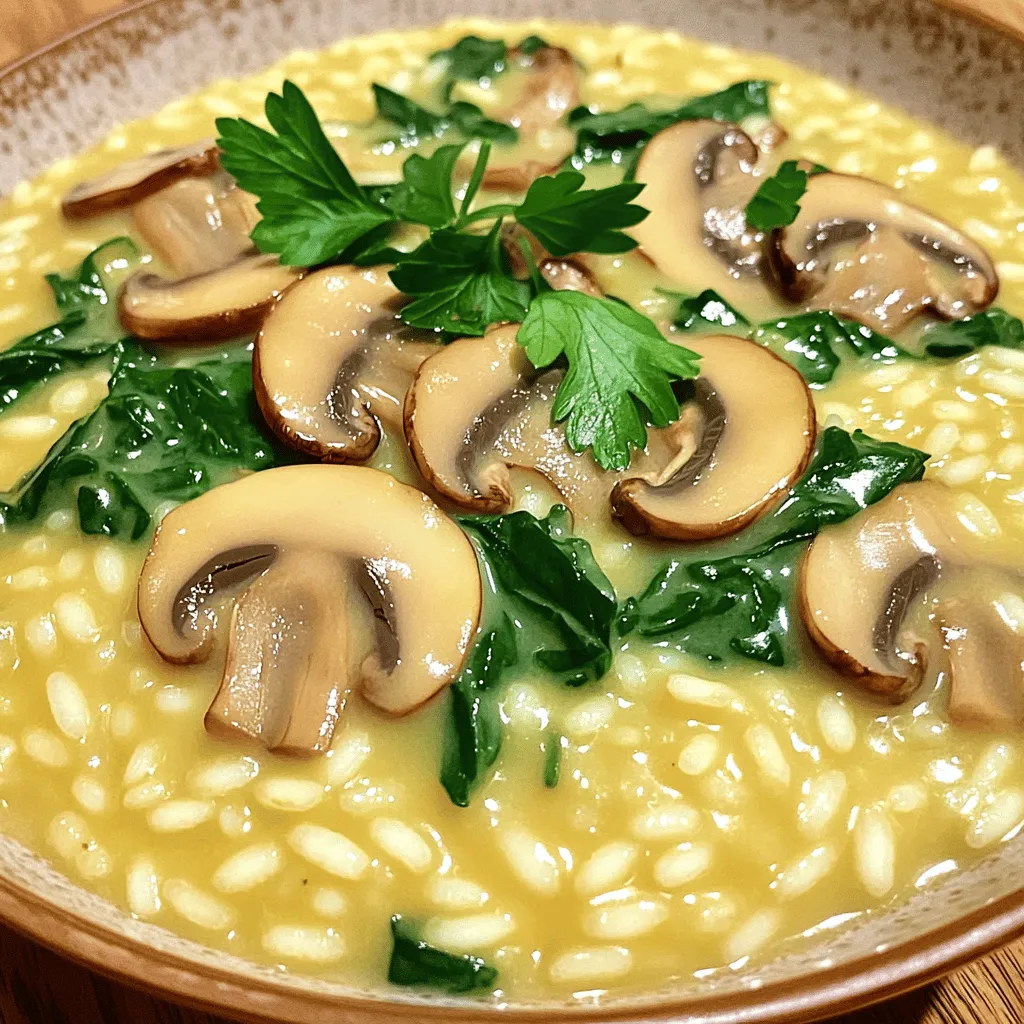
Looking for a comforting dish that’s both delicious and easy to make? My Creamy Mushroom Risotto hits all the right

- 1 cup all-purpose flour: This is the base for your pancakes. It gives them structure. - 1 tablespoon granulated sugar: This adds sweetness and helps the pancakes brown. - 1 tablespoon baking powder: This is key for making your pancakes light and fluffy. - 1/2 teaspoon fine sea salt: This enhances the flavors in your pancakes. - 1 cup whole milk: It adds moisture. You can use almond or oat milk if preferred. - 1 large egg: It binds the ingredients together and adds richness. - 2 tablespoons unsalted butter: This adds flavor and moisture. Use coconut oil for a dairy-free option. - 1 teaspoon pure vanilla extract: This gives a lovely aroma and taste. - 1 cup fresh blueberries: They add natural sweetness and vibrant color. Frozen blueberries work too; just thaw and drain them. - Additional butter or oil: For greasing the pan to prevent sticking. - Maple syrup and whipped cream: These are optional but make for a delicious topping. - Always choose fresh blueberries; look for plump, firm ones. - For flour, choose unbleached all-purpose for better flavor. - Buy organic milk and eggs for the best quality and taste. - If possible, get local butter for freshness. - To make gluten-free pancakes, swap all-purpose flour for gluten-free flour. - Use almond milk or coconut milk for a dairy-free version of this recipe. - Replace sugar with honey or maple syrup for a natural sweetener option. Using these tips, you can create the perfect fluffy pancakes with blueberries that fit your taste and dietary needs. Enjoy every bite! To make fluffy pancakes, start with your dry ingredients. Measure 1 cup of all-purpose flour, 1 tablespoon of granulated sugar, 1 tablespoon of baking powder, and 1/2 teaspoon of fine sea salt. Place these in a large mixing bowl. Whisk them together until no lumps remain. This helps the pancakes rise. Next, prepare your wet ingredients. In another bowl, combine 1 cup of whole milk, 1 large egg at room temperature, 2 tablespoons of melted unsalted butter, and 1 teaspoon of pure vanilla extract. Whisk until smooth. Mixing wet ingredients well ensures a uniform batter. Now, it’s time to cook! Preheat your non-stick skillet over medium heat. You want it hot but not smoking. Lightly grease the skillet with butter or oil. For each pancake, pour about 1/4 cup of batter onto the skillet. Watch for bubbles to form on the surface. This process takes about 2-3 minutes. When the edges look set, it’s time to flip. Use a spatula and carefully turn the pancake over. Cook for another 1-2 minutes until golden brown. Once cooked, transfer pancakes to a warm plate. If you’re making more, keep them warm in an oven set to low heat. For serving, stack the pancakes high. Garnish with extra blueberries and a sprinkle of powdered sugar. Drizzle with maple syrup or top with whipped cream for a treat. Enjoy your fluffy blueberry pancakes! For the full recipe, refer to the section above. To make fluffy pancakes, do not overmix the batter. Mixing too much breaks the bubbles that create fluffiness. Stir the batter gently until you see a few lumps. This will help keep your pancakes light and airy. Use the right amounts of ingredients too. The baking powder helps the pancakes rise. If you want taller pancakes, add a little extra baking powder. When choosing blueberries, fresh is best. They are juicy and burst with flavor. If you use frozen blueberries, thaw and drain them first. This keeps the batter from turning purple. To avoid bursting your blueberries, fold them in gently. Do not stir too hard or too fast. This keeps the berries whole and adds nice pops of flavor in every bite. For cooking, choose a non-stick skillet or griddle. This helps the pancakes cook evenly and slide off easily. Preheat it on medium heat before adding batter. Keep your surface well greased with butter or oil. This prevents sticking and helps the pancakes brown nicely. If the surface gets too hot, lower the heat to avoid burning. {{image_4}} You can change the fruits in this recipe. Bananas or strawberries work well. Both fruits add sweetness and flavor. If you need gluten-free pancakes, use almond flour or oat flour. For dairy-free options, try almond milk or oat milk. These swaps keep the pancakes tasty for everyone. You can add spices to make your pancakes special. A hint of lemon zest brightens the flavor. A sprinkle of cinnamon brings warmth. You can also mix in nuts or seeds. Chopped walnuts or sunflower seeds add crunch and make the pancakes even better. Pancakes don't have to be sweet. You can make savory pancakes too. Add cheese and herbs for a fun change. You can serve pancakes stacked high with fresh fruit on top. Drizzle honey or syrup for a sweet touch. You can add yogurt on the side for a creamy finish. Don't forget to explore the Full Recipe for more ideas! To keep your pancakes fresh, let them cool on a wire rack. This helps avoid sogginess. Once cooled, stack them with parchment paper in between each pancake. Use an airtight container for storage. This method keeps them from sticking together. Store them in the fridge for up to three days. You can reheat pancakes in several ways. The microwave is quick but may make them soggy. Heat each pancake for about 20 seconds. For a crispier texture, use a skillet. Heat the skillet on low and add a little butter. Place the pancake in the skillet for about one minute on each side. Toasting is another option. Just pop them in the toaster for a couple of minutes. This keeps them fluffy and warm. To freeze pancakes, stack them with parchment paper. Wrap the stack tightly in plastic wrap, then place it in a freezer bag. This method prevents freezer burn. They can stay fresh for up to three months. When you want to eat them, take them out and let them thaw in the fridge overnight. You can also heat them straight from frozen using the microwave or skillet. This way, you enjoy warm, fluffy pancakes anytime. What makes pancakes fluffy? Pancakes get fluffy from the leavening agents in the batter. In this recipe, baking powder is key. It creates air pockets when mixed with wet ingredients, helping the pancakes rise. The secret is to not overmix. This keeps the batter light and airy. Small lumps are okay! They help make the pancakes tender. Can I make the batter ahead of time? Yes, you can make the batter ahead. Just mix it and cover it. Store it in the fridge for up to 2 hours. If you wait longer, the pancakes might not be as fluffy. The baking powder loses its power over time. When ready to cook, give it a gentle stir. Why are my pancakes too flat? Flat pancakes often mean the batter is overmixed or the baking powder is old. Overmixing breaks down the air bubbles, making them dense. Check your baking powder for freshness. If it’s old, buy new. A good rule is to replace baking powder every six months. How do I fix overcooked pancakes? If pancakes become too brown, lower the heat next time. You want a medium heat for golden pancakes. If they are already overcooked, try serving them with toppings. Maple syrup or whipped cream can help with dryness. What goes well with blueberry pancakes? Blueberry pancakes pair well with maple syrup and whipped cream. Fresh fruit like strawberries or bananas also adds a nice touch. For a twist, try yogurt or a sprinkle of nuts for crunch. Can I add toppings to the batter? Absolutely! You can add toppings like chocolate chips or nuts right into the batter. Just fold them in gently. This gives your pancakes a fun surprise in every bite. Enjoy experimenting with flavors! This article covered the key steps to making perfect pancakes. We discussed ingredients, preparation, cooking, and storage. You learned how to create fluffy textures and flavorful variations. Whether you prefer fresh fruit or unique spices, you can customize your pancakes to suit your taste. Remember, practice makes perfect. Keep experimenting with different techniques until you find your ideal pancake recipe. Enjoy your cooking and share your delicious results!

Fluffy Pancakes with Blueberries Simple and Tasty Recipe

Get ready to transform your breakfast with my simple and tasty recipe for fluffy pancakes with blueberries! These pancakes are

Older posts
Newer posts
← Previous Page1 … Page77 Page78 Page79 … Page86 Next →

dsad

© 2026 lazychefmagic • Built with GeneratePress

Our Policies

  • Copyright Policy
  • Cookie Policy
  • GDPR Policy
  • Privacy Policy
  • Disclaimer
  • Terms Of Use

More Information

  • Home
  • About
  • Contact
  • Appetizers
  • Dessert
  • Dinner
  • Drinks
©2026, lazychefmagic About Back To Top