Skip to content
DisclaimerTerms Of UseGDPR PolicyCookie Policy

lazychefmagic

  • Home
  • Drinks
  • Appetizers
  • Dinner
  • Dessert
  • About
  • Contact
  • Privacy Policy
DisclaimerTerms Of UseGDPR PolicyCookie Policy

NO-ING-IMG

To make this mousse, gather the following ingredients: - 2 cups cottage cheese (choose low-fat or full-fat based on preference) - 3 tablespoons unsweetened cocoa powder - 2 tablespoons honey or maple syrup (adjust to taste) - 1 teaspoon pure vanilla extract - 1/4 cup Greek yogurt - A pinch of sea salt These main ingredients create a rich and creamy mousse. Cottage cheese is the star here, giving protein and texture. Cocoa powder adds chocolate flavor, while honey or maple syrup sweetens the mix. Vanilla extract enhances the taste, and Greek yogurt makes it extra creamy. For an added touch, consider these garnishes: - 1/4 cup dark chocolate chips (optional, for garnish) - Fresh berries (such as strawberries, raspberries, or blueberries) for topping (optional) Garnishes not only make the mousse look pretty but also add flavor. Dark chocolate chips offer a decadent bite. Fresh berries bring a burst of freshness and color. You can swap some ingredients for different options: - Use low-fat or full-fat Greek yogurt based on your diet. - Maple syrup can replace honey for a vegan choice. - Add a scoop of protein powder for an extra protein boost. These substitutions help you tailor the mousse to your taste and needs. Adjusting ingredients can change the flavor and texture while keeping it delicious. To start, gather your ingredients. You need 2 cups of cottage cheese, 3 tablespoons of cocoa powder, and 2 tablespoons of honey or maple syrup. Add 1 teaspoon of vanilla extract, 1/4 cup of Greek yogurt, and a pinch of sea salt to the mix. Place all these into your blender or food processor. This is your mousse base. Now, blend the mixture on high speed. Blend until it turns smooth and creamy. Stop to scrape the sides of the container. This helps mix all the ingredients well. Check the taste. If you want it sweeter, add more honey or syrup a little at a time. Blend again until fully mixed. Next, pour your mousse into individual serving cups. Make sure to divide it evenly. Place the cups in the fridge. Let them chill for at least 30 minutes. This will help the mousse set. When you serve, top each one with dark chocolate chips and fresh berries. This adds flavor and makes it look great! To get that smooth and creamy texture, blend the cottage cheese with the other ingredients. I suggest using a high-speed blender. Blend until there are no lumps. If your mixture seems thick, add a bit more Greek yogurt. This will help it blend better. Don’t forget to scrape the sides of the blender to mix everything well. Taste your mousse after blending. If it is not sweet enough, add honey or maple syrup. Start with just a little and blend again. Taste it again. Keep adjusting until it is just right for you. Remember, everyone's taste is different, so find what you love! For a beautiful look, use clear glasses. This shows off the mousse's lovely color and texture. Add a mint leaf on top for extra flair. You can also sprinkle some dark chocolate chips for a nice touch. Fresh berries like strawberries or blueberries add color and flavor. Arrange them nicely on top, and your dessert will be a hit! {{image_4}} You can make this mousse even better by adding flavors. Try mixing in a tablespoon of peanut butter for a nutty twist. You can also use almond extract instead of vanilla for a different taste. For a spicy kick, add a dash of cinnamon or cayenne. Want a fruit flavor? Blend in some mashed banana or pureed strawberries. Each choice makes this dessert a fun new treat! If you want a low-sugar option, use a sugar substitute like stevia or erythritol. You can skip the honey or maple syrup entirely. For a vegan mousse, replace cottage cheese with silken tofu. Use maple syrup as a sweetener, and choose dairy-free yogurt. This way, you can still enjoy a rich dessert while keeping it plant-based. Fresh fruits make great toppings for this mousse. Berries like strawberries, raspberries, or blueberries add sweetness and color. Sliced bananas also pair well, giving a creamy taste. For a tropical touch, try adding diced mango or pineapple. You can even sprinkle some chopped nuts for crunch. This allows you to create a dessert that suits your taste! To keep your mousse fresh, store it in airtight containers. This helps prevent any unwanted odors or flavors from mixing in. If you use clear glasses for serving, cover them tightly with plastic wrap. This keeps moisture out while maintaining that creamy texture. When stored correctly, your mousse will last about 3 to 5 days in the fridge. After this time, the flavors may fade. You might notice it becoming less creamy as well. Always check for any changes in smell or texture before serving leftovers. You don’t need to reheat the mousse, as it is best enjoyed cold. If it seems a bit thick after chilling, simply stir in a splash of milk or a bit more Greek yogurt. This will help restore the smoothness. If you want to add a fresh touch, top it with new berries right before serving. Cottage cheese is a great source of protein. It helps build muscles and keeps you full. One cup has about 28 grams of protein. It also has calcium, which is good for bones. Plus, it has vitamins like B12 and riboflavin. These nutrients can boost your energy and help your body work well. Choosing low-fat or full-fat cottage cheese can fit your diet needs. Yes, you can freeze the mousse! Just make sure to store it in an airtight container. It keeps well in the freezer for up to two months. When you’re ready to eat it, move it to the fridge to thaw overnight. The texture may change a bit, but it will still taste good. I recommend enjoying it fresh for the best creamy texture. Absolutely! This mousse is perfect for meal prep. You can make it in advance and store it in the fridge. It stays fresh for about four days. Just keep it in individual serving containers. It’s a great snack or dessert to grab on busy days. Plus, it’s a fun way to get more protein in your meals. This blog post covered how to make creamy, high-protein chocolate cottage cheese mousse. You learned about key ingredients and how to garnish your dish. We explored step-by-step instructions for a smooth texture and the best ways to chill and set the mousse. I shared helpful tips for the perfect consistency and ways to adjust sweetness. You also found variations, storage tips, and answers to your most common questions. Enjoy creating this delicious dessert that can fit into your meal plans!

High-Protein Chocolate Cottage Cheese Mousse Recipe

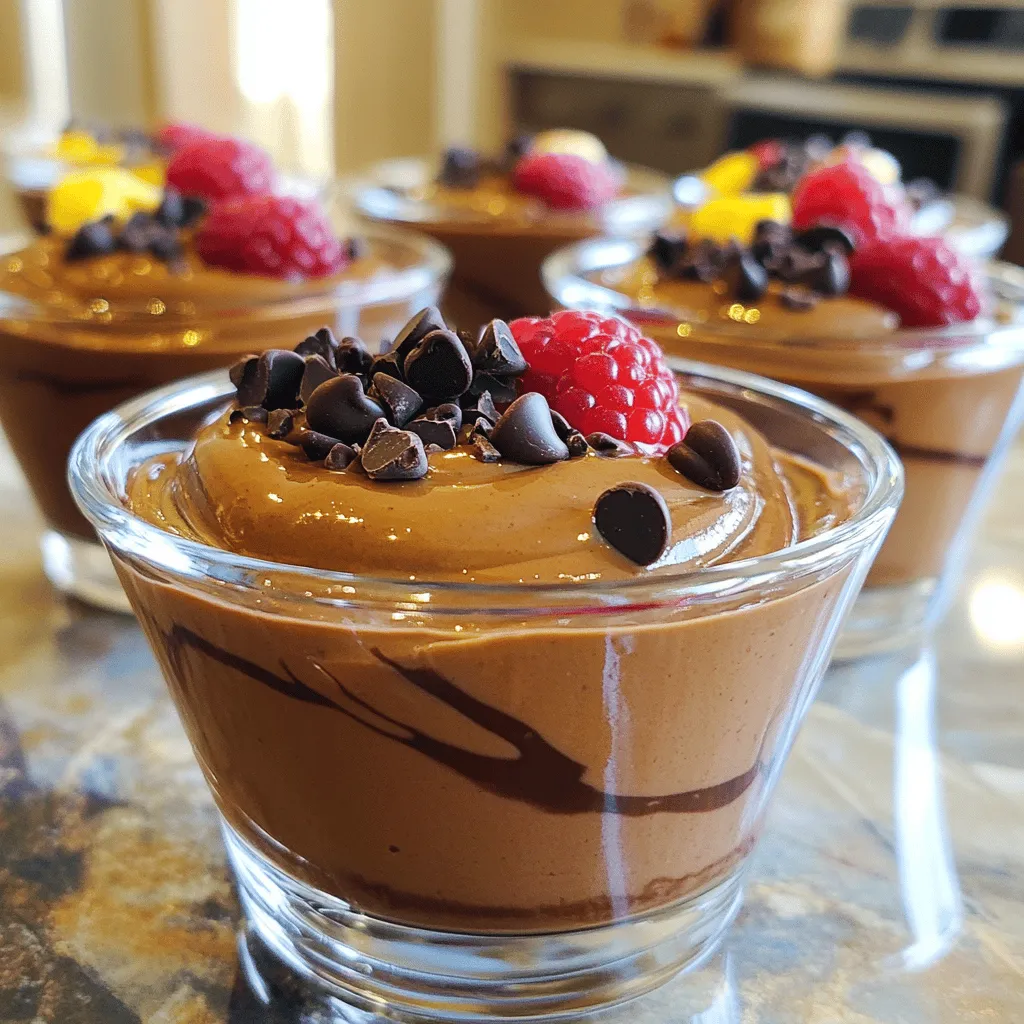
Are you ready to indulge in a tasty treat that won’t ruin your diet? This High-Protein Chocolate Cottage Cheese Mousse

To make Chicken Tetrazzini Bake, gather these key ingredients. Each one plays a part in creating a tasty dish. - 2 cups cooked chicken, shredded - 8 oz spaghetti, cooked and drained - 1 cup sliced mushrooms - 1 small onion, diced - 2 cloves garlic, minced - 1 cup frozen peas - 3 cups chicken broth - 1 cup heavy cream - 1 tablespoon olive oil - 1 teaspoon dried thyme - 1 teaspoon salt - ½ teaspoon black pepper - 1 cup grated Parmesan cheese - 1 cup shredded mozzarella cheese - ½ cup breadcrumbs (for topping) - Fresh parsley, chopped (for garnish) Each ingredient adds flavor and makes this dish special. The chicken gives protein, while the pasta adds heartiness. Mushrooms and peas bring texture and color. Cheese creates that creamy richness we all love. Don't skip the parsley; it brightens the dish! {{ingredient_image_2}} Start by preheating your oven to 350°F (175°C). This ensures your dish cooks evenly. Lightly grease a large baking dish with olive oil to stop sticking. In a large skillet, heat one tablespoon of olive oil over medium heat. Add one small diced onion and two minced garlic cloves. Sauté for 2-3 minutes until the onion is soft and fragrant. This step builds a great base for flavor. Next, add one cup of sliced mushrooms to the skillet. Cook for about 5 minutes. Stir them occasionally, so they get tender. You want them to release their juices and become flavorful. Now, stir in 2 cups of shredded cooked chicken, one cup of frozen peas, three cups of chicken broth, and one cup of heavy cream. Add one teaspoon of dried thyme, one teaspoon of salt, and half a teaspoon of black pepper. Increase the heat a little and bring the mix to a gentle simmer. Let those flavors blend well. Once the mixture simmers, gently fold in 8 ounces of cooked spaghetti and half of the grated Parmesan cheese. Stir everything well. You want the pasta and chicken to be evenly coated with the creamy sauce. Carefully pour the tetrazzini mixture into the greased baking dish. Spread it out evenly. This helps it cook uniformly. In a separate bowl, mix the remaining grated Parmesan with one cup of shredded mozzarella and half a cup of breadcrumbs. Sprinkle this cheesy mix evenly over the top of the tetrazzini. It will give a nice crispy finish. Place the baking dish into the preheated oven. Bake for 25-30 minutes. Look for a golden brown top and bubbling edges. This means it's ready! After baking, take the dish out of the oven and let it cool for a few minutes. Just before serving, sprinkle some chopped fresh parsley on top for color and freshness. Enjoy your Chicken Tetrazzini Bake! To make your Chicken Tetrazzini Bake truly shine, focus on the flavors. Use fresh garlic and onion for a strong base. Sauté until the onion is soft and sweet. This step builds a great flavor. Also, let your chicken sit in the sauce for a few minutes before baking. This lets the chicken soak up all the tasty goodness. For a creamy texture, don’t skip the heavy cream. It adds richness. Lastly, bake it until the top is golden and bubbly. This gives you a crunchy finish that everyone loves. You can easily swap some ingredients. If you don’t have chicken, use turkey or even mushrooms for a veggie twist. For pasta, any type works. Use penne or fettuccine if you prefer. No heavy cream? Use milk or a dairy-free option. If you want a lighter dish, you can reduce the cheese. You can also skip the breadcrumbs for a lower-carb meal. These changes help fit your taste and diet. To make this dish, you need a few simple tools. A large skillet helps with sautéing the onions and garlic. A 3-quart baking dish is perfect for the oven. Use a wooden spoon to mix everything well. For easy serving, have bowls ready. A sharp knife helps chop the parsley for garnish. With these tools, you’re set to create a lovely Chicken Tetrazzini Bake. Pro Tips Use Leftover Chicken: This recipe is perfect for using up leftover rotisserie chicken or any cooked chicken you have on hand, saving both time and resources. Customize Your Veggies: Feel free to add or substitute other vegetables like bell peppers or spinach to suit your taste or use what you have in your fridge. Make It Ahead: Prepare the dish in advance, cover it tightly, and refrigerate. When ready to serve, simply bake it from cold, adding a few extra minutes to the cooking time. Check for Creaminess: If you prefer a creamier sauce, you can add more heavy cream or a splash of white wine for added depth of flavor. {{image_4}} You can make a great vegetarian version of Chicken Tetrazzini. Start by swapping the chicken for a protein-rich option like cooked lentils or chickpeas. These will add texture and flavor. Use vegetable broth instead of chicken broth for a rich base. You can also add in tofu for extra protein. This dish still tastes creamy and satisfying. While the recipe calls for spaghetti, you can use any pasta you like. Penne or fusilli work great too. Just make sure to cook the pasta until it's al dente. This will help it hold its shape during baking. Different shapes may add a fun twist to your meal. Plus, it can change the way the sauce clings to the pasta. Adding extra vegetables is a smart way to boost nutrition. You can toss in bell peppers, spinach, or zucchini. These veggies cook quickly and add lots of color and flavor. Sauté them with the onions and garlic for a tasty base. You can also use frozen mixed veggies if you're short on time. This is a simple way to make the dish more hearty and healthy. You can keep leftover Chicken Tetrazzini in the fridge. Use an airtight container for best results. It stays fresh for about 3 to 4 days. To reheat, just scoop out a portion and warm it in the microwave or oven. Make sure it heats all the way through. If you want to freeze it, let it cool first. Then, place it in a freezer-safe container. Chicken Tetrazzini freezes well for up to 2 months. When you're ready to eat, thaw it in the fridge overnight. This way, the texture stays nice. To reheat, you can use the oven or microwave. If using the oven, preheat it to 350°F (175°C). Place the tetrazzini in a baking dish. Cover it with foil to keep it moist. Bake for about 20-25 minutes. If using the microwave, heat in short bursts to avoid drying it out. Check it often to make sure it's heated well. Enjoy your meal! Yes, you can use leftover rotisserie chicken. It adds great flavor and saves time. Just shred the chicken and mix it in with the other ingredients. This makes the dish even quicker to prepare. To make Chicken Tetrazzini gluten-free, swap out regular pasta for gluten-free pasta. Also, check the chicken broth and breadcrumbs to ensure they are gluten-free. Many brands offer gluten-free options, so read the labels carefully. You can serve Chicken Tetrazzini Bake with a side salad or garlic bread. A fresh green salad adds crunch and balances the dish's creaminess. Garlic bread is perfect for scooping up the cheesy goodness. Yes, you can prepare this dish ahead of time. Assemble all the ingredients in the baking dish, cover it, and store it in the fridge. Bake it when you are ready to serve, adding a few extra minutes to the baking time if it's cold. This blog post guides you through making delicious Chicken Tetrazzini. I covered key ingredients, cooking steps, and tips to perfect your dish. You can even explore variations and storage options. My final thought is simple: Chicken Tetrazzini is a versatile, tasty meal for everyone. You can impress family and friends with ease. Enjoy cooking and sharing this dish!

Chicken Tetrazzini Bake Quick and Tasty Recipe

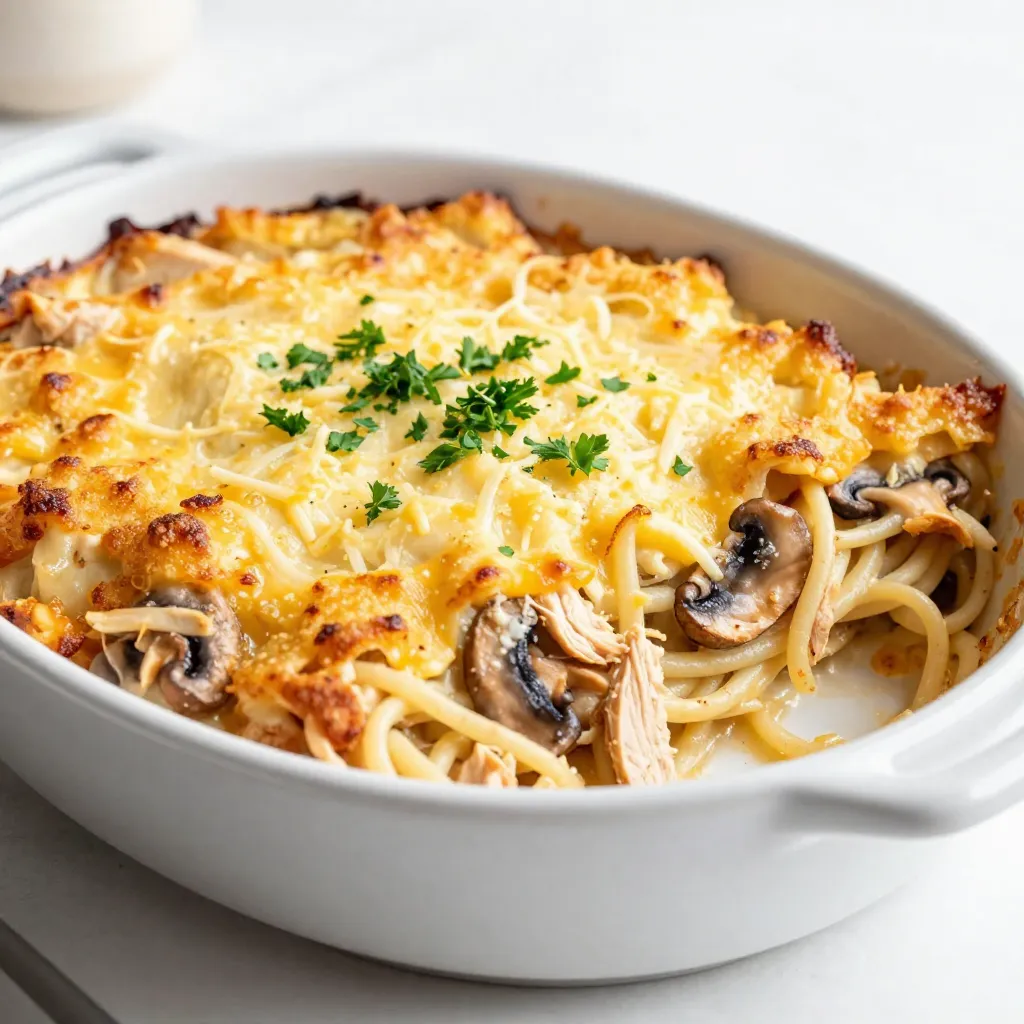
Are you craving a comforting meal that’s both quick and delicious? Look no further! This Chicken Tetrazzini Bake recipe combines

- 1 pound chicken tenders - 1 cup buttermilk - 1 cup all-purpose flour - 1/2 cup breadcrumbs - 1/4 cup sesame seeds - 1/4 cup poppy seeds - 2 tablespoons garlic powder - 2 tablespoons onion powder - 2 teaspoons dried dill - 2 teaspoons salt - 1 teaspoon black pepper - 1 teaspoon smoked paprika - Olive oil spray Everything Bagel Chicken Tenders start with two main ingredients: chicken tenders and buttermilk. The chicken gives you juicy bites. Buttermilk adds flavor and makes the chicken tender. Next, we have the coating components. This mix includes flour, breadcrumbs, sesame seeds, and poppy seeds. The flour gives crunch. The seeds add texture and that classic bagel taste. Then, we need seasonings. Garlic powder and onion powder boost flavor. Dried dill adds a fresh taste. Salt and pepper enhance every bite. Smoked paprika gives a nice, smoky touch. Finally, olive oil spray helps the tenders brown perfectly in the oven. Each ingredient plays a role in making your tenders flavorful and crunchy. Get ready to enjoy a tasty dish! First, you need to make the marinade. In a medium bowl, mix 1 cup of buttermilk with garlic powder, onion powder, salt, black pepper, and smoked paprika. Stir until it is smooth. Now, add 1 pound of chicken tenders to the bowl. Make sure each piece is coated well. Cover the bowl and refrigerate for at least 30 minutes. If you have time, let it marinate for up to 2 hours. This step makes the chicken tender and adds flavor. For the coating, get a large dish. In this dish, mix 1 cup of all-purpose flour, 1/2 cup of breadcrumbs, 1/4 cup of sesame seeds, and 1/4 cup of poppy seeds. Also, add dried dill and a pinch of salt. Use a fork to mix it well. This coating will give the tenders their crunch and flavor. While the chicken is marinating, you can get the oven ready. Set it to preheat at 400°F (200°C). Then, line a baking sheet with parchment paper. This helps with clean-up and keeps the chicken from sticking. Lightly spray the parchment with olive oil to help with browning. After marinating, take the chicken out of the fridge. Let excess marinade drip off each tender. Now, dredge each tender in the everything bagel coating. Press the mixture into the chicken to make sure it sticks well. Place each coated tender on the baking sheet, leaving space between them for even cooking. Once all the tenders are coated, spray the tops lightly with olive oil. This helps them brown nicely. Now, put the baking sheet in the oven. Bake for 20–25 minutes. Check that the chicken is golden brown and reaches an internal temperature of 165°F (75°C). After baking, let the tenders cool for a few minutes before serving. You can enjoy them plain, or try them with dipping sauces. Ranch and honey mustard work great for extra taste. To get that amazing crunch, press the coating onto the chicken. This helps it stick better. When you coat the chicken tenders, make sure to use your fingers. Press down firmly to help the mixture cling. This step is key for a great texture. Olive oil plays a big role too. A light spray on top of the coated tenders helps them brown. It also adds a nice flavor. Don't skip this step if you want a crisp finish. For the best taste, marinate your chicken tenders for at least 30 minutes. This time helps the chicken soak up all the yummy flavors. You can marinate them for up to 2 hours for even better results. Just remember, the longer you marinate, the more flavor you get. If you want extra flavor, add some herbs or spices to the buttermilk. A pinch of cayenne or a sprig of fresh dill can boost the taste. Cooking time can change based on the size of your chicken tenders. Thin tenders cook faster than thick ones. Check on them around 20 minutes to see how they are doing. If they look golden brown, it’s time to check the inside. Also, keep your oven's accuracy in mind. Some ovens can run hot or cool. Use an oven thermometer to ensure you get the right temperature for even cooking. This way, your chicken tenders will turn out perfectly every time. {{image_4}} You can spice up your tenders with cayenne or chili powder. Just add a teaspoon to the coating mix for heat. If you want fresh flavors, try using herbs like thyme or rosemary. Just chop them finely and mix them into the coating. This gives your tenders a unique twist and can change the taste completely. If you prefer using an air fryer, it's simple. Preheat your air fryer to 400°F (200°C). Place the coated tenders in a single layer and cook for 10-12 minutes. Flip halfway through to ensure even cooking. For a pan-fried version, heat oil in a skillet over medium heat. Cook the tenders for about 4-5 minutes on each side until golden and crispy. These chicken tenders pair well with many side dishes. Try serving them with crispy fries or a simple vegetable medley. For lighter options, consider a fresh salad. A mixed greens salad with a tangy vinaigrette balances the rich flavors of the tenders nicely. You can also add sliced cucumbers or tomatoes for extra crunch. To store leftovers, place the chicken tenders in an airtight container. This keeps them fresh. You can also wrap them tightly in plastic wrap. They will last in the fridge for about 3 to 4 days. After that, their taste and texture may change. You can freeze these tenders before or after baking. If you freeze them before cooking, just coat them and put them in a single layer on a baking sheet. Once frozen, transfer them to a freezer bag. If you freeze them after baking, let them cool first. They will stay good for up to 3 months. When you are ready to eat them, you can reheat them right from the freezer. To reheat, the oven works best. Preheat it to 350°F (175°C). Place the tenders on a baking sheet and warm them for about 10 to 15 minutes. This method helps keep them crispy. If you use a microwave, the tenders can get soggy. If you must use a microwave, heat them in short bursts. This way, they will not lose too much of their crunch. To marinate chicken tenders well, you need a good mix. Start with buttermilk. It makes the chicken tender and juicy. I like to add garlic powder, onion powder, salt, black pepper, and smoked paprika. These spices give flavor. Mix everything in a bowl and coat the chicken. Cover the bowl and chill it in the fridge for at least 30 minutes. For more flavor, you can marinate for up to 2 hours. This extra time allows the chicken to soak up all the tasty goodness. Yes, you can adapt this recipe for gluten-free needs. Instead of all-purpose flour, use a gluten-free flour blend. For the breadcrumbs, choose gluten-free options, or crush gluten-free crackers as a substitute. Make sure to check the labels on all your ingredients. This way, you avoid hidden gluten. With these swaps, you can enjoy the same crunch and flavor without worry. To ensure chicken tenders are cooked through, check their internal temperature. Use a meat thermometer for the best accuracy. The safe temperature for chicken is 165°F (75°C). Insert the thermometer into the thickest part of the tender. If it reads 165°F or higher, your chicken is done. If not, return it to the oven and check again in a few minutes. Dipping sauces can elevate your chicken tenders. I recommend ranch dressing for a classic taste. Honey mustard adds a sweet twist. Barbecue sauce brings a smoky flavor. You could also try buffalo sauce for heat. Each sauce brings its own fun to the meal. Experiment to find your favorite! This blog post covered how to make Everything Bagel Chicken Tenders, from ingredients to serving. You learned about marinating, coating, and baking for a tasty crunch. In summary, enjoy customizing flavors and experimenting with cooking methods. Keep these tips in mind for the best results. Happy cooking!

Everything Bagel Chicken Tenders Flavorful and Crunchy

Get ready to take your chicken tenders to the next level with this Everything Bagel Chicken Tenders recipe! These crunchy,

Here’s what you need for a tasty creamy Cajun sausage pasta: - 8 oz penne pasta - 1 lb smoked sausage (Andouille or kielbasa) - 1 tablespoon olive oil - 1 bell pepper (diced) - 1 small onion (finely chopped) - 3 cloves garlic (minced) - 1 cup heavy cream - 1 cup chicken broth - 2 tablespoons Cajun seasoning - 1 cup cherry tomatoes (halved) - 1 cup baby spinach - Salt and black pepper (to taste) - Freshly grated Parmesan cheese (for serving) - Fresh parsley (chopped, for garnish) This list brings together flavors that work in harmony. The penne pasta serves as a great base. Smoked sausage adds depth, while the veggies bring color and crunch. The heavy cream and chicken broth create a rich sauce. Cajun seasoning gives it that spicy kick. Don’t forget to garnish with cheese and parsley for a lovely finish. Each ingredient plays a role in making this dish truly special. - Cook penne pasta to al dente and reserve pasta water. - Heat olive oil in a skillet and brown the sliced sausage. To start, boil water in a large pot. Add salt once it boils. Then, cook the penne pasta according to the package. It should feel firm but not hard. Once done, drain it, but keep a cup of the pasta water. This will help later if the sauce is too thick. Next, take a large skillet and heat the olive oil over medium heat. Once hot, add the sliced sausage. Cook it for about 5 to 7 minutes. You want it to be nicely browned. Stir it often to cook all sides evenly. - Sauté diced vegetables and garlic until softened. - Stir in heavy cream, chicken broth, and Cajun seasoning, simmering gently. - Add cherry tomatoes and spinach, allowing spinach to wilt. After you brown the sausage, add the diced bell pepper, onion, and minced garlic to the skillet. Sauté for about 3 to 4 minutes. You want the veggies to soften and the onion to turn clear. Now, pour in the heavy cream and chicken broth. Stir well to mix everything. Sprinkle the Cajun seasoning into the skillet. Bring the mixture to a gentle simmer. Once it simmers, add the halved cherry tomatoes and baby spinach. Stir gently for about 2 minutes. Watch as the spinach wilts down and blends into the sauce. - Toss cooked penne pasta in the creamy sauce. - Adjust sauce thickness with reserved pasta water. - Season and serve, garnished with Parmesan and parsley. Now, add the cooked penne pasta to the skillet. Toss it well in the creamy sauce. If the sauce feels too thick, add some reserved pasta water. Keep tossing until everything is well combined. Finally, taste the dish and add salt and black pepper if needed. Serve the pasta warm, topping each bowl with freshly grated Parmesan and chopped parsley. This adds a nice touch and freshness to your creamy Cajun sausage pasta. How to achieve perfect al dente pasta To make al dente pasta, cook it for about 8-10 minutes. Check the package for exact times. Taste a piece before draining. It should be firm, not mushy. If you forget, no worries! Just make sure to watch it closely next time. Tips for evenly browning sausage When cooking sausage, use medium heat. This helps the sausage brown nicely. Slice the sausage evenly, so it cooks at the same rate. Stir it often while cooking. This way, every piece gets that golden color. How to adjust sauce thickness If your sauce is too thick, add a splash of reserved pasta water. This helps loosen it up without losing flavor. If it’s too thin, let it simmer a bit longer. This thickens the sauce as it cooks down. Flavor enhancement options You can boost flavor with extra spices. A pinch of cayenne pepper adds heat. Fresh herbs like thyme or basil brighten the dish. Taste the sauce as you go. Adjust the seasoning to match your taste. Serving suggestions for an appealing dish Serve the pasta in shallow bowls to show off the creamy sauce. This makes it look fancy and inviting. You can also layer the pasta and sauce for a nice effect. Garnishing ideas for extra visual appeal Top each bowl with freshly grated Parmesan cheese. Sprinkle chopped parsley for a fresh touch. A dash of extra Cajun seasoning adds a pop of color. Fresh spinach leaves make a lovely garnish, too. {{image_4}} You can switch the smoked sausage for other proteins. Chicken, shrimp, or tofu work great. For chicken, use diced breast or thighs. Cook them until they are no longer pink. For shrimp, add them in the last few minutes of cooking. They cook quickly and add nice flavor. If you want a vegetarian option, use mushrooms or lentils. Both add a hearty texture. If you want a lighter dish, swap heavy cream for coconut milk or almond milk. These options work well and keep the dish creamy. You can also use cashew cream for a rich texture. Adjust the Cajun seasoning based on your taste. If you like it spicier, add more seasoning. If you prefer a milder flavor, reduce the amount. Adding more vegetables boosts nutrition and flavor. Try zucchini, broccoli, or bell peppers. These veggies add color and crunch. You can also use seasonal vegetables like asparagus or peas. Just chop them small and sauté with the onions. This keeps the dish fresh and exciting. Customize the recipe based on what you have in your kitchen. To store creamy Cajun sausage pasta, let it cool first. Use an airtight container to keep the pasta fresh. It can stay in the fridge for up to three days. If you want to keep it longer, freezing is a great option. To freeze creamy Cajun sausage pasta, place it in a freezer-safe container. Make sure to leave some space at the top for expansion. It can last for up to three months in the freezer. When you’re ready to eat it, thaw it in the fridge overnight. Reheat it slowly on the stove or in the microwave. Add a splash of water or broth to bring back the creaminess. To keep the pasta's texture and flavor when reheating, use low heat. Stir it often to prevent sticking. If it looks too thick, add a little cream or broth. This will help keep it smooth and tasty. Enjoy your pasta just like when it was fresh! What is Cajun seasoning made of? Cajun seasoning is a mix of spices. It often includes paprika, cayenne, garlic powder, onion powder, thyme, and oregano. You can find it in stores or make your own. Adjust the spices to match your taste. Can I use other pasta types? Yes, you can use other pasta types. While penne works great, you can try rotini, fettuccine, or even spaghetti. Choose what you have on hand or prefer. How can I make this recipe spicier? To add more heat, increase the Cajun seasoning. You can also add crushed red pepper flakes or diced jalapeños. Start small and taste as you go. Is this dish suitable for meal prep? Absolutely! This dish holds up well in the fridge. Just store it in an airtight container. You can reheat it on the stove or in the microwave. What can I serve alongside creamy Cajun sausage pasta? Pair it with a fresh green salad or garlic bread. These sides balance the richness of the pasta. You can also serve it with steamed vegetables for added nutrition. How long does it take to cook penne pasta? It usually takes about 10-12 minutes to cook penne pasta. Follow the package instructions for best results. What is the total cooking time for this recipe? The total cooking time for this recipe is about 30 minutes. This includes prep and cooking time. What are ideal side dishes for this pasta dish? Good side dishes include a Caesar salad or roasted vegetables. Breadsticks are also a great choice for dipping in sauce. Can it be paired with wine? If so, what kind? Yes, this dish pairs well with white wine. A chilled Sauvignon Blanc or a light Pinot Grigio complements the flavors nicely. This blog post shared a tasty recipe for creamy Cajun sausage pasta. You learned about the key ingredients, cooking steps, and helpful tips. I also covered fun variations and storage advice to keep your dish fresh. Cooking pasta should be enjoyable, and with this recipe, it can be easy and fun. Don’t forget to try the suggested garnishes for a beautiful finish. Enjoy making this dish and impressing your friends!

Creamy Cajun Sausage Pasta Flavorful and Easy Recipe

Looking for a meal that’s both flavorful and easy to make? My Creamy Cajun Sausage Pasta is the answer! With

To make the dough for your hot pockets, you need: - 2 cups all-purpose flour - 1 teaspoon salt - 1 teaspoon baking powder - ½ cup unsalted butter, cold and cut into small cubes - ½ cup ice-cold water The flour gives the dough structure. Salt enhances flavor, while baking powder helps it rise. Cold butter makes the dough flaky. Ice-cold water keeps the dough from getting tough. For the delicious filling, gather these items: - 4 large eggs - 1 cup cooked breakfast sausage or diced ham - 1 cup shredded sharp cheddar cheese - 1 cup finely diced bell peppers (mix of colors for vibrancy) - ½ cup diced sweet onions - 1 teaspoon garlic powder - Salt and pepper to taste Eggs bind everything together. The sausage or ham adds protein. Cheese gives creaminess, while bell peppers and onions add color and flavor. Garlic powder boosts taste, and salt and pepper season the mix. To make your hot pockets pop, consider these garnishes: - Fresh herbs (like chopped chives or parsley) Fresh herbs add a bright touch to your meal. They enhance the taste and look of your hot pockets. {{ingredient_image_2}} Start by mixing the flour, salt, and baking powder in a large bowl. Use your hands or a pastry cutter to add the cold butter. You want it to look like coarse crumbs. Then, slowly add ice-cold water. Mix until it forms a dough. Wrap it in plastic wrap and chill for 30 minutes. In a large skillet over medium heat, add some olive oil. Sauté the diced onions and bell peppers until they soften, which takes about 5-7 minutes. Then, stir in the cooked sausage or ham. Heat it until warm. In another bowl, whisk the eggs, then add them to the skillet. Cook and stir until the eggs are scrambled. Add garlic powder, salt, and pepper for flavor. Let this mix cool a bit. Preheat your oven to 400°F (200°C). Roll out the chilled dough on a floured surface to about 1/4 inch thick. Cut rectangles of 5x7 inches. Place a spoonful of the egg and meat mix in the center of one rectangle. Top it with shredded cheddar cheese. Don’t overfill! Fold the dough over the filling and press the edges to seal. You can use a fork to crimp the edges for a nice touch. Line a baking sheet with parchment paper, and place the hot pockets on it, leaving space between them. Bake for 20-25 minutes until they are golden brown and puffed up. Enjoy your homemade breakfast hot pockets! To make great dough, mix flour, salt, and baking powder well. Add cold butter next. Use your fingers or a pastry cutter to combine until it looks like crumbs. Slowly pour in ice-cold water. Mix until the dough forms. Be careful not to overwork it. Wrap it and chill for 30 minutes. This step helps the dough stay flaky and light. The filling is key to your hot pockets. I love using cooked sausage or ham for a savory taste. You can also add bell peppers and sweet onions for crunch. Don't forget the cheese! Sharp cheddar melts beautifully and adds flavor. Other options include spinach or mushrooms for a twist. Get creative! Try different herbs too for extra zest. Baking gives you crispy, golden pockets. They puff up nicely and taste fresh. It takes about 20-25 minutes in the oven. Microwaving is faster but may leave the dough soft. If you’re in a hurry, a quick zap works. Just know that baked hot pockets have the best texture. Choose what fits your schedule! Pro Tips Chill Your Dough: Keeping the dough chilled before rolling out helps maintain its structure and makes it easier to work with, resulting in a flakier crust. Variety of Fillings: Feel free to customize the filling by adding spinach, mushrooms, or different cheeses according to your taste preferences. Golden Finish: For an extra golden finish, brush the tops of the hot pockets with an egg wash before baking. Make Ahead: These hot pockets can be prepared in advance and frozen. Just bake them straight from the freezer, adding a few extra minutes to the baking time. {{image_4}} You can easily make these hot pockets meat-free. Start by replacing sausage or ham with veggies. Use a mix of mushrooms, spinach, and zucchini for a tasty filling. You can also add more cheese for a creamy texture. Try using feta or mozzarella for a new flavor. If you need a gluten-free option, swap the all-purpose flour for a gluten-free blend. Look for a blend that works well for baking. Make sure your filling is also gluten-free. Check labels on all ingredients to ensure they fit your needs. With these changes, you can still enjoy homemade hot pockets. Don't feel limited to just savory fillings. You can create sweet hot pockets too! Fill them with cream cheese and fruit like berries or apples. Add some cinnamon and sugar for a touch of sweetness. You can even make a breakfast dessert with chocolate chips and bananas. Mixing flavors keeps breakfast exciting! After enjoying your hot pockets, let them cool down. Once cooled, wrap each hot pocket in plastic wrap or place them in an airtight container. This keeps them fresh. Store them in the fridge if you plan to eat them within three days. To reheat, you have a few options. For best results, use an oven. Preheat the oven to 350°F (175°C). Place the hot pockets on a baking sheet and heat for about 15 minutes. This keeps the crust crispy. If you’re in a hurry, you can use the microwave. Heat each hot pocket for 1-2 minutes. Check to make sure they are hot all the way through. If you want to save them for later, freezing is a great option. Wrap each hot pocket tightly in plastic wrap and then in foil. This prevents freezer burn. Place them in a freezer bag or container. They can last for up to three months. To enjoy frozen hot pockets, thaw them in the fridge overnight before reheating. Yes, you can use any cheese you like. Try mozzarella for a melty texture. Feta adds a nice tang. Swiss cheese has a mild flavor that works well too. Mix and match cheeses for fun flavors! You can store hot pockets in the fridge for up to three days. Place them in an airtight container. For longer storage, freeze them for up to three months. Just remember to wrap them well to avoid freezer burn. Absolutely! You can prepare the dough a day in advance. Just wrap it tightly and keep it in the fridge. This saves time on busy mornings. Chilling the dough also helps it hold its shape better when you roll it out. Besides baking, you can pan-fry or air-fry hot pockets. Pan-frying gives a crispy crust, while air-frying cooks them evenly with less oil. For a quick option, you can microwave them, but they won’t be as crispy. Enjoy experimenting with these methods! We covered how to make hot pockets from scratch. You learned about the key ingredients for both dough and fillings. I showed you step-by-step instructions to prepare, cook, and bake them perfectly. With tips on dough consistency and best filling mixes, you can create tasty combinations. Plus, I shared ideas for variations and storage. Now, get creative with your hot pockets. Enjoy making them your own!

Homemade Breakfast Hot Pockets Delicious and Easy Recipe

Start your mornings right with my homemade breakfast hot pockets! These tasty treats are simple to make and fun to

- 1 pound large shrimp, peeled and deveined - 2 tablespoons olive oil - Zest and juice of 2 limes - 2 teaspoons chili powder - 1 teaspoon garlic powder - 1/2 teaspoon ground cumin - Salt and black pepper to taste - 1 cup cooked quinoa - 1 cup cherry tomatoes, halved - 1 cup corn kernels (fresh, canned, or frozen) - 1 ripe avocado, sliced - Fresh cilantro, chopped, for garnish - Lime wedges, for serving This dish is all about fresh flavors and easy prep. The shrimp gives you protein, while the quinoa adds a nutty taste and great texture. The cherry tomatoes and corn bring sweetness, which balances the spicy chili powder. The avocado adds creaminess and healthy fats. When you mix the olive oil with lime juice and zest, you create a bright marinade. It really wakes up the shrimp. The spices give the dish a nice kick, so you can adjust them to fit your taste. Want it spicier? Just add more chili powder! After you gather all these ingredients, you can get cooking. This meal is not just tasty; it's also colorful and pretty on a plate. Enjoy your cooking adventure with these vibrant ingredients! To start, make your marinade. In a medium bowl, mix together: - 2 tablespoons olive oil - Zest and juice of 2 limes - 2 teaspoons chili powder - 1 teaspoon garlic powder - 1/2 teaspoon ground cumin - Salt and black pepper to taste Whisk this mixture well. This marinade will pack your shrimp with flavor. Next, add 1 pound of peeled and deveined shrimp to the bowl. Toss the shrimp gently. Make sure each piece is well coated. Let the shrimp marinate for at least 15 minutes. If you want a stronger taste, you can marinate them for up to 30 minutes. Now, it’s time to grill. Preheat your grill or grill pan over medium-high heat. If you use a grill pan, spray it lightly with non-stick cooking spray. Once the grill is hot, carefully place the marinated shrimp on the grill. Cook for about 2-3 minutes on each side. Look for the shrimp to turn pink and opaque. You want them to have nice grill marks. Once cooked, remove the shrimp from the heat and set aside. As you assemble your bowls, start with a generous scoop of cooked quinoa in each bowl. Then, layer on the grilled shrimp. Add halved cherry tomatoes, corn kernels, and sliced avocado on top. Finally, garnish with chopped fresh cilantro. Serve your bowls with lime wedges on the side. Squeeze some lime juice over the top for an extra burst of flavor. Enjoy your fresh and flavorful meal! For the best flavor, marinate your shrimp for at least 15 minutes. If you want a more intense taste, 30 minutes works well, too. The lime juice and zest give a bright kick. You can also add a touch of honey for sweetness or some diced jalapeños for heat. To get great grill marks, make sure your grill is hot. Heat it for about 10 minutes before adding shrimp. Place the shrimp on the grill and don’t move them for 2-3 minutes. Flip them once they are pink and opaque. This helps form those beautiful grill lines. Serve your bowls with a light drink like sparkling water or a fruity iced tea. For sides, try a crisp salad or fresh tortilla chips. When assembling your bowl, start with a scoop of quinoa. Layer on your shrimp, then add corn, tomatoes, and avocado. Finish with a sprinkle of cilantro and lime wedges. This adds freshness and zest! {{image_4}} You can swap shrimp for chicken, tofu, or fish. Each option pairs well with the chili lime flavor. - Chicken: Use boneless, skinless chicken thighs or breasts. Cut them into bite-sized pieces. Marinate the same way as shrimp for great taste. - Tofu: Choose firm or extra-firm tofu. Press it to remove excess water. Cut into cubes and marinate. Grill until golden for a tasty vegan option. - Fish: Opt for a firm fish like salmon or mahi-mahi. Cut into fillets and follow the same marinating steps. Grill until flaky and tender. You can easily adjust ingredients for dietary needs. Here are some swaps: - Gluten-free: Ensure all spices and oils are gluten-free. Quinoa is naturally gluten-free. - Vegan: Replace shrimp with tofu and use vegetable broth instead of any meat-based sauces. This keeps the dish flavorful and plant-based. Using seasonal produce adds freshness to your bowl. Here are some ideas: - Spring: Add asparagus or snap peas for a crunch. - Summer: Try fresh bell peppers or zucchini for vibrant color. - Fall: Incorporate roasted butternut squash for warmth and sweetness. - Winter: Use hearty greens like kale or Brussels sprouts for added nutrition. Feel free to mix and match proteins and veggies. This way, you can create a unique bowl every time! To keep your chili lime grilled shrimp bowls fresh, store them in airtight containers. Place the shrimp, quinoa, and veggies in separate containers. This helps keep each part fresh. Refrigerate all items within two hours of cooking. The bowls will stay good for up to three days. When you are ready to enjoy your leftovers, gently reheat them. Use a skillet over low heat for the best flavor. Stir the shrimp and veggies often to heat evenly. You can also use a microwave. Heat in short bursts, about 30 seconds at a time, stirring in between to avoid overcooking. Can you freeze chili lime grilled shrimp bowls? Yes, but with some care. Place the shrimp and quinoa in freezer-safe bags. Remove as much air as you can. Keep the veggies separate, as they do not freeze well. They may lose their crunch. Use within three months for the best taste. When ready to eat, thaw in the fridge overnight, then reheat. You can use several tasty options instead of quinoa. - Brown rice is a great choice. It adds a nutty flavor. - Farro gives a chewy texture and a wholesome taste. - Cauliflower rice is low-carb and very fresh. - Couscous cooks quickly and has a nice, fluffy feel. - You could even use barley for a unique twist. Each of these options will pair well with the shrimp and veggies. Perfectly cooked shrimp have a few telltale signs. - They turn pink and opaque as they cook. - The shrimp should curl into a C shape. - If they look firm and plump, they are ready. - You can also check the internal temperature. It should reach 120°F. Overcooked shrimp can turn tough and rubbery, so watch them closely. Yes, you can prep the marinade in advance. - Mix the olive oil, lime juice, zest, and spices in a bowl. - Store it in an airtight container in the fridge for up to three days. - This makes meal prep easy and quick. You can also marinate the shrimp for up to 30 minutes before grilling. Just remember to store it in the fridge to keep it fresh. In this article, we explored a delicious chili lime grilled shrimp bowl. We covered the ingredients, marinating steps, and grilling techniques. You learned how to assemble your bowl for a tasty meal. Remember, you can swap ingredients for dietary needs. Storing leftovers properly keeps your bowls fresh. Enjoy creating your unique version, using fresh ingredients and your favorite flavors. With these tips, you can serve up a delightful dish every time.

Chili Lime Grilled Shrimp Bowls Fresh and Flavorful Meal

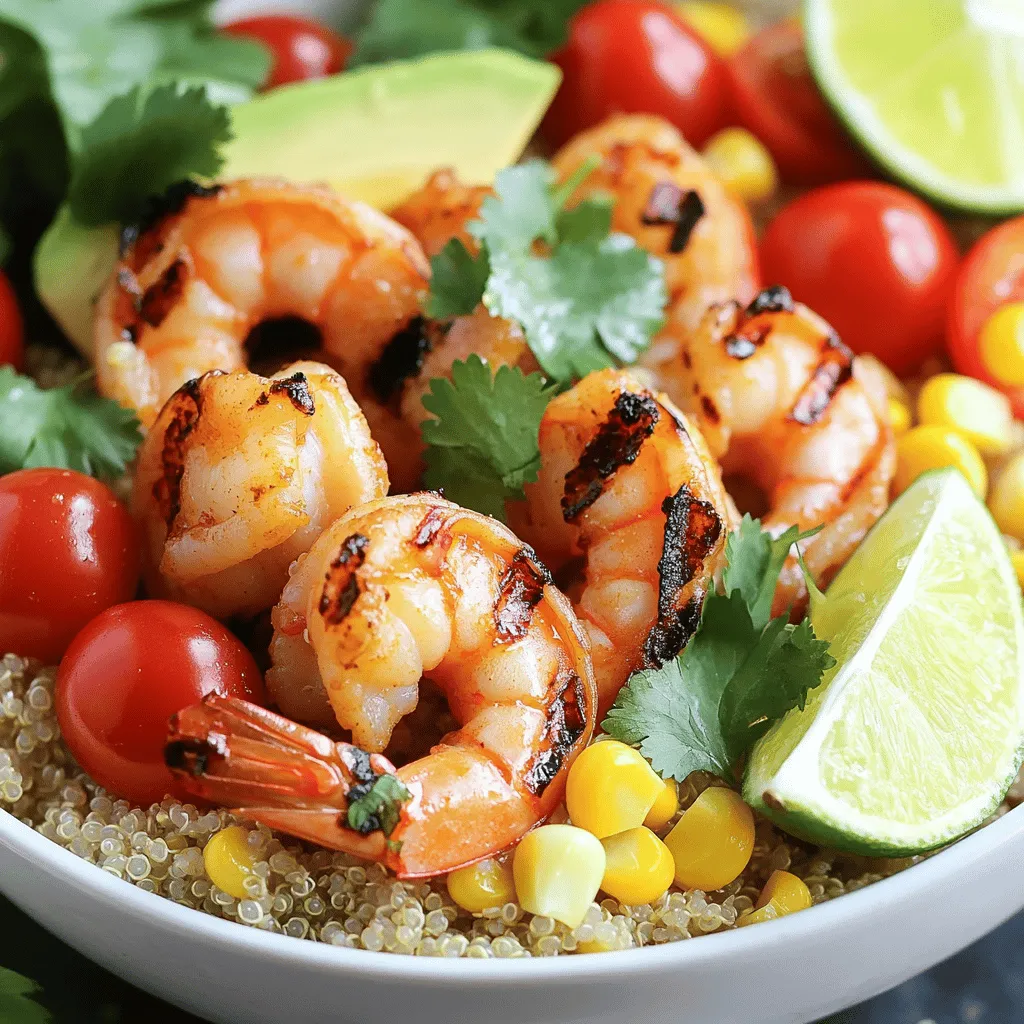
Get ready for a burst of flavor with my Chili Lime Grilled Shrimp Bowls! This dish is fresh, easy to

- 4 chicken thighs, skin-on and bone-in - 4 medium potatoes, cut into wedges - 1 large red onion, quartered - 4 cloves garlic, smashed - 2 lemons (1 for juice and 1 thinly sliced) - 1/4 cup extra virgin olive oil - 2 teaspoons dried oregano - 1 teaspoon smoked paprika - Salt and black pepper to taste - Fresh parsley, finely chopped Gathering the right ingredients sets the stage for your Greek Lemon Chicken & Potato Traybake. You need juicy chicken thighs, which give a great taste. Cut your potatoes into wedges for even cooking. A large red onion adds flavor and sweetness. Don't forget the garlic; it brings a lovely aroma. Use fresh lemons for zest and juice. Extra virgin olive oil is key for a rich flavor. Seasoning is just as important. Dried oregano gives a classic Greek taste. Smoked paprika adds depth, while salt and black pepper balance everything. Finally, fresh parsley will brighten your dish as a garnish. With these ingredients, you create a meal that’s both simple and full of flavor. - Preheat your oven to 400°F (200°C). This gets it nice and hot. - In a bowl, mix extra virgin olive oil, lemon juice, oregano, smoked paprika, salt, and pepper. This is your marinade. - Add chicken thighs to the marinade. Turn them to coat well. Let them sit for about 15 minutes. - In another bowl, toss potato wedges and quartered red onion with olive oil, salt, and pepper. Make sure they are well-coated. - Take a large baking tray. Lay the marinated chicken thighs skin-side up on it. Surround them with the seasoned potatoes and onions. - Scatter smashed garlic cloves across the dish for flavor. - Layer thin lemon slices on top of the chicken and potatoes. This adds a zesty kick. - Place the tray in the preheated oven. Bake for 40-45 minutes. Check that the chicken reaches 165°F (75°C). The potatoes should be golden brown. - Once cooked, take the tray out and let it rest for 5 minutes. This allows the flavors to settle before you serve. To get crispy skin on the chicken, always place it skin-side up. This lets the heat reach the skin, making it golden and crunchy. Use medium potatoes, like Yukon Gold, for the best texture. They crisp up nicely while staying fluffy inside. For the best flavor, marinate the chicken for at least 15 minutes. This short time lets the marinade soak in without making the chicken soggy. If you're short on time, even 5 minutes works. You can switch up the marinade by adding yogurt for creaminess or honey for sweetness. Serve the dish directly from the tray for a cozy look. Arrange the chicken and potatoes nicely on individual plates for a fancier touch. Pair it with a fresh salad or a glass of cold white wine to balance the meal. A slice of lemon on the side adds a bright splash of flavor. {{image_4}} You can change the protein in this dish. Try chicken breast or drumsticks. Both options work well. If you want more color, use seasonal veggies. Carrots or bell peppers add great taste and look nice too. To boost flavor, add fresh herbs like thyme or rosemary. These herbs pair well with lemon. You can also try using different citrus fruits. Orange or lime can add a unique twist to the dish. If you need gluten-free options, this recipe fits the bill. All ingredients are gluten-free. For a vegetarian version, swap chicken for chickpeas or tofu. Both options will soak up the delicious marinade. To keep your Greek Lemon Chicken and Potato Traybake fresh, store leftovers in an airtight container. This helps prevent drying out. You can place the dish in the fridge for up to three days. When it’s time to enjoy again, reheat it in the oven at 350°F (175°C). This keeps the chicken crispy and the potatoes warm. You can also microwave it if you’re short on time, but the oven is best for taste. Freezing is a great way to save portions for later. To freeze, let the traybake cool completely. Then, cut it into serving sizes. Wrap each piece tightly in plastic wrap and place them in a freezer bag or container. This helps avoid freezer burn. You can freeze it for up to three months. When you’re ready to eat, thaw it overnight in the fridge. If you’re in a rush, you can defrost it in the microwave, but slow thawing is best for flavor. For the best taste, enjoy your Greek Lemon Chicken and Potato Traybake within three days if refrigerated. In the freezer, it stays fresh for about three months. Always check for signs of spoilage, like off smells or changes in texture. Following these tips helps keep your meal tasty and safe to eat. Yes, you can use boneless chicken thighs. They cook faster and stay juicy. Just adjust the baking time. Aim for about 30-35 minutes in the oven. Check for doneness at 165°F (75°C). To check if the chicken is done, use a meat thermometer. It should read 165°F (75°C) in the thickest part. If you don’t have a thermometer, cut into the chicken. The meat should be white and juices clear. You can prepare it a few hours ahead. Marinate the chicken and cut the potatoes. Store them in the fridge until you are ready to bake. This saves time and boosts flavor. This dish pairs well with a fresh salad or steamed vegetables. You could also serve it with crusty bread to soak up the juices. Rice or quinoa adds a nice touch, too. Yes, you can use a slow cooker! First, brown the chicken thighs in a pan. Then, place them in the slow cooker with the potatoes, onions, and garlic. Cook on low for 6-8 hours or high for 3-4 hours. This method makes the chicken super tender and flavorful. This blog post detailed how to make a Greek Lemon Chicken & Potato Traybake. We covered key ingredients like chicken thighs, potatoes, and garlic, along with an easy marinade. I provided simple steps to prepare and cook the dish perfectly. You learned tips for crispiness, flavor swaps, and storage. In closing, this recipe is not just tasty but also flexible. You can adjust ingredients or flavors to suit your needs. Enjoy your cooking!

Greek Lemon Chicken & Potato Traybake Savory Delight

Are you ready for a meal that’s bursting with flavor? The Greek Lemon Chicken & Potato Traybake is your next

To make this delightful drink, you'll need a few key ingredients: - 2 cups whole milk - 1 cup heavy cream - ⅓ cup unsweetened cocoa powder - ½ cup granulated sugar - 1 teaspoon pure vanilla extract - A pinch of fine sea salt These ingredients create a rich base that makes your hot chocolate creamy and flavorful. The cocoa powder gives it that deep chocolate taste, while the sugar balances the flavors perfectly. To elevate your hot chocolate, consider adding these optional ingredients: - ½ cup mini marshmallows - ¼ cup crushed peppermint candies - Edible glitter Mini marshmallows add a fun texture. Crushed peppermint candies give a refreshing twist. Edible glitter is the finishing touch, making your drink sparkle like a snow globe! Presentation is key for this recipe. Use these garnishes to wow your guests: - Whipped cream, for topping - Holiday-shaped cookies or chocolate decorations A generous dollop of whipped cream looks like fresh snow. Adding cookies or chocolate on the rim brings a festive flair. Serve your snow globe hot chocolate in clear mugs to show off all the beautiful layers! {{ingredient_image_2}} First, take your medium saucepan. Pour in 2 cups of whole milk and 1 cup of heavy cream. Set the heat to medium and stir often. Watch for steam but don’t let it boil. This step helps keep the milk smooth and tasty. While the milk heats, get a mixing bowl. Add ⅓ cup of unsweetened cocoa powder and ½ cup of granulated sugar. Don’t forget a pinch of fine sea salt! Mix them well. Now, take a few tablespoons of the hot milk mixture. Pour it into the bowl while you whisk. Keep whisking until you have a smooth chocolate paste. This step builds rich flavor. Once your paste is smooth, pour it back into the saucepan. Stir it into the warm milk and cream. Whisk until everything is mixed and warm throughout. This usually takes a few minutes. Now, remove the saucepan from the heat. Add 1 teaspoon of pure vanilla extract and stir it gently. If you want some magic, add a sprinkle of edible glitter. It makes your hot chocolate sparkle! Next, pour the hot chocolate into clear glass mugs, filling them halfway. Top with whipped cream, making it puff up high. Then, sprinkle mini marshmallows and crushed peppermint candies on top. This creates a snowy look inside your mugs. Finally, add holiday-shaped cookies or chocolate decorations for a festive touch. Enjoy your cozy night with this warm treat! To keep your milk from scorching, use low heat. Stir the milk often as it warms. Scorching happens when the milk cooks too fast. If you see steam, that's great! But if it starts to boil, turn down the heat. Always watch it closely. This method helps keep the milk smooth and creamy. For the best whipped cream, start with cold heavy cream. Place your mixing bowl and whisk in the fridge for 10 minutes. This keeps the cream from melting too fast. Whip the cream until soft peaks form. Avoid overwhipping, as it can turn into butter. Add a little sugar and vanilla for sweetness. This cream is perfect for topping your hot chocolate! To add sparkle, wait until your hot chocolate is ready. Sprinkle edible glitter on top of the whipped cream. A little goes a long way. The glitter makes your drink look magical and festive. It’s fun to watch it swirl in your hot chocolate. This touch will impress your friends and family! Pro Tips Use Fresh Ingredients: Always opt for fresh whole milk and heavy cream for the creamiest hot chocolate. This makes a noticeable difference in flavor and texture. Whisk for Smoothness: Ensure to whisk the cocoa and sugar mixture thoroughly before adding it to the milk to avoid lumps. A smooth chocolate paste will yield a richer drink. Customize Your Toppings: Feel free to experiment with different toppings such as chocolate shavings, crushed cookies, or flavored whipped cream to make your snow globe hot chocolate uniquely yours. Serve Immediately: For the best experience, serve the hot chocolate right after making it. This ensures it’s warm and frothy, keeping the festive spirit alive! {{image_4}} You can switch up the milk in your snow globe hot chocolate. If you want a lighter drink, try almond or oat milk. These options still create a creamy texture. Coconut milk adds a fun tropical twist. For a richer taste, use cashew milk. Each milk changes the flavor a bit, so have fun finding your favorite! Want to spice things up? There are many fun flavors to add! Try a splash of peppermint extract for a minty kick. Hazelnut or caramel syrups also work great. You can even mix in a spoonful of peanut butter for a nutty delight. Just remember to taste as you go, and have fun with it! Seasonal ingredients can make this drink even more special. During the fall, add a pinch of pumpkin spice for warmth. In winter, try cinnamon sticks for stirring. For the holidays, mix in some eggnog in place of milk for a festive twist. These seasonal touches keep your hot chocolate fresh and exciting all year round! To store leftover hot chocolate, let it cool first. Pour it into a clean, airtight container. Seal it tightly and place it in the fridge. It can stay fresh for up to three days. When you're ready to enjoy it again, simply follow the reheating instructions below. To reheat your hot chocolate, pour it into a saucepan. Heat it over low to medium heat. Stir it often to prevent scorching. You can also use a microwave. Place it in a microwave-safe bowl and heat it for 30 seconds at a time. Stir between each interval until it's warm. For the ingredients, store them properly to keep them fresh. Here’s how: - Milk and Cream: Keep these in the fridge. Use them within a week of opening. - Cocoa Powder: Store it in a cool, dry place. A sealed container works best. - Sugar: Keep it in a dry spot. A tightly closed jar will keep it fresh. - Vanilla Extract: Store it in a cool, dark place. It lasts a long time. - Marshmallows and Peppermint Candies: Keep them in an airtight container. This prevents them from getting hard. Following these tips will help your Snow Globe Hot Chocolate stay delicious and enjoyable! Yes, you can make Snow Globe Hot Chocolate ahead of time. To do this, prepare the hot chocolate and let it cool. Store it in the fridge for up to three days. When you want to enjoy it, reheat it gently on the stove. Stir well to mix the flavors again before serving. You can find Snow Globe Hot Chocolate kits at many local stores. Look in the baking or seasonal sections. Online stores like Amazon often have these kits too. They may include cocoa, marshmallows, and fun toppings. This makes it easier to create your cozy drink. Yes, you can make a vegan version of Snow Globe Hot Chocolate. Use almond milk or oat milk instead of whole milk. Replace heavy cream with coconut cream for a rich taste. Choose vegan marshmallows and ensure your chocolate is dairy-free. This way, everyone can enjoy this festive drink! Making Snow Globe Hot Chocolate is fun and easy. We explored key ingredients, optional add-ins, and garnishes to make it special. I shared step-by-step instructions to create the perfect drink, plus tips to help avoid common mistakes. You can also customize it with different flavors and seasonal touches. In the end, this drink warms up cold days and brings joy. Try it out with family and friends. Enjoy the magic of your own Snow Globe Hot Chocolate!

Snow Globe Hot Chocolate Delight for Cozy Nights

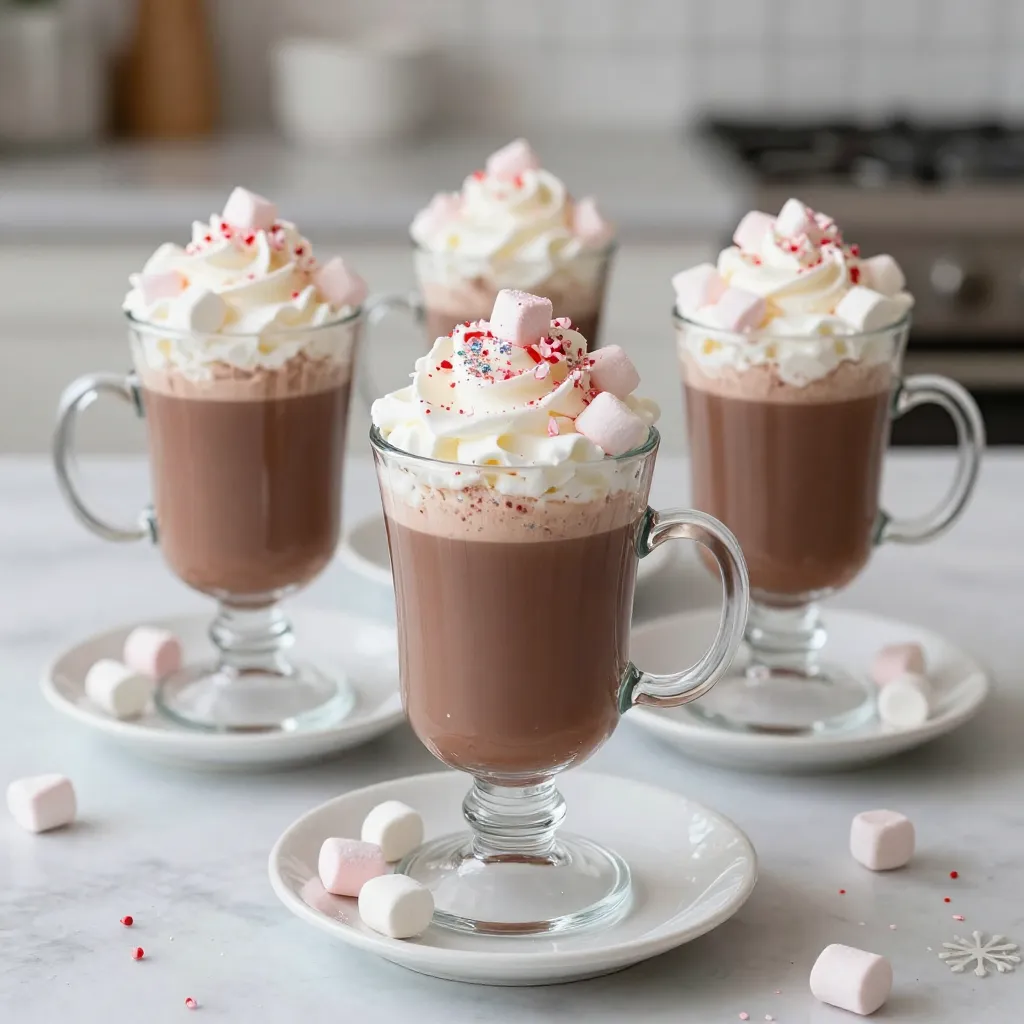
When the chilly nights of winter arrive, there’s nothing like a cozy cup of Snow Globe Hot Chocolate. This delightful

For the best banana bread, gather these key ingredients: - 3 ripe bananas, well-mashed - 1/2 cup unsalted butter, fully melted and slightly cooled - 3/4 cup brown sugar, firmly packed - 1/4 cup granulated sugar - 2 large eggs, at room temperature - 1 teaspoon pure vanilla extract - 1 teaspoon baking soda - 1/4 teaspoon fine sea salt - 1 1/2 cups all-purpose flour, sifted - 1/2 cup sour cream or Greek yogurt, at room temperature These ingredients create a moist and rich texture that you will love. To take your banana bread to the next level, consider adding: - 1/2 cup chopped walnuts or pecans - 1/4 cup dark chocolate chips These extras add a nice crunch and sweetness. Feel free to mix and match based on your taste. If you need to swap out ingredients, here are some ideas: - Use coconut oil instead of butter for a dairy-free option. - Substitute eggs with flaxseed meal mixed with water for a vegan version. - Try using almond flour for a gluten-free option. These alternatives keep your banana bread delicious while catering to different diets. Start by preheating your oven to 350°F (175°C). This step is key for even baking. While the oven heats, grab a 9x5 inch loaf pan. Grease it well with butter. If you prefer, you can line the pan with parchment paper. This makes it easy to remove the bread later. In a big mixing bowl, mash three ripe bananas until smooth. This gives the bread flavor and moisture. Next, pour in 1/2 cup of melted butter. Mix them together well. Now, add 3/4 cup of brown sugar and 1/4 cup of granulated sugar. Stir until the mixture is creamy and smooth. This sweet base makes the bread rich. Now it’s time to add two large eggs. Crack them in one at a time. Mix well after each egg to make sure they blend nicely. Then, add 1 teaspoon of pure vanilla extract. This adds a warm flavor to the bread. Stir again until everything is well combined. Next, sprinkle 1 teaspoon of baking soda and 1/4 teaspoon of fine sea salt over the mixture. Gently fold these dry ingredients in. Be careful not to overmix, as this keeps the bread tender. After that, add 1 1/2 cups of sifted all-purpose flour. Stir until you do not see any dry flour left. If you want, you can enhance your banana bread by adding extras. Fold in 1/2 cup of sour cream or Greek yogurt for added moisture. For a nice crunch, mix in 1/2 cup of chopped walnuts or pecans. You can also add 1/4 cup of dark chocolate chips for sweetness. This step is all about your taste. Pour the banana batter into your prepared loaf pan. Smooth the top with a spatula. This helps the bread bake evenly. Place the pan in the preheated oven. Bake for 60-70 minutes. Your banana bread is ready when a toothpick comes out clean or with a few moist crumbs. Once baked, let it cool in the pan for 10-15 minutes. Then, transfer it to a wire rack to cool completely. To get moist banana bread, start with ripe bananas. The darker the bananas, the sweeter and creamier they become. Mash them well; this helps the bread stay moist. Adding sour cream or Greek yogurt is key. It adds richness and moisture. Don't overmix your batter; just mix until combined. This keeps the bread soft and fluffy. Store leftover banana bread in an airtight container. This keeps it fresh for up to four days. You can also wrap it in plastic wrap and then foil for extra protection. If you want to keep it longer, slice it and freeze it. Just place slices in a freezer bag. It can last up to three months in the freezer. Enjoy banana bread warm or at room temperature. For a tasty twist, add a dusting of powdered sugar on top. A dollop of butter or nut butter makes it even better. You can also serve it with fresh fruit or a scoop of ice cream. This creates a delightful dessert that's sure to please. {{image_4}} You can easily make vegan banana bread. Replace eggs with flax eggs or applesauce. Use plant-based butter instead of unsalted butter. For sour cream, opt for a dairy-free yogurt. This gives you a moist and tasty vegan treat. To make gluten-free banana bread, swap all-purpose flour for a gluten-free blend. Look for blends that include xanthan gum, as it helps with texture. Ensure all other ingredients are gluten-free. This way, everyone can enjoy this delicious bread. You can play with flavors in your banana bread. Add spices like cinnamon or nutmeg for warmth. Try mixing in fruits like blueberries or chopped apples for a fruity twist. You can even add a handful of coconut flakes for a tropical vibe. Each option brings new joy to your loaf. To keep your banana bread fresh, store it in an airtight container. This helps keep moisture in. You can also wrap it tightly in plastic wrap or aluminum foil. Make sure it is completely cool before wrapping. If you want to enjoy it later, keep it at room temperature for up to three days. For longer storage, consider freezing it. To freeze banana bread, slice it first. This makes it easy to grab a piece later. Wrap each slice in plastic wrap, then place them in a freezer bag. Label the bag with the date. You can freeze banana bread for up to three months. When ready to eat, just take out a slice and let it thaw at room temperature. Reheating banana bread is simple and quick. For the best taste, heat it in the oven. Preheat your oven to 350°F (175°C). Place the bread on a baking sheet and warm it for about 10 minutes. You can also use a microwave. Heat it for about 15-20 seconds. Enjoy it warm with butter or a spread of your choice! The key ingredients for moist banana bread are ripe bananas and sour cream. - Ripe bananas add natural sweetness and moisture. - Sour cream or Greek yogurt gives richness and a tender crumb. - Unsalted butter also helps create a soft texture. Using these ingredients ensures your banana bread stays soft and enjoyable. Yes, you can make banana bread without eggs. - Use 1/4 cup of unsweetened applesauce for each egg. - You can also use flaxseed meal mixed with water. - Mix 1 tablespoon of flaxseed meal with 2.5 tablespoons of water. These substitutes keep your banana bread moist and fluffy. You can tell banana bread is done by checking the center. - Insert a toothpick into the middle. - If it comes out clean or with a few moist crumbs, it’s ready. - The edges should pull away from the pan slightly. When it’s done, let it cool for perfect slicing. To boost banana flavor, use very ripe bananas. - The darker the banana, the sweeter and more flavorful it is. - You can also add banana extract for an extra kick. - A touch of cinnamon pairs well with the banana taste, too. These tips ensure your banana bread bursts with flavor. Yes, you can use a bread machine for banana bread. - Follow the order of ingredients as per your machine’s instructions. - Most machines have a specific setting for quick breads. - Keep an eye on the baking time, as it may vary. Using a bread machine can make the process easier and faster. This article covered all you need for rich banana bread. We explored key ingredients, including main and optional ones, along with smart swaps. The step-by-step guide made baking simple, while tips ensured moisture and freshness. I shared ways to adapt recipes for vegan or gluten-free options. Finally, I included best storage practices and answered common questions. With these insights, you can bake delicious banana bread that everyone will enjoy. Happy baking!

Rich Banana Bread Irresistible and Simple Recipe

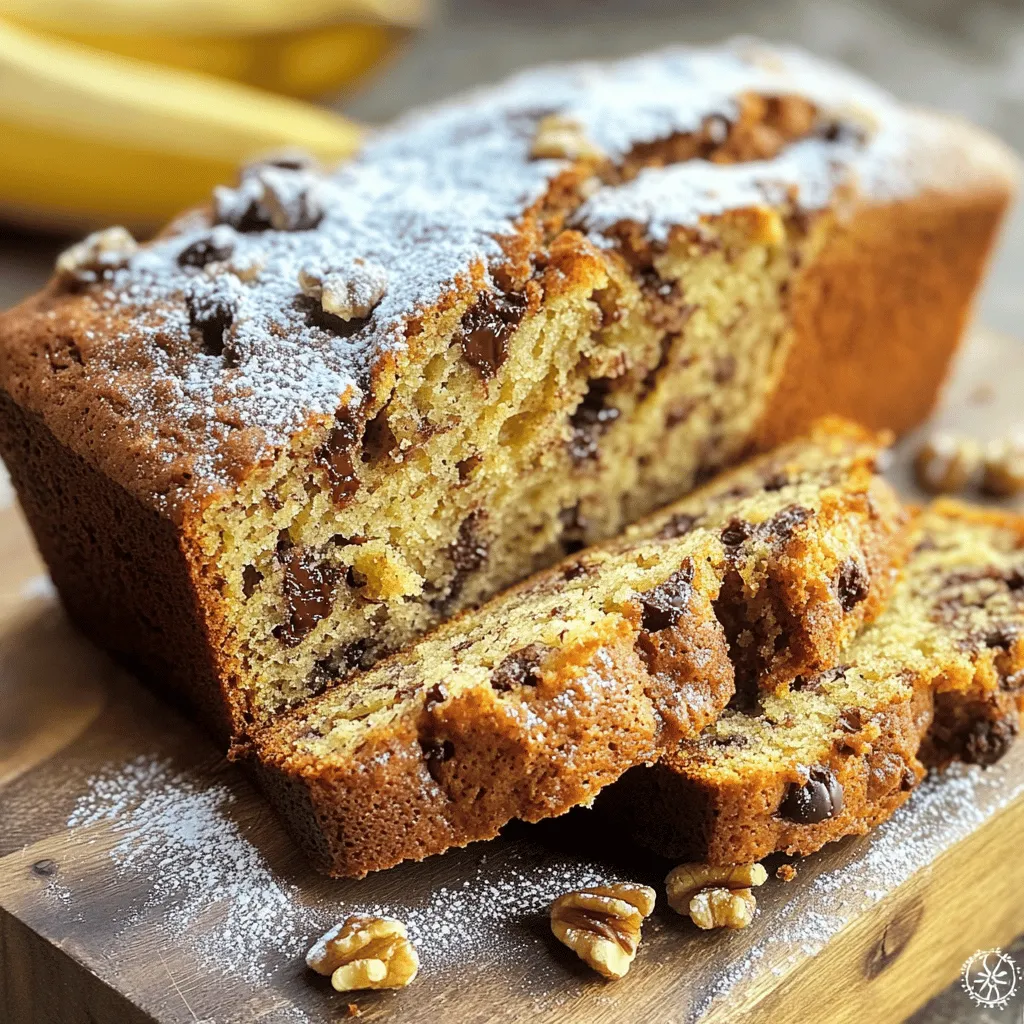
If you’re craving a sweet treat that’s easy to make, look no further! This Rich Banana Bread recipe combines simple

To make Green Goddess Herb Soup, you need: - 1 tablespoon olive oil - 1 medium onion, finely chopped - 2 cloves garlic, minced - 4 cups vegetable broth (preferably low-sodium) - 3 cups fresh spinach, roughly chopped - 1 cup fresh parsley, loosely packed and chopped - 1 cup fresh basil, loosely packed and chopped - 1/2 cup fresh dill, chopped - 1 tablespoon freshly squeezed lemon juice - Salt and freshly ground black pepper, to taste These ingredients create a base full of rich flavor and nutrients. The fresh herbs give the soup its vibrant green color and unique taste. You can enhance the soup by adding: - 1/4 cup heavy cream or coconut milk for creaminess - Croutons for garnish Using cream or coconut milk adds a smooth texture. Croutons give a nice crunch and contrast to the soft soup. If you need alternatives, consider these swaps: - Use avocado oil instead of olive oil - Swap vegetable broth for chicken broth for a different taste - Replace spinach with kale or Swiss chard if you prefer Feel free to mix and match herbs. You can use cilantro or mint for a twist. Each change can create a new flavor, keeping your meals exciting. Start by heating one tablespoon of olive oil in a large pot over medium heat. Once the oil shimmers, add one finely chopped medium onion. Sauté this for about five minutes until the onion turns soft and clear. Stir it often to cook evenly. Next, add two cloves of minced garlic to the pot. Sauté for one more minute, stirring to avoid burning the garlic. Now, pour in four cups of vegetable broth. Turn the heat up to bring this to a boil. When the broth boils, lower the heat to a gentle simmer. Carefully stir in three cups of roughly chopped spinach, one cup of chopped parsley, one cup of chopped basil, and half a cup of chopped dill. Cook for five to seven minutes until the greens wilt and soften. Before cooking, wash all the fresh herbs and vegetables. For the onion, peel and finely chop it to help it cook faster. Mince the garlic into tiny pieces for better flavor. Chop the spinach roughly, but not too small, so it stays vibrant in the soup. When chopping parsley, basil, and dill, pack them loosely in a measuring cup, then chop them finely. This will release their fresh flavors. To blend the soup, you can use an immersion blender directly in the pot. Blend until smooth and creamy. If you don’t have an immersion blender, carefully transfer the soup to a standard blender in batches. Blend until it reaches a smooth texture, then return it to the pot. This step is key for a silky soup that feels rich and delicious. To make the best Green Goddess Herb Soup, start with fresh herbs. Fresh herbs give the soup its bright and vibrant taste. Use a sharp knife to chop the onion and garlic finely. This helps release their flavors. Heat the olive oil until it shimmers before adding the onion. This step builds a great base for your soup. Sauté the onion until it's soft and translucent, about five minutes. Then, add the garlic and cook for just one more minute. This keeps the garlic from burning. If the soup feels too thick, add more vegetable broth. You want a creamy yet smooth texture. For a richer taste, stir in heavy cream or coconut milk. Lemon juice adds brightness, so don't skip it. Taste the soup as you season. Add salt and pepper to enhance the flavors. If you want a hint of spice, a pinch of red pepper flakes works well. To impress your guests, serve the soup in warm bowls. This keeps it hot longer. Drizzle extra cream or coconut milk on top for a stunning look. Garnish with fresh herbs like basil or parsley. Finally, add croutons for a nice crunch. This not only adds texture but makes the dish visually appealing too. {{image_4}} You can choose between creamy or vegan styles for this soup. If you want creaminess, add heavy cream or coconut milk. This makes the soup rich and smooth. For a vegan version, skip the cream. The soup will still taste great without it. The fresh herbs keep the flavor bright. To make your soup more filling, add proteins or grains. Cooked quinoa or lentils blend well. They add texture and nutrients. You can also use shredded chicken or chickpeas for extra protein. This way, the dish becomes a complete meal, keeping you satisfied longer. Feel free to swap herbs based on your taste. If you don’t have basil, try cilantro or mint. These herbs give a fresh twist. You can even mix in some chives for a mild onion flavor. Experimenting with herbs can change the soup’s taste and make it unique to you. To keep your Green Goddess Herb Soup fresh, store it in an airtight container. Let the soup cool to room temperature before sealing it. This helps avoid condensation, which can make the soup watery. You can keep it in the fridge for up to three days. If you want to keep it longer, consider freezing it. Freezing is a great way to extend the life of your soup. Pour the cooled soup into freezer-safe containers or bags. Make sure to leave some space at the top, as the soup will expand when frozen. Label the containers with the date. You can freeze the soup for up to three months. When you’re ready to eat, just thaw it in the fridge overnight. Reheating your soup is easy. Pour the desired amount into a pot and heat it over medium heat. Stir occasionally to avoid sticking. If the soup seems thick after freezing, add a splash of broth or water. You can also use the microwave. Heat in short bursts, stirring in between, until hot. Enjoy your warm, flavorful soup! Green Goddess Herb Soup is a fresh, vibrant dish made with herbs. It features spinach, parsley, basil, and dill, giving it a bright green color. The soup is light yet packed with flavor. It has a creamy texture, thanks to optional cream or coconut milk. This soup is perfect for any season and is easy to make. You can prepare Green Goddess Herb Soup ahead of time. Simply follow the recipe and let the soup cool. Once cool, store it in an airtight container in the fridge. It stays fresh for about three days. When ready to eat, just reheat on the stove or in the microwave. Yes, you can use dried herbs, but the flavor will change. Fresh herbs provide a brighter taste. If you use dried herbs, use one-third of the amount. Dried herbs are stronger, so a little goes a long way. Add them to the pot early to enhance their flavor. Green Goddess Herb Soup is very nutritious. It is low in calories and high in vitamins. Spinach provides iron and calcium. Parsley and dill are great for digestion. This soup also has antioxidants from the herbs. The olive oil adds healthy fats, making it a well-rounded meal. When stored properly, this soup stays fresh for three to four days in the fridge. If you freeze it, it can last for about three months. To keep the best flavor and texture, store it in airtight containers. Always let it cool completely before freezing or refrigerating. This blog post covered all you need to make Green Goddess Herb Soup. We looked at key ingredients, step-by-step cooking methods, and tips to enhance flavor. I shared storage techniques for leftovers and answered common questions too. Green Goddess Herb Soup is fun to make and packed with taste. Use this guide to experiment and create your own versions. Enjoy making a delicious, healthy soup that's sure to please!

Green Goddess Herb Soup Nourishing and Flavorful Meal

Are you ready to dive into a bowl of vibrant flavor? Green Goddess Herb Soup is not just a feast

Older posts
Newer posts
← Previous Page1 … Page7 Page8 Page9 … Page86 Next →

dsad

© 2026 lazychefmagic • Built with GeneratePress

Our Policies

  • Copyright Policy
  • Cookie Policy
  • GDPR Policy
  • Privacy Policy
  • Disclaimer
  • Terms Of Use

More Information

  • Home
  • About
  • Contact
  • Appetizers
  • Dessert
  • Dinner
  • Drinks
©2026, lazychefmagic About Back To Top