![- Salmon fillets (4 pieces) - Fresh herbs (parsley, dill, thyme) - Lemon (juiced and sliced) - Olive oil and garlic - Additional spices - Marinade variations - Calories per serving: About 350 - Protein content: Approximately 30 grams - Overview of vitamins and minerals: Rich in Omega-3s, vitamin D, and B vitamins This Lemon Herb Grilled Salmon recipe is not just easy; it's full of flavor and healthy. You can use fresh herbs like parsley, dill, and thyme to make it shine. Lemons add a bright taste that makes the salmon pop. The olive oil keeps the fish moist and delicious. If you want to add a twist, try some spices like paprika or cumin. You can even switch up the herbs based on what you have. This way, you can make it your own. For nutrition, this dish packs a punch. Each serving has about 350 calories. You get around 30 grams of protein, which is great for muscle health. Plus, salmon is full of Omega-3 fatty acids, good for your heart. It also brings vitamins like D and B, which are key for energy and bone health. You can find the full recipe [here]. To start, let's mix the marinade. Grab a small mixing bowl. Add 2 tablespoons of extra virgin olive oil. Then, juice one lemon and add the juice to the bowl. Don't forget the zest! Next, add 3 cloves of finely minced garlic. Toss in 2 tablespoons of chopped parsley, 1 tablespoon of fresh dill, and 1 tablespoon of fresh thyme leaves. Finally, season with salt and pepper to taste. Whisk everything together until it looks bright and mixed. Marinating is key! It allows flavors to soak into the fish. This step makes your salmon juicy and flavorful. Aim to marinate for at least 30 minutes. If you have more time, let it sit for up to 2 hours. Now, let’s marinate the salmon. Place 4 salmon fillets in a shallow dish or a resealable bag. Pour the marinade over the fillets. Make sure every piece is coated well. Cover the dish or seal the bag tightly. This helps the marinade work its magic. For the best flavor, aim for that 30-minute mark. But if you can wait, longer is better. Just remember, don’t marinate too long. The acid from the lemon can change the texture of the fish. While the salmon is marinating, preheat your grill. Set it to medium-high heat, about 375°F to 400°F. This is the sweet spot for grilling salmon. Once the salmon has marinated, remove the fillets. Let any extra marinade drip off. Discard the leftover marinade responsibly. Place the salmon skin-side down on the grill. Grill for about 6-7 minutes. Avoid moving it around; let it cook. After that time, flip the fillets carefully with a spatula. Grill for another 4-5 minutes. You’ll know it’s done when it flakes easily with a fork. For a fun twist, grill some lemon slices too! Place them on the grill during the last minute. They should get nice char marks in just 1-2 minutes. This is how you create a delicious Lemon Herb Grilled Salmon. Get ready for a tasty meal! For more details, check out the Full Recipe. To check if your salmon is done, look for a few signs. The flesh should change from translucent to opaque. Also, it should flake easily with a fork. A digital meat thermometer is your best friend here. Aim for an internal temperature of 145°F. Avoid common mistakes to ensure great results. First, don't move the salmon too much on the grill. Let it sear for about 6-7 minutes before flipping. Second, be careful with the heat. Too hot, and the outside may burn before the inside cooks. Adjusting seasoning can make a big difference. If you like it spicy, add a pinch of red pepper flakes to the marinade. For a sweeter taste, try a bit of honey. Taste your marinade before you add it to the fish. This way, you can tweak it to your liking. To add zest, use fresh herbs. Chopped chives or basil can bring a nice twist. You can also sprinkle some lemon juice right before serving. It brightens the dish and enhances the lemon flavor. For plating, arrange the salmon on a colorful platter. Place each fillet on a bed of greens for contrast. Top with grilled lemon slices to add a pop of color. Fresh herbs can also add visual appeal. Serve the salmon with sides that complement its flavors. Steamed asparagus or a fresh salad works well. A light quinoa dish also pairs nicely. This adds texture and keeps the meal balanced. {{image_4}} You can easily change the flavor of Lemon Herb Grilled Salmon. Try adding fresh herbs like basil or cilantro for a different taste. You can also use spices like paprika or cumin if you like some heat. For a more citrusy kick, mix in orange or lime juice with your marinade. Each option adds a unique twist, keeping your meals fun and exciting. If you don’t have a grill, you can still enjoy this dish. Oven-baking is a great choice. Preheat your oven to 400°F. Place the marinated salmon on a baking sheet and cook for about 12-15 minutes. You can also broil the salmon. Set your broiler to high and cook for 6-8 minutes, watching closely to avoid burning. Both methods yield tasty results without losing flavor. Pair your Lemon Herb Grilled Salmon with tasty sides. Steamed asparagus brings a nice crunch and color. A fresh mixed greens salad adds a crisp texture. You can also serve it with quinoa or rice for a hearty meal. Roasted vegetables like zucchini or bell peppers complement the salmon’s flavors well. These sides create a balanced plate that everyone will enjoy. To keep your leftover Lemon Herb Grilled Salmon fresh, place it in an airtight container. Store it in the fridge. It is best to eat it within three days for the best flavor and safety. If you want to enjoy it later, follow these steps: - Cool the salmon: Let it cool to room temperature before storing. - Seal it well: Use a tight-fitting lid to prevent air from getting in. Keeping it in the fridge helps maintain its taste and texture. If you want to freeze your cooked salmon, you can do that too. Wrap each fillet tightly in plastic wrap. Then, place it in a freezer-safe bag. This method helps prevent freezer burn. Cooked salmon can last about two to three months in the freezer. When it’s time to eat, thaw the salmon in the fridge overnight for the best results. Avoid using hot water, as it can lead to uneven thawing. After thawing, you can reheat it gently in the oven or on the stovetop. For more detailed instructions, you can check the full recipe. If you can't find salmon, try these fish options: - Trout - Mahi-mahi - Tilapia - Cod These fish work well with the same marinade. They each have a mild flavor that matches nicely with lemon and herbs. To check if salmon is done, look for these signs: - The flesh changes from bright pink to a lighter color. - It flakes easily when you poke it with a fork. - The internal temperature reaches 145°F. These signs show that your salmon has cooked through perfectly. Yes, you can grill salmon without skin. Here are some tips: - Use a non-stick grill spray for easy cooking. - Place the fillets on a piece of foil to prevent sticking. - Flip the salmon gently using a spatula. These steps will help you grill skinless salmon with ease. Pair your salmon with these tasty side dishes: - Steamed asparagus - Mixed greens salad - Quinoa or rice - Roasted vegetables These sides complement the fresh flavors of the salmon. Absolutely! You can prepare the marinade in advance. Here are some tips: - Mix all the marinade ingredients a day before. - Store it in an airtight container in the fridge. - Marinate the salmon just before grilling. This saves time and keeps your meal fresh. You can find the full recipe for Lemon Herb Grilled Salmon in the [Full Recipe]. This detailed guide will help you create this delicious dish step-by-step. This article covered everything you need for Lemon Herb Grilled Salmon. I shared required and optional ingredients, plus nutrition facts. I gave you step-by-step instructions for marinating and grilling. I included tips for perfect grilling and ways to mix up the flavors. You also learned how to store leftover salmon and answers to common questions. Now, you can enjoy this tasty dish confidently. Get grilling and savor the fresh flavors!](https://lazychefmagic.com/wp-content/uploads/2025/04/120aec2f-afb3-410f-8727-eccf543fb021.webp)
Lemon Herb Grilled Salmon Flavorful and Simple Recipe
Ready to elevate your dinner game? This Lemon Herb Grilled Salmon recipe is both flavorful and simple, perfect for any
Ready to elevate your dinner game? This Lemon Herb Grilled Salmon recipe is both flavorful and simple, perfect for any
![- 1 pound baby carrots (or 3 large carrots, cut into sticks) - 2 tablespoons unsalted butter - 1/4 cup pure maple syrup - 1 teaspoon ground cinnamon - 1/2 teaspoon ground nutmeg - 1/4 teaspoon sea salt - 1 tablespoon freshly squeezed lemon juice - 2 tablespoons fresh parsley, finely chopped (for garnish) - You can use honey or agave syrup instead of maple syrup. - Fresh carrots taste great, but frozen ones work too. - For a vegan option, try using coconut oil or vegan butter. Using these ingredients brings out a sweet and warm flavor in the carrots. The maple syrup pairs well with the spices, creating a rich glaze. You can adjust the sweetness and spices based on your taste. The lemon juice adds a nice touch of brightness. This recipe makes a delicious side dish for any meal. For the full recipe, check out Sweet & Sticky Maple Glazed Carrots. - Rinse and clean baby carrots. - Peel and slice larger carrots into sticks. Start by rinsing the baby carrots in cold water. This step removes dirt and makes them fresh. If you choose larger carrots, peel them if you like. Cut them into sticks that are about the same size. This helps them cook evenly. - Melting the butter and adding carrots. - Incorporating maple syrup and spices. - Simmering covered for tenderness. Next, grab a large skillet. Melt the unsalted butter over medium heat. Watch the butter closely so it does not brown. Add the prepared carrots to the skillet. Stir them gently to coat with the melted butter. Now, drizzle the pure maple syrup over the carrots. Sprinkle in the ground cinnamon, nutmeg, and sea salt. Stir everything well to mix the flavors. Increase the heat a bit to bring the mix to a gentle simmer. Cover the skillet with a lid. Let the carrots cook for about 10 minutes. Stir occasionally to keep them from sticking. They should get tender enough to pierce with a fork. - Reducing the glaze for thickening. - Adding lemon juice for brightness. - Garnishing with parsley before serving. Once the carrots are tender, take off the lid. Let the glaze reduce for another 5 minutes. Stir often to prevent sticking. The sauce will thicken to a syrupy texture. After thickening, mix in the freshly squeezed lemon juice. This adds a bright flavor that balances the sweet glaze. Finally, transfer the maple-glazed carrots to a serving dish. Garnish them with finely chopped parsley. The parsley adds a pop of color and fresh taste. Enjoy your sweet and sticky maple glazed carrots! For the full recipe, check out the instructions above. - Uniform carrot size: Cut your carrots into even pieces. This helps them cook at the same rate. Baby carrots are great for this, but if you use large carrots, cut them into sticks. - Thickening the glaze: To thicken the glaze, let it simmer without a lid. This allows steam to escape and the sauce to reduce. Keep stirring to avoid burning. - Common pitfalls: Don’t rush the cooking. If you cook them too fast, they may burn. Always keep an eye on the heat and stir often. - Additional spices: For a deeper flavor, try adding a pinch of ginger or a dash of cayenne pepper. These spices lift the dish and add warmth. - Serving suggestions: Maple-glazed carrots pair well with roasted meats, like chicken or pork. They also complement grains like quinoa or rice. - Complete meal options: Add grilled chicken or baked tofu for a full meal. The sweet glaze works well with savory proteins, making it a balanced dish. For the full recipe, check the detailed cooking instructions provided above. {{image_4}} You can make maple glazed carrots even better by adding seasonal veggies. For fall, try adding butternut squash. It adds a creamy texture and pairs well with the sweet glaze. In spring, toss in some fresh peas for a pop of color and sweetness. For holidays, tweak the spices. Add cloves or allspice for a warm touch, perfect for festive meals. You can cook maple glazed carrots in various ways. Oven-roasting gives them a nice caramelized flavor. To roast, place the carrots on a baking sheet after coating them in the glaze. Roast at 400°F for about 20 minutes. Stir halfway through for even cooking. You can also use the stovetop method. This is quicker and keeps the carrots tender. If you want an easy option, use a slow cooker. Just add all ingredients, set it to low, and cook for about four hours. You’ll have sweet, tender carrots without much work. If you follow a paleo diet, use coconut oil instead of butter. This keeps the dish compliant while adding a distinct flavor. You can also swap maple syrup for honey if you prefer. For a vegan version, opt for plant-based butter. This allows everyone to enjoy the dish. You won't lose any flavor or sweetness, making it a great choice for all diets. To explore the full recipe, check [Full Recipe]. To keep your maple glazed carrots fresh, follow these tips: - Cool down the carrots before storing. - Use an airtight container to prevent moisture loss. - Refrigerate them within two hours of cooking. This helps them stay crisp and tasty. You can store them for up to three days in the fridge. If you want to keep them longer, consider freezing. Use freezer-safe bags for best results. When reheating, you want to keep the carrots tender and flavorful. Here’s how: - Use a skillet on low heat. Add a splash of water or broth to prevent sticking. - Cover the skillet to help steam the carrots back to life. You can also add leftovers to soups or stir-fries. They add a sweet twist to any dish! For a quick meal, toss them with pasta or grains. Enjoy the sweet flavor! What is the best way to cut carrots for glazing? The best way to cut carrots is to use baby carrots. They cook evenly and look nice. If you use large carrots, cut them into sticks about the same size. This helps them cook at the same rate. Can I use brown sugar instead of maple syrup? Yes, you can use brown sugar instead of maple syrup. The flavor will change, but it will still taste good. Brown sugar adds a rich sweetness. However, maple syrup gives a unique flavor that you might miss. How long can I store maple glazed carrots in the fridge? You can store maple glazed carrots in the fridge for up to four days. Keep them in a sealed container. Reheat them gently to enjoy again. The flavors will still be nice, even after a few days. Are there any health benefits to eating carrots? Yes, carrots are very healthy. They are low in calories and high in fiber. They contain vitamins A, C, and K. Carrots also have antioxidants that help your body. Eating carrots can support your vision and boost your immune system. Overview of calories and nutritional breakdown One serving of maple glazed carrots has about 150 calories. They have around 8 grams of sugar from the maple syrup. The dish provides some healthy fats from the butter. Highlighting vitamins and minerals found in carrots Carrots are rich in vitamin A, which is great for your eyes. They also contain vitamin K, important for bone health. Carrots have potassium, which helps your heart. Eating them can support your overall health. For the full recipe, check out the Sweet & Sticky Maple Glazed Carrots recipe. This blog post shared a simple, tasty recipe for maple-glazed carrots. We covered key ingredients, cooking steps, and helpful tips. You can easily adapt this dish for different diets and seasons. Always remember to store leftovers properly for later use. Enjoy trying these techniques and flavors in your own kitchen! Your meals will shine with this new twist on a classic side dish. Making food fun and easy can lead to better meals for everyone!](https://lazychefmagic.com/wp-content/uploads/2025/04/1cc45279-8e0f-4e4c-8764-19e9f6fe406b.webp)
Looking for a quick, delicious side dish? Maple Glazed Carrots are perfect for you! This sweet and savory recipe showcases

If you crave a sweet treat that’s fun to make, look no further! Cinnamon sugar churros are crispy, warm delights

Looking for a tasty energy boost? Try my Mocha Chip Protein Bars! They pack a punch with rich flavors and
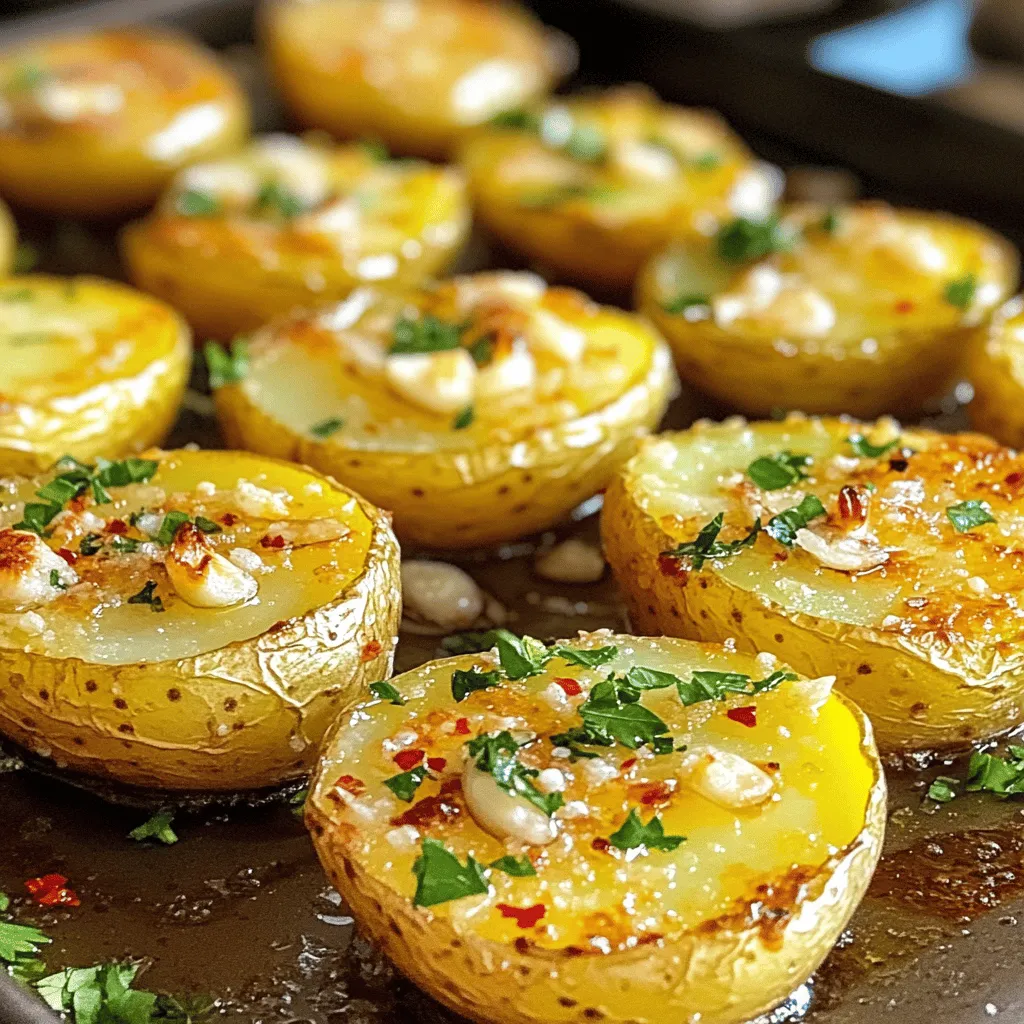
If you want a side dish that wows, look no further than Garlic Parmesan Roasted Potatoes. These tasty little gems
![When making Pesto Caprese Pasta Salad, you need fresh and simple ingredients. Here’s what you will need: - 2 cups rotini pasta - 1 cup cherry tomatoes, halved - 1 cup fresh mozzarella balls, halved - 1 cup fresh basil leaves, torn - ½ cup basil pesto (homemade or store-bought) - 2 tablespoons extra virgin olive oil - Salt and freshly ground black pepper to taste - ¼ cup pine nuts, toasted (optional for added texture) - Balsamic glaze for drizzling (optional for garnish) Each ingredient plays a key role. The rotini pasta holds the pesto well, making every bite flavorful. Cherry tomatoes add a juicy burst, while fresh mozzarella brings creaminess. The torn basil leaves add a fragrant touch that brightens the dish. Using basil pesto gives the salad its signature taste. Extra virgin olive oil adds richness, while salt and pepper enhance all the flavors. Toasted pine nuts add a delightful crunch if you choose to include them. Drizzling balsamic glaze adds a sweet note to finish. This recipe is versatile, and you can easily adjust it to fit your taste. For the full recipe, check out the detailed instructions provided. To start, boil a large pot of salted water. Once it bubbles, add the rotini pasta. Cook it according to the package for about 8-10 minutes. You want it al dente. After cooking, drain the pasta and rinse it under cold water. This stops the cooking and keeps it firm. While the pasta cooks, grab your cherry tomatoes and fresh mozzarella. Halve the tomatoes and mozzarella balls. This makes them bite-sized and easy to mix. Next, take fresh basil leaves and gently tear them into smaller pieces. This helps release their lovely aroma. In a big bowl, mix the cooled rotini pasta with the halved cherry tomatoes, halved mozzarella balls, and torn basil leaves. Use a spatula to fold everything together. Be gentle, so you don’t break the mozzarella. For a crunchy twist, toast some pine nuts. Heat a dry skillet over medium heat. Stir the pine nuts for about 3-4 minutes until they turn golden brown. Let them cool before adding to the salad. This little step adds a nice texture. Cover the pasta salad with plastic wrap and place it in the fridge. Let it chill for at least 30 minutes. Chilling gives the flavors time to blend and creates a refreshing taste. When you're ready to serve, scoop the pasta salad into bowls or onto a platter. Finish it off with a drizzle of balsamic glaze. This adds a sweet touch and makes the dish look beautiful. Enjoy your Pesto Caprese Pasta Salad! For the complete recipe, check out the Full Recipe. To get al dente pasta, cook it in boiling salted water. The pasta should be firm but not hard. Follow the package instructions for the best timing. Usually, this takes about 8 to 10 minutes. As soon as it's done, drain the pasta. Rinsing it under cold water halts the cooking. This step keeps the pasta from getting mushy. Fresh basil and mozzarella make a big difference. They bring bright flavors to your dish. When you pick basil, choose vibrant, green leaves. They should smell strong and fresh. For mozzarella, look for soft balls that feel creamy. The right pesto matters, too. Homemade pesto is best, but store-bought works well if it's high quality. Check for fresh ingredients in the list. To boost flavor, consider adding other herbs. Oregano or parsley can add a nice touch. You might also try adding some diced bell peppers for crunch. If you want to switch it up, alternative dressings can work. A light vinaigrette or a creamy dressing can change the taste. Just remember to keep it fresh and simple! For the full recipe, check the link. {{image_4}} For those with dietary needs, here are some great options: - Gluten-free pasta options: Use brown rice or quinoa pasta for a gluten-free dish. These options maintain a nice texture and flavor. - Vegan alternatives: Swap fresh mozzarella for vegan cheese. Nutritional yeast can add a cheesy flavor without dairy. You can change up your salad with seasonal ingredients: - Vegetables to consider based on seasons: In summer, add cucumbers for crunch. Autumn brings roasted butternut squash for warmth. Spring can include peas for sweetness. - Protein additions: Grilled chicken or shrimp can make this salad heartier. Just cook the protein and toss it in with the other ingredients. To spice up your salad, consider these tweaks: - Spicy variations with ingredients like jalapeños: Add sliced jalapeños for a kick. This heats up the dish and adds a nice contrast to the creamy cheese. - Using different types of cheese: Try feta or goat cheese if you want to switch it up. These cheeses can add a tangy flavor that complements the pesto. Feel free to get creative with your Pesto Caprese Pasta Salad. With these variations, you can enjoy a new twist every time! To keep your Pesto Caprese Pasta Salad fresh, store it in the fridge. Use an airtight container to reduce air exposure. This will help keep the flavors intact. If you have a large batch, divide it into smaller portions. This makes it easy to grab a serving later. Always let the salad cool before sealing. This helps prevent condensation, which can make it soggy. You can enjoy this pasta salad cold or at room temperature. Reheating is not necessary. If you prefer it warm, use a microwave. Heat it for short bursts. Stir in between to warm it evenly. Avoid overheating, as this can make the pasta mushy. If you want to revive the flavors, add a little extra pesto or olive oil. Your salad stays fresh for about three days in the fridge. Look for signs of spoilage like a sour smell or slimy texture. If the tomatoes become mushy or the basil wilts, it’s time to toss it out. Keeping an eye on your leftovers helps ensure you enjoy the best flavors. For the full recipe, refer back to the earlier sections. Yes, you can make this salad ahead of time. It tastes even better after chilling. I suggest preparing it a few hours before serving. This gives the flavors time to mix. Store it in the fridge in an airtight container. If you need a substitute for pesto, you have options. You can use store-bought sauces like sun-dried tomato or olive tapenade. A simple dressing of olive oil, lemon juice, and garlic also works well. Feel free to get creative with different flavors. This salad is great for meal prep. It keeps well in the fridge for up to three days. Pack it in individual containers for easy grab-and-go meals. Just make sure to keep the balsamic glaze separate until you’re ready to eat. You can definitely add cooked chicken to your salad. It adds protein and makes the dish heartier. Use grilled or rotisserie chicken for best results. Just chop it into bite-sized pieces and mix it in with the other ingredients. For a full recipe, please refer to the [Full Recipe]. You now have a simple and tasty recipe for Pesto Caprese Pasta Salad. We covered the key ingredients, like rotini pasta, cherry tomatoes, and fresh mozzarella. You learned how to prepare each component while ensuring great flavor. We explored different ways to customize the salad based on your diet and preferences. Making this dish ahead is easy, and it stores well. Enjoying fresh, quality ingredients makes all the difference. Try it out and impress your friends!](https://lazychefmagic.com/wp-content/uploads/2025/04/2eafd766-1eba-44a7-8221-0b9e1fc6c11b-2.webp)
Looking for a dish that’s both tasty and easy to make? Try Pesto Caprese Pasta Salad! With fresh ingredients like

Get ready for game day with my crispy garlic Parmesan wings! These tasty treats are easy to make and pack
![- 1 lb beef sirloin or tenderloin - 8 oz egg noodles - 1 cup sour cream The main ingredients are key to making a great beef stroganoff. I love using beef sirloin or tenderloin for this dish. It gives that tender texture. The egg noodles soak up the sauce well, adding a nice touch. Sour cream adds creaminess and tang. - Olive oil - Worcestershire sauce - Smoked paprika Olive oil is best for searing the beef. It helps achieve that nice brown crust. Worcestershire sauce adds depth to the sauce. Smoked paprika gives a hint of smokiness. These elements work together to create rich flavors. - Salt and black pepper - Fresh parsley Salt and black pepper are essential for seasoning. They enhance the natural flavors of the dish. Fresh parsley adds brightness and color. It makes the dish look more appealing. For the complete cooking process, check out the Full Recipe. To cook the egg noodles, bring a pot of salted water to a boil. Add the noodles and cook them until they are al dente. This usually takes about 6-8 minutes. Once cooked, drain the noodles and transfer them to a warm pot. Cover the pot to keep them warm and prevent sticking. For a perfect sear, heat olive oil in a large skillet over medium-high heat. When the oil shimmers, add the sliced beef in small batches. Avoid crowding the pan, as this can steam the meat. Sear each side for 2-3 minutes until it has a nice brown crust. Once browned, move the beef to a plate to keep warm. In the same skillet, lower the heat slightly. Add the sliced onions and mushrooms. Sauté for about 5-7 minutes until the onions are clear and the mushrooms turn golden. Then, add minced garlic and stir for another minute. Garlic adds a rich flavor that enhances the dish. Sprinkle all-purpose flour over the onion and mushroom mix. Stir well to coat all the veggies. Cook this for about 1 minute to remove the raw flour taste. Gradually pour in beef broth while stirring constantly. This helps prevent lumps from forming. Next, add Worcestershire sauce, smoked paprika, salt, and pepper. Return the seared beef to the skillet and reduce the heat to low. Gently fold in the sour cream until everything is mixed. Heat through for about 5 minutes, stirring occasionally. Taste your sauce and adjust the seasoning if needed. To serve, spoon the creamy beef stroganoff over the warm egg noodles. Make sure to distribute the beef and sauce evenly. For a fresh touch, sprinkle finely chopped parsley on top just before serving. Consider serving with steamed vegetables or a crisp green salad for a complete meal. For more details, check the [Full Recipe]. To make a classic beef stroganoff, choose the right cut of beef. I suggest using beef sirloin or tenderloin. These cuts are tender and flavorful. Fresh ingredients are also key. Use fresh mushrooms and onions for the best taste. Fresh herbs can brighten up your dish too. One common mistake is overcooking the beef. This can make it tough and chewy. Sear the beef quickly, just until browned. Another mistake is not seasoning properly. Always season your beef and sauce with salt and pepper. This step brings out all the flavors. You can enhance your stroganoff with optional ingredients like Dijon mustard. It adds a nice tang. Also, consider using different types of mushrooms. Cremini or shiitake mushrooms can add depth. You can even mix in some caramelized onions for extra sweetness. If you want to try the complete dish, check out the Full Recipe. {{image_4}} To make a meatless beef stroganoff, you can swap out the beef for mushrooms or lentils. Both options bring a hearty texture to the dish. Use about 8 ounces of mixed mushrooms, like cremini and shiitake, for a rich flavor. For a creamy touch, substitute sour cream with cashew cream or plain yogurt. These swaps maintain the tasty essence of stroganoff while keeping it vegetarian. If you prefer chicken or turkey, simply replace the beef with 1 pound of thinly sliced chicken breast or turkey breast. Cook the meat the same way as you would the beef. For a unique twist, consider seafood. Shrimp or scallops can add a delightful taste. Just sauté them until pink and tender, then follow the same sauce-making steps. While egg noodles are classic, you can try other noodles or grains. Fettuccine, penne, or even rice can work well. If you need gluten-free options, use rice noodles or quinoa. Both choices have great textures and absorb the sauce nicely. Feel free to experiment and find what you enjoy most. For the full recipe, check out the details provided earlier. To keep your Beef Stroganoff fresh, refrigerate leftovers in an airtight container. Make sure to cool it to room temperature before sealing it. This dish stays good for 3 to 4 days in the fridge. Always check for signs of spoilage before eating. If you want to store Stroganoff for longer, freezing is a great choice. Use a freezer-safe container and leave some space at the top for expansion. For best taste, consume within 3 months. When you're ready to eat, thaw it in the fridge overnight. You can reheat Beef Stroganoff using either a microwave or stovetop. If using a microwave, heat in short bursts and stir often. If using the stovetop, do so over low heat. Always stir in a little extra sour cream to avoid separation in the sauce. This keeps it creamy and delicious. Enjoy your meal! To make Beef Stroganoff from scratch, follow these key steps: 1. Cook the noodles: Boil them until al dente. 2. Sear the beef: Cook it in batches for a nice brown crust. 3. Sauté onions and mushrooms: Make them soft and golden. 4. Create the sauce: Use flour to thicken, then add broth and seasonings. 5. Combine everything: Mix in the beef and sour cream before serving. For taste adjustments, you can add more smoked paprika or Worcestershire sauce. This adds depth and richness to the dish. Yes, you can substitute sour cream. Here are some alternatives: - Greek yogurt for a tangy flavor. - Cream cheese for a rich texture. - Heavy cream for extra creaminess. Each choice will change the flavor. Greek yogurt adds tang, while cream cheese makes it richer. Heavy cream will give it a velvety finish. Beef Stroganoff pairs great with several sides. Here are some suggestions: - Mashed potatoes: Creamy and smooth, they soak up the sauce. - Green beans: They add a nice crunch and color. - Steamed broccoli: A healthy option that balances the richness. To complete the meal experience, serve with a fresh salad or crusty bread for dipping. To adjust the recipe for larger servings, scale your ingredients. Here’s how: - Double the meat: Use 2 lbs of beef. - Increase the noodles: Use 16 oz of egg noodles. - Adjust the sauce: Use 2 cups of sour cream and broth. Cooking times may slightly change. Keep an eye on the beef as it cooks to avoid overcooking. You want it tender and juicy. Beef Stroganoff is a tasty dish that combines beef, noodles, and a creamy sauce. We covered the main ingredients, cooking steps, and helpful tips. You learned about variations, including vegetarian options and different protein choices. Remember to avoid common mistakes like overcooking the beef. Keep the flavors fresh and bold with the right ingredients. With these steps, you can make a delicious meal that everyone will enjoy. Now, go ahead and impress your family or friends with your new cooking skills!](https://lazychefmagic.com/wp-content/uploads/2025/04/49567ec5-ebea-4a1a-afe9-3abd3f8becf3.webp)
Are you ready to savor a timeless dish that warms the soul? Classic Beef Stroganoff is rich, creamy, and full

Get ready to delight your taste buds with my Grilled Vegetable and Quinoa Salad! This vibrant dish bursts with color
![- 1 ½ cups Arborio rice - 1 ½ cups mixed mushrooms (like cremini and shiitake), sliced - 1 cup heavy cream or coconut cream - ½ cup grated Parmesan cheese or nutritional yeast To make this creamy mushroom risotto, the main ingredients are key. Arborio rice is the star. This short-grain rice gives risotto its rich and creamy texture. Mixed mushrooms add depth and umami flavor. You can use any blend you like, but cremini and shiitake work great together. For creaminess, heavy cream is perfect. If you want a vegan option, coconut cream is just as good. Lastly, Parmesan cheese gives that savory touch. Nutritional yeast is a great substitute for a vegan twist. - 1 medium onion, finely chopped - 2 cloves garlic, minced - 4 cups low-sodium vegetable broth - 2 tablespoons extra virgin olive oil - 1 teaspoon dried thyme - Salt and freshly ground pepper to taste - Fresh parsley, chopped (for garnish) The additional seasoning brings life to the dish. Onion and garlic create a flavorful base. They make the kitchen smell amazing too! Olive oil helps to sauté these ingredients, adding richness. Dried thyme gives a lovely herbal note. Salt and pepper allow you to adjust the taste to your liking. Finally, fresh parsley adds a pop of color and freshness to the dish. For the complete list of ingredients, check the Full Recipe. 1. Start by setting your Instant Pot to 'Sauté' mode. This mode helps build flavor. 2. Once the pot is hot, add 2 tablespoons of olive oil. Let it coat the bottom well. 1. Add 1 medium onion, finely chopped. Sauté for 3-4 minutes until clear and fragrant. 2. Next, add 2 cloves of minced garlic and 1 ½ cups of sliced mushrooms. Stir often for about 5 minutes. The mushrooms should soften and release moisture. 3. Now, stir in 1 ½ cups of Arborio rice. Toast the rice for 1-2 minutes while stirring. This step adds depth to your risotto. 1. Carefully pour in 4 cups of low-sodium vegetable broth. Add 1 teaspoon of dried thyme. Stir gently to mix everything well. 2. Secure the Instant Pot lid. Set the steam valve to sealing. Cook on 'Manual' for 6 minutes at high pressure. 3. When the time is up, let the pressure release naturally for 5 minutes. Then, do a quick release for any remaining steam. 1. Open the lid cautiously. Stir in 1 cup of heavy cream (or coconut cream) and ½ cup of grated Parmesan cheese (or nutritional yeast). Mix until creamy. 2. Taste your risotto and adjust seasoning with salt and freshly ground pepper as needed. 3. Let the risotto sit for a few minutes. This allows it to thicken before serving. For the complete recipe, check out the [Full Recipe]. Stirring is key to a great risotto. It helps release the rice's starch. This gives the dish its creamy texture. You should stir often while cooking. If you prefer a thicker risotto, cook it for an extra minute. For a lighter texture, reduce the cooking time. You can use many types of mushrooms for more flavor. Try shiitake, portobello, or oyster mushrooms. Each type adds a unique taste. Adding white wine before the broth boosts the flavor. The wine adds depth and a hint of acidity. Just let it simmer for a minute to cook off the alcohol. Serve the risotto in shallow bowls. This showcases the creamy texture. Garnish with fresh parsley for color. Adding extra Parmesan cheese on top makes it look fancy. You can also place a few sautéed mushroom slices on top. This adds a nice touch and makes the dish pop. For the full recipe, check out the details above. {{image_4}} To make this creamy mushroom risotto vegan, you can use plant-based substitutes. Instead of heavy cream, try coconut cream. It gives a rich flavor and creamy texture. For cheese, use nutritional yeast. It adds a cheesy taste without dairy. If you want to add protein, chicken or shrimp work well. Cook them separately and mix them in after the risotto is done. For a vegetarian option, consider adding chickpeas or lentils. These will enhance the dish and keep it filling. Seasonal vegetables can change the taste of your risotto. In spring, add peas or asparagus. In the fall, try butternut squash or pumpkin. For special occasions, include herbs like sage or rosemary. They add a festive touch and enhance the flavor. For more details, check out the Full Recipe. You can keep your creamy mushroom risotto in the fridge for about 3 to 4 days. To store it well, use an airtight container. This keeps it fresh and prevents strong odors from mixing. Before sealing the container, let the risotto cool for a few minutes. This step helps avoid condensation, which can make the risotto soggy. If you want to save risotto for later, freezing is a great option. First, let the risotto cool completely. Then, scoop portions into freezer-safe bags. Press out as much air as you can before sealing. Label the bags with the date. For best taste, use it within 1 to 2 months. When you are ready to eat, thaw it overnight in the fridge. You can reheat risotto on the stovetop or in the microwave. If you choose the stovetop, add a splash of broth or water while heating. This will help bring back the creamy texture. Stir often to heat it evenly. In the microwave, use a microwave-safe bowl. Cover it with a damp paper towel to keep moisture in. Heat in short bursts, stirring in between. Always check that it’s heated through before serving. Traditionally, risotto requires a lot of stirring. This helps the rice release its starch. The stirring creates the creamy texture we love. However, the Instant Pot changes the game. You can make risotto without constant stirring. The sealed environment allows for even cooking. You’ll still enjoy a creamy dish with less effort. You can use other types of rice, but Arborio is best. Arborio rice has high starch content. This gives risotto its unique creaminess. If you want to try other types, consider Carnaroli or Vialone Nano. They also work well in risotto. You can use long-grain rice, but the texture will differ. It may not be as creamy or rich. Yes, this risotto is gluten-free. All the ingredients are naturally free from gluten. The Arborio rice, broth, and cream do not contain gluten. If you want to be extra safe, check the broth label. Some brands may add gluten ingredients. To keep it gluten-free, use certified gluten-free broth. Enjoy your creamy mushroom risotto worry-free! This blog post covered how to make risotto in an Instant Pot. We explored key ingredients like Arborio rice and mushrooms, along with step-by-step instructions. Tips on perfecting texture and enhancing flavor added depth. We also shared variations for vegan options and protein additions. Remember, you can customize this dish easily. Your risotto will delight everyone at the table. Try it today, and enjoy a creamy, delicious meal!](https://lazychefmagic.com/wp-content/uploads/2025/04/d2885559-c7c9-4e3a-bd13-e87d1d5f5fdb.webp)
Are you ready to impress your taste buds with a creamy sensation? This Instant Pot Creamy Mushroom Risotto is not
