Skip to content
DisclaimerTerms Of UseGDPR PolicyCookie Policy

lazychefmagic

  • Home
  • Drinks
  • Appetizers
  • Dinner
  • Dessert
  • About
  • Contact
  • Privacy Policy
DisclaimerTerms Of UseGDPR PolicyCookie Policy

NO-ING-IMG

For this dish, you'll need: - 1 pound flank steak, thinly sliced against the grain - 1 cup jasmine rice - 2 cups beef broth - 1 red bell pepper, sliced into strips - 1 green bell pepper, sliced into strips - 1 onion, thinly sliced - 3 cloves garlic, minced To bring out the flavors, gather these items: - 2 tablespoons soy sauce - 1 tablespoon cornstarch - 1 tablespoon vegetable oil - 1 tablespoon chili garlic sauce - 1 teaspoon sugar - Salt and pepper, to taste For a beautiful finish, consider these garnishes: - Sliced green onions - Toasted sesame seeds Each ingredient plays a key role in making this dish shine. The flank steak gives a rich, meaty flavor. The bell peppers add color and crunch. Jasmine rice serves as the perfect base, soaking up the sauce. Don't skip the seasonings; they pull everything together. I love the touch of chili garlic sauce for a little kick! To start, rinse the jasmine rice under cold water until it runs clear. This helps remove excess starch. Next, combine the rinsed rice and beef broth in a medium pot. Bring it to a boil on high heat. Once boiling, reduce the heat to low and cover with a lid. Let it simmer for 15 minutes. The rice will become tender as it absorbs the broth. After 15 minutes, remove it from heat and let it sit for 5 more minutes. Fluff it gently with a fork before serving. Now, let’s marinate the flank steak. In a mixing bowl, put the thinly sliced beef. Add soy sauce, cornstarch, and a pinch of salt and pepper. Toss the beef well to coat it evenly. Let it marinate for at least 10 minutes. This step makes the meat more flavorful and tender. For the next step, heat vegetable oil in a large skillet or wok over medium-high heat. Once hot, add the marinated beef in a single layer. Allow it to sear without stirring for 2 to 3 minutes. This helps achieve a crispy texture. After 3 minutes, flip the beef and cook for another 2 minutes until it’s browned and crispy. Once done, transfer the beef to a plate. In the same skillet, add sliced onions and bell peppers. Sauté them for 3 to 4 minutes. You’ll know they are ready when the onions turn translucent and the peppers soften. Next, add minced garlic to the skillet and sauté for an extra minute. Be careful not to burn the garlic, as it can turn bitter. Now it’s time to bring everything together. Return the crispy beef to the skillet. Drizzle chili garlic sauce over the beef and vegetables. Sprinkle sugar on top. Stir well to mix all the ingredients. Cook for an additional 2 minutes to heat everything through. Adjust the seasoning with salt and pepper if needed. To serve, scoop fluffy jasmine rice onto each plate. Top it with the flavorful chili beef and vegetable mixture. For a nice touch, garnish with sliced green onions and toasted sesame seeds. This adds color and crunch to your dish. Enjoy your delicious meal! To get crispy beef, start by slicing flank steak thinly. Always cut against the grain for tender bites. Marinate the beef in soy sauce and cornstarch for flavor and crispness. Let it sit for at least 10 minutes. Heat your skillet over medium-high heat and add vegetable oil. When the oil is hot, add the beef in a single layer. This helps create a nice sear. Don’t stir for the first few minutes. Just let it cook for 2-3 minutes. Then flip and cook for another 2 minutes. This method makes it crispy and golden. Cooking jasmine rice is simple and rewarding. First, rinse the rice under cold water until the water runs clear. This removes excess starch and helps it cook better. Use beef broth instead of water for added flavor. Combine the rinsed rice and broth in a pot, then bring it to a boil. Once boiling, reduce the heat to low and cover. Let it simmer for about 15 minutes. After the rice absorbs all the liquid, remove it from heat. Let it sit for 5 minutes before fluffing it with a fork. This ensures each grain stays separate and fluffy. To enhance flavor, adjust your seasonings as you cook. Start with the base flavors from soy sauce and chili garlic sauce. Taste as you go. You can add more salt, pepper, or even a splash of vinegar for tang. If you like it spicy, add more chili garlic sauce or fresh chilies. For sweetness, a little extra sugar can balance the heat. Don’t forget to garnish with toasted sesame seeds and green onions. They add a fresh finish and a nice crunch. Adjusting these elements helps make the dish your own! {{image_4}} You can easily make a vegetarian version of crispy chili beef rice by using tofu. Tofu absorbs flavors well and gives a nice chewy texture. Start with firm or extra-firm tofu. Cut it into cubes and press it to remove excess water. - Ingredients: - 1 pound firm tofu, cubed - Follow the same marinade with soy sauce and cornstarch - Use the same vegetables: bell peppers, onions, and garlic Marinate the tofu just like the beef. Heat oil in the skillet and crisp the tofu cubes until golden brown. Sauté the same vegetables, then mix in the crispy tofu. The dish will still be tasty and satisfying. To make this dish gluten-free, substitute soy sauce with tamari. Tamari offers a similar flavor without gluten. - Ingredients: - 1 pound flank steak (or tofu for a vegetarian option) - Replace regular soy sauce with tamari - Use the same beef broth or a gluten-free broth Follow the same steps for cooking. Your dish will remain delicious while catering to gluten-free diets. If you love heat, you can amp up the spice in your crispy chili beef rice. - Ingredients: - Add extra chili garlic sauce to your liking - Include sliced fresh chili peppers, like jalapeños or Thai chilis - Consider a sprinkle of red pepper flakes for additional heat Mix these spicy items in with the beef and veggies. This will elevate the flavor and give your dish a fiery kick. Enjoy your spicy creation! To store your Crispy Chili Beef Rice, let it cool first. Use an airtight container to keep it fresh. You can keep it in the fridge for up to three days. Make sure to separate the rice from the beef if you want them to stay fresh longer. When you're ready to enjoy leftovers, use the microwave or a skillet. If using a microwave, heat in 30-second bursts. Stir in between to heat it evenly. If you prefer a skillet, add a splash of water and heat over low heat. This helps to keep the rice fluffy and the beef juicy. If you want to freeze the dish, it’s best to store the beef and rice separately. Place them in freezer-safe bags or containers. This way, they last up to three months. To reheat, let them thaw overnight in the fridge. Then, follow the reheating instructions above for the best taste. Yes, you can use other cuts. Sirloin or ribeye work well too. Choose cuts that are tender and have some fat. This will help the beef stay juicy and flavorful when cooked. To add more spice, increase the chili garlic sauce. You can also add fresh chopped chili peppers. If you like it really hot, sprinkle some red pepper flakes on top. You can serve this dish with steamed broccoli or a side salad. A simple cucumber salad adds a nice crunch. You can also pair it with egg rolls for a fun twist. The jasmine rice takes about 15 minutes to cook. After boiling, let it simmer on low heat. Once done, let it sit for 5 minutes before fluffing. If you don’t have chili garlic sauce, use sriracha or hot sauce. You can mix minced garlic with your favorite hot sauce for a similar taste. Adjust the amount to suit your spice level. In this blog post, I covered all you need to make Crispy Chili Beef Rice. You learned about the key ingredients, from the steak to seasonings. I shared step-by-step instructions to guide you through cooking. Tips for crispy beef and flavor enhancements were included. I also explored fun variations, storage tips, and answered common questions. Enjoy this delicious dish, knowing you can adapt it to your taste!

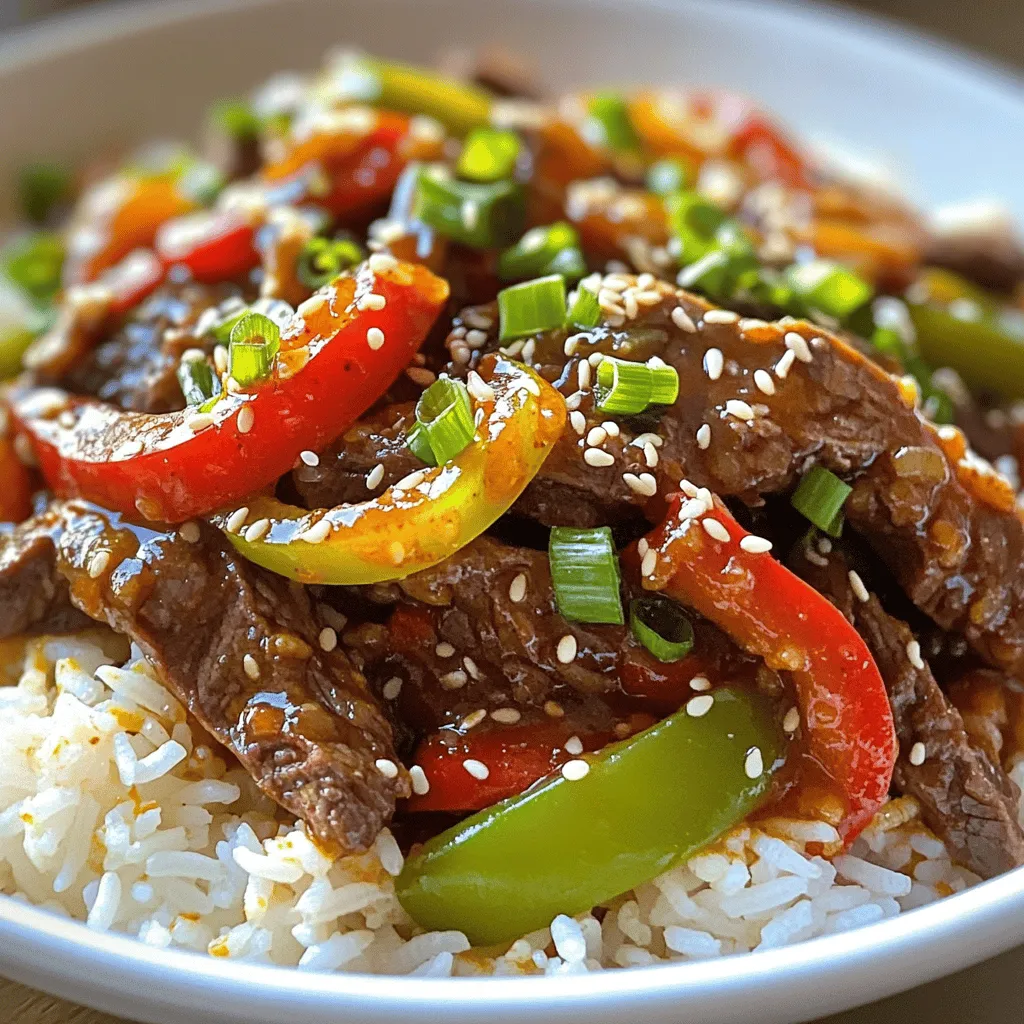
Crispy Chili Beef Rice Flavorful and Easy Dinner Dish

If you’re looking for a quick, tasty dinner, Crispy Chili Beef Rice is perfect! This dish combines tender beef, fragrant

- 1 sheet of puff pastry, thawed - 1 cup deli ham, diced - 1 cup shredded cheese (cheddar or Gruyère) - 1 tablespoon Dijon mustard - 1 egg, beaten (egg wash) - Salt and black pepper to taste - Fresh chives for garnish - Baking sheet - Parchment paper - Mixing bowl - Pastry brush To start, gather your ingredients. You need just a few simple items to create these tasty ham and cheese puffs. Make sure your puff pastry is thawed before you begin. It should feel soft and pliable, making it easy to work with. Next, for the filling, choose your cheese. Cheddar gives a sharp taste, while Gruyère adds a rich, nutty flavor. Deli ham adds a savory touch; diced pieces mix well with cheese and mustard. The mustard not only adds flavor but also helps bind the filling. You will need a few tools as well. A baking sheet lined with parchment paper keeps your puffs from sticking. A mixing bowl is essential for combining your filling ingredients. A pastry brush helps spread the egg wash for that golden finish. With your ingredients and tools ready, you are set to create a delicious snack. First, preheat your oven to 400°F (200°C). This step is key for getting the perfect puff. Next, line a baking sheet with parchment paper. This helps the puffs not stick. On a lightly floured surface, roll out the thawed puff pastry. This will create a smooth texture. Use a knife or pizza cutter to cut the pastry into 4 equal squares. In a mixing bowl, combine 1 cup of diced deli ham, 1 cup of shredded cheese, and 1 tablespoon of Dijon mustard. Mix these ingredients well for a balanced flavor. Season the mixture with salt and black pepper to taste. This enhances the overall taste and brings out the flavors. Take each pastry square and place about a tablespoon of the filling in the center. Be careful not to overfill, as this can lead to a mess. Fold each corner of the pastry square towards the center. This creates a pocket that holds the filling. Press the edges firmly to seal, making sure no filling escapes during baking. Using a pastry brush, coat the tops of the filled puffs with the beaten egg. This gives them a lovely golden color. Place the sealed pastries on the prepared baking sheet, leaving space between them. Bake in the preheated oven for about 15 to 20 minutes. Keep an eye on them until they are puffed and golden brown. After baking, let them cool for a few minutes before serving. Optionally, sprinkle with finely chopped chives for a fresh touch. - How to avoid overfilling: When you add the filling, use only a tablespoon. Too much filling makes sealing hard. Ensure the edges are clear so they can stick well. This keeps the filling inside while baking. - Tips for achieving golden color: Use the beaten egg wash on top of each puff. This gives a shiny, golden look. Bake them until they are puffed and brown. Keep an eye on them in the oven to catch the perfect color. - Best ways to present Ham & Cheese Puffs: Place your puffs on a lovely platter. A wooden board adds charm. You can sprinkle chives on top for color. This makes your dish look fresh and inviting. - Recommended dips and sides: Serve with a small bowl of Dijon mustard for dipping. It adds a kick to each bite. Pair with a light salad or fresh veggies for a balanced meal. Enjoy the mix of flavors! {{image_4}} You can switch up the cheese in your puff pastry. Instead of cheddar or Gruyère, try these: - Mozzarella: This cheese melts well and adds a nice stretch. - Fontina: A creamy choice that brings a rich flavor. - Goat Cheese: Adds a tangy taste and creamy texture. Each of these cheeses brings a unique twist, making your dish even more delightful. Enhance your ham and cheese puffs with extra flavors. Here are some fun ideas: - Spinach: Fresh or sautéed spinach adds color and nutrition. - Mushrooms: Use cooked mushrooms for an earthy taste. - Red Peppers: Chopped roasted red peppers give a sweet flavor. - Fresh Herbs: Basil or parsley can brighten your dish. These add-ins elevate your puffs and make them even more enjoyable. If you need a gluten-free option, there are great substitutes for puff pastry. Consider using: - Gluten-free phyllo dough: This option has a similar flaky texture. - Almond flour pastry: A nutty flavor that is gluten-free and tasty. - Store-bought gluten-free puff pastry: Many brands offer a ready-to-use option. These alternatives let everyone enjoy this savory delight without worry. To keep your Ham & Cheese Puff Pastry fresh, place the leftovers in an airtight container. This helps prevent them from drying out. If you don’t have a container, you can wrap each puff tightly in plastic wrap. Store them in the fridge for up to three days. Avoid stacking them to keep their shape intact. When you want to enjoy your leftovers, you can reheat them easily. The best way is to use an oven. Preheat your oven to 350°F (175°C). Place the puffs on a baking sheet. Heat them for about 10-15 minutes or until they feel warm and crispy again. You can also use an air fryer at 350°F for a quick reheat. This keeps the puff pastry nice and flaky. Avoid using a microwave, as it can make them soggy. Yes, you can prepare these puffs in advance. Here are some tips: - Prepare the filling: You can mix the ham, cheese, and mustard a day ahead. - Assemble: Fill and fold the pastries, but don’t bake them yet. - Store: Keep them in the fridge, covered with plastic wrap. - Bake later: When ready, bake them straight from the fridge. Just add a few minutes to the baking time. For the best flavor, use good quality deli ham. Here are some options: - Honey ham: Adds a sweet touch. - Black forest ham: Gives a rich, smoky flavor. - Smoked ham: Offers a deep, savory taste. Choose the one you love most for your puff pastry! Yes, you can freeze these tasty puffs! Follow these steps for best results: - Unbaked puffs: Assemble them, then freeze before baking. - Wrap well: Use plastic wrap or a freezer bag to prevent freezer burn. - Bake from frozen: When ready, bake them without thawing. Just add a few extra minutes to the baking time. This way, you’ll have a quick snack ready whenever you want! You learned how to make Ham & Cheese Puffs from simple ingredients. Using puff pastry, ham, and cheese, you can create tasty snacks. Remember to follow the steps for preparing, filling, and baking. Tips for perfecting your puffs and storage info will help you succeed. Feel free to get creative with cheese or add veggies. Whether serving them at a party or enjoying a snack, these puffs are sure to impress. Happy cooking!

Savory Ham & Cheese Puff Pastry Delight Recipe

Get ready for a tasty treat that’s easy to make! My Savory Ham & Cheese Puff Pastry Delight Recipe combines

- 2 lbs lean beef chuck roast - 1 cup low-sodium soy sauce - 1/2 cup honey or maple syrup - 1/4 cup rice vinegar - 4 cloves garlic, minced - 1 tablespoon ginger, freshly grated - 2 green onions, chopped (plus additional for garnish) - 1 carrot, julienned - 1 bell pepper (your choice of color), sliced into strips - 1 cup broccoli florets - 1 teaspoon red pepper flakes - 1 teaspoon cornstarch mixed with 1 tablespoon water - Cooked brown rice or quinoa for serving The recipe has simple and healthy ingredients. The beef chuck roast is a great choice. It becomes tender and flavorful in the crockpot. Low-sodium soy sauce keeps the dish healthy. Honey or maple syrup adds natural sweetness. Rice vinegar brightens the flavors. Fresh garlic and ginger give the dish warmth and depth. Green onions add a nice crunch. Carrots, bell peppers, and broccoli provide bright colors and nutrients. You can adjust the spice level with red pepper flakes. Cornstarch is optional to thicken the sauce. Serve it over brown rice or quinoa for a complete meal. This recipe is flexible. You can swap in your favorite veggies. Try different proteins like chicken or tofu for variety. Enjoy the process of cooking and make it your own! {{ingredient_image_2}} To start, grab a large mixing bowl. Add these ingredients: - 1 cup low-sodium soy sauce - 1/2 cup honey or maple syrup - 1/4 cup rice vinegar - 4 cloves garlic, minced - 1 tablespoon ginger, freshly grated - 1 tablespoon sesame oil - 2 green onions, chopped - 1 teaspoon red pepper flakes (optional) Whisk these together until smooth. Make sure there are no lumps. This sauce will coat the beef and bring it to life. Next, take your trimmed beef chuck roast. Place it in the crockpot. Pour the sauce over it evenly. Make sure every part of the beef is coated. Then, it’s time for the veggies. Add: - 1 carrot, julienned - 1 bell pepper, sliced into strips - 1 cup broccoli florets Spread the vegetables around the beef. This helps them cook evenly. You have two choices for cooking time. For low, cook for 6-8 hours. If you choose high, cook for 4-5 hours. The beef should be tender. Use a fork to check. If it shreds easily, it’s ready. If you want a thicker sauce, remove the roast once it's done. Mix 1 teaspoon of cornstarch with 1 tablespoon of water. Stir this into the sauce in the crockpot. Cook on high for another 10 minutes to thicken it up. Finally, shred the beef and mix it back in, ensuring it's well coated. To make this dish your own, tweak the flavors. You can add more honey or maple syrup for sweetness. If you like it spicy, add more red pepper flakes. Taste the sauce before cooking. Adjust it to suit your palate. Shredding beef can be tricky. To make it easy, let the beef cool for a few minutes. Use two forks to pull apart the meat. It should fall apart easily. For a finer shred, chop it a bit after pulling. This dish is packed with nutrients. Lean beef provides protein and iron. Broccoli adds fiber and vitamins. Carrots give you beta-carotene, good for your eyes. Using low-sodium soy sauce cuts down on salt. Opt for honey or maple syrup as a natural sweetener. These choices help keep the meal healthy. Serve this Korean beef over brown rice or quinoa. Both are healthy and filling. They add a nice texture, too. For extra flair, garnish with chopped green onions. You can also add sesame seeds for a nutty crunch. A sprinkle of fresh cilantro can enhance the flavor and look. Pro Tips Choose the Right Cut: For the best flavor and tenderness, always opt for a well-marbled beef chuck roast. The fat will render down during cooking, keeping the meat juicy. Customize Your Veggies: Feel free to swap in your favorite vegetables such as snap peas or mushrooms to add variety and nutrition to the dish. Marinate for More Flavor: If time allows, marinate the beef in the sauce for a few hours or overnight in the refrigerator for even more depth of flavor. Serve with Toppings: Enhance your dish by serving with pickled vegetables or a sprinkle of sesame seeds for an authentic Korean touch. {{image_4}} You can easily swap the beef for chicken or tofu. Chicken cooks well in the crockpot and tastes great with the same sauce. If you want a vegan option, use firm tofu. Just cut it into cubes and add it to the sauce. Tofu soaks up flavors well, making it a tasty choice. You can add seasonal veggies to this dish. Think about using zucchini, snap peas, or mushrooms. These add different flavors and colors. You can also use frozen vegetables if fresh ones aren't available. Just make sure to add them during the last hour of cooking so they don't get too soft. If you have kids, you may want to tone down the spice. Skip the red pepper flakes or use just a pinch. For those who like heat, you can add extra spices. Try sriracha or chili paste for a kick. Adjust the heat to match your taste. Homemade Korean beef lasts in the fridge for up to four days. Store it in an airtight container. This keeps it fresh and tasty. I like to let it cool before sealing it. This helps prevent condensation and sogginess. You can freeze cooked Korean beef for up to three months. Just place it in a freezer-safe bag. When ready to eat, thaw it overnight in the fridge. To reheat, warm it on the stove or in the microwave. Add a splash of water if it seems dry. To save time during busy weeks, prepare this dish ahead. You can cook a big batch and store it. Divide it into single servings for easy meals. This helps make weeknight dinners quick and stress-free. Enjoy your healthy Korean beef any day! You should cook beef in a crockpot for 6-8 hours on low or 4-5 hours on high. Cooking times may vary based on the size of your beef cut. Always check for tenderness. The beef should shred easily with a fork when done. This slow cooking makes the meat juicy and full of flavor. Yes, you can use other cuts like brisket or round. Each cut has its own flavor and texture. Chuck roast is great for its tenderness and taste, but alternatives work well, too. Adjust the cooking time based on the cut you choose. Lean cuts may cook faster, while fattier cuts may need longer. You can serve this dish with cooked brown rice or quinoa for a healthy base. Steamed veggies add color and nutrients. Try adding a side salad for freshness. You can also top with extra green onions or sesame seeds for added flavor. Enjoy customizing your plate with your favorite sides! This post covered tasty Korean beef in a crockpot. You learned about key ingredients, like beef and vegetables. I shared step-by-step instructions and helpful tips for the best results. Remember, you can customize your dish with different proteins and veggies. Store leftovers correctly to keep them fresh. Experiment with flavors to make the recipe your own. Enjoy your cooking journey and the delicious meals ahead. Each preparation is a chance to create something special!

Healthy Crockpot Korean Beef Easy Dinner Option

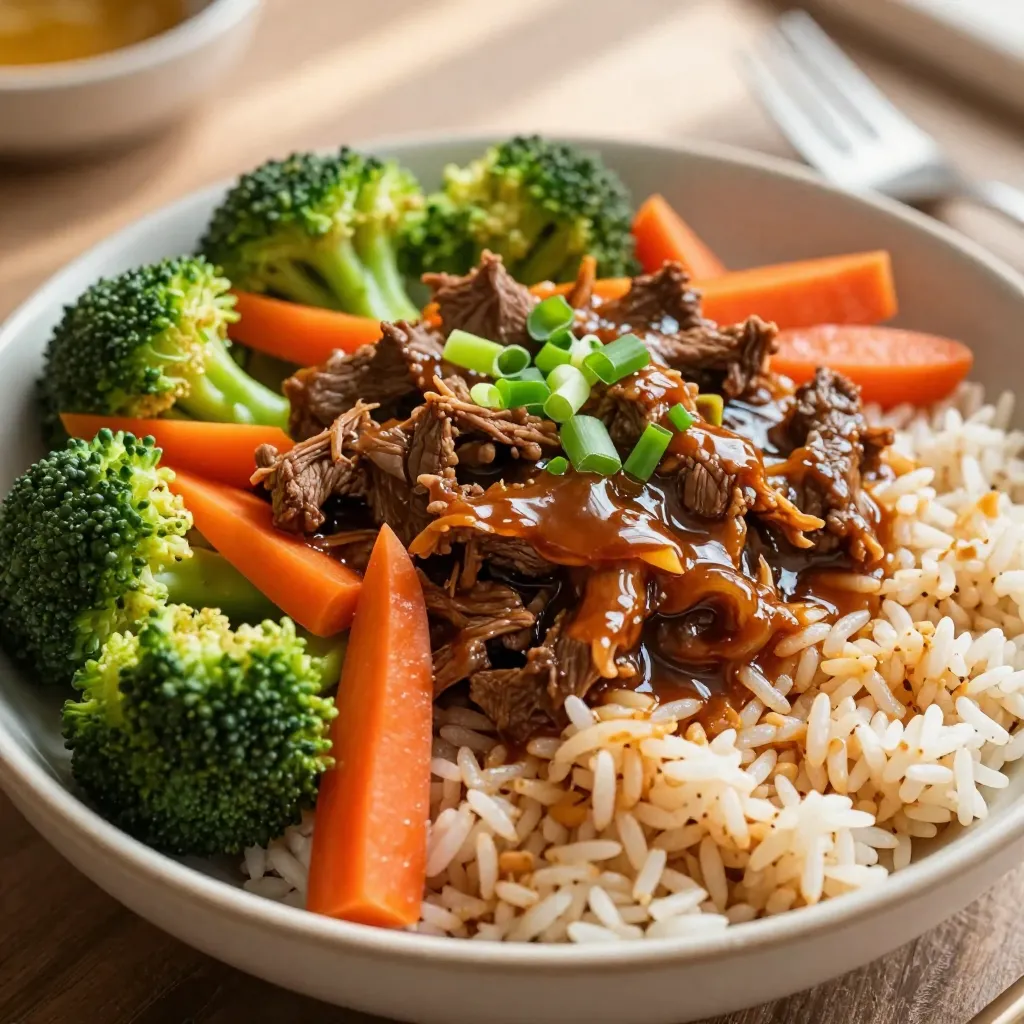
Looking for a quick and tasty dinner idea? You’ve come to the right place! My Healthy Crockpot Korean Beef recipe

- 2 cups frozen hashbrowns, thawed - 1 large egg - 1/2 cup shredded cheese (cheddar or mozzarella) - 1/4 cup green onions, finely chopped - 1/4 teaspoon garlic powder - 1/4 teaspoon onion powder - Salt and freshly ground black pepper to taste - Cooking spray or oil for the waffle maker For this savory hashbrown chaffle, you need just a few simple ingredients. Start with frozen hashbrowns. Thaw them out so they mix well. A large egg helps bind everything together. I love using shredded cheese. You can pick cheddar or mozzarella based on what you like. Green onions add a nice crunch and flavor. Next, we have seasoning. Garlic powder and onion powder bring in extra taste. Don’t forget salt and black pepper. You can add these to your liking. Finally, grab some cooking spray or oil. This helps the chaffles cook without sticking to the waffle maker. When you gather these ingredients, you set yourself up for a tasty treat. This chaffle is not just fun to make, but also so easy to customize with your favorite flavors! First, preheat your waffle maker. Follow the manufacturer's guidelines for the best results. This step is key. A hot waffle maker cooks the chaffles evenly and keeps them crispy. Next, grab a large mixing bowl. Combine the thawed hashbrowns, one egg, shredded cheese, and finely chopped green onions. Mix well to combine. Then, add in the garlic powder, onion powder, salt, and black pepper. Stir everything until it’s nicely blended. Seasoning is crucial for flavor. Now, spray or oil the waffle maker. This prevents the chaffles from sticking. Use a measuring cup to scoop out a portion of the hashbrown mixture. Aim for about 1/2 to 3/4 cup. Place it in the center of the preheated waffle maker. Close the lid and cook for 5-7 minutes. Look for a golden brown color. This means they are ready. Carefully use a fork or tongs to remove the chaffle. Avoid burning yourself! Repeat with the remaining mixture until all chaffles are cooked. Enjoy! - For a tasty topping, try sour cream, salsa, or avocado. - Stack your chaffles on a nice plate for a great look. - Garnish with chopped green onions for a pop of color. - Always preheat your waffle maker for the best chaffles. - Taste your mixture before cooking to adjust the seasoning. - Use 1/2 to 3/4 cup of the mixture for each chaffle. - Cook for 5-7 minutes until golden brown for perfect results. - Make sure to keep an eye on the time for even cooking. {{image_4}} You can switch up the cheese in your hashbrown chaffle. Mozzarella gives a nice stretch. Pepper jack adds a kick of spice. Cheddar is rich and sharp. Experiment with what you love most. Adding veggies can boost flavor and nutrition. Try finely chopped peppers for a sweet crunch. Spinach adds a healthy green twist. Jalapeños bring a spicy punch. Mix and match to find your favorite combo. Want a sweet chaffle? Swap out the savory ingredients. Use mashed bananas or applesauce instead of hashbrowns. Add cinnamon and a splash of vanilla. Top with maple syrup or fresh fruit. Enjoy a fun twist on the classic chaffle! To store leftover chaffles, wait until they're cool. Place them in an airtight container. You can keep them in the fridge for up to 3 days. If you want to enjoy them later, wrap each chaffle in plastic wrap before placing them in the container. This keeps them fresh and tasty. Freezing chaffles is simple. Make sure they cool down completely first. Layer them between parchment paper in a freezer-safe bag or container. This prevents them from sticking together. You can freeze them for up to 2 months. When you're ready to eat, just pull them out and reheat. To keep your chaffles crispy, use an oven or toaster oven. Preheat your oven to 375°F (190°C). Place the chaffles on a baking sheet for about 10 minutes. You can also use an air fryer at 350°F (175°C) for about 5 minutes. This method crisps them up nicely without losing flavor. Chaffles are delicious waffles made from cheese and eggs. They became popular in low-carb diets, especially among keto followers. The name is a mix of “cheese” and “waffle.” Chaffles are crispy and versatile. You can eat them sweet or savory. They offer a great way to enjoy classic waffle shapes without many carbs. Yes, you can make chaffles ahead of time. They store well in the fridge. After cooking, let them cool down. Place them in an airtight container. They last for about three days. You can also freeze chaffles for longer storage. Use parchment paper between each chaffle when freezing. This keeps them from sticking together. When you are ready to eat, just reheat them in a toaster or oven. To make gluten-free chaffles, use gluten-free hashbrowns. Many brands have options that fit this need. Check the label to be sure. You can also use gluten-free flour or almond flour as a binder. These substitutions work well and keep the chaffle tasty. Always verify ingredients to ensure they fit your dietary needs. You learned how to make delicious chaffles using simple ingredients. We covered the steps for mixing, cooking, and serving these tasty bites. You can customize them with different cheeses and veggies for more flavor. Storing them is easy, too, whether in the fridge or freezer. Now, you have all you need to impress at your next meal. Enjoy experimenting with this fun recipe and make it your own!

Savory Hashbrown Chaffle Simple and Tasty Recipe

Looking for a quick and delicious recipe? Try this Savory Hashbrown Chaffle! With just a few simple ingredients, you can

- 1 can (15 oz) chickpeas, drained and rinsed - 2 cups broccoli florets (fresh or frozen) - 2 tablespoons sesame oil, divided - 1 tablespoon fresh ginger, finely grated - 3 cloves garlic, minced (about 1 tablespoon) - 1/4 cup soy sauce (substitute tamari for gluten-free) - 2 tablespoons honey or maple syrup (for a vegan option, use maple syrup) - 1 tablespoon rice vinegar - 1 tablespoon cornstarch - Salt and pepper to taste Chickpeas and broccoli are the stars of this dish. Chickpeas give a hearty feel. They are rich in protein and fiber. Broccoli adds great color and crunch. It boosts vitamins, too. Together, they make a healthy meal. Sesame oil and soy sauce bring depth to the flavor. Sesame oil has a nutty taste. It makes the dish rich and fragrant. Soy sauce adds a savory umami touch. You can use tamari for a gluten-free option. Honey or maple syrup adds sweetness. This balance is key in the sauce. It helps cut the saltiness of soy sauce. Use honey for a richer flavor. Maple syrup is perfect for a vegan choice. - 2 tablespoons sesame seeds - 2 green onions, chopped (for garnish) Garnishes make your meal visually appealing. Sesame seeds add a nice crunch. They also enhance the nutty flavor. Green onions give freshness and color. This final touch makes the dish pop. - Heating Sesame Oil Heat 1 tablespoon of sesame oil in a large skillet over medium heat. This oil gives great flavor to the chickpeas. - Sautéing Chickpeas Once the oil is hot, add 1 can of drained and rinsed chickpeas. Sauté them for about 5 minutes. Stir them often until they turn golden and crispy. Season with salt and pepper to taste. After cooking, set the chickpeas aside on a plate. - Sautéing Instructions In the same skillet, add 1 tablespoon of sesame oil. Let it heat for about a minute. Next, add 2 cups of broccoli florets. Sauté the broccoli for 3 to 4 minutes. Stir frequently until the broccoli turns bright green but stays crunchy. - Seasoning Tips Sprinkle a pinch of salt and pepper over the broccoli. This simple step makes the broccoli taste fresh and vibrant. - Combining Ingredients In a small bowl, mix together 1/4 cup of soy sauce, 2 tablespoons of honey (or maple syrup for vegan), 1 tablespoon of rice vinegar, 1 tablespoon of cornstarch, the grated ginger, and minced garlic. - Whisking for Smoothness Whisk the mixture until smooth. Make sure the cornstarch dissolves fully. This sauce will bring all the flavors together beautifully. Achieving Crispy Chickpeas To get crispy chickpeas, start with drained and rinsed beans. Heat the sesame oil before adding the chickpeas. Sauté them for about five minutes. Stir them often to prevent sticking. Cook until they turn golden brown. Season with salt and pepper for extra flavor. Keeping Broccoli Crunchy For crunchy broccoli, cook it for only three to four minutes. Use high heat and stir often. This keeps the bright green color and crisp texture. A little salt and pepper will enhance its taste without making it mushy. Adding Spices You can boost the flavor with spices. Try adding a pinch of red pepper flakes for heat. A dash of smoked paprika adds an earthy taste. Experimenting with spices can make your dish unique and exciting. Adjusting Sweetness The sweetness comes from honey or maple syrup. You can adjust it to your taste. If you prefer less sweetness, reduce the amount of honey. For a more intense flavor, you can add a bit more. Taste as you go for the best balance. Pairing with Rice or Quinoa Serve your Sticky Sesame Chickpeas and Broccoli over rice or quinoa. This adds a nice base to soak up the sauce. Brown rice or quinoa adds a nutty flavor, which pairs well with the dish. Creative Serving Ideas Get creative with your plating. Use bowls for a cozy look. Add sesame seeds and green onions for a fresh touch. You can also serve it in lettuce cups for a fun, light option. This makes it easy to eat and adds a crunch! {{image_4}} You can easily make this dish vegan. Just swap honey for maple syrup. The maple syrup brings a sweet touch. It blends well with the sesame oil and soy sauce. This small change keeps the dish tasty and plant-based. You still get that sticky, rich flavor without losing the essence of the recipe. Make sure to check the label on your soy sauce. Some brands may contain animal products. If you need a gluten-free version, it’s simple to modify. Use tamari instead of soy sauce. Tamari gives you the same great taste without gluten. Check other sauce ingredients too. Some brands of rice vinegar might contain gluten. Always read the labels. Your dish will still be full of flavor and safe for gluten-free diets. Want to mix things up? Add more veggies for color and taste. Bell peppers bring a sweet crunch. They pair well with chickpeas and broccoli. Carrots also add a nice texture and sweetness. You can slice them thin or use small pieces. Just sauté them with the broccoli. This will make your meal more colorful and nutrient-rich. Don't hesitate to get creative with your favorite vegetables! To keep your Sticky Sesame Chickpeas and Broccoli fresh, store leftovers in an airtight container. Place the dish in the fridge within two hours of cooking. It will last up to three days. This way, you can enjoy the flavors again! When reheating, use a skillet or microwave. If you use a skillet, heat it on low. Add a splash of water or broth to keep the dish moist. Stir often to avoid sticking. In a microwave, heat in 30-second bursts, stirring in between. This helps keep the chickpeas crispy and the broccoli crunchy. You can freeze this dish too! Allow it to cool completely before freezing. Transfer to a freezer-safe container or bag. It will stay good for up to three months. To thaw, move it to the fridge overnight. Reheat it in a skillet or microwave, adding a little water if needed. Enjoy your tasty meal even later! No, I do not recommend using frozen chickpeas. Canned chickpeas work best. They are soft and ready to cook. Frozen chickpeas may take longer to cook and lose texture. To change the spice level, add red pepper flakes. Start with a pinch. You can also use fresh chili peppers for more heat. If you want less spice, skip the red pepper. You can serve this dish with rice or quinoa. Both options add a nice base. You can also pair it with noodles for a different twist. For a crunchy side, serve with a salad. Yes, this recipe is perfect for meal prep. You can store it in the fridge for up to three days. Just reheat it when ready to eat. The flavors will blend even more over time. Yes, you can use other veggies. Bell peppers and carrots work well. You can also try snap peas or cauliflower. Just adjust the cooking time based on the vegetable you choose. This blog post covers how to make Sticky Sesame Chickpeas and Broccoli. We explored key ingredients, like chickpeas and sesame oil. I provided steps for prepping and cooking. Plus, I shared tips for texture, flavor, and serving ideas. You can adapt the dish for vegan or gluten-free diets too. In my opinion, this recipe is simple yet tasty. You can customize it as you like. Enjoy making this healthy meal and have fun with it!

Sticky Sesame Chickpeas and Broccoli Flavor Burst

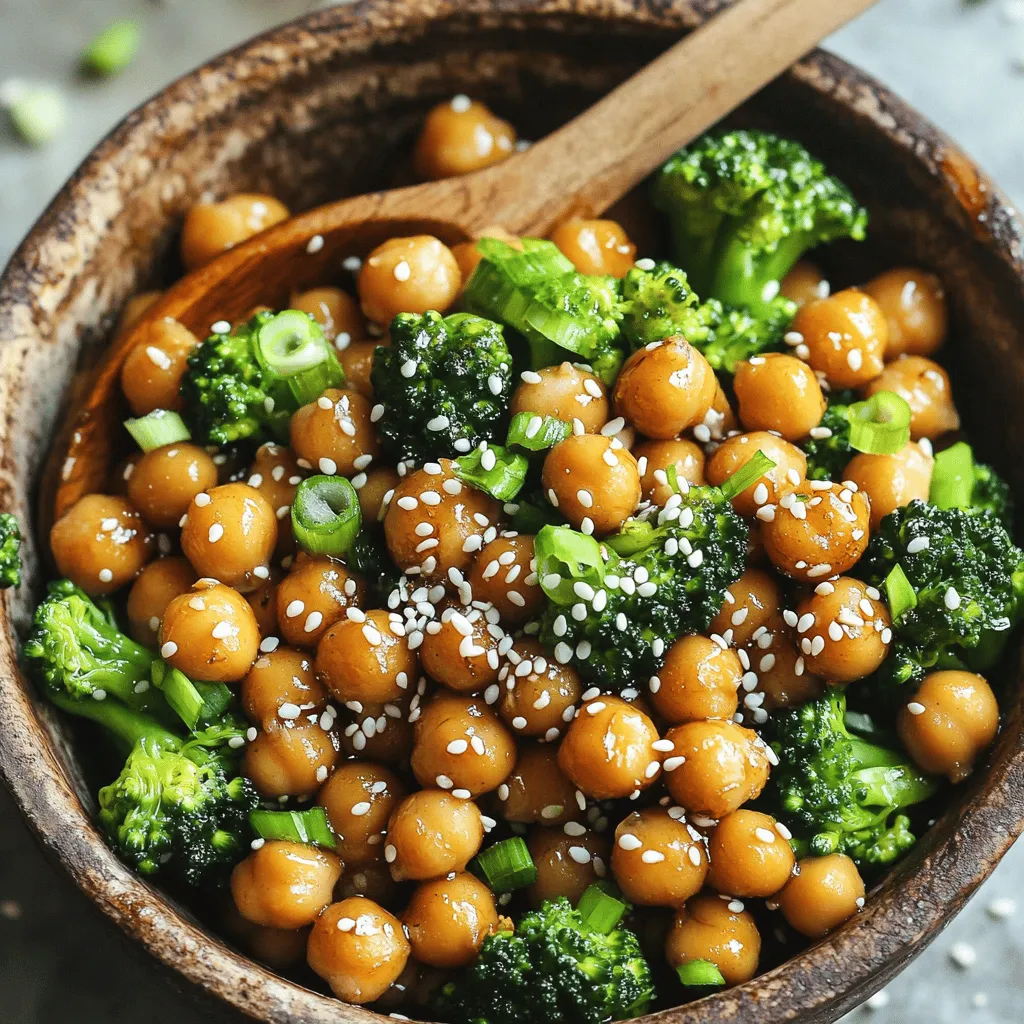
Are you ready for a flavor explosion? This Sticky Sesame Chickpeas and Broccoli dish packs a punch that’s hard to

- 2 pounds baby potatoes, halved - 1/4 cup honey - 3 tablespoons olive oil - 1 teaspoon garlic powder - 1 teaspoon smoked paprika - Salt and freshly cracked black pepper - Fresh rosemary sprigs for garnish - Optional: 1/4 cup chopped pecans or walnuts When making honey roasted potatoes, you need simple yet flavorful ingredients. Start with baby potatoes. They are small, tender, and perfect for this dish. Halve each potato to help them cook evenly. Next, grab some honey. This sweet ingredient brings a lovely glaze to the potatoes. The olive oil adds richness and helps crisp the outside. Garlic powder and smoked paprika add depth and warmth. Don’t forget salt and pepper. They boost all the flavors and make the dish pop. Fresh rosemary sprigs will make your potatoes smell great and look pretty. If you like crunch, add chopped pecans or walnuts. They give a nice texture to the dish. Gather these ingredients, and you’re ready to create a delicious side that everyone will love! {{ingredient_image_2}} Preheating your oven to 400°F (200°C) is key. A hot oven cooks the potatoes evenly. This temperature helps the honey glaze caramelize. Position the oven rack in the center for best results. To make the honey mixture, grab a large bowl. Add 1/4 cup of honey and 3 tablespoons of olive oil. Next, sprinkle in 1 teaspoon of garlic powder and 1 teaspoon of smoked paprika. Add a pinch of salt and black pepper. Whisk until the mix is smooth and well combined. Now, add 2 pounds of halved baby potatoes to the bowl. Use your hands or a spatula to toss the potatoes. Make sure each potato piece gets a nice coat of the honey mixture. This step is crucial for flavor and texture. Prepare a baking sheet by lining it with parchment paper. This helps with cleanup and prevents sticking. Spread the coated potatoes in a single layer on the sheet. Avoid overcrowding; it helps them roast evenly. Roast the potatoes for 25-30 minutes. Halfway through, take them out and toss gently. This step promotes even cooking and browning. For extra crunch, add 1/4 cup of chopped pecans or walnuts during the last 5 minutes. This gives a delightful texture. Once the potatoes are golden brown and tender, take them out. Garnish with fresh rosemary sprigs before serving. This adds aroma and a lovely look. To get the best honey roasted potatoes, avoid overcrowding the pan. Spread the potatoes out. Each piece needs space to cook well. If they are too close, steam forms. This keeps them from getting crispy. For oven settings, preheat your oven to 400°F (200°C). This temperature works best for roasting. It allows the honey to caramelize. Aim for a light golden color for perfect crispiness. Want to boost the taste? Try adding spices and herbs. Rosemary pairs well with honey and potatoes. You could also add thyme or oregano. If you like heat, sprinkle in some chili powder. Mix in a pinch of cayenne pepper for a kick. Experiment with flavors to find your favorite blend. When serving, think about presentation. Use a rustic bowl or a nice platter. Let the rosemary sprigs cascade over the edges. This looks inviting and adds a festive touch. For meal pairings, honey roasted potatoes go great with chicken or pork. They also taste wonderful with a fresh salad. Try serving them alongside grilled veggies for a colorful plate. Pro Tips Use Fresh Herbs: Fresh rosemary adds a wonderful aroma and flavor; feel free to experiment with other herbs like thyme or parsley for variation. Adjust Sweetness: Depending on your preference, you can adjust the amount of honey used. Try using maple syrup for a different flavor profile. Uniform Sizing: Ensure all potato halves are of similar size to promote even cooking and browning for a perfect roast. Pre-soak for Crispiness: Soaking the halved potatoes in cold water for 30 minutes before roasting can help achieve a crispier texture. {{image_4}} You can use many types of potatoes for this dish. I love using baby potatoes for their tender skin and creamy texture. However, golden potatoes add a buttery taste. Red potatoes give a nice color and a slight sweetness. Feel free to mix them for fun flavors and textures. If you want a change from honey, you can try maple syrup. Maple syrup brings a nice depth of flavor and enhances the dish. Agave syrup is another good choice. It is sweet and has a mild taste. These alternatives keep your dish sweet without losing the delightful glaze. To boost flavor, add lemon zest to the mix. The zest brightens the dish and adds a fresh twist. You can also explore herbs like thyme or oregano. These herbs pair well with honey and potatoes. Just sprinkle them in the glaze for an extra layer of taste. To keep your honey roasted potatoes fresh, use airtight containers. Glass or plastic containers work well. Store them in the fridge for up to four days. Make sure they cool down before sealing them. This prevents steam from making them soggy. Reheat the potatoes in the oven for the best texture. Preheat your oven to 350°F (175°C). Spread the potatoes on a baking sheet. Heat for about 10-15 minutes until hot. You can also use a microwave. Just be mindful that they may lose some crispness. To freeze honey roasted potatoes, place them in a single layer on a baking sheet. Freeze them until firm, about two hours. Then, transfer them to a freezer bag. Be sure to remove as much air as possible. They can last for up to three months in the freezer. To use, thaw them in the fridge overnight before reheating. Yes, you can make honey roasted potatoes in advance. Cook them, let them cool, and store them in the fridge. They can last for about three days. Reheat them in the oven to keep them crispy. This way, you save time on busy days. If you need a substitute for honey, try maple syrup or agave nectar. Both options will give you a sweet flavor. They work well in the recipe. Adjust the amount to taste, as some sweeteners are stronger than others. Check the potatoes after 25 minutes. They should be golden brown and tender. You can use a fork to test them. If it goes in easily, they are done. If not, give them a few more minutes. Honey roasted potatoes can be a healthy side dish. They are made with fresh potatoes and healthy fats from olive oil. However, honey adds sugar. Enjoy them in moderation as part of a balanced diet. Yes, you can use sweet potatoes instead of regular ones. They will add a different flavor and color. Cut them into similar sizes for even cooking. You might want to adjust the cooking time slightly, as sweet potatoes can roast faster. In this blog post, we covered the essential ingredients and steps to make honey roasted potatoes. You learned how to prepare the honey mixture, coat the potatoes, and roast them to perfection. We shared tips for achieving the best flavor and texture, plus ideas for storing leftovers. Remember, you can switch ingredients for more variety, like different potatoes or sweeteners. Enjoy these easy yet tasty potatoes as a side dish at any meal. Trust me, they will impress everyone at your table.

Honey Roasted Potatoes Simple and Flavorful Dish

Are you ready to impress your family with a simple yet tasty dish? Honey roasted potatoes are the perfect blend

- 4 mini pavlovas (store-bought or homemade) - 2 cups heavy whipping cream - 3 tablespoons powdered sugar - 1 teaspoon vanilla extract - 1 cup mixed berries (strawberries, blueberries, raspberries) - 1 cup mandarin oranges (canned or fresh) - 1/2 cup crushed pistachios (for garnish) - Fresh mint leaves (for garnish) - Different fruits like kiwi or banana - Flavored extracts, like almond or orange - Chocolate shavings for added richness - Other nuts like almonds or walnuts Choose berries that are bright and firm. They should not have any mushy spots. For mandarin oranges, pick segments that smell sweet and citrusy. If you’re using fresh fruit, make sure they are ripe but not overripe. For cream, look for heavy whipping cream with a high-fat content for the best texture. When selecting mint leaves, choose vibrant green ones without spots or wilting. Fresh ingredients make a big difference in flavor and look. {{ingredient_image_2}} To start, gather your ingredients. You need heavy whipping cream, powdered sugar, and vanilla extract. 1. In a large mixing bowl, pour in 2 cups of heavy whipping cream. 2. Add 3 tablespoons of powdered sugar and 1 teaspoon of vanilla extract. 3. Use an electric mixer or a whisk to whip the cream. Keep mixing until soft peaks form. 4. Be careful not to over-whip, or your cream may become grainy. You want it smooth and creamy. Now, it's time to layer the pavlova. You can use a trifle bowl or a clear glass dish. 1. Take 4 mini pavlovas and break them into bite-sized pieces. 2. Place the pavlova pieces evenly at the bottom of the bowl. This creates a tasty base layer. Next, we will assemble the trifle. This is where the fun begins! 1. On top of the pavlova, add a generous layer of mixed berries. You can use strawberries, blueberries, and raspberries. 2. Next, add 1 cup of mandarin orange segments on top of the berries. This adds a bright pop of color and flavor. 3. Carefully spoon a layer of your whipped cream over the fruit. Make sure to cover it all. 4. Repeat the layers of pavlova, fruit, and cream until you reach the top of the bowl. 5. Aim to finish with a big layer of whipped cream on top. Now, cover your trifle with plastic wrap and chill it in the fridge for at least 1 hour. This helps all the flavors mix well. Just before serving, sprinkle crushed pistachios and add fresh mint leaves for a lovely finish. Enjoy your festive dessert! When making a trifle, avoid over-whipping your cream. This can make it grainy. Aim for soft peaks, not stiff ones. Also, be gentle when layering the pavlova and fruits. If you press too hard, it can crush the layers. Finally, let your trifle chill long enough. This helps the flavors mix well and the texture to set. To get perfect whipped cream, start with cold cream. Cold cream whips better and faster. Use an electric mixer or whisk. Whip until you see soft peaks. Stop there! If you whip too long, it will turn into butter. Add powdered sugar and vanilla before whipping. This gives it a nice sweetness and flavor. For a stunning presentation, serve your trifle in clear glasses. This shows off the lovely layers. Make sure each layer is distinct and visible. You can also garnish with crushed pistachios and fresh mint leaves. These add color and a touch of elegance. If you want to personalize it, include a small card with each glass. This adds a nice touch for your guests. Pro Tips Whip the Cream Just Right: Be careful not to over-whip the cream. You want it to be smooth and creamy, so stop whipping as soon as you see soft peaks forming. Layer with Care: For a stunning presentation, ensure each layer is distinct. Use a spatula to spread the cream evenly and avoid mixing the layers together. Chill for Best Flavor: Letting the trifle chill for at least an hour allows the flavors to meld beautifully. If you can, chill it longer for an even more delicious treat. Use Fresh Ingredients: For the best flavor and presentation, choose fresh berries and mandarin oranges. They will add vibrant color and taste to your trifle. {{image_4}} You can mix up the fruit in your trifle. Instead of mixed berries and mandarins, try these fruits: - Kiwi slices add a tart touch. - Peaches bring a sweet, juicy flavor. - Pineapple chunks offer a tropical vibe. Each fruit brings its own taste and color, making your trifle unique. You can enhance the flavor of your trifle easily. Here are some ideas: - Add a splash of orange juice for a zesty note. - Mix in a bit of almond extract for a nutty flavor. - Use flavored whipped cream, like chocolate or coffee, for a twist. These enhancements can change the whole profile of your dessert. Making this trifle gluten-free or dairy-free is simple. Use these swaps: - For gluten-free, pick pavlovas made with cornstarch instead of wheat. - Use coconut cream instead of heavy whipping cream for a dairy-free version. - Choose dairy-free whipped toppings available in stores. These adjustments keep the dessert tasty while catering to different diets. To store your Christmas pavlova trifle, cover it with plastic wrap or a lid. This keeps the trifle fresh. Place it in the refrigerator. Make sure it is stored away from strong-smelling foods. This prevents unwanted flavors from mixing. You do not need to reheat the trifle. It is best served cold. If it looks a bit flat after a few hours, just add more whipped cream on top. This will refresh its look and texture. You can also add fresh fruits to perk it up. The trifle lasts for up to 3 days in the fridge. After that, the pavlova may get soggy. Avoid freezing the trifle. Freezing can ruin the texture of the cream and fruit. If you want to prepare ahead, keep ingredients separate. Assemble the trifle just before serving for the best taste and texture. Yes, you can use store-bought pavlovas. They save time and effort. Just choose mini pavlovas for easy layering. They still taste great and look lovely in the trifle. If you enjoy baking, homemade pavlovas can add a personal touch. You can chill the trifle for at least one hour. This allows the flavors to mix and the cream to set. If you want to prepare it ahead, it can chill overnight. Just remember to add garnishes right before serving for the best look. Mixed berries are perfect for decorating. Strawberries, blueberries, and raspberries add color and flavor. Mandarin oranges also make a bright addition. You can even use kiwi or pomegranate seeds for a festive touch. Fresh mint leaves on top add a nice pop too. This blog post covered everything you need for a perfect trifle. We explored key ingredients, tips for fresh selections, and step-by-step assembly. You now know how to avoid mistakes and achieve that perfect whipped cream texture. We even discussed variations, storage tips, and answered common questions. Making a trifle is fun and rewarding. With these clear steps, you can impress anyone. Enjoy creating your own delicious trifle masterpiece!

Christmas Pavlova Trifle Festive and Easy Dessert

Looking for a festive dessert that wows without the stress? Let me introduce you to the Christmas Pavlova Trifle! This

- 1 can (15 oz) chickpeas, drained and rinsed - 1 can (14 oz) diced tomatoes, with juices - 4 cups vegetable broth (low-sodium recommended) - 1 tablespoon extra virgin olive oil - 1 medium onion, finely diced - 2 cloves garlic, finely minced - 1 medium carrot, peeled and diced - 1 large red bell pepper, diced - 1 cup fresh spinach, roughly chopped - 1 teaspoon ground cumin - 1 teaspoon ground coriander - 1/2 teaspoon ground cinnamon - 1/2 teaspoon smoked paprika - 1/2 teaspoon cayenne pepper (adjust according to heat preference) - Salt and freshly ground black pepper, to taste Moroccan chickpea soup brings warmth and flavor to your table. The mix of spices creates a rich taste. You will need some pantry staples. Start with chickpeas, diced tomatoes, vegetable broth, and olive oil. These ingredients form the base of the soup. Next, gather fresh ingredients. You want a medium onion, garlic, a carrot, a red bell pepper, and fresh spinach. These veggies add color, texture, and nutrients. Now, let’s talk about spices. Ground cumin and coriander add depth. Ground cinnamon brings warmth. Smoked paprika gives a nice smoky touch. Cayenne pepper adds heat; adjust it to your taste. Finally, salt and pepper enhance all the flavors. With these ingredients, you will create a dish that warms the soul and delights the palate. Each bite offers layers of rich flavor and fresh goodness. Enjoy the process of making this delicious soup! To start, heat 1 tablespoon of extra virgin olive oil in a large pot over medium heat. You want the oil hot but not smoking. Next, add 1 medium onion, finely diced. Cook the onion for about 3-4 minutes. It should turn translucent and smell great. Now, it's time to add more flavor. Incorporate 2 cloves of finely minced garlic, 1 diced carrot, and 1 diced red bell pepper into the pot. Stir these ingredients well. Let them soften for about 5 minutes. Stir occasionally to avoid burning. Spices are key to Moroccan flavor. Sprinkle in 1 teaspoon ground cumin, 1 teaspoon ground coriander, 1/2 teaspoon ground cinnamon, 1/2 teaspoon smoked paprika, and 1/2 teaspoon cayenne pepper. Stir constantly for about a minute. This helps the spices bloom and fill your kitchen with amazing scents. Next, pour in 1 can of diced tomatoes along with their juices and 4 cups of vegetable broth. Raise the heat and bring this mixture to a rolling boil. Watch closely; a good boil is essential for the next step. Once boiling, reduce the heat to a gentle simmer. Add 1 can of rinsed chickpeas to the pot. Let the soup cook for 20 minutes. This time allows the flavors to develop nicely. After 20 minutes, stir in 1 cup of roughly chopped spinach. Cook for an additional 5 minutes. You want the spinach to wilt and brighten the soup's color and texture. Now, it's time to taste your soup. Add salt and freshly ground black pepper to fit your preferences. Don't be shy; seasoning is key! Ladle the hot soup into bowls. For a beautiful finish, garnish with fresh cilantro or parsley. Serve with lemon wedges on the side. The lemon adds a fresh zing to each bowl. Enjoy your Moroccan chickpea soup with family or friends! To boost the flavor of your Moroccan chickpea soup, consider adding a few extra spices. Besides the cumin and coriander, try adding: - 1 teaspoon ground turmeric - 1 teaspoon fennel seeds - A pinch of saffron for a special touch Use fresh herbs as you cook. Adding fresh thyme or mint can brighten your dish. When you sauté the onions, let them cook until they're golden. This adds depth. For a creamier soup, add coconut milk or heavy cream. - Stir in 1 cup of coconut milk near the end, right before serving. - If using cream, add it just before serving to keep the soup light. Both options bring a rich texture and flavor. They balance the spices well and make each spoonful a delight. This soup is naturally vegan and gluten-free. To keep it that way, ensure all ingredients are free from gluten. - Check your vegetable broth for gluten-free labels. - Use fresh vegetables and canned goods that have no added ingredients. These steps will help you enjoy a warm, comforting bowl without worry. {{image_4}} You can add chicken or tofu to this soup. For chicken, use cooked and shredded meat. Stir it in during the last five minutes of cooking. If you prefer tofu, use firm tofu. Cut it into cubes and sauté it with the veggies. This adds protein and makes it more filling. Feel free to mix in seasonal veggies. Zucchini, sweet potatoes, or green beans work well. You can also add kale or Swiss chard instead of spinach for variety. Just chop them into small pieces. Toss them in with the other veggies. This keeps the dish fresh and colorful. Adjust the heat based on your taste. Use less cayenne for a milder soup. Add more cayenne or a pinch of chili flakes for spice lovers. You can also serve hot sauce on the side. This way, everyone can customize their bowl to their liking. Store leftovers in airtight containers. Glass or plastic containers work well. Make sure to cool the soup before sealing. This helps keep the soup fresh. Place the container in the fridge. It will last up to five days this way. To freeze the soup, let it cool completely. Pour it into freezer-safe bags or containers. Leave some space for expansion. Label each bag with the date. The soup can stay in the freezer for up to three months. To reheat, use a pot on the stove. Heat over low to medium heat. Stir often to avoid sticking. You can also use the microwave. Place the soup in a microwave-safe bowl. Heat in short bursts, stirring in between. This helps keep the soup's texture and flavor intact. Moroccan Chickpea Soup is a warm, hearty dish. It features chickpeas, rich spices, and fresh vegetables. This dish has roots in North African cuisine. It offers a mix of flavors that are both unique and comforting. The soup is often enjoyed during colder months. It provides warmth and satisfaction with every spoonful. Yes, you can use dried chickpeas. You will need to soak them overnight. This helps them cook faster. After soaking, boil them for about 1 to 1.5 hours until tender. You may also use a pressure cooker. This can cut cooking time to just 15-20 minutes. Remember to drain and rinse them before adding to the soup. You can easily prepare this soup in advance. Cook the soup fully and let it cool. Store it in the fridge for up to three days. You can also freeze it for longer storage. When ready to eat, reheat on the stove or in the microwave. The flavors will deepen, making it even tastier. Pair this soup with crusty bread or pita. A fresh salad goes well too, adding a crunchy contrast. You could also serve it with couscous for a heartier meal. For drinks, consider mint tea or a light juice. These options balance the warm spices in the soup. Yes, this soup is perfect for meal prep. It stores well and reheats easily. Make a big batch to enjoy throughout the week. It’s packed with protein and fiber, making it a filling choice. Just remember to adjust seasoning before serving, as flavors can change when stored. In this blog post, we explored Moroccan Chickpea Soup, covering ingredients, instructions, and storage tips. We began with essential pantry staples like chickpeas and diced tomatoes. Fresh ingredients added flavor, while spices made it special. I shared steps for cooking, enhancing flavor, and serving. Lastly, we discussed variations and storage methods. This soup is not only tasty but also flexible for your needs. Prepare it your way, and enjoy a warm bowl of comfort!

Moroccan Chickpea Soup Delicious and Flavorful Dish

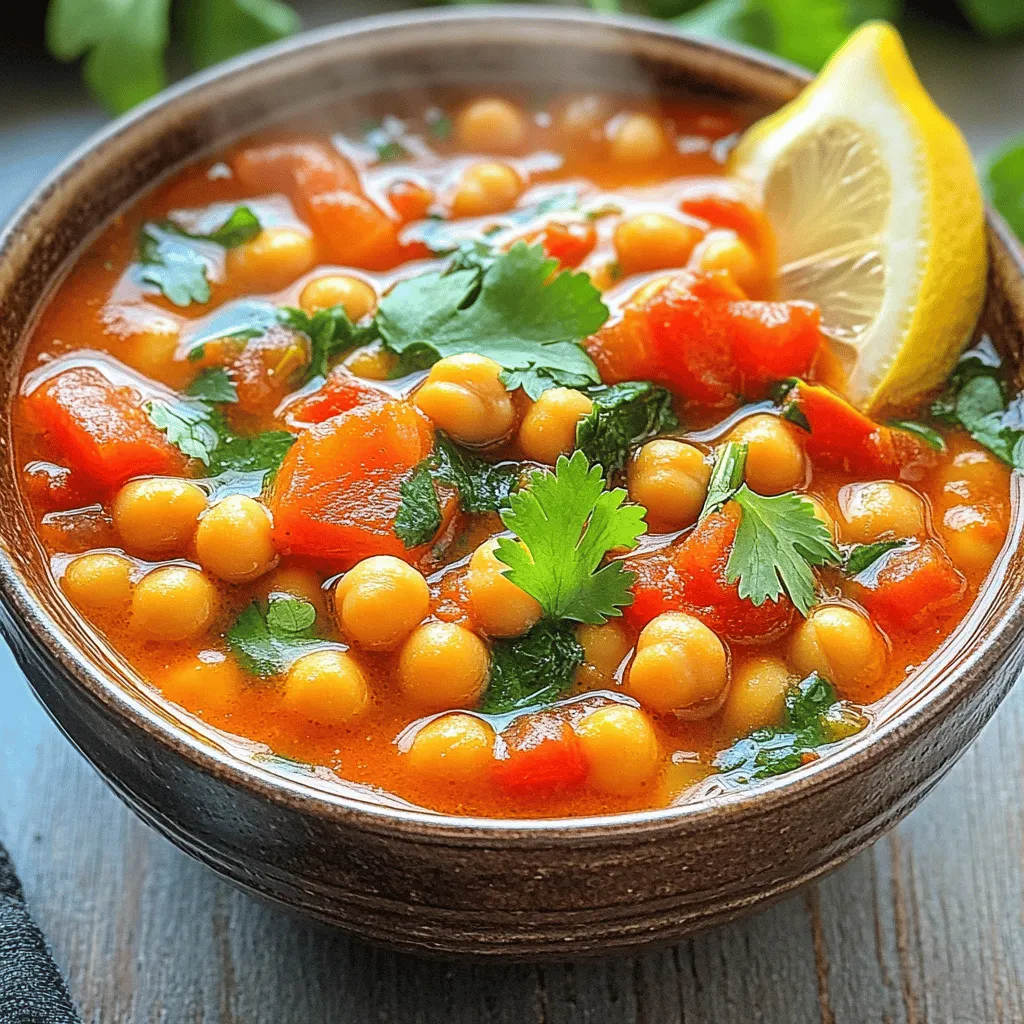
Looking to spice up your meals? Moroccan Chickpea Soup is a delicious and flavorful dish that warms both the body

To make a delicious Creamy Carrot Potato Soup, you need simple and fresh ingredients. Here’s the list: - 4 large carrots, peeled and finely chopped - 2 medium potatoes, peeled and diced into small cubes - 1 medium onion, finely chopped - 2 cloves garlic, minced - 4 cups vegetable broth - 1 cup full-fat coconut milk - 2 tablespoons extra-virgin olive oil - 1 teaspoon ground cumin - 1 teaspoon smoked paprika - Salt and freshly ground black pepper, to taste - Fresh parsley, chopped, for garnish These ingredients come together to create a warm and comforting bowl of soup. Each one adds to the flavor and texture. The carrots bring sweetness, while the potatoes add creaminess. Garlic and onion give a savory base. The coconut milk makes it rich and smooth. Spices like cumin and paprika add warmth. Don’t forget the parsley for a fresh touch at the end. Enjoy the process of gathering these items, as they are key to a hearty soup! 1. Heating the olive oil and sautéing onions and garlic Start by pouring the olive oil into a large pot over medium heat. Once the oil is hot, add the chopped onion and minced garlic. Stir them together and cook for about 3 to 4 minutes. You want the onion to turn clear and fragrant. 2. Adding carrots and potatoes Next, add the finely chopped carrots and diced potatoes to the pot. Mix everything well and continue to sauté for about 5 minutes. This step helps soften the veggies just a bit, enhancing their flavor. 3. Incorporating spices and broth Now, sprinkle the ground cumin and smoked paprika into the pot. Stir to coat the vegetables evenly with the spices. Then, carefully pour in the vegetable broth. Increase the heat until the mixture boils. After it boils, reduce the heat and let it simmer for 20 minutes. The carrots and potatoes should be tender enough to pierce with a fork. 4. Blending the soup to desired consistency After the veggies are tender, it’s time to blend. If you have an immersion blender, use it right in the pot. Blend until the soup is smooth and creamy. If you don’t have one, carefully transfer the soup in small batches to a standard blender. Make sure to handle the hot soup with care. 5. Stirring in coconut milk and final seasoning Once blended, stir in the rich coconut milk. This adds a lovely creaminess to the soup. Now, taste the soup and season it with salt and freshly ground black pepper. Let it simmer for another 5 minutes. This helps all the flavors blend together nicely. 6. Serving the soup Serve the soup hot. A sprinkle of freshly chopped parsley on top adds color and flavor. Enjoy this warm, comforting bowl of creamy carrot potato soup! To achieve the perfect creamy texture, use an immersion blender. It helps blend the soup right in the pot. If you don’t have one, a standard blender works too. Just be careful with the hot soup. You can also sauté the onions and garlic in olive oil until they turn soft and fragrant. This step adds a lot of flavor to your soup. For the best pairings, serve this soup with crusty bread or a fresh salad. The bread is great for dipping. Garnish your soup with fresh parsley and a swirl of coconut milk. This adds color and a rich taste. Consider serving in rustic bowls for a cozy feel. {{image_4}} You can switch up the veggies in this soup. Sweet potatoes work great instead of regular potatoes. They add a nice sweetness. Butternut squash is another tasty choice. It gives a smooth texture and a hint of nutty flavor. For a dairy-free option, use almond milk or soy milk instead of coconut milk. Both will give a creamy feel without any dairy. If you want it vegan, make sure your broth is plant-based too. This way, everyone can enjoy this dish. Adding herbs and spices can change the soup's taste. Thyme brings a warm, earthy flavor. You can also add chili flakes for a spicy kick. This adds a fun twist to the classic taste. Using different broths can also make a big difference. Try using mushroom broth for a deep, rich flavor. Chicken broth brings a hearty essence too. Each choice gives the soup a unique twist, making it fun to explore new tastes. To store leftover soup, let it cool first. Place the soup in an airtight container. This helps keep it fresh. You can store it in the fridge for up to three days. When you are ready to eat, just heat it up on the stove or in the microwave. For the best results, use glass or BPA-free plastic containers. These containers do not hold odors. They also make it easy to see what's inside. Always label your containers with the date. This way, you can keep track of how long it has been stored. If you want to save the soup for later, freezing is a great choice. Pour the cooled soup into freezer-safe containers. Leave some space at the top because the soup will expand as it freezes. You can freeze it for up to three months. When you are ready to enjoy it again, thaw the soup in the fridge overnight. If you need it fast, you can use the microwave. Heat it on low until it is warm. Stir it often to make sure it heats evenly. Once thawed, reheat it on the stove until hot. Enjoy your creamy carrot potato soup any time you wish! Can I make this soup ahead of time? Yes, you can make this soup ahead of time. It tastes even better the next day! Just store it in the fridge in an airtight container. Reheat it on the stove or in the microwave until hot. Is it possible to make this soup in a slow cooker? Absolutely! To make this soup in a slow cooker, add all the ingredients except the coconut milk. Cook on low for 6-8 hours or high for 3-4 hours. Blend the soup and stir in the coconut milk before serving. What are the nutritional benefits of this soup? This soup is packed with vitamins and minerals. Carrots provide vitamin A, while potatoes give potassium. Coconut milk adds healthy fats. The soup is also low in calories and high in fiber, making it a great option for a healthy meal. Can I use frozen vegetables instead of fresh ones? Yes, you can use frozen vegetables! They are convenient and can save time. Just add them to the pot and adjust the cooking time if needed. Frozen carrots and potatoes can blend well and still create a creamy texture. This blog post covered a simple yet delicious soup recipe. You learned what ingredients to use and how to prepare them step by step. I shared tips on achieving the perfect texture and suggested great pairings. You also found ways to customize the soup with various ingredients and flavors. Finally, we discussed how to store or freeze leftovers for later. Remember, cooking can be fun, and with these tips, you can make great soup anytime! Enjoy experimenting in your kitchen.

Creamy Carrot Potato Soup Warm and Comforting Bowl

Looking for a warm and comforting dish to brighten your day? This Creamy Carrot Potato Soup is just what you

To make Garlic Parmesan Spaghetti, you will need the following ingredients: - 12 oz spaghetti - 4 tablespoons unsalted butter - 6 cloves garlic, finely minced - 1 teaspoon red pepper flakes - 1 cup freshly grated Parmesan cheese - 1/4 cup fresh parsley, finely chopped - Salt and black pepper - Zest and juice of 1 lemon - 1/4 cup toasted pine nuts (optional) These simple ingredients create a dish full of flavor. The spaghetti serves as the base, while garlic and butter bring richness. The Parmesan cheese adds a creamy touch. The lemon zest and juice brighten up the dish. Fresh parsley brings color and freshness. If you like a bit of heat, red pepper flakes do the trick. Pine nuts add a nice crunch but are optional. Be sure to use fresh ingredients for the best taste. When you gather these items, you set the stage for a hearty meal. To cook perfect spaghetti, fill a large pot with water. Add a generous amount of salt. This step adds flavor to the pasta. Bring the water to a rapid boil. Once boiling, add the spaghetti. Cook according to the package instructions, usually about 8-10 minutes. You want the pasta to be al dente, which means it should still have some bite. Before you drain, save about a cup of the pasta water. This water is starchy and will help your sauce later. After saving the water, drain the spaghetti and set it aside. For the garlic butter sauce, start with a large skillet. Melt the unsalted butter over medium heat. Once the butter is melted, add the minced garlic and red pepper flakes. Be careful here; you don’t want to burn the garlic. Stir it often for about 2-3 minutes. The garlic should become fragrant and turn a light golden color. This step is key for a rich flavor. Now it’s time to bring it all together. Reduce the heat to low and add the drained spaghetti to the skillet. Toss the spaghetti gently in the garlic butter. You want every strand to be coated in that delicious sauce. Next, slowly pour in the reserved pasta water. This will help the noodles soak up the garlic flavor and create a silky sauce. Then, add the freshly grated Parmesan cheese. Stir it in until it melts and coats the spaghetti. If the sauce seems too thick, you can add more pasta water. Lastly, season with salt and freshly cracked black pepper. Add the lemon zest and juice, then toss everything together. For a fresh touch, mix in the chopped parsley and optional toasted pine nuts. To make Garlic Parmesan Spaghetti even better, you can add a few extra ingredients. Try adding some sun-dried tomatoes or olives for a nice twist. Fresh herbs like basil or thyme also boost the flavor. Salt and pepper are key, too. Always season your dish well. Taste as you go to find the right balance. Getting the sauce just right is important. If your sauce seems too thick, add more pasta water slowly. This water is starchy and helps the sauce cling to the spaghetti. If the sauce is too thin, let it cook a bit longer. Stir often until you reach the creaminess you want. When serving your Garlic Parmesan Spaghetti, think about garnishes. A sprinkle of extra Parmesan cheese adds a lovely touch. Fresh parsley not only looks good but adds a burst of flavor. You can pair the dish with a simple salad or garlic bread. For drinks, a light white wine or sparkling water complements it well. {{image_4}} You might want to change ingredients based on your taste. If you need a garlic swap, consider shallots or leeks. They add a sweet, mild flavor. For cheese, try nutritional yeast or a dairy-free option. These give a nice cheesy taste without dairy. If you're gluten-free, choose gluten-free spaghetti. Whole grain spaghetti is another great choice, offering more fiber and nutrients. Mix-ins can make your dish even better. Try adding vegetables like spinach, cherry tomatoes, or zucchini. They add color and nutrients. For protein, grilled chicken or sautéed shrimp work well. You can also toss in some cooked sausage. These options make the dish heartier and more filling. Want more kick? Add more red pepper flakes. Start small and taste as you go. For a milder dish, skip the red pepper or use less. You can also add herbs like basil, oregano, or thyme. These herbs brighten the flavors and add depth. Experiment with what you like best! To keep your Garlic Parmesan Spaghetti fresh, follow these steps: - Let the spaghetti cool down before storing. - Use an airtight container to prevent moisture. - Store in the fridge for up to 3 days. You can enjoy it again, but the flavor may fade over time. When it's time to enjoy leftovers, try these methods: - Use a skillet on low heat for even warming. - Add a splash of pasta water to restore creaminess. - Stir gently to keep the texture nice. You can also microwave it, but do it in short bursts. Stir between each burst to heat evenly. Yes, you can freeze Garlic Parmesan Spaghetti! Here’s how: - Cool the spaghetti completely before freezing. - Place it in freezer-safe bags, removing as much air as possible. - It can last for up to 2 months in the freezer. When you're ready to eat, thaw it overnight in the fridge. Reheat as mentioned above for the best results. You can easily boost the nutrition of Garlic Parmesan Spaghetti. Here are some simple ideas: - Add veggies: Spinach, broccoli, or zucchini can add color and nutrients. - Swap pasta: Use whole grain or legume-based spaghetti for extra fiber. - Include protein: Toss in grilled chicken, shrimp, or chickpeas for more filling meals. - Use less butter: Replace some butter with olive oil for healthy fats. - Add herbs: Fresh basil or arugula can enhance flavor without extra calories. These swaps can help you enjoy a tasty and healthier meal. Garlic Parmesan Spaghetti pairs well with several side dishes. Here are some great options: - Simple salad: A fresh green salad with a light vinaigrette balances the dish. - Garlic bread: A crunchy, warm garlic bread complements the flavors in the pasta. - Roasted vegetables: Carrots, bell peppers, or asparagus provide a healthy side. - Grilled meats: Chicken or steak can make the meal more hearty. - Soup: A light tomato or minestrone soup can be a comforting addition. These sides can elevate your dining experience. Yes, you can easily create a vegan version of Garlic Parmesan Spaghetti. Here are some tips: - Use vegan butter: Replace unsalted butter with a plant-based butter or olive oil. - Vegan cheese: Find a dairy-free Parmesan or nutritional yeast for cheesy flavor. - Skip the butter: You can sauté garlic in vegetable broth for less fat. - Add nuts: Toasted walnuts or cashews can add crunch and richness. - Use lemon: Keep the lemon zest and juice for brightness without dairy. These changes make the dish vegan while keeping it delicious. This blog post covered everything you need to know about making Garlic Parmesan Spaghetti. We explored the key ingredients, detailed step-by-step cooking instructions, and shared handy tips for flavor and texture. You learned about variations and how to store or reheat leftovers effectively. In conclusion, this dish is versatile and easy to customize. Whether you prefer it simple or loaded with extras, it’s sure to please. Enjoy creating your own version of this delicious pasta!

Garlic Parmesan Spaghetti Hearty and Flavorful Dish

Garlic Parmesan Spaghetti is a dish that brings warmth and joy to any table. With just a few simple ingredients,

Older posts
Newer posts
← Previous Page1 … Page8 Page9 Page10 … Page86 Next →

dsad

© 2026 lazychefmagic • Built with GeneratePress

Our Policies

  • Copyright Policy
  • Cookie Policy
  • GDPR Policy
  • Privacy Policy
  • Disclaimer
  • Terms Of Use

More Information

  • Home
  • About
  • Contact
  • Appetizers
  • Dessert
  • Dinner
  • Drinks
©2026, lazychefmagic About Back To Top