WANT TO SAVE THIS RECIPE?
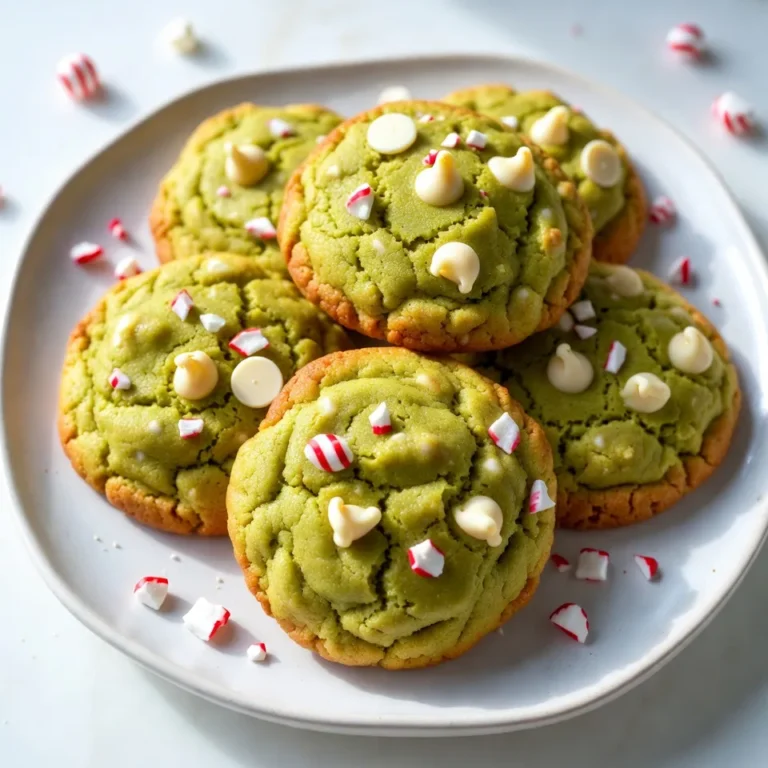
Get into the festive spirit with my Peppermint Grinch Cookies! These fun, green treats are perfect for holiday gatherings or cozy nights at home. With a mix of minty goodness and sweet chocolate, they’ll be a hit with everyone. I’ll guide you through easy steps and tips to make sure your cookies are simply delightful. Let’s dive into the recipe and create some holiday magic together!
Why I Love This Recipe
- Festive Flavor: The combination of peppermint and white chocolate creates a delightful holiday treat that brings joy to every bite.
- Easy to Make: This recipe is straightforward and requires minimal effort, making it perfect for baking with kids or during busy holiday seasons.
- Colorful Presentation: The vibrant green color adds a fun and festive touch to your holiday cookie platter, making them visually appealing.
- Perfect for Gifting: These cookies are great for sharing with friends and family, making them an excellent homemade gift during the holidays.
Ingredients
Main Ingredients for Peppermint Grinch Cookies
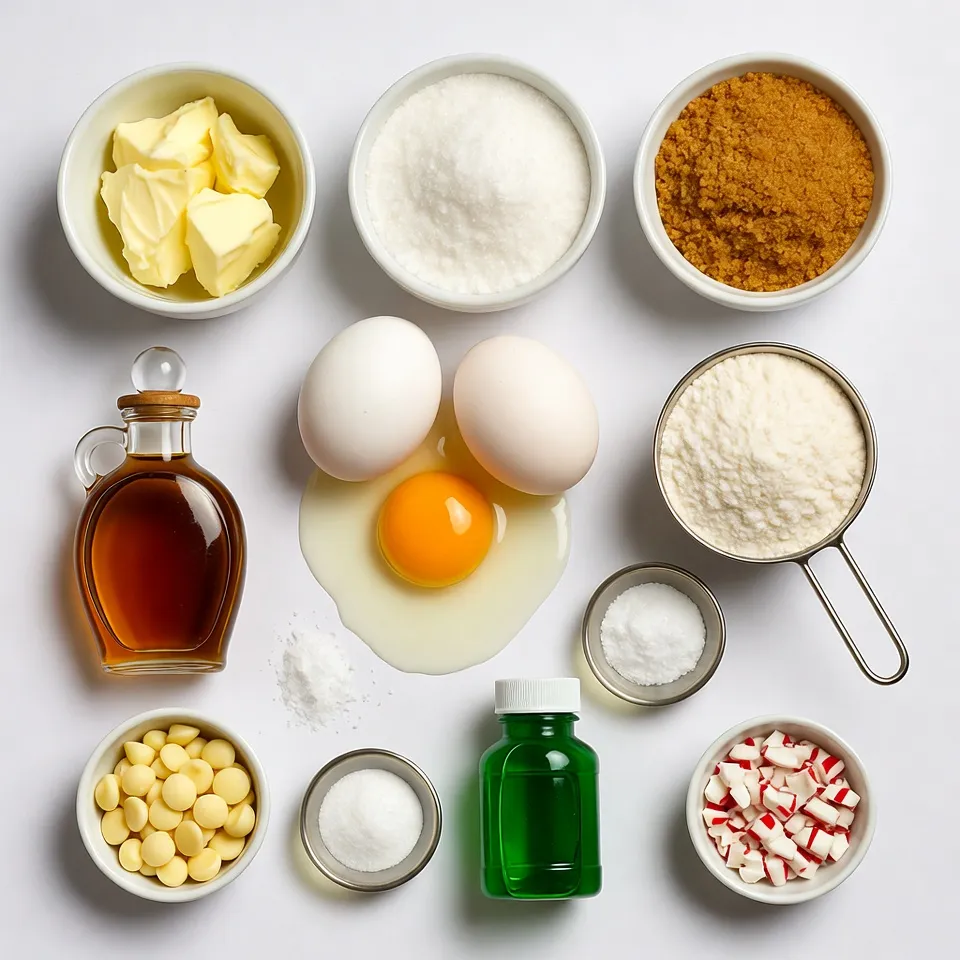
To make Peppermint Grinch Cookies, gather these key ingredients:
– 1 cup unsalted butter, softened to room temperature
– 1 cup granulated sugar
– 1 cup tightly packed brown sugar
– 2 large eggs at room temperature
– 1 teaspoon pure vanilla extract
– 3 ¼ cups all-purpose flour
– 1 teaspoon baking soda
– ½ teaspoon fine sea salt
– 1 teaspoon peppermint extract
– ½ cup green food coloring
– 1 cup white chocolate chips
– ½ cup crushed peppermint candies
These ingredients create a soft, colorful cookie. The green color comes from the food coloring. The peppermint extract gives a nice holiday flavor.
Optional Garnishes
You can add fun garnishes to make your cookies pop. Here are some ideas:
– Extra crushed peppermint candies for topping
– A drizzle of melted white chocolate
– Festive sprinkles in red and green
These garnishes add flair and enhance the festive spirit of the cookies.
Tools and Equipment Needed
To bake these cookies, you will need a few tools:
– Two baking sheets
– Parchment paper
– Mixing bowls (one large and one medium)
– Electric mixer or wooden spoon
– Whisk for dry ingredients
– Tablespoon or cookie scoop for dough
Having the right tools makes baking easier and more fun. Make sure to prepare everything before you start. This way, you can enjoy the process!

Step-by-Step Instructions
Prepping the Oven and Baking Sheets
First, set your oven to 350°F (175°C). This heat helps the cookies bake evenly. Next, grab two baking sheets. Line them with parchment paper. This step keeps the cookies from sticking.
Creaming Together the Ingredients
In a large bowl, put one cup of softened butter. Add one cup of granulated sugar and one cup of brown sugar. Use an electric mixer or a strong spoon to mix. Beat until the mixture is light and fluffy. This process takes about 2 to 3 minutes. Then, add two large eggs, one at a time. Mix well after adding each egg. Stir in one teaspoon of pure vanilla extract and one teaspoon of peppermint extract.
Mixing Dry Ingredients and Forming the Dough
In another bowl, whisk together 3 ¼ cups of all-purpose flour, one teaspoon of baking soda, and ½ teaspoon of fine sea salt. Gradually add the dry mix to the wet mix. Stir just enough to remove any flour streaks. Be careful not to overmix. This keeps the cookies soft and tender.
Baking the Cookies to Perfection
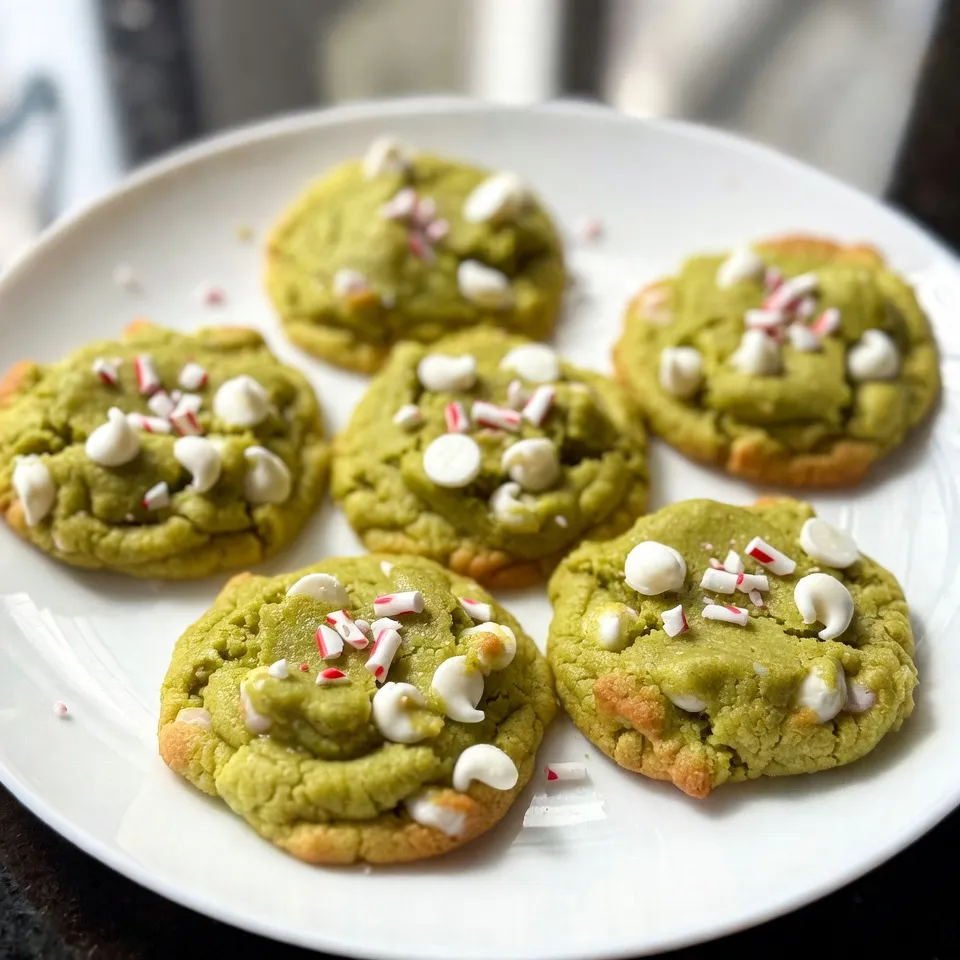
Now, add ½ cup of green food coloring. Mix gently until the color is spread evenly. Then, fold in one cup of white chocolate chips and ½ cup of crushed peppermint candies. Use a tablespoon or cookie scoop to drop rounded balls of dough on the baking sheets. Leave about 2 inches between each ball. Bake them for 10 to 12 minutes. The edges will be lightly golden, and the centers may look a bit underbaked. They will firm up as they cool.
Cooling and Serving Suggestions
After baking, let the cookies cool on the sheets for about 5 minutes. Then, move them to wire racks to cool completely. For a fun presentation, stack the cookies in a bright festive jar or arrange them on a pretty platter. You can also sprinkle extra crushed peppermint on top before serving. Enjoy your festive treat!
Tips & Tricks
Best Practices for Cookie Dough Consistency
For the best cookie dough, start with room temperature butter. This helps the butter blend well with sugar. Cream the butter and sugars until light and fluffy. This should take about 2 to 3 minutes. When adding eggs, mix one at a time for a smooth dough. After mixing in the dry ingredients, stop as soon as you see no flour. Overmixing can make the cookies tough.
How to Achieve the Perfect Green Color
To get a bright green color, use gel food coloring. It gives a vibrant hue without adding too much liquid. Add the green coloring after blending the wet and dry ingredients. Start with a few drops, then mix. Keep adding until you reach your desired shade. Remember, the color will lighten a bit when baked.
Recommended Baking Sheet and Parchment Paper Tips
Use light-colored baking sheets for even baking. Dark sheets can cause the edges to brown too fast. Line each sheet with parchment paper. This makes it easy to lift cookies off without sticking. Space the dough balls about 2 inches apart. This allows the cookies to spread without merging together.
Pro Tips
- Chill the Dough: For even thicker cookies, chill the dough for at least 30 minutes before baking. This helps prevent spreading and gives a chewier texture.
- Use Fresh Peppermint Candies: Opt for freshly crushed peppermint candies for a more vibrant flavor and crunch. Old candies can lose their zest and texture.
- Check for Doneness: Don’t wait for the cookies to turn golden all over; pull them out when the edges are set and the center is still soft. They will continue to cook on the baking sheet.
- Decorate with Style: Add a drizzle of melted white chocolate on top of the cooled cookies for an elegant finish, and sprinkle with additional crushed peppermint for a festive touch.
Variations
Gluten-Free Version of Peppermint Grinch Cookies
You can make gluten-free Peppermint Grinch Cookies. Just swap the all-purpose flour with a gluten-free blend. Look for a mix that has xanthan gum. This will help the cookies hold together. Follow the same steps as in the original recipe. The cookies may be slightly softer but still taste great.
Alternative Chocolate Options
If you want to change up the chocolate, try using dark chocolate chips or milk chocolate chips instead of white chocolate. Each option brings a new flavor that complements the peppermint. You can also mix chocolate types for a fun twist. This small change can make a big difference in taste.
Swapping Peppermint for Other Flavors
Feel free to experiment with different flavors. If peppermint isn’t your favorite, try using almond extract or vanilla extract instead. You can also add a bit of orange zest for a citrusy kick. This way, you create a new cookie that still has that festive spirit. Just remember to adjust the amount of extract based on your taste.
Storage Info
How to Store Peppermint Grinch Cookies
To keep your Peppermint Grinch Cookies fresh, store them in an airtight container. This helps maintain their soft and chewy texture. Place parchment paper between layers of cookies to prevent sticking. Keep the container in a cool, dry place away from sunlight. This way, your cookies can stay delicious for up to one week.
Freezing Instructions for Longer Shelf Life
If you want to save some cookies for later, freezing is a great option. First, let the cookies cool completely. Then, place them in a single layer on a baking sheet. Freeze them for about an hour until they are firm. After that, transfer the cookies to a freezer-safe bag or container. Make sure to remove as much air as possible. You can freeze the cookies for up to three months. When you’re ready to enjoy them, simply thaw them at room temperature.
Best Containers for Freshness
For the best storage, use clear plastic containers or glass jars with tight lids. These containers keep air out and lock in moisture. If you have decorative tins, those can work well too, adding a festive touch. Just remember to add a layer of parchment paper to keep the cookies safe. Using the right containers will help your Peppermint Grinch Cookies stay fresh and tasty!
FAQs
Can I make these cookies ahead of time?
Yes, you can make these cookies ahead. Prepare the dough and chill it. Wrap it tightly in plastic wrap and refrigerate for up to three days. You can also freeze the dough for up to three months. Just remember to thaw it overnight in the fridge before baking.
What’s the best way to soften butter quickly?
To soften butter fast, cut it into small cubes. Place the cubes in a bowl and let them sit at room temperature for about 10-15 minutes. You can also microwave it for 10 seconds. Make sure it softens, but does not melt.
How can I adjust the sweetness of the cookies?
To adjust the sweetness, you can reduce the sugar by ¼ cup. If you want them sweeter, add more white chocolate chips or peppermint candies. Taste the dough before baking to find the right balance for you.
You learned how to make Peppermint Grinch Cookies step-by-step, from ingredients to storage. We explored tips for perfect dough and variations like gluten-free options. Remember to use the right tools and equipment for the best results. These cookies combine fun flavors and festive cheer, ideal for any holiday gathering. I hope you enjoy baking and sharing them! Happy bakin
Peppermint Grinch Cookies
Festive green cookies with peppermint and white chocolate, perfect for the holiday season.
Prep Time 15 minutes mins
Cook Time 12 minutes mins
Total Time 30 minutes mins
Course Dessert
Cuisine American
Servings 24
Calories 150 kcal
- 1 cup unsalted butter, softened to room temperature
- 1 cup granulated sugar
- 1 cup tightly packed brown sugar
- 2 large eggs at room temperature
- 1 teaspoon pure vanilla extract
- 3.25 cups all-purpose flour
- 1 teaspoon baking soda
- 0.5 teaspoon fine sea salt
- 1 teaspoon peppermint extract
- 0.5 cup green food coloring
- 1 cup white chocolate chips
- 0.5 cup crushed peppermint candies
Begin by preheating your oven to 350°F (175°C). Prepare two baking sheets by lining them with parchment paper to prevent sticking.
In a large mixing bowl, using an electric mixer or a sturdy wooden spoon, cream together the softened butter, granulated sugar, and brown sugar until the mixture becomes light and fluffy—this should take about 2-3 minutes.
Add the eggs to the mixture, one at a time. Make sure to mix thoroughly after each addition. Stir in the pure vanilla extract and peppermint extract until well combined.
In a separate bowl, whisk together the all-purpose flour, baking soda, and fine sea salt. Gradually blend the dry ingredients into the wet mixture, mixing just until no flour streaks remain. Avoid overmixing to keep the cookies tender.
Add the green food coloring to the dough and mix gently until the color is evenly distributed throughout the dough.
Carefully fold in the white chocolate chips and crushed peppermint candies, ensuring they are evenly dispersed throughout the mixture.
Using a tablespoon or a cookie scoop, drop rounded balls of dough onto the prepared baking sheets, leaving about 2 inches of space between each cookie for spreading during baking.
Place the cookies in the preheated oven and bake for 10-12 minutes. The edges should be lightly golden while the centers might appear slightly underbaked; they will firm up as they cool.
After baking, allow the cookies to cool on the baking sheets for about 5 minutes. Then, gently transfer them to wire racks to cool completely.
Stack the cookies in a vibrant festive cookie jar or elegantly arrange them on a decorative platter. For an extra holiday flair, sprinkle a bit of crushed peppermint on top of each cookie just before serving!
Keyword cookies, dessert, holiday, peppermint
WANT TO SAVE THIS RECIPE?