Go Back
- Butterfinger candy bars - Vanilla wafer crumbs - Cream cheese - Caramel sauce - Semi-sweet chocolate chips - Coconut oil - Additional Butterfinger for rolling - 1 cup crushed Butterfinger candy bars - 1 cup finely ground vanilla wafer crumbs - 1/2 cup cream cheese, softened - 1/4 cup caramel sauce (plus extra for drizzling) - 1/2 teaspoon pure vanilla extract - 1 cup semi-sweet chocolate chips - 1 tablespoon coconut oil - Extra crushed Butterfinger for rolling You can add different flavors to these truffles. Try using different extracts like almond or mint. You could also mix in chopped nuts for extra crunch. Consider using dark chocolate instead of semi-sweet for a richer taste. {{ingredient_image_2}} First, gather all your ingredients. In a large bowl, mix the crushed Butterfinger candy bars, vanilla wafer crumbs, cream cheese, caramel sauce, and vanilla extract. Use a spatula or your hands to blend everything well. You want a smooth, pliable dough. Next, take small pieces of the mixture. Roll each piece into a ball about 1 inch wide. Place the truffles on a parchment-lined baking sheet. Make sure to space them out so they don’t stick together. Now, cover the truffles with plastic wrap. Place them in the fridge for about 30 minutes. This helps them firm up and hold their shape. While they chill, prepare the chocolate coating. In a microwave-safe bowl, mix the semi-sweet chocolate chips with coconut oil. Microwave the mixture in 30-second bursts. Stir after each interval until the chocolate is smooth and melted. Once the truffles are firm, take them out of the fridge. Use a fork to dip each truffle into the melted chocolate. Make sure they are fully coated, then let any excess chocolate drip off. Immediately roll the wet truffles in additional crushed Butterfinger. This gives them a nice crunch. To set the chocolate, place the truffles back on the parchment-lined sheet. You can leave them at room temperature or put them back in the fridge for about 15 minutes. This ensures the chocolate coating hardens nicely. To make the best Caramel Crunch Butterfinger Truffles, start with a smooth mixture. Combine crushed Butterfinger, vanilla wafer crumbs, cream cheese, caramel sauce, and vanilla extract. Mix well until it forms a dough. If it feels too sticky, add more wafer crumbs. This helps achieve a firmer truffle. After mixing, form the dough into small balls. Each ball should be about one inch wide. Let the truffles chill in the fridge for 30 minutes. This helps them firm up before coating. A good temperature makes dipping easier and keeps the truffles from falling apart. For an even chocolate coating, melt semi-sweet chocolate chips and coconut oil together. Use a microwave-safe bowl to heat in short intervals. Stir well after each interval until smooth. When dipping, use a fork to lower each truffle into the chocolate. Make sure it gets fully coated. To avoid a chocolate mess, tap the fork gently on the bowl's edge. This helps shake off excess chocolate. You want a thin, even layer around each truffle. Make your truffles look fancy when serving. Arrange them on a decorative platter. Drizzle extra caramel sauce over the top for a sweet touch. This adds both beauty and flavor. Sprinkle more crushed Butterfinger on top for a fun finish. This gives the truffles a pop of color and crunch. Your guests will love the look and taste! Pro Tips Chill for Best Texture: Ensure the truffles are well-chilled before dipping in chocolate to maintain their shape and achieve a smoother coating. Use Quality Chocolate: Opt for high-quality chocolate chips for a richer flavor and a more appealing sheen on the finished truffles. Customize Your Coating: Experiment with different toppings like crushed nuts, sprinkles, or even a dusting of cocoa powder for unique variations. Store Properly: Keep the truffles refrigerated in an airtight container to maintain their freshness and prevent them from becoming too soft. {{image_4}} You can make these truffles even more delicious. Try adding spices like cinnamon or nutmeg. A hint of these spices gives a warm touch. You can also add extracts like almond or hazelnut for a twist. Want to change the candy? Use other candy bars! Snickers or Milky Way can work well. Each candy adds its own unique flavor. Mixing different candies gives you fun options to explore. If you need gluten-free truffles, use gluten-free vanilla wafer crumbs. Many brands offer these, so finding them is easy. You can also use crushed gluten-free cookies as an alternative. For vegan options, swap the cream cheese with a plant-based cream cheese. Use dairy-free chocolate chips too. These small changes keep the truffles tasty and friendly for all diets. Make your truffles fit special occasions. For Halloween, add orange and black sprinkles. You can also use pumpkin spice for a seasonal flavor. During the holidays, try peppermint extract for a festive touch. You can roll truffles in crushed candy canes for a fun crunch. Custom flavors for birthdays can include favorite candies or colors. Each theme turns these truffles into a special treat. To keep your Caramel Crunch Butterfinger Truffles fresh, store them in an airtight container. This prevents air from drying them out. I recommend using a container lined with parchment paper. Place the truffles in a single layer to avoid them sticking together. If you want them to last longer, consider separating layers with more parchment paper. You can store these truffles at room temperature for a short time. If your kitchen is warm, it's best to refrigerate them. The chocolate coating will stay firm in the fridge. However, let them sit out for a few minutes before serving. This allows them to soften a bit and enhances the taste. These truffles can last up to one week in the fridge. If stored well, they may last a bit longer. Look for signs of spoilage like a change in smell or texture. If they feel sticky or look dull, it’s best to toss them. Always trust your senses to ensure they are still good to eat. Yes, you can use other candies. Snickers or Reese's cups work well too. Just crush them like the Butterfinger. This will change the taste, so pick a candy you enjoy. You can also mix different types for a fun twist! To make truffles healthier, try using low-fat cream cheese. You can also use dark chocolate instead of semi-sweet chocolate. If you want, add nuts or dried fruit for extra nutrition. These swaps keep the flavor while making them better for you. The best way to melt chocolate is in a microwave. Use a microwave-safe bowl and heat in 30-second bursts. Stir after each time to avoid burning. You can also use a double boiler for more control. Just make sure the bowl doesn’t touch the water. To stop truffles from sticking, chill them before rolling. Keep space between each truffle on the baking sheet. Use a bit of cocoa powder or crushed nuts in the bowl when rolling them. This will help keep them separate and easy to enjoy! Now you have everything you need to make delicious Butterfinger truffles. We covered the main ingredients, exact measurements, and optional tweaks to fit your taste. I shared helpful tips for perfecting texture and coating, plus creative presentation ideas. We also explored various flavors and storage options to keep your treats fresh. Remember, truffles are fun to customize for any occasion. Enjoy experimenting and delighting others with your tasty creations!

Caramel Crunch Butterfinger Truffles

Delicious truffles made with crushed Butterfinger candy bars, vanilla wafers, and a creamy filling, coated in chocolate and rolled in more Butterfinger.
Prep Time 20 minutes
Cook Time 10 minutes
Total Time 30 minutes
Course Dessert
Cuisine American
Servings 24
Calories 150 kcal

Ingredients
  

  • 1 cup crushed Butterfinger candy bars
  • 1 cup finely ground vanilla wafer crumbs
  • 1/2 cup cream cheese, softened to room temperature
  • 1/4 cup caramel sauce (plus extra for drizzling)
  • 1/2 teaspoon pure vanilla extract
  • 1 cup semi-sweet chocolate chips
  • 1 tablespoon coconut oil
  • to taste cup extra crushed Butterfinger for rolling

Instructions
 

  • In a large mixing bowl, combine the crushed Butterfinger candy bars, finely ground vanilla wafer crumbs, softened cream cheese, caramel sauce, and vanilla extract. Mix the ingredients thoroughly until they are well incorporated and achieve a smooth, pliable dough.
  • With your hands, take small portions of the mixture and roll them into balls about 1 inch in diameter. Place the formed truffles on a parchment-lined baking sheet, ensuring they are spaced apart to prevent sticking.
  • Once all the truffles are shaped, cover them with plastic wrap and refrigerate for about 30 minutes, allowing them to firm up.
  • While the truffles are chilling, prepare the chocolate coating. In a microwave-safe bowl, combine the semi-sweet chocolate chips and coconut oil. Microwave in 30-second intervals, stirring after each interval, until the mixture is completely smooth and melted.
  • Remove the chilled truffles from the refrigerator. Carefully dip each truffle into the melted chocolate, using a fork to ensure they are fully coated. Allow any excess chocolate to drip off before transferring them back to the parchment-lined baking sheet.
  • Immediately after dipping, roll the wet chocolate-coated truffles in the additional crushed Butterfinger, ensuring an even coating.
  • Allow the chocolate to set at room temperature or place the truffles back in the refrigerator for approximately 15 minutes, until the chocolate coating is firm and set.

Notes

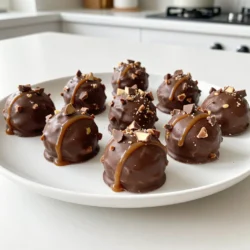
For an elegant finish, arrange the truffles on a decorative platter. Drizzle a little extra caramel sauce over the top for a luxurious touch, and sprinkle additional crushed Butterfinger on top for an eye-catching presentation!
Keyword candy, chocolate, truffles