Go Back
- 2 cups carrots, julienned - 2 cups cucumbers, sliced - 1 cup radishes, thinly sliced - 1 cup red bell pepper, sliced These fresh vegetables bring color and crunch. They create a great base for your tangy pickled veggies. Choose crisp, firm vegetables for the best results. - 1 cup white vinegar - 1 cup water - 3 tablespoons sugar - 1 tablespoon salt - 1 teaspoon mustard seeds - 1 teaspoon coriander seeds - 1 teaspoon black peppercorns - 2 cloves garlic, minced These ingredients give your pickles their signature tang. The vinegar adds acidity, while sugar balances it. Salt helps preserve your veggies and enhances flavor. - Fresh dill sprigs (for garnish) While not necessary, dill adds a nice herbal touch. You can also try adding red pepper flakes for heat. Experiment with your favorites to make the recipe unique. For the full recipe, see the section above. Start by making the pickling brine. In a medium pot, mix white vinegar, water, sugar, salt, mustard seeds, coriander seeds, and black peppercorns. Set the heat to medium and stir until the sugar and salt dissolve. Bring the mix to a boil. Once boiling, remove it from the heat and let it cool for about 10 minutes. While your brine cools, chop your veggies. Julienned carrots, sliced cucumbers, thinly sliced radishes, and red bell peppers work well. Aim for uniform sizes. This helps them pickle evenly. Set the chopped vegetables aside for the next step. Grab a clean jar or multiple jars if you want individual servings. Layer the chopped vegetables inside the jar. Add minced garlic between the layers for extra flavor. This makes each bite taste great. Once your brine has cooled a bit, pour it over the veggies in the jar. Ensure the vegetables are fully submerged. If needed, press them down gently to remove air bubbles. Seal the jars with a lid and let them cool to room temperature. Then, place them in the fridge for at least 24 hours. This waiting time helps the flavors develop. After a day, your tangy pickled vegetables are ready to enjoy! You can store them in the fridge for up to 2 weeks. To create tangy pickled vegetables, you need balance. The key is in the brine. Use equal parts water and vinegar. This mix gives a sharp kick, but the sugar softens it. If you want more heat, add chili flakes. For extra depth, mix in herbs like dill or thyme. Taste your brine before pouring it over the veggies. Adjust the salt or sugar if needed. Remember, the best pickles come from your palate. Many people make simple mistakes. One common error is not cutting the veggies evenly. This can lead to uneven pickling. Always slice them to a similar size. Another mistake is skipping the cooling step for the brine. Pouring hot brine over cold veggies can cook them. Lastly, don’t rush the pickling time. Let them chill in the fridge for at least 24 hours. This wait is key for the flavors to blend. Clean jars keep your pickles safe. Start by washing jars in hot, soapy water. Rinse them well. Next, place the jars in a pot of boiling water for 10 minutes. This kills germs and bacteria. You can also run them through a dishwasher on high heat. Once the jars are clean, let them cool upside down on a clean towel. Avoid touching the inside of the jars after they are sterilized. This step ensures your tangy pickled vegetables stay fresh and tasty. For the complete recipe, check the Full Recipe section. {{image_4}} You can mix and match many vegetables when making pickled veggies. Some great choices include: - Zucchini - Cauliflower - Green beans - Red onions - Jalapeños These options add fun colors and tastes. Each veggie gives its own twist on the flavor. Feel free to experiment! If you love heat, try adding spicy elements. You can mix in: - Fresh chili peppers - Red pepper flakes - Sriracha sauce These will kick up the spice level. Start with a little, then adjust to your taste. The extra heat pairs well with the tangy brine. For a sweet and sour taste, consider adding: - Extra sugar - Pineapple chunks - Honey These ingredients balance the sour vinegar. You will enjoy a complex flavor profile. This variation works well with carrots and cucumbers from the full recipe. To keep your tangy pickled vegetables fresh, store them in the fridge. Make sure to use clean, airtight jars. This helps lock in flavor and keep bacteria out. Always let the pickled veggies cool completely before sealing the jars. Once sealed, place them in the fridge immediately. Your pickled vegetables can last up to two weeks in the fridge. After 24 hours of chilling, they will be ready to eat. The flavors will deepen over time, making them even tastier. However, for the best taste, try to enjoy them within the first week. Check for any unusual smells or colors. If the vegetables look slimy or discolored, it’s best to throw them out. Bubbles forming in the jar can also mean spoilage. If you see any mold, discard the batch right away. Keeping an eye on these signs will ensure you enjoy your pickles safely. Tangy pickled vegetables last up to two weeks in the fridge. After that, they may lose flavor. To keep them fresh, store them in an airtight jar. A good tip is to label the jar with the date. This helps you remember how long they have been stored. Yes, you can use many kinds of vegetables for pickling. Try using green beans, cauliflower, or even onions. Just cut them into similar sizes for even pickling. Experimenting with different veggies adds fun and new flavors to your pickles. Pickled vegetables offer several health benefits. They are low in calories and high in fiber. This makes them a great snack. They also contain probiotics, which help gut health. Additionally, pickled veggies provide vitamins and minerals that support overall health. You can find high-quality pickled vegetables at local farmers' markets or specialty stores. Many stores offer homemade options, which often taste better. You may also find good brands online. Look for products with few ingredients for the best flavor. If you want freshness, making your own is a great choice! For a simple recipe, check out the Full Recipe section. You now know how to make pickled vegetables from fresh ingredients. Start with the right veggies and brine. Choose flavor enhancers to make your pickles special. Follow the steps for prep, assembly, and storage. Avoid mistakes with the tips provided. Lastly, explore fun variations to keep things exciting. Remember, pickling lets you customize flavors while preserving freshness. Enjoy your homemade pickles; they're tasty and healthy!

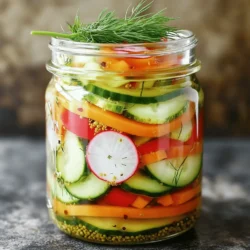
Tangy Pickled Vegetables

Discover the art of making tangy pickled vegetables with this simple recipe! Perfect for adding a zesty crunch to your meals, these vibrant veggies are easy to prepare and packed with flavor. Using fresh carrots, cucumbers, and bell peppers, along with a delicious brine, you can create a colorful and healthy side dish. Click through now to explore the full recipe and savor these tasty pickles at home!

Ingredients
  

2 cups carrots, julienned

2 cups cucumbers, sliced

1 cup radishes, thinly sliced

1 cup red bell pepper, sliced

1 cup white vinegar

1 cup water

3 tablespoons sugar

1 tablespoon salt

1 teaspoon mustard seeds

1 teaspoon coriander seeds

1 teaspoon black peppercorns

2 cloves garlic, minced

Fresh dill sprigs (optional for garnish)

Instructions
 

In einem mittelgroßen Topf die weißen Essig, das Wasser, den Zucker, das Salz, die Senfkörner, die Koriandersamen und die schwarzen Pfefferkörner zusammengeben. Die Mischung bei mittlerer Hitze zum Kochen bringen und dabei rühren, bis sich Zucker und Salz vollständig aufgelöst haben. Sobald die Mischung kocht, vom Herd nehmen und etwa 10 Minuten abkühlen lassen.

    Während die Einlegeflüssigkeit abkühlt, die Gemüse vorbereiten, indem die Karotten julienniert und die Gurken, Radieschen sowie die rote Paprika in dünne Scheiben geschnitten werden.

      In ein sauberes Glasgefäß (oder mehrere Gläser, wenn du individuelle Portionen bevorzugst) die vorbereiteten Gemüse schichten. Zwischen den Schichten das gehackte Knoblauch für zusätzlichen Geschmack hinzufügen.

        Nachdem die Einlegeflüssigkeit etwas abgekühlt ist, diese über die Gemüse in das Glas gießen, sodass sie vollständig untergetaucht sind. Gegebenenfalls sanft drücken, um das Gemüse zu packen und Luftblasen zu entfernen.

          Die Gläser mit einem Deckel verschließen und auf Raumtemperatur abkühlen lassen. Sobald sie abgekühlt sind, im Kühlschrank für mindestens 24 Stunden aufbewahren, damit sich die Aromen vollständig entfalten können.

            Nach 24 Stunden sind deine würzigen eingelegten Gemüse bereit zum Genießen! Sie können im Kühlschrank bis zu 2 Wochen gelagert werden.

              Vorbereitungszeit: 15 Minuten | Gesamtzeit: 25 Minuten (plus 24 Stunden Kühlzeit) | Portionen: Ergibt etwa 4 Tassen eingelegte Gemüse.

                - Präsentationstipps: Serviere die eingelegten Gemüse in kleinen Schalen als bunten Beilagensalat oder Appetizer. Garniere mit frischen Dillzweigen für einen zusätzlichen Hauch von Geschmack und Ästhetik.